Windows 10 Automatic Repair Loop: 7 Fixes That Actually Work
Fix the Windows 10 automatic repair loop with 7 proven steps: Startup Repair, bootrec, SFC, DISM, Safe Mode, and reset, in the order that works.
Quick AnswerForce three failed boots to reach the Windows Recovery Environment, then run Startup Repair, followed by bootrec /fixmbr, /fixboot, and /rebuildbcd from the recovery Command Prompt. That sequence breaks the Windows 10 automatic repair loop on most healthy drives within one reboot.
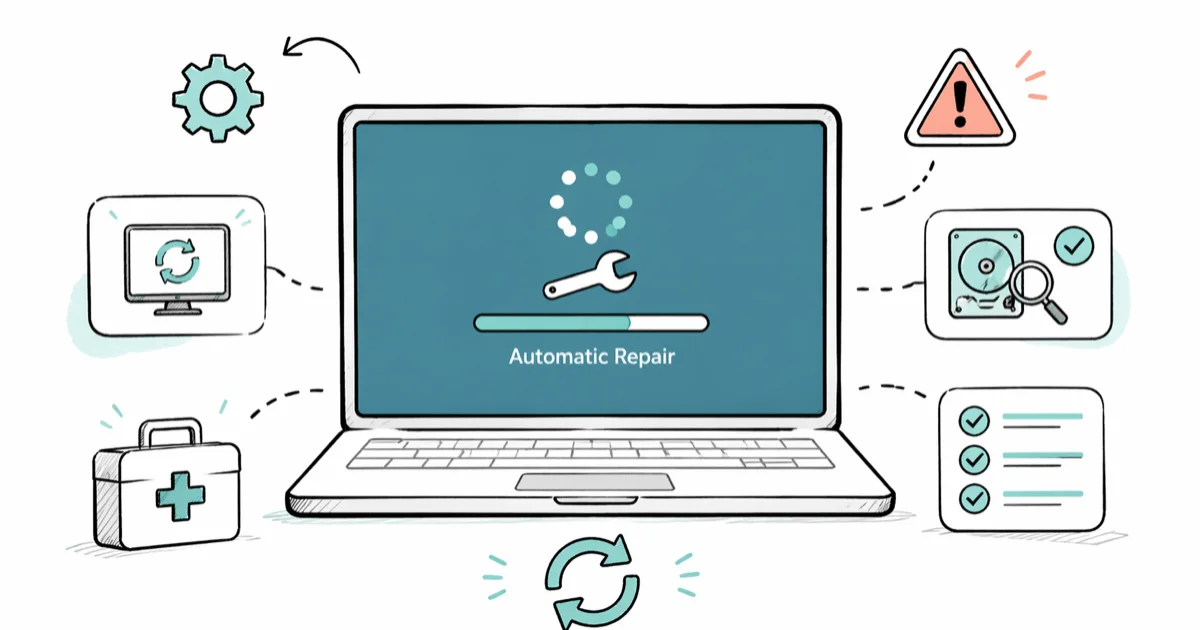
The Windows 10 automatic repair loop traps your PC at “Preparing Automatic Repair,” restarts before you can log in, then loops back to the same blue screen. It usually traces back to corrupted boot files, a broken BCD store, a bad driver, or file-system damage. The fix order below starts with the least destructive recovery steps and moves toward heavier repairs only when needed.
- The repair loop runs when Windows fails to start, calls Automatic Repair, fails again, then restarts and repeats the cycle indefinitely
- Force three failed boots in a row to load Windows Recovery Environment without needing an installation disc
- Startup Repair from WinRE is the first no-data-loss repair to try before rebuilding boot records
- bootrec /fixmbr, /fixboot, /scanos, and /rebuildbcd in order rebuilds the boot store when Startup Repair fails
- Disabling automatic startup repair with bcdedit lets Windows show the real error instead of looping back to the recovery screen
#Why Does Windows 10 Get Stuck in an Automatic Repair Loop?
Windows 10 runs Automatic Repair whenever it detects two consecutive failed startups. The feature is meant to fix the boot environment without user input. When the underlying problem is something Automatic Repair can’t handle, the tool itself crashes, triggers another failed boot, and the loop begins.
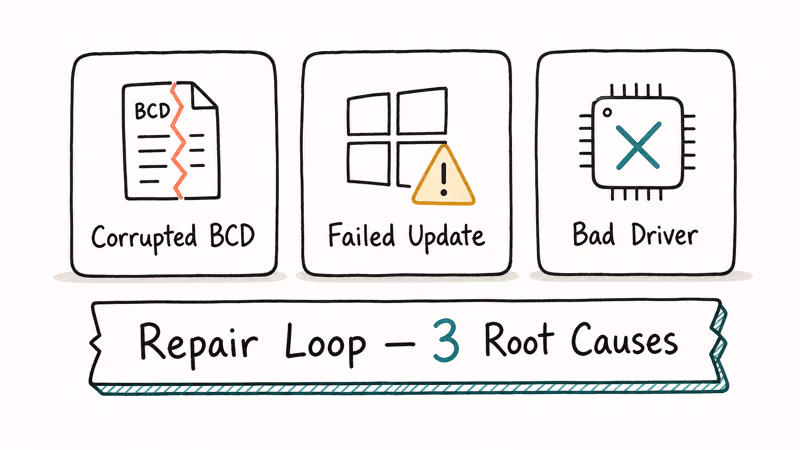
Software causes dominate. A damaged BCD store, a corrupted MBR, a bad Windows Update, a faulty boot driver, or NTFS corruption all surface this way. Hardware faults (failing SSD, loose SATA cable) produce the same symptoms.
According to Microsoft’s Windows recovery options documentation, the repair loop typically appears after a forced shutdown during a feature update, a kernel-mode driver crash, or a registry hive corruption inside the boot path. Microsoft confirms that the system performs two retry attempts before surfacing the recovery screen, which is why some loops feel like they restart “every other boot” rather than continuously.
If the same PC has thrown any of these recent errors, assume the drive or BCD store is degrading and treat data backup as a priority before running any of the repairs below:
#How Do You Boot Into Windows Recovery When You’re Stuck in the Loop?
You don’t need an installation disc to reach the Windows Recovery Environment from a loop. Windows 10 drops you into WinRE on its own after three failed boot attempts in a row.
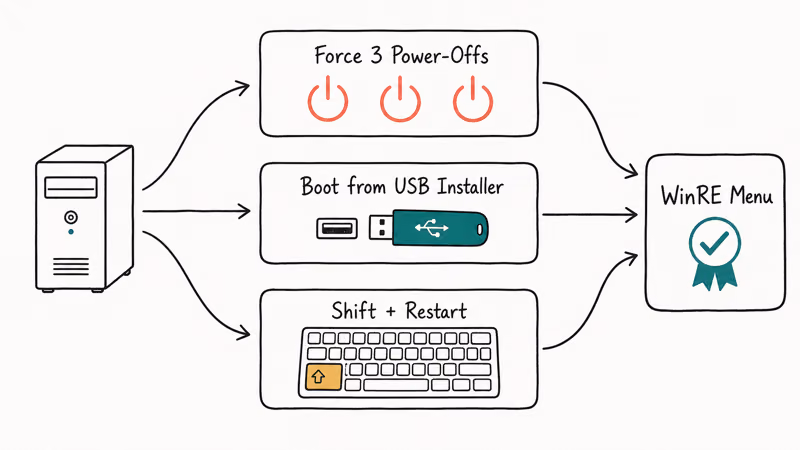
Power on the PC. As soon as the Windows logo appears, press and hold the power button for 10 seconds to force a hard shutdown. Repeat that sequence two more times. On the fourth power-on, Windows boots into “Preparing Automatic Repair” and then to the Choose an option screen.
From there, pick Troubleshoot > Advanced options. The menu lists Startup Repair, Command Prompt, Startup Settings, System Restore, Uninstall Updates, and Go back to the previous version. Those six options cover almost every repair path below without touching personal files.
When three forced shutdowns fail to trigger WinRE, the boot record is too broken to chain into recovery on its own. Build a Windows 10 install USB on a working PC with the Microsoft Media Creation Tool, boot from it, choose your language, and click Repair your computer in the bottom-left of the Install screen. That route opens the same Advanced options menu.
#Run Startup Repair From WinRE First
Startup Repair is the safest first attempt. It scans the BCD store, the MBR, key boot files, and the system registry hive, then patches whatever it identifies as broken. The tool does not touch user data.
From Advanced options, pick Startup Repair, then select your Windows 10 installation. The tool reboots automatically and can take a while depending on disk size and corruption depth. If Startup Repair finds a boot configuration problem it recognizes, it applies the repair and restarts Windows.
Startup Repair does not always succeed. When the underlying fault is physical (a failing drive, bad sector under the boot files) or when the BCD is too damaged to parse, the tool logs “Automatic Repair couldn’t repair your PC” and dumps you back at the menu. That is your cue to move to bootrec next, not to keep retrying Startup Repair.
Check SrtTrail.txt for the exact root cause. Open it from Command Prompt with notepad x:\windows\system32\logfiles\srt\srttrail.txt.
#Disable Automatic Startup Repair to See the Real Error
Sometimes Windows can boot normally, but Automatic Repair triggers anyway and never gives you the chance to log in. Turning the feature off lets the real error surface instead of looping back to the recovery screen.
From WinRE Advanced options, open Command Prompt and run bcdedit /set {default} recoveryenabled No. Type exit, then pick Continue to attempt a normal Windows boot. If Windows reaches the desktop, you can troubleshoot the underlying issue without the repair loop interrupting.
This is not a permanent fix. Once Windows is stable, re-enable the feature with bcdedit /set {default} recoveryenabled Yes from an elevated Command Prompt, because Automatic Repair is useful when the next real problem hits. Microsoft’s bcdedit reference states that the recoveryenabled flag controls whether the boot manager invokes Startup Repair on a failed boot.
Use it only long enough to identify the next repair target.
#Rebuild the BCD and Master Boot Record With Bootrec
When Startup Repair fails, the bootrec utility is the next layer down. It rebuilds the Boot Configuration Data store from scratch and rewrites the Master Boot Record byte by byte.
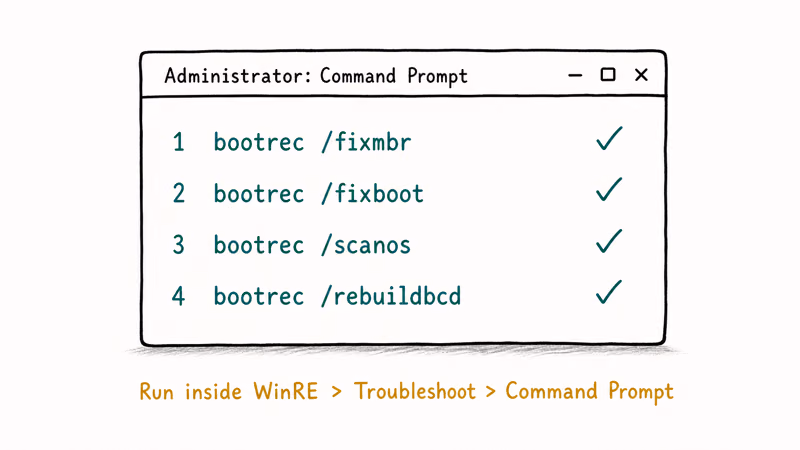
Open Command Prompt from WinRE Advanced options and run these four commands in this exact order:
bootrec /fixmbrbootrec /fixbootbootrec /scanosbootrec /rebuildbcd
According to Microsoft’s bootrec documentation, /fixmbr writes a Windows-compatible MBR to the system partition without overwriting the existing partition table, while /rebuildbcd scans all disks for Windows installations and lets you re-add them to the boot list.
When /rebuildbcd prompts “Add installation to boot list?”, press Y. Then type exit, restart, and let Windows attempt a normal boot.
bootrec /fixboot can fail with “Access is denied” on UEFI systems. The accepted workaround is bcdboot c:\windows /s c: /f UEFI, which writes a fresh UEFI boot file to the EFI partition. You can find the matching path discussion in the same Microsoft article above.
If your PC also throws a bootmgr is missing or there was a problem resetting your PC error after running bootrec, the partition table itself is damaged and you’ll need to move on to SFC, DISM, or a clean install.
#Run SFC and DISM to Fix Corrupted System Files
Corrupted system files inside C:\Windows\System32 produce repeat repair loops even after the BCD is healthy. Two built-in tools repair them: SFC (System File Checker) and DISM (Deployment Image Servicing and Management).
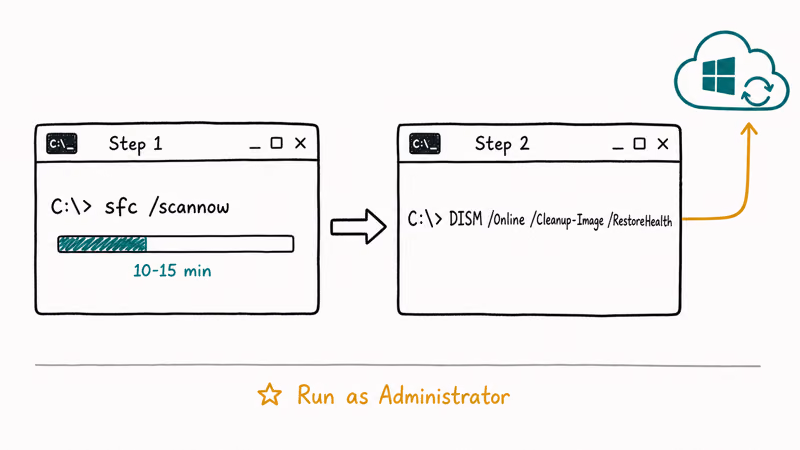
From the WinRE Command Prompt, first identify which drive letter Windows actually lives on. Run diskpart, then list volume, then exit. Note the letter assigned to your Windows partition (it’s not always C: from inside recovery). For the rest of this section, replace C: with whatever letter diskpart showed.
Run sfc /scannow /offbootdir=C:\ /offwindir=C:\Windows. The scan takes 10 to 25 minutes and reports either “Windows Resource Protection did not find any integrity violations” or a list of files it repaired. If SFC reports it found corrupt files but could not fix them, follow up with DISM.
DISM repairs the underlying Windows component store that SFC pulls from. Run dism /image:C:\ /cleanup-image /restorehealth /source:wim:F:\sources\install.wim:1 where F: is the drive letter of your install USB. The scan runs for 15 to 45 minutes. According to Microsoft’s DISM reference, /restorehealth rewrites broken component files from the source image rather than from Windows Update, which is the only practical path when the OS can’t reach the internet from recovery mode.
After both tools finish, restart and check whether the loop clears. If SFC throws the Windows resource protection could not perform the requested operation error mid-scan, the recovery environment itself has read-only restrictions blocking the repair, and you’ll need to boot from install media to retry from a writable WinRE.
#Boot Into Safe Mode to Uninstall Bad Drivers or Updates
If a recent driver update or Windows Update triggered the loop, Safe Mode is the cleanest way to roll it back. Safe Mode loads only the minimum drivers Windows needs to reach the desktop, which skips whatever broken driver is crashing Normal Mode.
From WinRE Advanced options, pick Startup Settings > Restart. After the reboot, press 4 for Safe Mode or 5 for Safe Mode with Networking. Windows boots into a minimal desktop.
Once you are in, open Settings > Update & Security > Windows Update > View update history > Uninstall updates and remove anything installed within 24 hours of when the loop started. For driver issues, open Device Manager, right-click the suspect device (graphics card, storage controller, chipset), and choose Uninstall device with “Delete the driver software for this device” checked.
Storage and display drivers can trigger repair loops after a bad update. Removing the suspect driver from Safe Mode and letting Windows reinstall a generic Microsoft driver is often safer than trying another normal boot with the same broken driver loaded.
When Safe Mode also crashes back into the loop, the corruption is below the driver layer and you’ve exhausted in-place repair options.
#Reset or Reinstall Windows 10 as a Last Resort
If Startup Repair, bootrec, SFC/DISM, and Safe Mode all leave you stuck, Windows 10 itself needs to be reset or reinstalled. Two paths exist, and they don’t carry equal risk to your files.
From WinRE Advanced options, pick Reset this PC. Choose Keep my files to preserve documents, photos, and accounts while reinstalling Windows and removing apps. Choose Remove everything for a full wipe. Microsoft recommends the “Keep my files” path for repair loops because it rebuilds the system partition while preserving the user profile, which is the same fix Microsoft Support steers users to when Startup Repair and bootrec both fail.
The “Keep my files” reset takes 30 to 90 minutes on most modern hardware. Plug the laptop in, because a power loss mid-reset will create a worse loop than the one you started with.
When even Reset This PC fails with “There was a problem resetting your PC,” you’ve reached the bottom of the in-place ladder. Boot from your Windows 10 install USB and pick Custom: Install Windows only, then delete the partitions on the system drive and let the installer recreate them. A clean install from scratch wipes everything on the system drive, so back files up via a Linux live USB or external SATA dock first.
Other recovery-mode errors on the same machine often share roots with the repair loop. If you also see critical process died or boot device not found after a clean install, the underlying drive is suspect even if Windows boots once or twice before failing again.
#Bottom Line
Force three failed boots to reach WinRE, then run Startup Repair first because it’s the lowest-risk fix. If that fails, work through bootrec, SFC/DISM, Safe Mode driver rollback, and Reset This PC in that order. Skip ahead and you’ll either lose data or miss the root cause. Replace the drive if SMART shows reallocated sectors, because a fresh Windows install on a failing SSD buys you days, not months.
#Frequently Asked Questions
Can I fix the Windows 10 automatic repair loop without losing my files?
Yes. Startup Repair, bootrec, SFC, DISM, and Safe Mode driver rollback all preserve user files. Reset This PC has a “Keep my files” option.
Why does the Preparing Automatic Repair screen keep coming back after I run Startup Repair?
Startup Repair only fixes problems it recognizes. When the root cause is a damaged BCD store, a corrupted system registry hive, or a failing drive, the tool logs “Automatic Repair couldn’t repair your PC” and the loop returns on the next boot. Move on to bootrec and SFC instead of re-running Startup Repair more than twice.
How long should I let the Preparing Automatic Repair screen run before forcing a shutdown?
Wait at least 20 to 30 minutes the first time. Some scans take that long on healthy systems. If the screen has not progressed past “Preparing Automatic Repair” after 45 minutes, force a shutdown by holding the power button for 10 seconds. Anything longer than 60 minutes with no disk activity confirms the loop and you should move to the WinRE recovery steps.
Does disabling automatic startup repair with bcdedit damage Windows?
No. The bcdedit /set {default} recoveryenabled No command only turns off the automatic call to Startup Repair after a failed boot, and Windows itself is unchanged.
What does the SrtTrail.txt log file actually tell me?
SrtTrail.txt records exactly which file or registry hive Startup Repair flagged as the root cause of the failed boot. The “Root cause found” line near the bottom names a specific driver, system file, or hive. That filename is your fastest clue to the underlying problem, especially when the error itself is generic.
Will resetting Windows 10 stop the repair loop forever, or will it come back?
A “Keep my files” reset clears the loop permanently if the cause is software. If the underlying drive is failing, the loop returns within days to weeks, and the machine usually throws other random stop codes between appearances. Replace the SSD or HDD before reinstalling when SMART data reports reallocated sectors. Don’t reinvest hours into a fresh Windows install on a disk that already shows physical wear.
Can I trigger the repair loop on Windows 11 the same way as Windows 10?
Yes. Windows 11 uses the same WinRE flow, the same bootrec utility, the same SFC and DISM commands, and the same Reset This PC options. The recovery menu UI is nearly identical. Every fix above works on Windows 11 with no command changes.
Is it safe to keep using the same drive after fixing the repair loop?
Only if SMART data is clean. Open Command Prompt as administrator after recovery and run wmic diskdrive get model,status for a quick check, or use CrystalDiskInfo for a detailed report. Reallocated sector counts above zero, pending sectors, or a “Caution” status mean the drive is degrading and should be replaced even though Windows now boots normally.

Bluetooth Not Working on Snapdragon X? Fixes for 2026
Bluetooth not working on your Snapdragon X Copilot+ PC? Generic audio, mice, and keyboards work, but vendor apps often lack an ARM build. Fixes inside.

Docker Desktop and WSL2 Not Working on Snapdragon X? Fix It
WSL2 runs fine on Snapdragon X, but Docker Desktop ARM is Early Access and throws WSL errors. Use WSL2 plus native ARM64 Ubuntu and Docker Engine.

Does iTunes Work on Snapdragon X? ARM Windows 11 Guide
Yes, iTunes runs on Snapdragon X laptops through Prism emulation, but the Apple Devices app is the smoother route. Here is what to install on ARM.

Does OBS Studio Work on Snapdragon X? ARM64 Build Guide
Yes, OBS Studio has an experimental ARM64 build since version 31.1, but x64 plugins won't load and hardware encoding is missing. Here is what works.