Fix Windows Resource Protection Could Not Perform Error
Fix the Windows Resource Protection Could Not Perform error in 7 verified steps using SFC, DISM, CHKDSK, Safe Mode, and the Windows Modules service.
Quick AnswerThe Windows Resource Protection could not perform the requested operation error usually means SFC cannot reach the protected files. Run sfc /scannow in Safe Mode as an administrator, then repair the component store with DISM /Online /Cleanup-Image /RestoreHealth.
The Windows Resource Protection could not perform the requested operation error stops SFC mid-scan on Windows 10 and Windows 11. The fix sequence below works around what SFC depends on: a healthy component store, the Windows Modules Installer service, and a disk with no bad sectors. The methods address each dependency in order, from Safe Mode to DISM, CHKDSK, and recovery.
- The error blocks sfc /scannow from finishing because Windows Resource Protection can’t reach the protected file store.
- Running SFC inside Safe Mode succeeds for most users since background services and third-party drivers stay offline.
- DISM /Online /Cleanup-Image /RestoreHealth rebuilds the component store SFC depends on and usually takes 15 to 30 minutes.
- CHKDSK with the /f /r switches catches the bad sectors that corrupt the WinSxS folder on aging hard drives.
- Set the Windows Modules Installer service to Manual or Automatic so SFC can talk to TrustedInstaller during the scan.
#The Windows Resource Protection Error Explained
Windows Resource Protection (WRP) guards system files, folders, and registry keys inside the WinSxS component store. When you run sfc /scannow from an elevated Command Prompt and Windows can’t read or write those protected entries, SFC stops with the message “Windows Resource Protection could not perform the requested operation.”
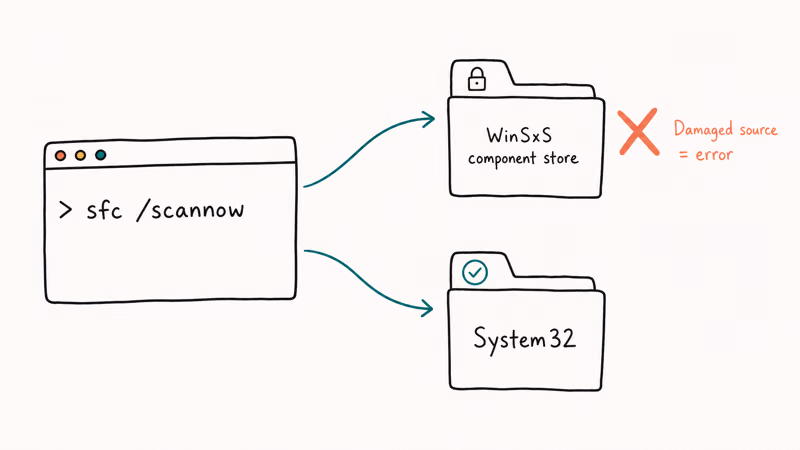
The error isn’t a single root cause. It’s the catch-all SFC returns when its dependencies fail.
The order below starts with the least disruptive repair and moves toward recovery options only if SFC still fails.
#Why Does Windows Resource Protection Fail?
According to Microsoft Learn’s SFC command reference, the System File Checker compares the protected versions in WinSxS with the in-use copies on the system drive and replaces damaged files from the side-by-side store. If the side-by-side store itself is corrupt, SFC has nothing to copy from and stops with the WRP error. The same reference also documents the /scanfile, /verifyfile, /offbootdir, and /offwindir switches, which Fix 5 below uses to scan an offline Windows installation that won’t boot normally.
Microsoft’s System File Checker support page states that on Windows 10 and Windows 11 you should run DISM before SFC. Skipping that step is the most common reason the scan fails after a recent Windows patch.
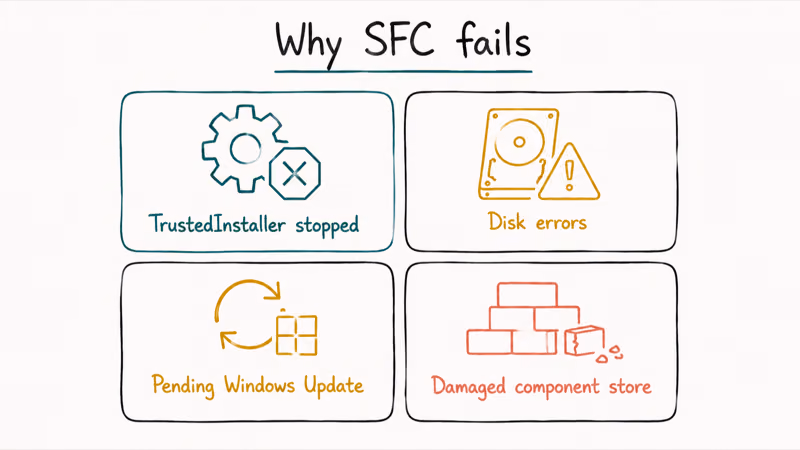
Three other triggers come up often:
- The Windows Modules Installer service (also called TrustedInstaller) is disabled or set to a startup type that prevents on-demand launch.
- A failed Windows update left pending operations queued in the registry, locking the protected files.
- The system drive has bad sectors inside the WinSxS folder, which Windows reports as an I/O error to SFC.
If your machine also dropped to a recovery loop or blue-screened around the same time, check the Windows 10 Automatic Repair loop guide and the “Your PC ran into a problem and needs to restart” error before continuing, because both can leave the same WRP symptom behind.
#Fix 1: Run SFC in Safe Mode
Safe Mode boots Windows with the bare minimum of services and no third-party drivers, which removes most of the interference that locks the protected files in a normal session.
Open Settings>System>Recovery(Windows 11) orSettings>Update & Security>Recovery(Windows 10).- Under Advanced startup, click Restart now.
- After the reboot, choose
Troubleshoot>Advancedoptions >Startup Settings>Restart. - When the menu appears, press 4 or F4 to start Safe Mode.
- Right-click the Start button, pick Terminal (Admin) or Command Prompt (Admin), and confirm the UAC prompt.
- Type
sfc /scannowand press Enter. - Wait for the scan to finish, then restart the PC normally.
Running sfc /scannow in Safe Mode can finish after a normal-mode scan hangs partway through verification. If the Safe Mode scan reports “Windows Resource Protection found corrupt files and successfully repaired them,” you’re done. If it reports the same WRP error, move to Fix 2.
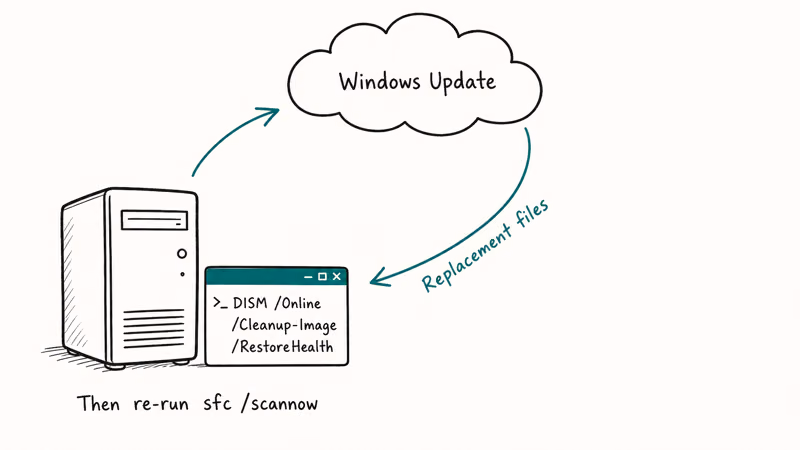
#Fix 2: Repair the Component Store with DISM
When SFC fails because the component store itself is damaged, DISM is the tool that rebuilds it. DISM pulls clean replacement files from Windows Update and stages them in WinSxS, which then gives SFC something to work with on the next pass.
- Right-click Start and open Terminal (Admin) or Command Prompt (Admin).
- Run
DISM /Online /Cleanup-Image /CheckHealthto see if the image is reported as repairable. - Run
DISM /Online /Cleanup-Image /ScanHealthfor a more thorough scan that doesn’t yet repair anything. - Run
DISM /Online /Cleanup-Image /RestoreHealthand leave the window open until it reaches 100%. - Restart the PC.
- Open an elevated Command Prompt again and run
sfc /scannowto verify the repair.
Microsoft recommends running DISM /Online /Cleanup-Image /RestoreHealth before sfc /scannow whenever component-store corruption is suspected. Run that repair first, restart, then run SFC again. If DISM stalls or fails with error 0x800f081f, the system needs an offline source: download a matching Windows ISO, mount it, and point DISM at the install.wim with /Source:WIM:D:\sources\install.wim:1 /LimitAccess.
Pending update problems also show up here. If you see Windows Update errors before SFC fails, work through the Windows update error 0x800705b4 guide first so DISM has a healthy update channel to draw from.
#Fix 3: Start the Windows Modules Installer Service
SFC depends on the Windows Modules Installer service (also called TrustedInstaller). If the service is Disabled or its startup type was changed by a tuning utility, SFC can’t ask it to swap protected files and returns the WRP error.
- Press Windows + R, type
services.msc, and press Enter. - Scroll to Windows Modules Installer in the list.
- Double-click the entry and set Startup type to Manual.
- Click Start if the Service status reads Stopped.
- Apply, then close Services.
- Reopen an elevated Command Prompt and run
sfc /scannow.
You can do the same thing from the command line if Services refuses to update the entry:
sc config trustedinstaller start= demand
net start trustedinstaller
The space after start= is required. The command sets startup to Manual; switch demand to auto if you want it Automatic. This setting matters because a disabled TrustedInstaller service prevents SFC from swapping protected files.
#Fix 4: Run CHKDSK to Find Disk Errors
A drive with bad sectors inside the WinSxS path will surface as the WRP error every time, even after DISM finishes cleanly. Microsoft Learn confirms that the chkdsk /r switch locates bad sectors and recovers readable information, which is why this is the right command to run when SFC keeps failing despite a healthy component store.
- Open Command Prompt (Admin).
- Run
chkdsk C: /f /r /xand press Y when prompted to schedule the scan for the next restart. - Restart the PC.
- Let CHKDSK run through all five stages without interruption.
- After Windows boots, open an elevated Command Prompt and run
sfc /scannowagain.
The full /r pass can take several hours on a mechanical disk because every sector is read individually. On an SSD it usually finishes in under an hour. If CHKDSK reports bad sectors that it couldn’t remap, the drive is failing and you should image it to a new SSD before running any more repair tools. The Microsoft chkdsk command reference lists the exact behavior of each switch if you want to tune the pass.
If CHKDSK fires off the PFN_LIST_CORRUPT blue screen during the scan, that’s a separate memory-management bug that needs RAM diagnostics before you continue.
#Fix 5: Boot Into Windows Recovery and Run Offline SFC
When Windows refuses to boot far enough to reach Safe Mode, you can still run SFC against the offline installation from Windows Recovery Environment (WinRE).

- Boot from a Windows 10 or Windows 11 installation USB.
- On the install screen, click Repair your computer.
Choose Troubleshoot>Advancedoptions > Command Prompt.- Identify the drive letter that contains Windows by running
bcdeditand noting theosdevicevalue, or by browsing the drives withdir D:\,dir E:\, and so on. - Run
sfc /scannow /offbootdir=D:\ /offwindir=D:\Windows, replacingD:with the letter you found. - Wait for the offline scan to finish, then restart without the USB.
The offline scan doesn’t depend on the live Windows Modules Installer service, so it bypasses one of the most common WRP triggers. It also won’t be interrupted by background processes, which makes it the most reliable single command for stubborn cases.
#Fix 6: Reset or Refresh Windows as a Last Step
If every fix above ends with the same WRP error, the install is damaged beyond what SFC and DISM can repair and a reset is faster than further triage.
Open Settings>System>Recovery(Windows 11) orSettings>Update & Security>Recovery(Windows 10).- Under Reset this PC, click Reset PC or Get started.
- Choose Keep my files to preserve documents and settings, or Remove everything for a clean reinstall.
- Pick Cloud download when prompted; it pulls a fresh image from Microsoft and avoids reusing the damaged local recovery files.
- Follow the prompts and let the reset finish.
Back up irreplaceable data first. Reset this PC with Keep my files preserves the user folders but does remove installed applications, so you’ll need to reinstall apps and re-enter license keys.
#How Do You Prevent the Error From Coming Back?
Three habits cut down the chance of the WRP error returning after a successful repair:
- Install Windows updates in the order Microsoft ships them. Skipping cumulative updates and then catching up all at once can damage the component store.
- Keep at least 20 GB of free space on the system drive. The WinSxS staging folder needs working room when DISM swaps files, and a full drive is a common cause of mid-update aborts.
- Run a monthly
chkdsk C: /scan(read-only pass, no offline reboot required) on mechanical drives so you catch a failing disk before it corrupts WinSxS.
If you also run into “Windows protected your PC” SmartScreen blocks after the reset, the steps in the Windows protected your PC guide cover unblocking trusted installers without weakening SmartScreen for everything else.
#Bottom Line
Start with Fix 1 (SFC in Safe Mode) and Fix 2 (DISM RestoreHealth) in that order. They resolve the WRP error on most patched machines without touching the disk or recovery image. If both fail, run CHKDSK before touching DISM again so the underlying disk is verified. Reset this PC with the Cloud download option is the right last step when SFC and DISM can’t finish.
For a daily-driver machine, don’t skip the prevention habits above. The WRP error rarely shows up out of nowhere; it almost always traces back to an interrupted update or a slowly failing disk that gave warning signs months earlier.
#Frequently Asked Questions
What does “Windows Resource Protection could not perform the requested operation” actually mean?
It means SFC couldn’t read or write the protected files it needed to repair, so the scan aborted. The error is generic and covers a damaged component store, a stopped Windows Modules Installer service, bad disk sectors, or a pending update lock. The fix sequence above targets each of those causes in turn.
Will running these fixes delete my files?
Fixes 1 through 5 don’t touch personal files. Fix 6 (Reset this PC) lets you keep documents or remove everything.
How long does the SFC scan take?
A clean sfc /scannow finishes in 10 to 30 minutes on most laptops. If the scan stalls past one hour without progressing, treat that as the WRP error and move to Safe Mode or DISM.
Can I run SFC on a specific file instead of the full system?
Yes. Run sfc /scanfile=C:\Windows\System32\target.dll from an elevated prompt to verify and repair a single file. This is useful when you know which DLL is reporting corruption from a crash log. It still depends on a healthy component store, so DISM may need to run first.
Do I need to run DISM before SFC every time?
Not always. Microsoft recommends DISM first on Windows 10 and Windows 11 only when component-store corruption is suspected, such as after a failed update or a previous SFC failure. For a healthy machine doing a periodic integrity check, sfc /scannow on its own is fine. If SFC returns the WRP error or finds corrupt files it couldn’t repair, that’s when DISM /RestoreHealth is the next step.
What if SFC and DISM both fail?
Run CHKDSK with the /f /r switches to rule out disk damage, then run the offline SFC from a Windows installation USB. If both still fail, reset Windows with the Cloud download option. Persistent failure after a reset points to hardware: bad RAM, a failing SSD, or a dying mechanical disk.
Is the error related to a virus or malware?
Rarely as a direct cause, but malware that tampers with Windows Update or with the Windows Modules Installer service can produce the same symptom. Run an offline Microsoft Defender scan before resetting Windows if your machine has any history of infection.

Bluetooth Not Working on Snapdragon X? Fixes for 2026
Bluetooth not working on your Snapdragon X Copilot+ PC? Generic audio, mice, and keyboards work, but vendor apps often lack an ARM build. Fixes inside.

Docker Desktop and WSL2 Not Working on Snapdragon X? Fix It
WSL2 runs fine on Snapdragon X, but Docker Desktop ARM is Early Access and throws WSL errors. Use WSL2 plus native ARM64 Ubuntu and Docker Engine.

Does iTunes Work on Snapdragon X? ARM Windows 11 Guide
Yes, iTunes runs on Snapdragon X laptops through Prism emulation, but the Apple Devices app is the smoother route. Here is what to install on ARM.

Does OBS Studio Work on Snapdragon X? ARM64 Build Guide
Yes, OBS Studio has an experimental ARM64 build since version 31.1, but x64 plugins won't load and hardware encoding is missing. Here is what works.