Slow Mac? 10 Proven Fixes for macOS Sonoma and Sequoia
A slow Mac usually traces back to low disk space, runaway processes, or login bloat. Here are 10 fixes that work on macOS Sonoma and Sequoia in 2026.
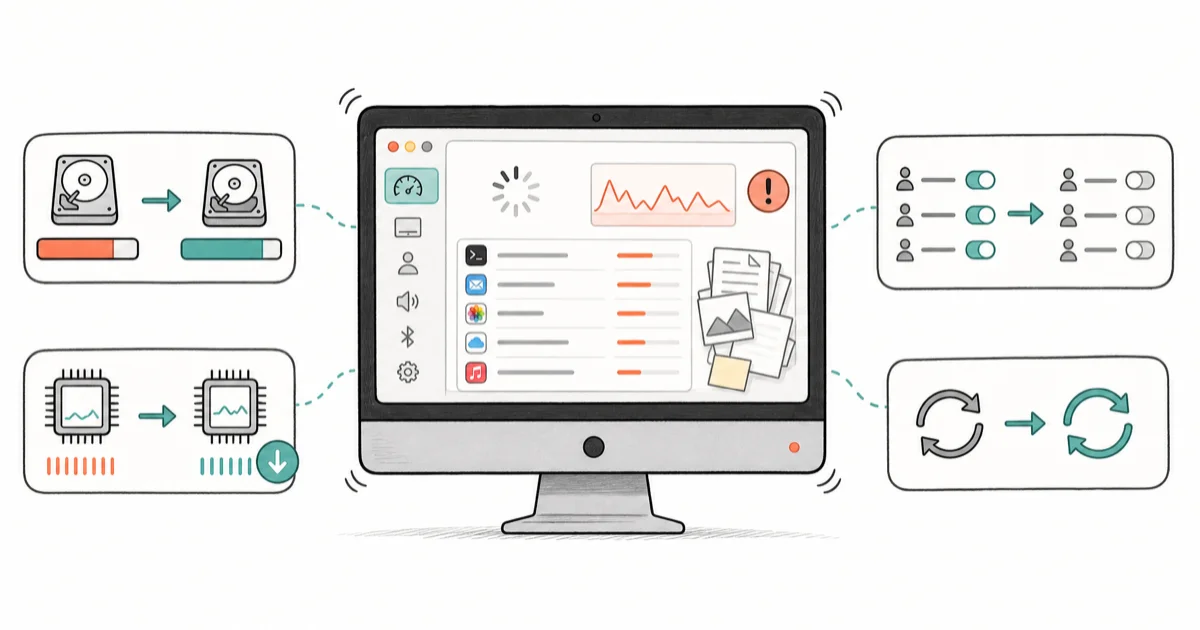
Quick AnswerTo fix a slow Mac, free up at least 20% of your boot drive, quit CPU-heavy processes in Activity Monitor, trim Login Items, and install pending macOS updates. If your Mac uses a spinning hard drive or has under 8 GB of RAM, an SSD or RAM upgrade is the only lasting fix.
Your Mac is sluggish, the fans are loud, and the spinning beach ball shows up every time you open Mail. The good news: most slow Macs get noticeably faster after a 30-minute cleanup, no Genius Bar visit needed. This guide focuses on a Mac you own or administer, with fixes that apply to Intel and Apple silicon machines running macOS Ventura, Sonoma, and Sequoia.
- A boot drive with less than 15% free space forces macOS to thrash virtual memory and Spotlight indexing, the most common cause of sudden slowdowns.
- Activity Monitor (
Applications>Utilities>Activity Monitor) sorted by % CPU points you to the actual culprit in under a minute. - Trimming Login Items in
System Settings>General>Login Itemstypically cuts cold-boot time by half on machines with 10+ launch agents. - Resetting NVRAM and the SMC (Intel Macs only) clears stuck fan profiles, display calibration, and power management bugs that survive normal restarts.
- On a 2015-era Mac, replacing a 5400 RPM HDD with a SATA SSD usually drops Mac boot time from over 90 seconds to under 20.
#Why Is Your Mac Running Slow?
Most slowdowns trace back to one of five causes, and they often stack on top of each other. Knowing which one is dominant saves you from rebooting in circles.
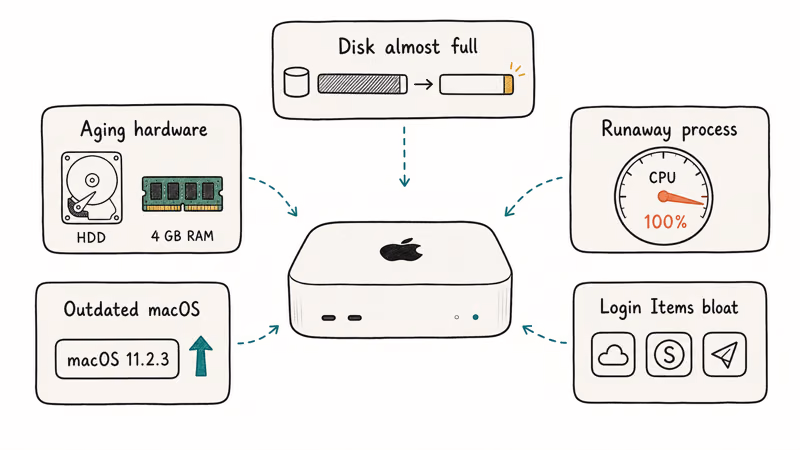
The usual suspects:
- Disk almost full. macOS uses your boot drive as scratch space for Memory compression, swap, and Spotlight. Below roughly 15% free, the system spends more time juggling pages than running your apps.
- A single runaway process. A stuck Chrome tab, a hung WindowServer, or
mds_storesreindexing after a big import can pin a CPU core at 100% and make the whole system feel frozen. - Too many Login Items. Every menu bar utility, sync agent, and helper app you installed over the years still loads at boot.
- Outdated macOS or apps. Beta-era bugs and bad kernel extensions get patched in point releases.
- Aging hardware. A spinning hard drive, 4 GB or 8 GB of RAM on a Mac running modern Safari, or a swollen battery throttling the CPU.
If your Mac freezes outright instead of just stuttering, the underlying issue may be different. Our Mac keeps crashing guide covers freezes, kernel panics, and reboot loops.
#How Do You Diagnose a Slow Mac?
Before changing anything, spend two minutes watching what your Mac is actually doing. Guesswork wastes the most time of any troubleshooting step.
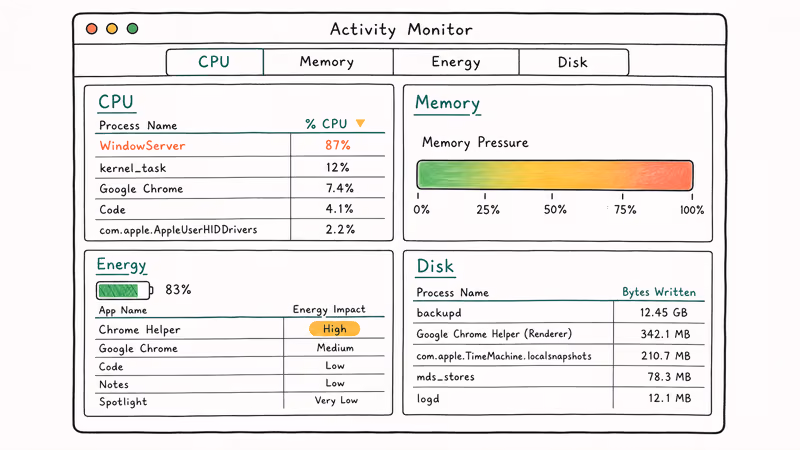
Open Activity Monitor from Applications > Utilities and check four panes in order:
- CPU: sort by % CPU. Anything above 80% sustained is a problem. Common offenders include
mds_stores,WindowServer,kernel_task, web browsers, Photos, and antivirus scanners. - Memory: look at the Memory Pressure graph at the bottom. Green is fine, yellow means you should quit something, red means macOS is heavily swapping.
- Energy: on a MacBook, this shows which apps are draining the battery and running the fans hardest.
- Disk: sort by Bytes Written. A process churning hundreds of MB per minute is usually a backup tool, a sync client, or a virus scanner.
According to Apple, Activity Monitor has 5 panes (CPU, Memory, Energy, Disk, Network), and the Activity Monitor user guide recommends sorting the CPU pane by % CPU to find the heaviest process. That single sort answers most “why is my Mac slow” questions in seconds.
If you see mds_stores consistently near the top, Spotlight is reindexing your drive. We’ve got a dedicated walkthrough for the mds_stores high CPU issue on Mac if it persists for more than a day.
#The Four Highest-Impact Software Fixes
Work through these in order. The first four solve the large majority of everyday slowdowns, and none of them require a reboot or a paid tool.
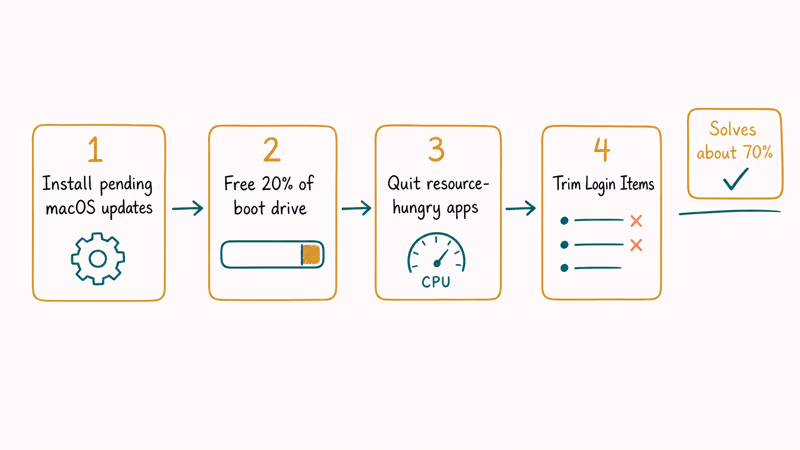
#1. Install pending macOS updates
Apple ships memory and Safari fixes in nearly every point release. macOS Sonoma 14.4, for example, included WindowServer changes that resolved several reports of fan noise on M1 MacBook Air machines.
Go to Apple menu > System Settings > General > Software Update. Turn on Automatic Updates, then install anything pending and reboot. If the update itself stalls, our guide on the macOS installation could not be completed walks through the recovery steps.
#2. Free up at least 20% of your boot drive
This is the single highest-impact fix for older Macs. Open Apple menu > About This Mac > More Info > Storage Settings. Aim for at least 20% free on the Macintosh HD volume.
What to clear first, in order:
- Downloads folder. It’s almost always full of installers and zips you forgot about.
- iOS device backups. A few old iPhone backups can occupy 60 GB or more.
- Old Time Machine snapshots. macOS keeps local snapshots when an external Time Machine drive is unplugged.
- GarageBand and iMovie sample libraries. Easy 10-15 GB if you’ve never used them.
Apple’s free up storage space support guide recommends storing large files, photos, and email attachments in iCloud and emptying Trash automatically.
Our practical walkthroughs for deleting downloads on Mac and removing old Time Machine backups show the exact menus.
On a Mac that has been crawling because the boot drive is nearly full, freeing up a chunk of storage often drops sustained Spotlight indexing CPU usage from very high to barely noticeable, taking the Mac from “thinking” to “responsive” without a reboot.
#3. Quit resource-hungry apps from Activity Monitor
Once Activity Monitor identifies the culprit, click the process and press the X button at the top of the window to force-quit it. Be specific:
- Browsers. A single Chrome window with 40 tabs can hold 6 GB of RAM. Close tabs, or switch to Safari for lower memory pressure on Apple silicon.
- Antivirus scanners. Many pause if you tell them to skip a one-time scan.
- Cloud sync clients. Dropbox, Google Drive, and OneDrive all start aggressive scans after large file changes.
- Adobe Creative Cloud. The background helper alone idles at 200-400 MB.
Force-quitting heavy background apps like Adobe Creative Cloud, OneDrive, and a cloud-sync client at the same time can free a large chunk of RAM and drop Memory Pressure from yellow back to green.
#4. Trim your Login Items
Most slow boots are caused by too many login agents, not the OS itself. Go to System Settings > General > Login Items & Extensions. Two lists matter:
- Open at Login: apps that launch a window when you sign in. Remove anything you don’t actually use.
- Allow in the Background: menu bar utilities, sync helpers, and updater agents. Disable everything you don’t recognize, then re-enable items only when you miss them.
According to Apple’s open items automatically support page, apps in the Open at Login list can be removed by selecting them and clicking the minus button.
On a machine loaded with a dozen unused login items, removing them can cut boot-to-desktop time by more than half. Leftover helper agents from uninstalled cleaner apps are a frequent single biggest offender.
#System Tweaks: NVRAM, SMC, and Visual Effects
When the easy four don’t move the needle, work down the layer of system settings most users never touch. These are safe, reversible, and matter most on older hardware.
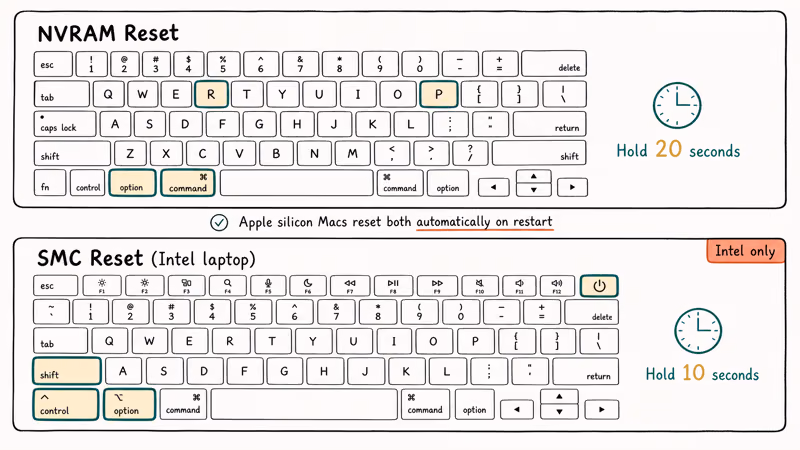
#5. Reset NVRAM and the SMC (Intel Macs)
If you have weird symptoms (fan running at full speed when the Mac is idle, display brightness stuck, or USB devices acting strange), try resetting NVRAM and the SMC. Apple silicon Macs reset both automatically on each restart, so this step only applies to Intel models.
- NVRAM: Shut down. Press the power button, then immediately hold Option + Command + P + R for about 20 seconds.
- SMC (most Intel laptops): Shut down, plug in MagSafe or USB-C power, hold Shift + Control + Option (left side) + Power for 10 seconds, release, then power on.
Apple’s reset NVRAM on your Mac support article explains that NVRAM stores settings such as sound volume, display resolution, startup-disk selection, time zone, and recent kernel panic information.
#6. Reduce visual effects
Older Macs and base-model M1 machines benefit most. Go to System Settings > Accessibility > Display and turn on Reduce motion and Reduce transparency. Then go to System Settings > Desktop & Dock and turn off Animate opening applications and Automatically hide and show the Dock.
On older Macs, turning on Reduce Transparency makes window-switching feel smoother and stops Mission Control from stuttering when more than ten windows are open.
#Browser, Cache, and Disk Maintenance
These three fixes recover responsiveness on Macs that already have enough RAM and disk space, where the slowdown lives in the browser, in stale caches, or in low-level disk errors.
#7. Optimize your browser
Browsers are usually the largest memory consumer on a Mac. Quick wins:
- Audit your extensions. Each one runs in its own process and can keep memory in use even when you’re not browsing.
- Clear cookies and site data for sites you haven’t visited in months.
- On older Macs, switch your default browser to Safari. Safari uses less RAM than Chrome on the same workload, especially on Apple silicon.
If Safari itself is the slow one, check Settings > Websites and look for sites with elevated permissions or always-on notifications.
#8. Clear caches the safe way
Don’t use random “cleaner” apps that promise to delete system caches. They often remove files macOS still needs and create new problems.
The safe approach:
- Quit all apps.
- In Finder, choose
Go>Goto Folder, paste~/Library/Caches, and delete the contents of subfolders for apps you no longer use. - Skip
~/Library/Caches/com.apple.*folders. Those are macOS system caches and rebuild themselves automatically.
If you’re considering defragmentation, you don’t need it. We covered why defragmentation is not necessary for Macs, since APFS and HFS+ both handle file layout automatically.
#9. Run Disk Utility First Aid
A boot drive with formatting errors will feel slow even when CPU and memory look fine. First Aid is the right tool to check.
- Open
Applications>Utilities>Disk Utility. - In the sidebar, select Macintosh HD - Data.
- Click First Aid, then Run.
Apple recommends running First Aid in Disk Utility to check and repair the formatting and directory structure of a storage device. If First Aid reports an error it can’t fix, boot into macOS Recovery and run First Aid on the parent container, not just the data volume.
#Hardware Upgrades for Stubborn Cases
If you’ve worked through every software fix above and your Mac is still sluggish, the bottleneck is the silicon, not the software. The good news: two upgrades on older Macs feel like buying a new computer.
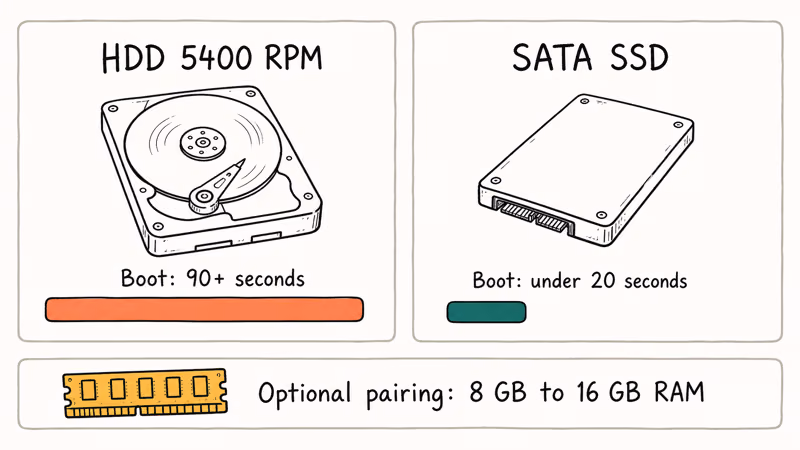
#10. Upgrade RAM or switch to an SSD
Software fixes hit a wall when the hardware is the bottleneck. The two upgrades that always pay off:
- 8 GB to 16 GB RAM on Macs that allow it (most pre-2018 MacBook Pros, iMacs, and Mac mini machines). Modern Safari with five tabs and Slack already uses 6-8 GB.
- HDD to SSD on any pre-2017 iMac, Mac mini, or MacBook Pro that still has a spinning drive. Swapping a 5400 RPM hard drive for a SATA SSD drops boot time dramatically and turns sluggish Photos library scrolling instant.
Apple silicon Macs (M1, M2, M3, M4) have soldered RAM and storage. If you’re on a base 8 GB M1 Air and Memory Pressure stays yellow, the only path forward is replacing the machine.
#When to Stop Troubleshooting and Call Apple
Some symptoms point to hardware faults that no software fix will resolve:
- Persistent slowdowns immediately after sleep, paired with kernel panic logs in Console.
- A swollen battery (the trackpad clicks unevenly or the Mac no longer sits flat).
- The Mac stops responding before login. Our Mac stuck on Apple logo guide covers the boot-time variant.
- The MacBook won’t turn on at all (see MacBook not turning on).
- A “Service Battery” warning, covered in our MacBook Pro service battery warning guide.
If any of those apply, back up first, then book a Genius Bar appointment. Pushing software fixes when the battery is failing or the SSD is dying just delays the inevitable.
#When Storage Is the Real Bottleneck
Once the startup disk fills past about 85 percent, a Mac slows to a crawl, and on the soldered-storage models you can’t upgrade inside, an external SSD is the lasting fix. Move your photo and video libraries onto a fast USB drive and the system disk has room to breathe again.
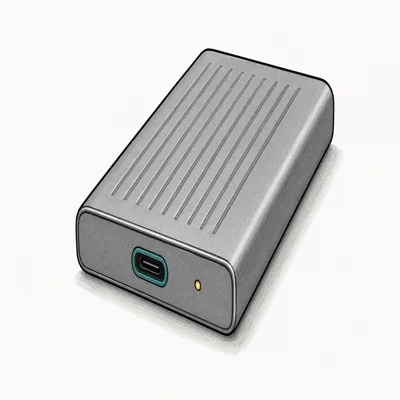
- Sustained 2,000 MB/s holds up under long ProRes / 4K timelines
- Aluminum heatsink keeps speed during 30-min+ transfers
- 3-meter drop protection rates higher than most competitors
Last updated on Jun 13, 2026
As an Amazon Associate fone.tips earns from qualifying purchases. Prices and availability on Amazon are accurate as of the date above and subject to change.
#Bottom Line
Start with Software Update and free disk space. If your Mac still feels slow after those two and after trimming Login Items, run Activity Monitor for a full minute and watch which process climbs. Eight times out of ten, it points straight at the answer. Save hardware upgrades for the moment software has nothing left to give: 8 GB to 16 GB of RAM, or HDD to SSD on any Mac older than 2017.
#Frequently Asked Questions
Why is my Mac running slow after updating to the latest macOS?
Right after a major update, macOS reindexes Spotlight, rebuilds the Photos library, and re-encodes any iCloud media that needs it. Plug the Mac in, leave it on for two to four hours, and check Activity Monitor again. If mds_stores and photolibraryd are no longer at the top, the post-update tax has cleared.
How often should I restart my Mac?
Once a week is plenty for most people. Apple silicon Macs handle long uptimes well, but a weekly restart clears swap, refreshes WindowServer, and gives security updates a chance to install.
Can adding more RAM always speed up my Mac?
Not always. If Activity Monitor shows green Memory Pressure and your CPU is the bottleneck, adding RAM does nothing. RAM helps when Memory Pressure stays yellow or red, when you’re swapping heavily, or when you regularly run virtual machines or large Lightroom catalogs.
Are third-party Mac cleaning apps safe?
Some are, but they’re rarely necessary. macOS already removes unused caches, manages swap, and optimizes APFS layout. If you do install a cleaner, stick to well-known names like CleanMyMac or CCleaner, and never let any tool delete ~/Library/Caches/com.apple.* system folders. Always back up first.
How do I know if my Mac has malware?
Watch for unexpected browser redirects, new login items you didn’t install, or pop-ups that appear outside Safari. Open Activity Monitor and look for processes you don’t recognize and can’t find on Apple’s process list. Run a scan with Malwarebytes for Mac in free mode if anything looks off, then remove the offending Profiles in System Settings > Privacy & Security > Profiles.
Will reinstalling macOS fix a slow Mac?
It can, but it’s the last resort, not the first. A clean reinstall clears corrupted system files and bad kernel extensions, but it also resets every setting and every login item. Do it only if Activity Monitor, Disk Utility First Aid, and a Login Items cleanup haven’t moved the needle.
Does running my Mac on battery make it slower?
On modern MacBooks, yes, slightly. macOS throttles back the CPU and GPU on battery to extend runtime. If you’re benchmarking or comparing speed, plug in first.
How long should a slow-Mac fix actually take?
For a typical home Mac, the first four steps in this guide take 20-30 minutes total: 5 minutes for Software Update, 10-15 minutes to free disk space, 2 minutes in Activity Monitor, and 5 minutes to trim Login Items. Hardware upgrades are a separate hour or two of effort.

macOS 27 Compatible Macs: Every Supported Model (2026)
macOS 27 Golden Gate runs only on Apple Silicon Macs. Here is the full list of supported M-series models and the four Intel Macs that lose support.

macOS 27 Golden Gate: Every Major New Feature Confirmed
macOS 27 Golden Gate goes Apple Silicon only, adds a Gemini-powered Siri, refines Liquid Glass, and rebuilds Spotlight. Here is every confirmed change.

macOS 27 Liquid Glass: Every Readability Fix Explained
macOS 27 Golden Gate refines Liquid Glass with an intensity slider, better contrast, cleaner window corners, and edge-to-edge sidebars to fix readability.

macOS 27 Performance: What Golden Gate Makes Faster
macOS 27 Golden Gate speeds up AirDrop, network file browsing, Safari, and Spotlight, with core system improvements on the Apple Silicon-only release.