MPSigStub.exe High CPU Usage: 7 Safe Fixes That Work
MPSigStub.exe high CPU usage is usually a stuck Windows Update or Defender scan, not malware. Here are 7 safe fixes that work on Windows 10 and 11.

Quick AnswerMPSigStub.exe is a legitimate Microsoft Protection Signature Stub used by Windows Update and Defender to extract update packages, so brief CPU spikes during updates are normal. Persistent high usage points to a stuck update or a stalled Defender scan, not a virus.
MPSigStub.exe running at 80 percent CPU on Windows 10 or 11 looks alarming. It’s part of Windows itself, not malware. The process spikes during cumulative updates, then drops to zero once extraction finishes.
The real fix usually means letting Windows Update complete or unsticking it. This guide covers what MPSigStub actually does, why it pegs the CPU, and seven safe fixes ordered from easiest to most thorough.
None of them ask you to delete the file from System32, because that breaks Windows Defender signature updates and future patch installs.
- MPSigStub.exe is short for Microsoft Protection Signature Stub and ships with every modern Windows install
- High CPU is normal during Windows Update extraction, typically lasting 5 to 15 minutes per cumulative update
- The legitimate file lives in C:\Windows\System32 and a temporary folder during extraction
- A copy of MPSigStub outside those two locations or with a non-Microsoft signature is the suspicious one
- SFC /scannow plus the Windows Update troubleshooter resolve most stuck-extraction cases without third-party tools
#MPSigStub.exe Explained: What It Does on Windows
MPSigStub stands for Microsoft Protection Signature Stub. It’s a tiny executable Microsoft uses to extract signed update packages before installing them, and it works for both Windows Update and Microsoft Defender.
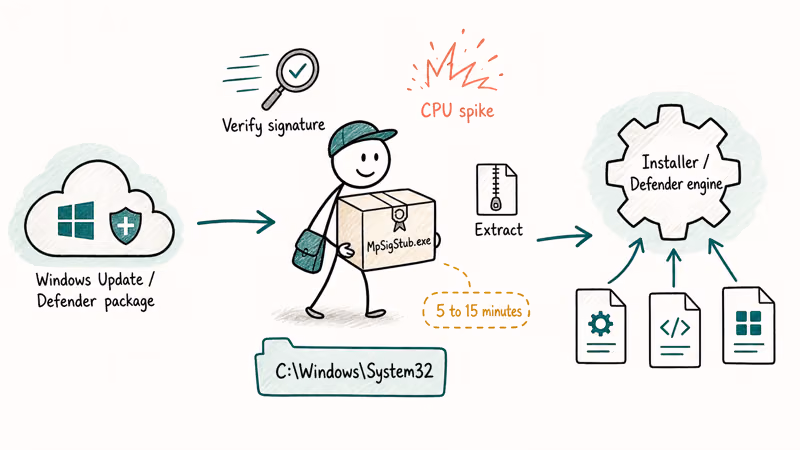
When wuauserv (the Windows Update service) downloads a cumulative update, the package arrives as a self-extracting archive. MPSigStub.exe verifies the signature, unpacks the archive into a temporary folder, then hands the extracted files to the installer. The same flow applies to Defender’s daily signature definition updates.
That signature check is the busy part. The file is unpacking and hashing megabytes of data, which is why CPU usage looks high while it runs.
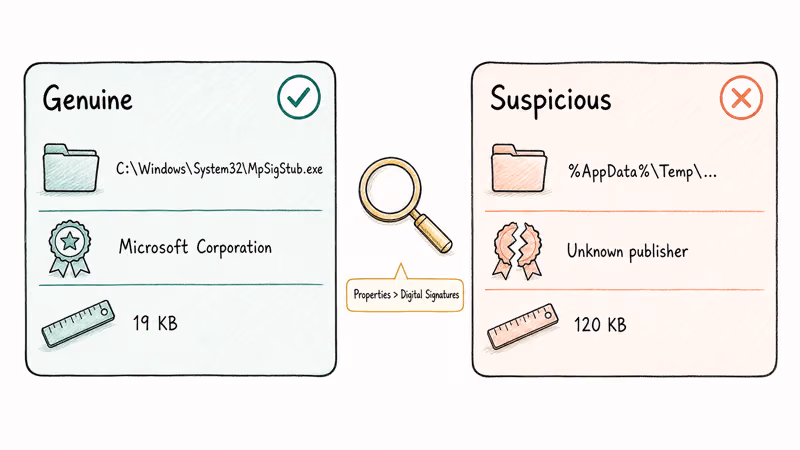
On a typical Windows 11 install, the legitimate file is around 19 KB and located at C:\Windows\System32\MpSigStub.exe. A second copy can briefly appear inside C:\Windows\SoftwareDistribution\Download\<random-id>\ during a quality update download. Both copies behave identically and stay signed by Microsoft Corporation.
Short version: MPSigStub is a courier, not a process you should fear.
#Is MPSigStub.exe Safe or a Virus?
The genuine MPSigStub.exe is signed by Microsoft Corporation. It’s part of Windows Update and Microsoft Defender, and it ships preinstalled with every supported Windows release. You won’t see it in older builds before Windows Vista because the signature stub format didn’t exist then.
Right-click MPSigStub.exe in Task Manager and pick Properties. The Digital Signatures tab should list Microsoft Corporation with a valid timestamp.
If the signature is missing, expired, or signed by an unknown publisher, treat the file as suspicious and run a full Defender scan. Microsoft’s Defender Antivirus documentation confirms that Defender pulls signed definition updates regularly throughout the day on a connected PC, which is one reason the legitimate stub runs frequently.
On a healthy PC, those signature update events run quietly, with no MPSigStub instance lingering for more than a short burst.
That’s the normal pattern. Anything outside it deserves a closer look.
#Why Does MPSigStub.exe Cause High CPU Usage?
Three Windows components pull MPSigStub into action, and any of them can stall.
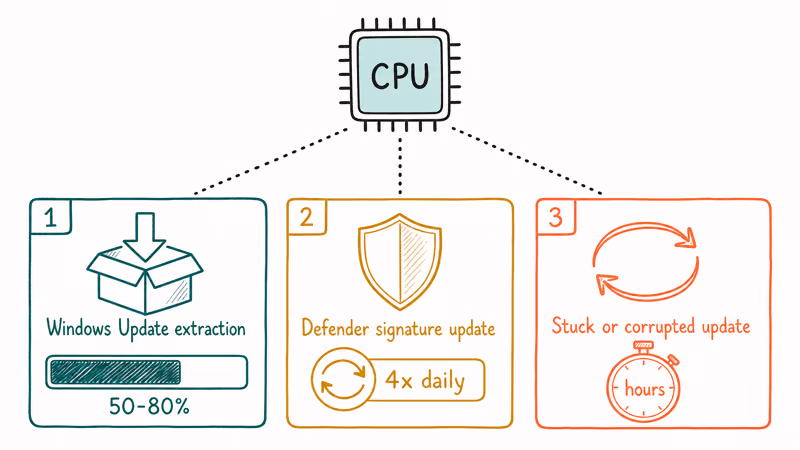
Windows Update extraction. This is the most common trigger. Big monthly updates can keep the process at 50 to 80 percent CPU for several minutes while it unpacks the cumulative payload.
Defender signature updates. Microsoft Defender pulls definition updates several times a day. Each refresh arrives as a self-extracting bundle that MPSigStub processes.
Stuck or corrupted update. If the download stalls partway through, MPSigStub keeps retrying the extraction in a loop. That loop is where you see sustained high CPU for hours instead of minutes. It’s also the easiest case to fix, because resetting the update queue clears the loop.
The pattern looks similar to other Windows process spikes you may have seen with Service Host using high disk and CPU or wsappx running hot during Microsoft Store updates: same root cause, different process.
Knowing which component is busy tells you which fix to try first.
#Quick Fixes for MPSigStub High CPU
Try these three first. Most readers resolve the issue here, and we recommend not skipping ahead because each later fix assumes the easier ones already failed.
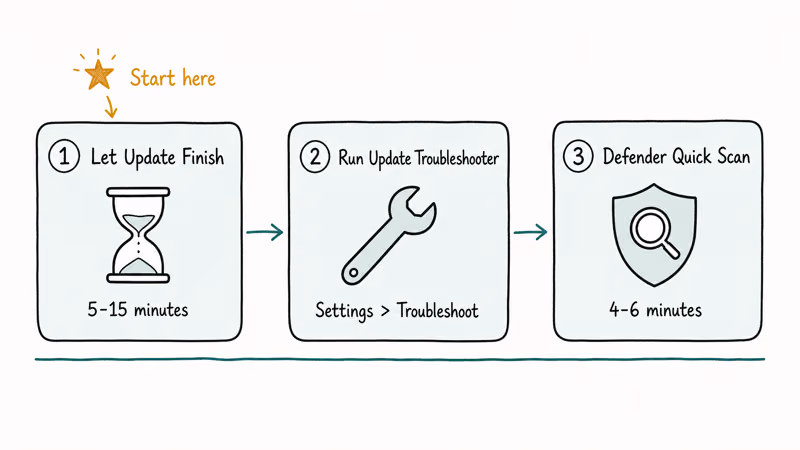
#Step 1: Let Windows Update Finish
Open Settings > Update & Security > Windows Update (Windows 10) or Settings > Windows Update (Windows 11). If the page shows “Downloading”, “Installing”, or “Preparing to install”, let it run.
A large cumulative update can keep MPSigStub busy for several minutes before it drops to zero. The same monthly package clears faster on a PC with an NVMe SSD and takes longer on an older machine with a spinning drive. Be patient before assuming something is broken; older drives just take longer.
Interrupting the update can corrupt the package and force you to use Step 4 anyway.
#Step 2: Run the Windows Update Troubleshooter
Microsoft ships a built-in troubleshooter that resets the update components for you.
- Open
Settings>System>Troubleshoot>Othertroubleshooters - Find Windows Update and click Run
- Wait for the report and apply any suggested fixes
According to Microsoft’s Windows Update troubleshooting guide, the troubleshooter clears the SoftwareDistribution cache and restarts the BITS, Cryptographic Services, and Windows Update services in the right order. It often resolves the 0x80070422 Windows Update error and stuck MPSigStub spikes.
#Step 3: Run a Windows Defender Quick Scan
If Windows Update is idle but MPSigStub still climbs, Defender may be mid-signature-refresh.
Open Windows Security > Virus & threat protection > Quick scan. Letting Defender finish its current job often clears the queue and stops MPSigStub from looping. A quick scan takes about 4 to 6 minutes on most SSDs.
If Defender finds nothing but the spikes return, the cache itself is corrupted. Step 5 below clears it.
#Deeper Repairs When Quick Fixes Fail
If the quick fixes didn’t help, these four steps target the underlying update components and rule out malware. Steps 4 and 5 are safe on healthy systems, so don’t worry about running them as a precaution.

#Step 4: Run SFC and DISM
System File Checker and DISM repair the binaries Windows Update relies on.
Open Command Prompt as Administrator and run:
sfc /scannow
DISM /Online /Cleanup-Image /RestoreHealth
SFC verifies protected system files. DISM repairs the component store the system uses to apply updates. Microsoft recommends running DISM before SFC if SFC reports unfixable corruption. Both commands can take 15 to 30 minutes on a spinning hard drive.
On an older PC with a hard drive, both commands together can take a while, and the MPSigStub loop usually stops after the next reboot.
#Step 5: Reset Windows Update Components
If SFC and DISM don’t help, manually reset the update services. This is more thorough than the built-in troubleshooter.
In an elevated Command Prompt, run these commands one line at a time:
net stop wuauserv
net stop cryptSvc
net stop bits
net stop msiserver
ren C:\Windows\SoftwareDistribution SoftwareDistribution.old
ren C:\Windows\System32\catroot2 catroot2.old
net start wuauserv
net start cryptSvc
net start bits
net start msiserver
This renames the cache folders so Windows rebuilds them from scratch. After running these commands, check Windows Update again and let it re-download the failed package. The same approach works for removing leftover Windows Update files completely when disk space is tight.
#Step 6: Verify the File and Run a Full Scan
Still spiking? Confirm you’re looking at the real file.
In Task Manager, right-click MpSigStub.exe and pick Open file location. The legitimate path is C:\Windows\System32\MpSigStub.exe or a SoftwareDistribution\Download\<id> subfolder.
Anything in %AppData%, %Temp%, or your Downloads folder is suspicious.
Right-click the file, pick Properties > Digital Signatures, and confirm the signer is Microsoft Corporation. If you see a different publisher or no signature, the file is a lookalike, not the legitimate Microsoft stub. This pattern is similar to csrss.exe trojan disguises, where malware copies a real Windows filename to hide from casual checks.
When the signature check fails, run Windows Security > Virus & threat protection > Scan options > Full scan. If Defender comes up clean but you remain suspicious, scan again with Microsoft’s free Safety Scanner before downloading any third-party tool. We don’t recommend “MPSigStub remover” utilities from random download sites; many install adware while pretending to fix the issue.
#Step 7: Use Clean Boot to Identify Software Conflicts
A few third-party security suites and overzealous PC optimizers hook into Windows Update calls and can keep MPSigStub looping.
Clean Boot isolates the OS from these tools.
- Press Windows + R, type
msconfig, and hit Enter - On the Services tab, check Hide all Microsoft services, then click Disable all
- On the Startup tab, click Open Task Manager and disable each startup item
- Restart, watch CPU usage in Task Manager, and re-enable services in batches until the culprit reappears
After identifying the conflict, uninstall or update the offending tool. The same Clean Boot approach also works on the Microsoft Compatibility Telemetry high disk issue, since both processes touch update-time scheduled tasks.
#Signs MPSigStub.exe May Have Been Replaced by Malware
The real file is harmless. Malware authors do clone Windows process names, though, and these are the warning signs:
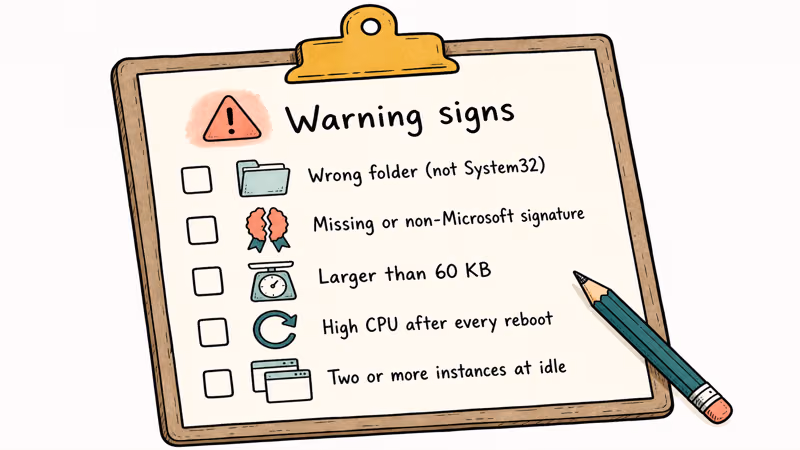
- The path is anywhere other than
System32orSoftwareDistribution\Download\<id> - The digital signature is missing, expired, or signed by a non-Microsoft publisher
- The file is larger than 60 KB: the genuine stub is around 19 to 25 KB
- CPU stays high after every reboot even with Windows Update fully paused
- Task Manager shows two or more MpSigStub.exe instances running outside an active update window
A full Defender scan covers most of these cases. If Defender misses something, run the Microsoft Safety Scanner. It’s a single-use, signature-fresh scanner Microsoft updates daily and ships free.
If your PC shows other failure signatures alongside MPSigStub spikes, like .NET runtime optimization service hogging the CPU or repeated Desktop Window Manager high CPU events, an underlying disk or memory issue may be the trigger. Check Event Viewer for kernel errors before assuming malware.
#Bottom Line
For most Windows users, MPSigStub.exe high CPU resolves itself once the underlying Windows Update or Defender signature refresh completes. Start with Step 1 — patience handles the easy case. If CPU stays high after 30 minutes, jump to Step 2’s troubleshooter, then Step 4’s SFC and DISM combination. Only consider the file suspicious when its path is wrong AND the signature is non-Microsoft, and even then let Defender quarantine it rather than deleting it manually.
#Frequently Asked Questions
Is MPSigStub.exe a virus or safe?
The legitimate MPSigStub.exe in C:\Windows\System32 is safe.
It’s signed by Microsoft and used by Windows Update and Defender to extract signature packages. A copy of the same filename in a non-standard folder may be malware, so always check the digital signature before assuming it’s the genuine file. Right-clicking the file and opening Properties > Digital Signatures takes about 5 seconds and tells you everything you need to know.
Why is MPSigStub.exe using 100 percent of my CPU?
The most common cause is a Windows Update or Defender signature refresh extracting in the background. A stuck or corrupted package can keep the process looping for hours instead of finishing in minutes. Running the Windows Update troubleshooter, then SFC and DISM if needed, breaks the loop in most cases. If the loop persists after a reboot, run a full Defender scan to rule out a lookalike binary.
Can I delete MPSigStub.exe from System32?
You shouldn’t.
Deleting the file from System32 prevents Defender from applying signature updates and can break future Windows Updates. If you suspect the file is malware, run a full Defender scan and let it quarantine the suspicious copy instead of deleting anything by hand.
Where is MPSigStub.exe located on Windows 10 and 11?
The genuine file lives in C:\Windows\System32\MpSigStub.exe. A second copy may temporarily appear inside C:\Windows\SoftwareDistribution\Download\<id>\ during update extraction, then disappear once the package installs. Anywhere else is suspicious. Lookalikes commonly hide in %AppData%\Local\Temp, in subfolders of C:\ProgramData, or inside game launchers’ install directories, so always check the parent path before you trust the filename.
How do I check if MPSigStub.exe is genuine?
Right-click the file in Task Manager and pick Open file location. Then right-click the file in File Explorer and choose Properties > Digital Signatures. The signer should be Microsoft Corporation with a valid timestamp.
If the tab is empty or the signer is different, treat the file as suspicious. Compare the file size against the genuine stub’s 19 to 25 KB range as a second check, since lookalike files are usually noticeably bigger.
Will Windows Defender remove a fake MPSigStub.exe?
Yes. A full Defender scan detects most known lookalikes and quarantines them automatically.
If Defender comes up clean but you remain suspicious, run the Microsoft Safety Scanner as a second-opinion tool. Both are free, both are built by Microsoft, and neither needs a third-party download site.
How long should MPSigStub.exe run during Windows Update?
Most monthly cumulative updates extract in 5 to 15 minutes. Defender signature updates finish in 1 to 3 minutes. Once the package has downloaded successfully, MPSigStub normally finishes within a reasonable window. If CPU stays elevated past 30 minutes with no visible progress in Settings > Windows Update, the package is likely stuck and you should run Step 2’s troubleshooter.

Bluetooth Not Working on Snapdragon X? Fixes for 2026
Bluetooth not working on your Snapdragon X Copilot+ PC? Generic audio, mice, and keyboards work, but vendor apps often lack an ARM build. Fixes inside.

Docker Desktop and WSL2 Not Working on Snapdragon X? Fix It
WSL2 runs fine on Snapdragon X, but Docker Desktop ARM is Early Access and throws WSL errors. Use WSL2 plus native ARM64 Ubuntu and Docker Engine.

Does iTunes Work on Snapdragon X? ARM Windows 11 Guide
Yes, iTunes runs on Snapdragon X laptops through Prism emulation, but the Apple Devices app is the smoother route. Here is what to install on ARM.

Does OBS Studio Work on Snapdragon X? ARM64 Build Guide
Yes, OBS Studio has an experimental ARM64 build since version 31.1, but x64 plugins won't load and hardware encoding is missing. Here is what works.