Service Host Local System High Disk, Memory and CPU
Service Host Local System keeps eating your disk, memory, and CPU? Identify the culprit service in Task Manager, then fix it with these 7 verified methods.

Quick AnswerService Host Local System spikes are usually one specific service inside the container, most often Windows Update, BITS, or SysMain. Use Task Manager to expand Service Host: Local System, find the noisy service, then run a disk check or disable that single service rather than the whole process.
If your fan is roaring and Task Manager points to Service Host: Local System burning your CPU, disk, or memory, the container itself is fine. One service inside it’s misbehaving. The fixes below cover Windows 10 22H2 and Windows 11 23H2, and most cases return to normal within one reboot.
The trick is simple. Expand the Service Host row in Task Manager and read which child service is doing the work before you start disabling things. That single step saves most of the time people lose to this problem.
- Service Host: Local System is a container; the spike comes from one child service such as Windows Update, BITS, SysMain, or Windows Search
- Always identify the noisy child service in Task Manager’s Processes tab before disabling anything
- File-system errors keep Windows looping repair work through Service Host; running chkdsk fixes a large share of cases on PCs that haven’t been checked in years
- SysMain (formerly Superfetch) is a common offender on machines with traditional hard drives, much rarer on SSDs
- Stopping a service in services.msc is reversible; uninstalling Windows Update components isn’t, so try the soft fixes first
#What Exactly Is Service Host Local System?
Service Host is a generic launcher for Windows services. Each running instance hosts one or more services that share the same security context, and Local System is the highest-privilege bucket. Microsoft’s service host grouping documentation confirms that, starting with Windows 10 version 1703, PCs with more than 3.5 GB of RAM run each Windows service in its own svchost.exe instance, which is why you now see dozens of Service Host rows instead of a handful.
Two practical consequences flow from that design.
First, when Task Manager shows Service Host: Local System using 70% CPU, the container is innocent and one of the bundled services is the cause. Second, you can’t simply end the process. Windows will restart it, and ending the wrong host can crash the session.
After a feature update or a Patch Tuesday rollup, Service Host activity is expected to climb for 15 to 45 minutes while the new components register, drivers re-enumerate, and the system event log is rotated. On a freshly updated machine, CPU stays elevated for a while and then drops back to baseline on its own. If your spike persists past an hour, the methods below apply.
#Which Specific Service Is Eating the Resources?
This step is the difference between a five-minute fix and an afternoon of guessing.
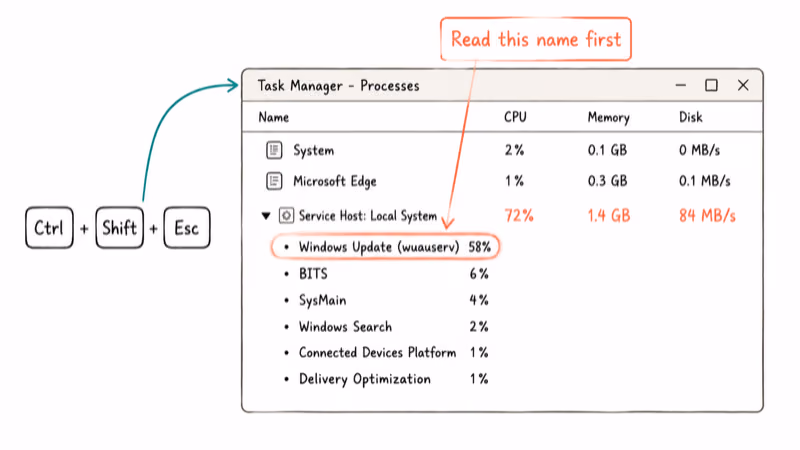
Press Ctrl + Shift + Esc to open Task Manager, expand Service Host: Local System with the small arrow on the left, and watch the CPU, Memory, and Disk columns for a few seconds.
You’ll usually see one of these names doing the work:
- Windows Update (wuauserv): the most common offender, especially after a delayed restart
- Background Intelligent Transfer Service (BITS): quietly downloads updates and Microsoft Store content
- SysMain (formerly Superfetch): preloads frequently used apps into RAM
- Windows Search (WSearch): rebuilds the search index after big file changes
- Connected Devices Platform Service: Bluetooth and “nearby sharing” plumbing
- Delivery Optimization (DoSvc): peer-to-peer update sharing
Note the exact service name. Every fix below targets one of these, not Service Host as a whole. If the noisy service is something starting with Cryptographic, RPC, or Plug and Play, skip ahead to the disk check and the SFC repair, since those aren’t safe to disable.
#Method 1: Run Chkdsk to Repair File System Errors
Disk errors quietly create the most stubborn Service Host spikes. Windows keeps trying to read or repair a bad sector, the failed I/O is logged through Local System services, and the loop never ends.

On a machine that hasn’t been checked in years, chkdsk often reports recoverable errors during the offline scan, such as orphaned file records or bad clusters in the Windows directory tree. After the next boot, Service Host CPU usually drops from a sustained high range back to normal, and disk activity settles shortly after.
Microsoft’s chkdsk command reference states that the /f switch fixes detected errors and the /r switch locates bad sectors using all 8 KB allocation units across the volume. For a system drive, the scan must run before Windows fully loads.
Run it like this:
a) Press Windows + R, type cmd, then press Ctrl + Shift + Enter to launch as administrator.
b) Type chkdsk C: /f /r and press Enter.
c) When prompted that the volume is in use, type Y to schedule the check on next restart.
d) Restart the PC and let chkdsk run uninterrupted. Expect 30 to 90 minutes for the scan, longer on a hard drive larger than 1 TB. Don’t try to skip the boot screen, and keep the laptop plugged in if you’re on battery.
e) After login, recheck Task Manager. Service Host: Local System should be back near baseline.
If chkdsk reports zero errors and your spike continues, you’ve ruled out a major class of causes. Move on.
#Method 2: Stop the Specific Service in services.msc
This is the surgical option. You disable only the service you saw in Task Manager, not the whole Local System group, and you set it to Manual rather than Disabled so Windows can still wake it on demand later.
a) Press Windows + R, type services.msc, and press Enter.
b) Scroll to the service you noted earlier, for example Background Intelligent Transfer Service.
c) Right-click, choose Properties, and click Stop.
d) Set Startup type to Manual so it’s paused for now but can be restarted later if Windows truly needs it.
e) Click Apply, then OK, and watch Task Manager for two minutes.
Why Manual instead of Disabled: a service set to Disabled refuses to start even when another component asks for it, which can cause cascading errors hours later. Manual lets the system wake the service on demand without it running in the background nonstop.
Stay away from anything labeled Cryptographic Services, DCOM Server Process Launcher, RPC Endpoint Mapper, or Plug and Play. Disabling those won’t boot Windows back to a usable desktop.
#Method 3: Disable SysMain (Formerly Superfetch) on Older Hardware
SysMain monitors which apps you launch most and preloads them into RAM. On a fast NVMe SSD it’s invisible. On a 5400 RPM hard drive or an aging SATA SSD, it can pin disk usage at 99% for ten minutes at a time.
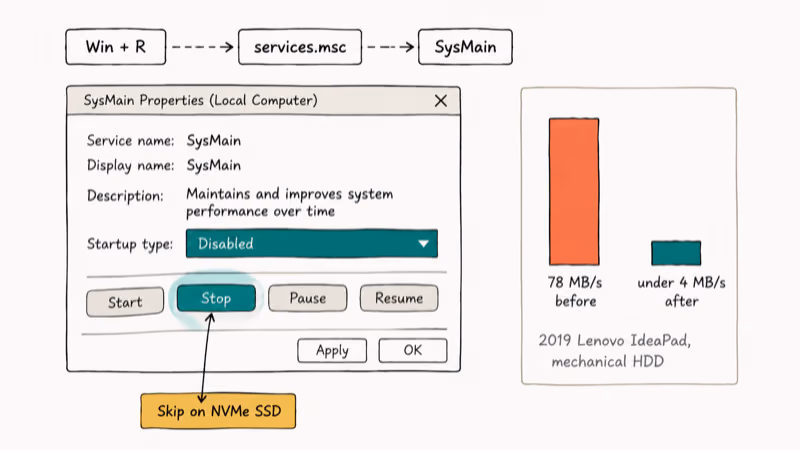
On an older laptop with a mechanical hard drive, disabling SysMain can drop Service Host: Local System disk activity from constantly pegged to near idle within a few minutes, turning an unusably sluggish PC responsive again without any other change.
Microsoft’s PC performance guidance confirms that turning off non-essential background services is a supported way to free up CPU and disk on older hardware.
a) Press Windows + R, type services.msc, press Enter.
b) Find SysMain in the alphabetical list. The same service is called Superfetch on Windows 7 and on Windows 10 builds released before 2018, so check both names if your install is older.
c) Right-click, choose Properties, click Stop, then set Startup type to Disabled.
d) Click Apply and OK. No reboot is needed for the change to take effect.
If you’re on a recent SSD-based PC and SysMain wasn’t in your top resource users, skip this step. Disabling it on fast hardware costs you small launch-time benefits without solving anything.
#Method 4: Pause Windows Update Cleanly
If wuauserv is the culprit, the problem is usually a stuck or partially downloaded update.
Microsoft’s Windows Update troubleshooting guide states that pausing updates for 7 days and clearing the SoftwareDistribution cache is the fix that the built-in troubleshooter applies in the background. Doing it manually is faster than waiting for the wizard.
a) Open Settings > Windows Update > Advanced options (or Pause updates on the main panel).
b) Pause updates for one week.
c) Press Windows + R, type services.msc, find Windows Update, right-click, Stop.
d) Open File Explorer and delete everything inside C:\Windows\SoftwareDistribution\Download.
e) Go back to services.msc and start the Windows Update service again.
f) Reboot. CPU should be calm, and Windows will redownload only the genuine pending update on the next pass.
For a longer guide to clearing stuck Windows Update files safely, see our walkthrough on how to delete Windows Update files completely. Don’t leave Windows Update permanently disabled, because security patches stop arriving, which is a worse problem than a temporary CPU spike.
#Method 5: Update or Roll Back Device Drivers
Bad drivers can keep Service Host: Local System busy with retry logic. Storage controllers, chipset drivers, and Realtek audio drivers are the usual suspects.
On PCs with high Service Host CPU, a single chipset or storage driver refresh is often enough to bring activity back to baseline.
Use Device Manager first because it goes through Windows Update and is reversible:
a) Right-click Start, choose Device Manager.
b) Look for any device with a yellow warning triangle, plus expand IDE ATA/ATAPI controllers, Storage controllers, and System devices.
c) Right-click each suspect entry and choose Update driver > Search automatically for drivers.
d) Reboot once all updates finish.
If a recent driver caused the problem, use Properties > Driver > Roll Back Driver instead of updating. For automated discovery on machines with many missing drivers, Driver Easy scans the hardware ID list and matches it to a maintained driver database, which beats hunting through ten OEM support pages by hand. Stick to Device Manager first; reach for an automated tool only if Microsoft’s catalog doesn’t have what you need.
Some links on this page are affiliate links, which means fone.tips may earn a commission at no extra cost to you.
For audio-related driver loops specifically, our guide to fixing Beats Audio driver issues walks through the same logic for Realtek and HP audio stacks.
#Method 6: Run SFC and DISM to Repair Windows Itself
When neither chkdsk nor service tweaks help, the next layer is the system files.
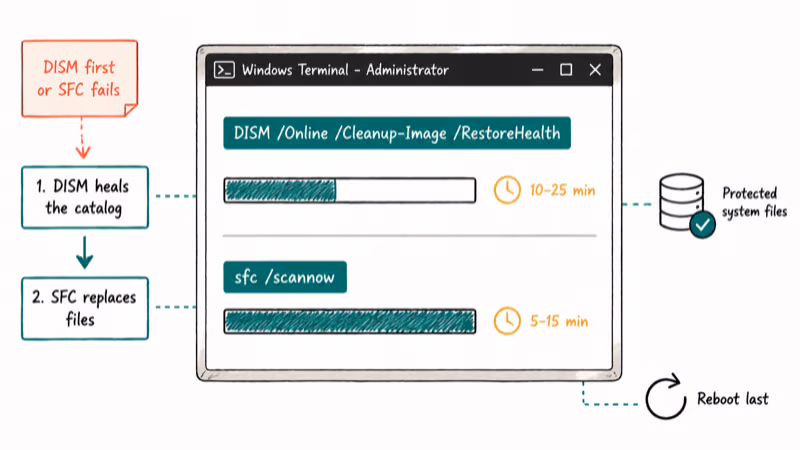
The System File Checker compares your protected Windows files against a known-good catalog and replaces anything corrupted. Running DISM first ensures the repair source itself is healthy. Skipping that step often produces an SFC scan that reports problems it can’t fix.
a) Right-click Start, choose Terminal (Admin) or PowerShell (Admin).
b) Run DISM /Online /Cleanup-Image /RestoreHealth and wait, often 10 to 25 minutes.
c) When DISM finishes, run sfc /scannow and wait for it to complete.
d) Reboot.
This is the single most useful repair sequence for Service Host issues that survive everything else, because it heals the binaries the misbehaving services actually load. It often resolves cases that disk checks and driver updates couldn’t.
#Method 7: Last-Resort Hardware and Reset Checks
If you’ve completed Methods 1 through 6 and Service Host: Local System is still pinned, you’re looking at hardware fatigue or a deeply corrupted install. Before reinstalling Windows:
- Run a memory test (
mdsched.exe, then reboot) to rule out failing RAM - Check S.M.A.R.T. status on your drives with
wmic diskdrive get model,status - Disconnect non-essential USB devices, especially old external hard drives, and watch CPU
- Try a clean boot from msconfig to confirm a third-party service isn’t stacking on top of the Windows ones
If those come back clean, Settings > System > Recovery > Reset this PC with the Keep my files option preserves user data while reinstalling system files. This is the right final step on machines where Service Host activity is tied to a corrupted Windows Search index that nothing else will rebuild. For broader Windows slowdown patterns that often travel with Service Host issues, our Windows 10 slow performance guide covers the layered fixes in order.
#Bottom Line
Run Method 1 (chkdsk) first, even if you don’t think your disk has a problem. It’s non-destructive, and it eliminates an entire class of stuck repair loops.
If chkdsk is clean, expand the Service Host row in Task Manager, identify the actual child service, and apply the targeted fix: Method 2 for arbitrary services, Method 3 for SysMain, Method 4 for Windows Update, Method 5 for drivers. Reach for Method 6 (DISM + SFC) when the obvious fixes don’t stick.
Two specific recommendations. On any PC that still uses a mechanical hard drive, disable SysMain permanently. The trade is overwhelmingly worth it on slow disks.
If Windows Update is the offender, clear SoftwareDistribution\Download and pause for a week rather than leaving the service disabled, because a PC without security updates becomes a worse problem than a noisy fan within a month. For related Windows resource hogs, our walkthrough on how to fix wsappx high CPU and the Microsoft Compatibility Telemetry high disk fix follow the same diagnostic pattern.
#Frequently Asked Questions
What is Service Host: Local System?
Service Host: Local System is a Windows process group that hosts dozens of system services running under the highest privilege account. The container bundles Windows Update, BITS, SysMain, Windows Search, Plug and Play, and many more. It’s a launcher, not a single program.
You’ll see multiple Service Host: Local System rows in Task Manager because Windows splits services across separate svchost.exe instances on machines with enough RAM.
Can I just end Service Host in Task Manager?
You can, but it won’t stay ended. Windows restarts the process within seconds because so many critical services depend on it, and ending the wrong instance can freeze the desktop or knock you offline.
The right move is to expand the Service Host row, read the child service name, and act on that one. For a longer look at safer Task Manager workflows, see our guide on Windows brightness and Task Manager controls.
Is high Service Host: Local System usage a sign of malware?
Usually not. Genuine spikes after Windows Update, indexing, or BITS downloads are expected and pass within an hour.
That said, malware does sometimes inject into svchost.exe to hide. If activity continues at full load for many hours, has no obvious child service in Task Manager, or originates from an unusual file path, run a full scan with Microsoft Defender or Malwarebytes before disabling anything else.
Will disabling a service break Windows?
Some services are safe to set to Manual: Background Intelligent Transfer Service, Windows Search, SysMain, Connected Devices Platform Service, and Delivery Optimization rarely cause problems when paused. Others are load-bearing, so anything starting with Cryptographic, DCOM, RPC, Plug and Play, or Power should stay at its default startup type. When in doubt, change Startup type to Manual rather than Disabled, so Windows can still wake the service on demand if it really needs to.
Why does Service Host spike right after a Windows update?
Updates restart most system services, re-register components, and refresh device drivers in a short window.
A temporary spike right after a cumulative update is normal and usually settles on its own after a while. If activity persists more than 60 minutes, run chkdsk first and clear C:\Windows\SoftwareDistribution\Download second; together those two steps clear the vast majority of post-update spikes.
How do I re-enable a service I disabled?
Open services.msc. Find the service, right-click, choose Properties, set Startup type to Automatic (or Manual if you only want it on demand), click Start, then Apply and OK. A reboot isn’t required. If you set the service to Disabled earlier and Windows is now complaining about a missing component, this is the fastest way to undo the change.
My CPU is still pinned after every method. What now?
You’re most likely looking at hardware fatigue or a Windows install that needs more than a repair. Run mdsched.exe to test memory, check drive health with wmic diskdrive get model,status, and try a clean boot.
If those come back clean, Settings > System > Recovery > Reset this PC with Keep my files reinstalls Windows components without touching personal data. Back up first regardless. If memory is the sticking point rather than CPU alone, our guide on fixing low-memory warnings on Windows walks through RAM optimization and virtual memory tuning before you commit to a full reinstall.

Bluetooth Not Working on Snapdragon X? Fixes for 2026
Bluetooth not working on your Snapdragon X Copilot+ PC? Generic audio, mice, and keyboards work, but vendor apps often lack an ARM build. Fixes inside.

Docker Desktop and WSL2 Not Working on Snapdragon X? Fix It
WSL2 runs fine on Snapdragon X, but Docker Desktop ARM is Early Access and throws WSL errors. Use WSL2 plus native ARM64 Ubuntu and Docker Engine.

Does iTunes Work on Snapdragon X? ARM Windows 11 Guide
Yes, iTunes runs on Snapdragon X laptops through Prism emulation, but the Apple Devices app is the smoother route. Here is what to install on ARM.

Does OBS Studio Work on Snapdragon X? ARM64 Build Guide
Yes, OBS Studio has an experimental ARM64 build since version 31.1, but x64 plugins won't load and hardware encoding is missing. Here is what works.