Locked Out of iPhone: 5 Ways to Get Back In (2026)
Locked out of your own iPhone? 5 proven methods to unlock it: Recovery Mode, DFU, the iOS 15.2+ on-screen Erase, Find My, and trusted unlock tools.
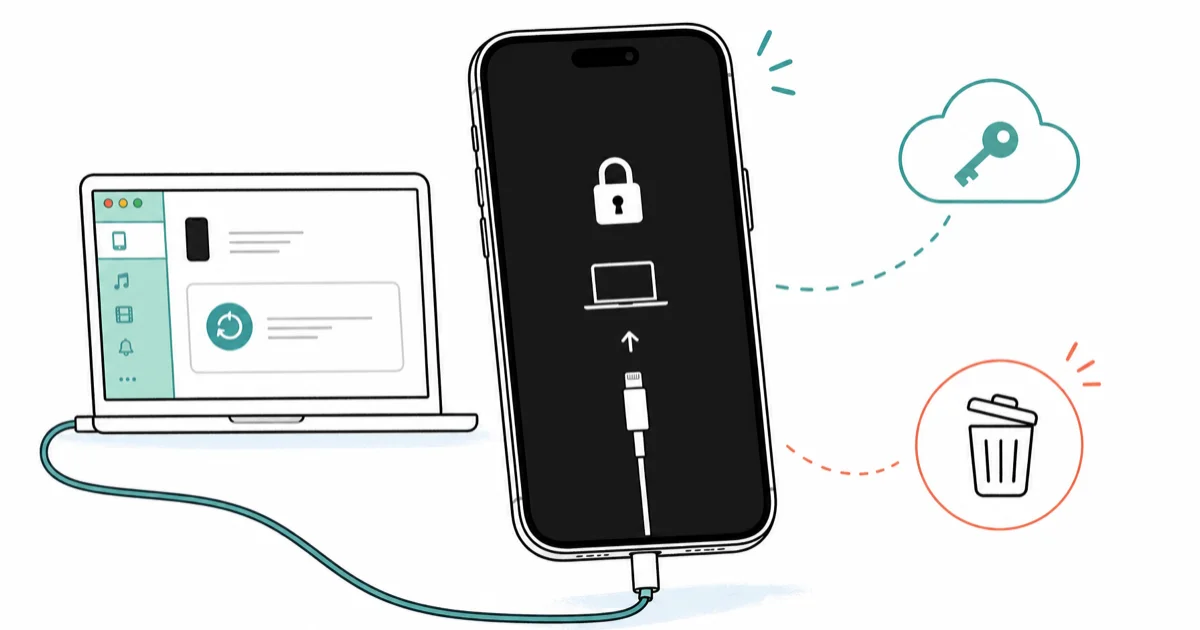
Quick AnswerIf your own iPhone shows iPhone Unavailable or Security Lockout, the fastest fix is Recovery Mode: connect it to a Mac or PC, force the device into Recovery, then click Restore in Finder or iTunes. On iOS 15.2 and later, you can also tap Erase iPhone right on the lock screen and sign in with your Apple ID.
Being locked out of your own iPhone is fixable, but every reliable method erases the device. A recent backup is what separates “minor annoyance” from “lost everything,” so this guide covers that too.
This guide assumes the iPhone is yours and you can prove ownership through your Apple ID, original receipt, or carrier records. Here are 5 ways back in, ordered from least to most invasive.
- iOS disables an iPhone after 10 wrong passcode attempts in a row, with escalating timeouts starting at 1 minute after attempt 6.
- Recovery Mode works on every iPhone model and is Apple’s official path back in when you have a Mac or PC nearby.
- iPhones on iOS 15.2 and later show an Erase iPhone button on the lock screen after a Security Lockout, so a computer is no longer required.
- All standard unlock paths wipe the device, so a recent iCloud or Finder backup is the only way to keep your photos, messages, and app data.
- Apple can’t bypass your passcode; Apple Support, Recovery Mode, and Find My are the only first-party options for an own-device lockout.
#How Does an iPhone Lockout Actually Happen?
iOS counts wrong passcode entries and locks the device on a fixed schedule. The clock resets only after a successful unlock, so even spaced-out attempts add up. Apple’s forgot iPhone passcode support article confirms that 10 consecutive wrong entries flip the device into iPhone Unavailable or Security Lockout, and the only way back in is a full restore.
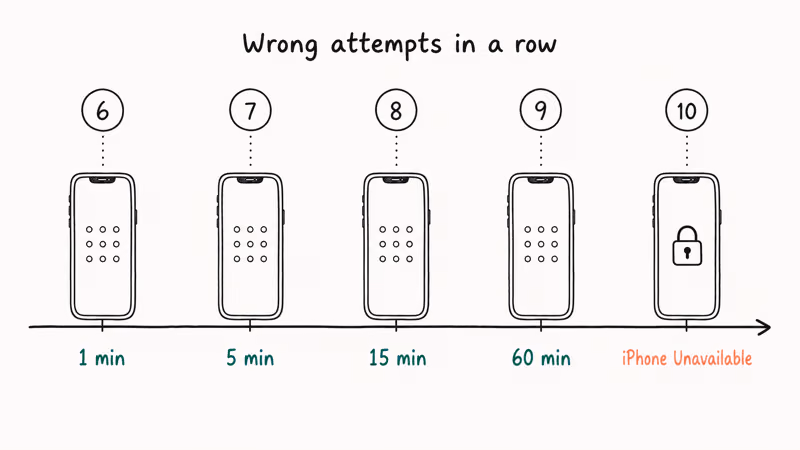
| Wrong attempts in a row | What happens |
|---|---|
| 6 | Disabled for 1 minute |
| 7 | Disabled for 5 minutes |
| 8 | Disabled for 15 minutes |
| 9 | Disabled for 60 minutes |
| 10 | iPhone Unavailable, no countdown; restore required |
If you turned on the Erase Data toggle in Settings → Face ID & Passcode, attempt 10 wipes the device automatically instead of holding it in a lockout state. Apple recommends this only if you back up regularly, because there’s no recovery path after the wipe other than restoring from a backup. The toggle is off by default and shouldn’t be flipped on without a working backup routine in place.
Everything below assumes the iPhone is yours. For someone else’s phone, see our iCloud Activation Lock guide.
#Method 1: Recovery Mode (Works on All iPhones)
Recovery Mode is Apple’s official, free way to restore a locked iPhone from a Mac or PC. The restore time depends mainly on the firmware download and your connection.
You’ll need a Lightning or USB-C cable that fits your iPhone, a Mac with Finder (macOS Catalina or later) or a PC with the Apple Devices app or iTunes installed, and a stable Wi-Fi connection on the computer.
#Step 1: Put the iPhone in Recovery Mode
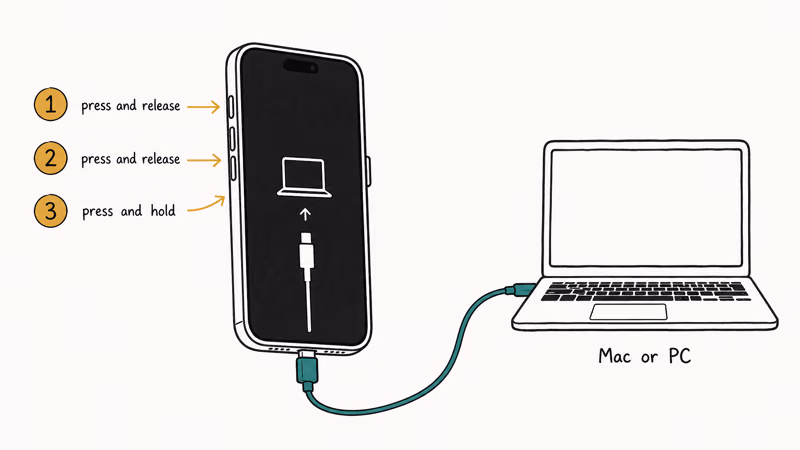
The button combo depends on your model. Plug the iPhone into the computer first, then run the sequence:
- iPhone 8, SE (2nd gen and later), X, and newer: Press and quickly release Volume Up. Press and quickly release Volume Down. Press and hold the Side button until the Recovery Mode screen (a cable pointing at a laptop) appears. Keep holding even after the Apple logo shows up.
- iPhone 7 and 7 Plus: Hold the Side button and Volume Down together until the Recovery Mode screen appears.
- iPhone 6s and older: Hold the Home button and the Top or Side button together until the Recovery Mode screen appears.
If the Apple logo appears and stays, you let go too early. Start over.
#Step 2: Restore From Finder or iTunes
- On the computer, a window pops up saying it detected an iPhone in Recovery Mode.
- Click Restore, not Update. Update will fail because the lockout blocks the install.
- Wait for the firmware to download. Apple’s servers limit the download window to about 15 minutes; if the iPhone exits Recovery Mode mid-download, repeat Step 1.
- After the restore finishes, the iPhone reboots to the Hello setup screen. Sign in with your Apple ID and choose to restore from a backup or set up as new.
If the restore stalls, see our walkthrough for an iPhone stuck on the restore screen and our fix for when an iPhone won’t restore in Recovery Mode.
Pros: Free, official, no third-party tools, works on every iPhone model. Cons: Erases all data on the device. Needs a trusted computer and 25 to 45 minutes.
#Method 2: DFU Mode (When Recovery Mode Fails)
DFU (Device Firmware Update) is a deeper restore that reflashes both firmware and iOS. Use it when Recovery Mode loops back to the Apple logo, errors out (errors 4013 or 9006 are common), or the device won’t even reach the Recovery screen. If Recovery Mode fails with iTunes error 9006, DFU is the next escalation.
The trickiest part of DFU is the timing. The screen must stay completely black during the sequence; if you see the Apple logo or the Recovery cable, you’re not in DFU.
iPhone 8 and newer (including SE 2nd gen and later):
- Connect to the computer and open Finder or iTunes.
- Press and quickly release Volume Up.
- Press and quickly release Volume Down.
- Press and hold the Side button for 10 seconds (screen turns black).
- Keep holding Side and also press and hold Volume Down for 5 seconds.
- Release the Side button but keep holding Volume Down for another 10 seconds.
- The screen stays black; Finder or iTunes detects “an iPhone in Recovery Mode.”
iPhone 7 and 7 Plus: Hold Side and Volume Down for 10 seconds, then release Side while still holding Volume Down for 5 more seconds.
iPhone 6s and older: Hold Home and Top or Side for 10 seconds, then release Top or Side while still holding Home for 5 more seconds.
When DFU is correctly entered, click Restore iPhone. The process is the same as Method 1 from this point. If the restore still fails, your fix path branches into harder problems like a stuck-on-iTunes-logo loop or error 4013, which usually point to a cable, USB port, or hardware issue rather than the lockout itself.
#Method 3: Erase iPhone From the Lock Screen (iOS 15.2+)
This one is the easy path if you already know your Apple ID password. Starting with iOS 15.2 (released December 2021), the Security Lockout screen shows an Erase iPhone button in the bottom-right corner. Use it when the device is online and you know the Apple ID password tied to it.
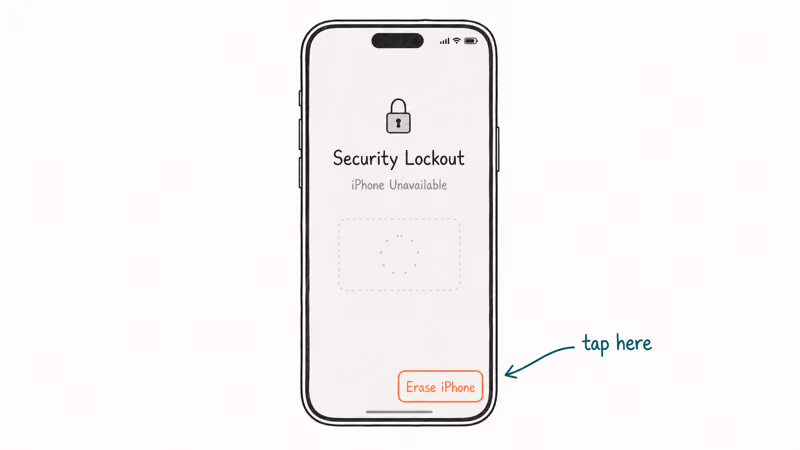
- Wait for the device to show Security Lockout or iPhone Unavailable. The button does not appear until the device has been disabled.
- Tap Erase iPhone in the bottom-right corner.
- Tap Erase iPhone again to confirm.
- Enter your Apple ID password when prompted to sign out of iCloud.
- The device wipes itself and reboots to the Hello setup screen.
Requirements:
- The iPhone must be on iOS 15.2 or later.
- The device needs Wi-Fi or cellular data connected so it can sign out of your Apple ID.
- You must know the Apple ID password tied to the device. There’s no bypass at this step; without the password, Apple’s servers won’t let the wipe complete, and you’ll have to fall back to Recovery Mode.
This route also clears Activation Lock as part of signing out, which is why the password check is mandatory. Apple states that any path that removes the device passcode also requires the Apple ID password to prevent stolen-device misuse.
#Method 4: Find My iPhone (Remote Erase via iCloud)
If you set up Find My before the lockout, you can erase from another Apple device or a browser without touching the locked iPhone. This is the no-cable path when the iPhone is somewhere else or you don’t have a cable handy. The erase runs once the device comes online.
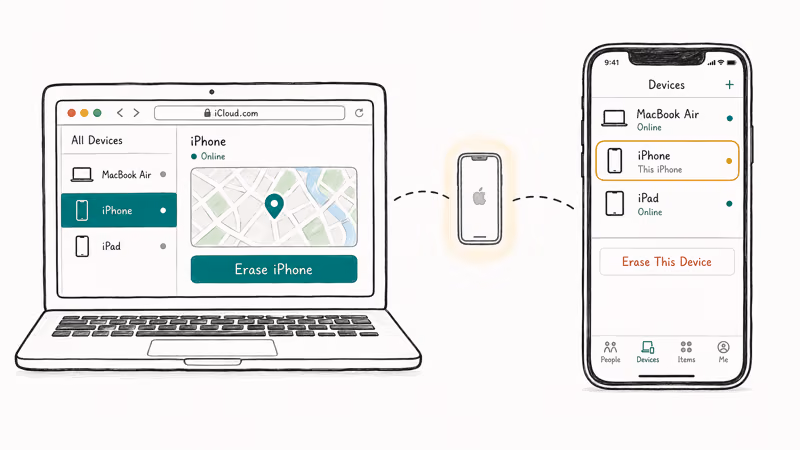
#Erase via iCloud.com
- On any browser, open iCloud.com/find and sign in with your Apple ID.
- Click All Devices at the top.
- Select the locked iPhone.
- Click Erase iPhone, confirm with your Apple ID password, and approve the two-factor code.
- The next time the iPhone is online, it wipes and shows the Hello setup screen.
#Erase via the Find My App
- On another iPhone, iPad, or Mac signed in with your Apple ID (or a Family Sharing member’s), open the Find My app.
- Tap the Devices tab.
- Tap the locked iPhone in the list.
- Scroll down and tap Erase This Device → Continue.
If the iPhone has been offline for weeks, Find My may show “No location found.” The erase is queued and runs as soon as the device connects to Wi-Fi or cellular. To verify a device is even eligible for remote erase, our Find My iPhone checker guide shows how to confirm Find My status using the Apple ID account page or the iPhone IMEI.
Pros: No computer, no cable, works fully remote. Cons: Erases the device; only works if Find My was enabled before the lockout and the device can reach the internet.
#Method 5: Third-Party Unlock Tools (Use Only on Your Own Device)
If Recovery Mode fails repeatedly and DFU is intimidating, a guided unlock tool can walk you through Recovery and DFU steps and handle the firmware download for you. These tools don’t bypass Apple’s security; they automate the same restore Apple uses, then handle the post-wipe setup. They should only be used on a device you own and can prove ownership of.
If you want a side-by-side before paying, the comparison details live in our 4uKey vs LockWiper vs dr.fone Unlock review.
- dr.fone Screen Unlock: Wide model coverage and a clean UI; tends to be the most beginner-friendly. Check the vendor’s compatibility list before buying, especially for current iOS releases.
- iToolab UnlockGo: Multiple unlock modes for passcode, Screen Time, and MDM (only on devices you own and manage).
- Tenorshare 4uKey: Frequent firmware updates and a high success rate when guided Recovery or DFU is needed.
If Apple’s erase routes didn’t complete on your own iPhone, AnyUnlock is another paid desktop fallback; it still erases the device and can’t remove Activation Lock.
Some links on this page are affiliate links, which means fone.tips may earn a commission at no extra cost to you.
Workflow is similar across the three:
- Install the desktop app on your Mac or PC.
- Plug the iPhone into the computer with a working cable.
- Confirm device ownership in the app’s prompt.
- Follow the on-screen guide for Recovery or DFU mode entry.
- Let the tool download Apple’s firmware and run the restore.
These tools also help when the screen physically can’t respond, which we cover separately in how to unlock an iPhone with a broken screen. They can’t remove iCloud Activation Lock on a phone tied to someone else’s Apple ID; that’s outside fair use, and Apple closes those bypass methods quickly.
Pros: Walks beginners through Recovery and DFU; downloads firmware automatically. Cons: Paid software, still wipes the device, not a magic bypass.
#Saving Your Data Before You Erase
Sometimes, but only if you prepared in advance. Once iPhone Unavailable shows up, the device is locked at the operating-system level, so most data extraction options are off the table. The realistic paths are:
- Pre-existing iCloud backup: Open Settings → [Your Name] → iCloud → iCloud Backup on another Apple device, or visit iCloud.com → Account Settings → Manage Storage. If a backup exists from before the lockout, you can restore it during setup after the wipe. Apple confirms iCloud Backup runs nightly when the iPhone is on Wi-Fi, plugged in, and locked, so there’s a good chance one exists.
- Pre-existing Finder or iTunes backup: If you ever clicked Trust on a Mac or PC, that computer holds a local backup. On Mac, check
~/Library/Application Support/MobileSync/Backup/. On Windows, check%APPDATA%\Apple Computer\MobileSync\Backup\. - Trusted-computer last-chance backup: If a previously trusted Mac or PC is still paired and the iPhone hasn’t been disabled for too long, you may be able to plug in and click Back Up Now in Finder before the lockout escalates. Our walkthrough on the Trust This Computer prompt covers what changes if you’ve recently reset trust.
Without one of these, the data is gone after the restore. There is no legitimate tool that decrypts a locked iPhone’s storage; the iOS Secure Enclave makes that mathematically impractical. Anyone selling such a service is either lying or describing a device-bug exploit that Apple patches in days.
#How Do You Avoid Getting Locked Out Again?
A few habits keep the next lockout from being your problem:
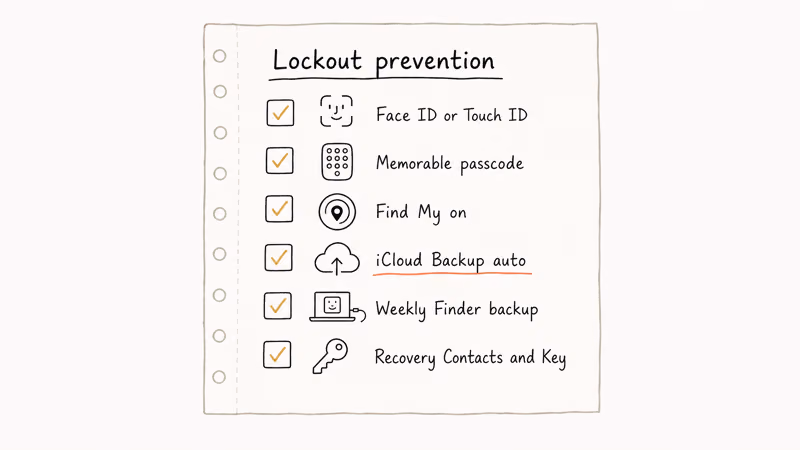
- Turn on Face ID or Touch ID. Biometrics handle 95%+ of unlock attempts, which keeps your fingers off the passcode and out of the lockout counter.
- Pick a 6-digit numeric or alphanumeric passcode you can actually remember. Storing it in 1Password or iCloud Keychain on a separate device is fine; sticky notes on the back of the phone are not.
- Enable Find My. Settings → [Your Name] → Find My → Find My iPhone. Without it, Method 4 isn’t available to you.
- Set up automatic iCloud Backup. Settings → [Your Name] → iCloud → iCloud Backup → toggle on. The free iCloud tier rarely covers a full iPhone, so the upgrade to 50 GB ($0.99/month in the US) is the cheap insurance. Apple’s iCloud support hub covers current pricing and storage tiers if you need to compare.
- Plug into a Mac weekly for a Finder backup. Finder → connect iPhone → General → Back up all of the data on your iPhone. This is faster to restore and doesn’t depend on iCloud space.
- Add Recovery Contacts and a Recovery Key. In Settings → [Your Name] → Sign-In & Security, set up at least one trusted contact and either a Recovery Key or print Recovery Codes. This is what keeps an Apple ID lockout from compounding the device lockout.
#Bottom Line
Start with Method 3 if your iPhone runs iOS 15.2 or later and you know your Apple ID password.
If Method 3 isn’t available, plug into a Mac or PC and run Recovery Mode (Method 1). DFU and third-party tools are only worth touching when Recovery fails twice and you’ve already verified the cable and USB port are good.
Whichever path you take, set up automatic iCloud Backup the moment the device finishes setup again. That single toggle turns the next lockout from a data-loss event into a 30-minute inconvenience.
For older devices that show the iPhone is disabled message instead of Security Lockout, the fix is the same: Recovery Mode, then restore.
#Frequently Asked Questions
Will unlocking my iPhone erase all my data?
Yes. Every reliable method (Recovery Mode, DFU, iOS 15.2 Erase, Find My) wipes the device. Only a prior backup brings your data back.
Can Apple unlock my iPhone for me at the Apple Store?
No. Apple can’t bypass your passcode, even at a Genius Bar with proof of ownership. The Genius Bar can verify your account and walk you through Recovery Mode, but the data still gets erased.
How many wrong attempts before the iPhone locks permanently?
Ten wrong passcodes in a row trigger the permanent iPhone Unavailable state. The Erase Data setting flips that into an automatic wipe at attempt 10 instead of a static lockout. Either way, the only path back is a restore. If no backup exists, the data is gone, which is why the prevention checklist matters more than the unlock method.
Can I unlock an iCloud-locked iPhone I bought used?
Only with the original owner’s help. Activation Lock removal requires the original Apple ID, the previous owner removing the device from Find My, or Apple verifying proof of original purchase. Anything else (jailbreak bypasses, MDM tricks) is grey-area at best. The right move on a found or used iPhone showing Activation Lock is to return it.
Is it legal to unlock a locked iPhone?
Your own iPhone: yes. Someone else’s iPhone, including a found device: no. The methods here assume ownership.
What if I don’t have a computer and Find My is off?
Use Method 3 if your iPhone is on iOS 15.2 or later. The Erase iPhone option appears on the lock screen after the device shows Security Lockout. You’ll need to know your Apple ID password and have Wi-Fi or cellular signal. If both Method 3 and Find My are unavailable, your only path is borrowing or visiting a computer for Recovery Mode at an Apple Store, library, or friend’s place.
Is there any way to recover data if I have no backup?
No. Secure Enclave encryption ties storage to the passcode, so wiping it wipes the key.
Does Recovery Mode work on the iPhone 16?
Yes. Recovery Mode and DFU work on every iPhone model from the 6s through the iPhone 16 lineup, including the iPhone 16 Pro Max. The button sequence is the same as for any iPhone 8 or later: quick Volume Up, quick Volume Down, then hold the Side button until the cable-and-laptop graphic appears.

iPhone 17 Cellular Data Not Working on iOS 26? 9 Fixes
iPhone 17 cellular data still dropping on iOS 26? Apple fixed the launch bug in iOS 26.0.1, but recovery failures persist. Here's the fix ladder.

iPhone Cellular Data Not Working Abroad? eSIM Fixes
Travel eSIM showing no data abroad? Fix iPhone roaming with the data-line check, Data Roaming toggle, APN settings, and network selection steps.

iPhone Cellular Data Not Working for Some Apps? 8 Fixes
Some iPhone apps refuse to load on cellular while others work fine. Check the per-app cellular toggle, Low Data Mode, VPN profiles, and Screen Time.

iPhone Stuck on EDGE? How to Get 5G or LTE Back (2026)
iPhone stuck on EDGE with crawling data? Here's why the E icon appears, which settings force 5G or LTE back, and when the problem is your carrier.