How to Unlock iPhone When Screen Is Broken or Unresponsive
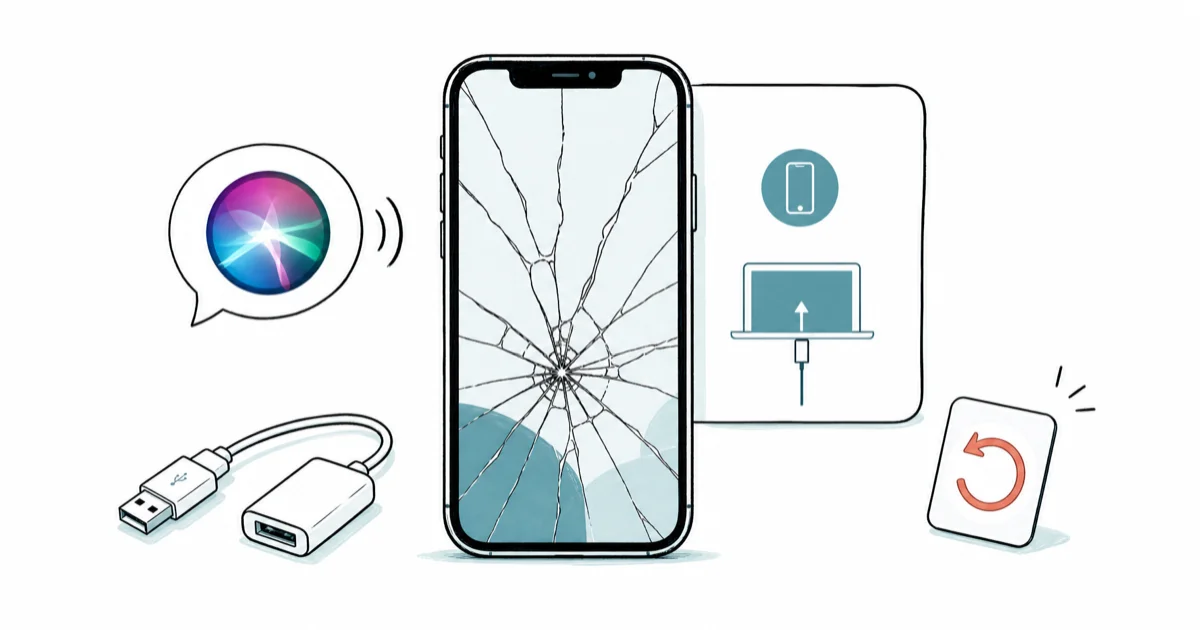
iPhone screen cracked or unresponsive? Unlock your own device with Voice Control, a USB keyboard, Recovery Mode, or an authorized Apple Store repair.
Quick AnswerIf you own the iPhone and it's signed into your Apple ID, start with a force restart, then ask Siri to turn on Voice Control or VoiceOver so you can speak your passcode. If touch is completely dead, plug in a USB keyboard via a Lightning or USB-C camera adapter, or restore through Finder or iTunes Recovery Mode if you have a current backup.
This guide explains how to unlock your own iPhone when the screen is broken or unresponsive, on a device signed into your Apple ID. The methods cover Voice Control with Siri, USB keyboard access through a Lightning or USB-C adapter, Finder and iTunes Recovery Mode, and authorized screen repair.
We won’t show you how to get into someone else’s locked iPhone. Find My Activation Lock and iOS encryption are designed to make that impossible, and in the United States, unauthorized access can be illegal under the Computer Fraud and Abuse Act (CFAA).
- A standard force restart fixes many software-related touch failures on iPhone 8 and later by tapping Volume Up, Volume Down, then holding Side until the Apple logo appears, and it never erases data
- Voice Control on iOS 13 and later lets you say “Tap one, tap two, tap three, tap four, tap six” to enter a passcode without touching a cracked screen, provided Siri can hear you
- A USB keyboard plugged in through a Lightning to USB Camera Adapter or USB-C adapter can type the passcode on the lock screen once you tap the space bar twice
- Erase iPhone through iCloud Find Devices wipes the device and removes the passcode, but the iPhone stays Activation Locked to your Apple ID and needs that password to set up again
- Apple authorized screen repair costs a flat $29 with AppleCare+ (or $99 for other damage), while out-of-warranty pricing varies by model, and it’s the only path that preserves your data without a prior backup
#Confirm It’s Your Own iPhone First
Before trying any unlock method, confirm two things: the iPhone is yours with a passcode you remember, and it’s still signed into your Apple ID.
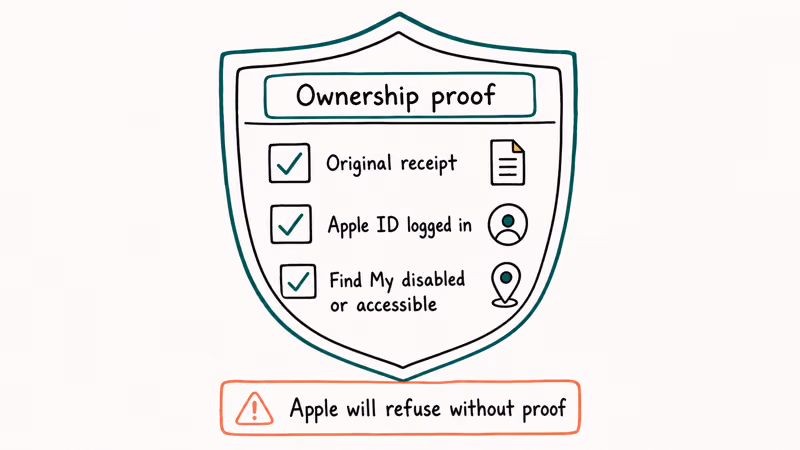
Every method below applies only to your own device or account. Using them on a phone you don’t own can violate federal privacy law.
If the iPhone belongs to a family member who has passed away, the right path is Apple’s Digital Legacy program, not a passcode workaround. If you bought a used iPhone that still shows the previous owner’s Apple ID at setup, that device is Activation Locked, and only the original owner can release it from their iCloud account. According to Apple’s Activation Lock support page, this protection is by design and applies even after a remote erase.
#What Should I Try Before Doing a Full Restore?
Most broken-screen unlock situations don’t need a destructive restore. Walk this short triage list in order, since the early steps preserve all your data and take less than five minutes.
#Force Restart and Look for a Software Glitch
A force restart clears RAM, kills frozen UI processes, and brings the lock screen back fresh. It’s risk-free and erases nothing.
- iPhone 8 and later, including iPhone 14 and 15: press and release Volume Up, press and release Volume Down, then press and hold the Side button until the Apple logo appears
- iPhone 7 and 7 Plus: hold Side plus Volume Down together for about ten seconds
- iPhone 6s, SE first generation, and earlier: hold Home plus the Top or Side button for about ten seconds
If touch starts responding after the reboot, it was a stuck process. With an intermittent digitizer failure after a drop, a force restart can restore touch long enough to back up the device and book an Apple repair appointment.
#Look at What Still Works
Quick check: which zones still register? Open Settings or Notes and try a sliding gesture to find the dead strip. Rotating the iPhone can then put a working strip under the passcode field.
#Method 1: Voice Control Plus Siri
Voice Control is the most powerful no-hardware option on iOS 13 and later. It works because the feature speaks numbers and grid coordinates instead of relying on touch input. According to Apple’s Voice Control support article HT210417, the feature can tap any visible control by its on-screen label or by an overlaid number, which is exactly what a broken digitizer needs.
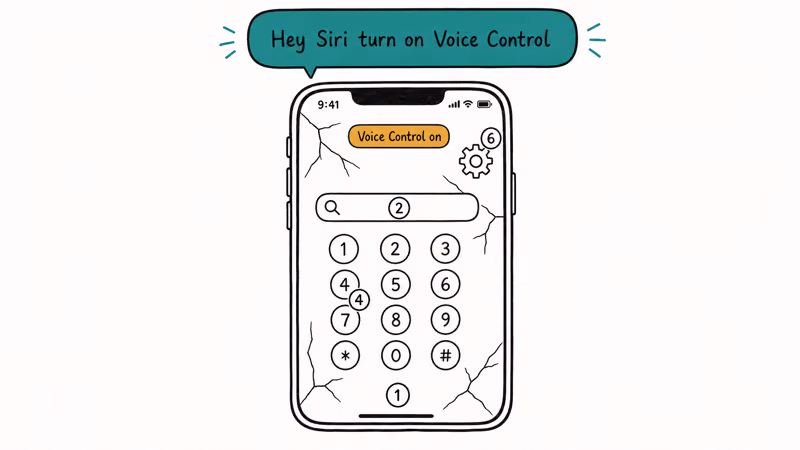
Walk through it like this on a device signed into your own Apple ID:
- Wake Siri by holding the Side button on Face ID models, the Home button on Touch ID models, or saying “Hey Siri” if it’s enabled
- Say “Turn on Voice Control”, and Siri will toggle it from Settings, Accessibility, Voice Control
- When the lock screen passcode field appears, say “Show numbers” to overlay a number on each digit
- Speak each digit of your passcode in order, for example “tap one, tap two, tap three, tap four, tap five, tap six”
- After unlock, say “Turn off Voice Control” to return to normal
If Voice Control isn’t yet enabled, the older Siri plus VoiceOver workaround still helps. Ask Siri to turn on VoiceOver, swipe across the passcode keypad with one finger to hear each digit, then double-tap to enter it. VoiceOver works back to iOS 11. If Siri itself is also off, you’re stuck on this method, since enabling Siri requires reaching Settings.
Two real constraints: Siri must’ve been enabled before the screen broke, because you can’t reach Settings to enable it now, and the microphone has to be clear. A cracked back glass or a wet Lightning port can mute audio, which makes Siri’s confirmations hard to hear.
#Method 2: USB Keyboard via Lightning or USB-C Adapter
If touch is fully dead and Siri can’t hear you, a wired USB keyboard through a Lightning or USB-C adapter is the most reliable route.
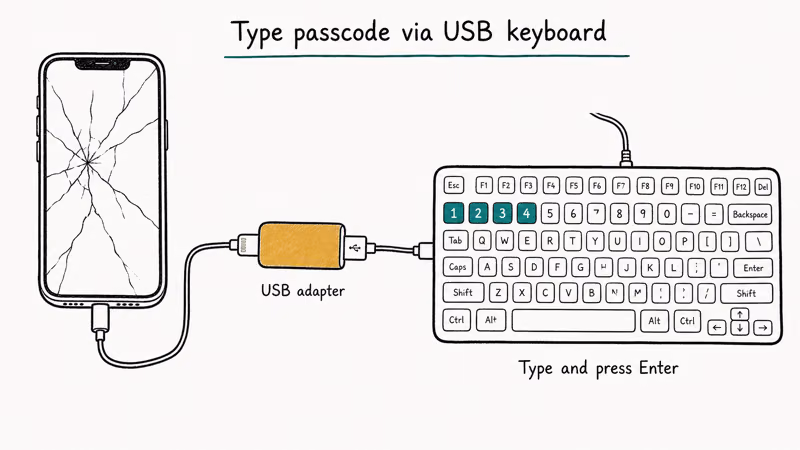
On an iPhone with a shattered digitizer, a basic wired Apple Magic Keyboard plugged through the Lightning to USB 3 Camera Adapter can let you type the passcode and unlock the device:
- Plug the Lightning to USB 3 Camera Adapter or USB-C cable into the iPhone, then attach your USB keyboard
- Press the space bar twice to bring up the passcode entry field
- Type the six-digit or alphanumeric passcode and press Return
- If iOS prompts to trust the accessory and you can’t tap Trust, plug in a power adapter to the Lightning to USB 3 adapter’s pass-through port, since trust prompts on adapters with power often clear themselves
A few notes. Wireless Bluetooth keyboards don’t help on a locked iPhone, because pairing requires touch confirmation. Apple’s accessibility documentation confirms that USB keyboards are recognized as input devices on iOS 11.4 and later. The same docs note that iOS 11.4.1 added a Trust accessory prompt for unknown USB devices, which can require screen interaction on newer firmware.
#See the Cracked Screen on a TV While You Type
If the digitizer is dead but the display still lights up, a Lightning-to-HDMI adapter mirrors that lock screen onto any TV so you can watch the passcode field while the USB keyboard from Method 2 does the typing. This older-iPhone part also feeds Recovery Mode to a big screen when the cable icon is hard to read. It mirrors the display, so pair it with the keyboard or recovery steps above.
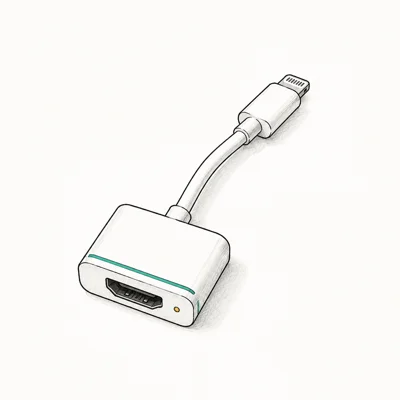
- First-party part, works when third-party HDMI cables fail
- Charge-through port keeps the phone powered while mirroring
- No Wi-Fi or app needed
Last updated on Jun 13, 2026
As an Amazon Associate fone.tips earns from qualifying purchases. Prices and availability on Amazon are accurate as of the date above and subject to change.
#Method 3: Back Up Through Finder or iTunes First
This is the step most people skip and later regret. If your computer was previously trusted by the iPhone, you can still create a fresh backup even with a broken screen. That backup is what makes the next two methods safe.
- macOS Catalina or later: open Finder, connect the iPhone with a Lightning or USB-C cable, select the device in the sidebar, then click Back Up Now
- Windows or older macOS: open iTunes, connect the iPhone, select the device icon, then click Back Up Now
- Encrypt the backup so Health, Keychain, Wi-Fi passwords, and saved logins survive the restore
Apple’s Finder backup guide confirms that an encrypted local backup captures Health and Activity data, saved passwords, and Wi-Fi settings that iCloud-only backups skip. If the computer was never trusted, you’ll see a Trust This Computer prompt on the iPhone that you can’t tap. You’ll need the USB keyboard from Method 2 to tap Trust before any backup will start. See also our guide to recovering an iPhone backup password if you encrypted previously and don’t remember the key.
#Method 4: Erase Through iCloud Find Devices
If nothing else has worked and you have a current backup, you can wipe the iPhone remotely from a browser. This removes the passcode but keeps Activation Lock tied to your Apple ID, so the device stays yours.
According to Apple’s Find Devices on iCloud.com guide, the erase happens as soon as the iPhone next connects to a network and finishes within a few minutes for most models. Steps:
- Go to iCloud.com/find on any browser and sign in with your Apple ID
- Select All Devices, choose your iPhone, then click Erase iPhone
- Wait for the status to change to Erased, then set the iPhone up fresh and restore from your Finder, iTunes, or iCloud backup
Two requirements catch people. Find My iPhone has to have been turned on before the screen broke, and the device has to come online, either on a known Wi-Fi network or with active cellular service. You’ll also need your Apple ID password to reactivate the device after erase, so don’t start this process if you can’t remember it.
#Method 5: Finder or iTunes Recovery Mode Restore
A Recovery Mode restore is the nuclear option, since it wipes the iPhone and reinstalls iOS, but it works even when the device has never been online and Find My is off. Connect the iPhone to a computer with a cable that you know carries data, then enter Recovery Mode:
- iPhone 8 and later: press and release Volume Up, press and release Volume Down, then press and hold the Side button until the Recovery Mode screen with the cable icon appears
- iPhone 7: hold Side plus Volume Down until the Recovery Mode screen appears
- iPhone 6s and earlier: hold Home plus the Top or Side button until the Recovery Mode screen appears
Finder or iTunes will offer Update or Restore. Pick Restore, confirm, then let the firmware download and install. The process usually takes 15 to 45 minutes depending on the iOS version size and your bandwidth.
If the screen damage prevents you from seeing the cable icon, software like Tenorshare 4uKey walks the steps with audio cues and a visual progress bar on your computer, which helps when you can’t see the iPhone display at all. For deeper recovery scenarios, see iPhone won’t restore in Recovery Mode.
Some links on this page are affiliate links, which means fone.tips may earn a commission at no extra cost to you.
After restore, set up the device, sign in with your Apple ID to clear Activation Lock, then restore from your most recent backup. If you skipped Method 3, anything since your last iCloud backup is gone.
#Method 6: Authorized Apple Screen Repair
If you can’t back up because the computer was never trusted, and your last iCloud backup is months old, the only data-preserving path is a screen repair through Apple or an Apple Authorized Service Provider. Out-of-warranty screen pricing varies by model and Apple quotes an exact estimate first. According to Apple’s AppleCare service fees, the same repair costs a flat $29 with AppleCare+, or $99 for other accidental damage.
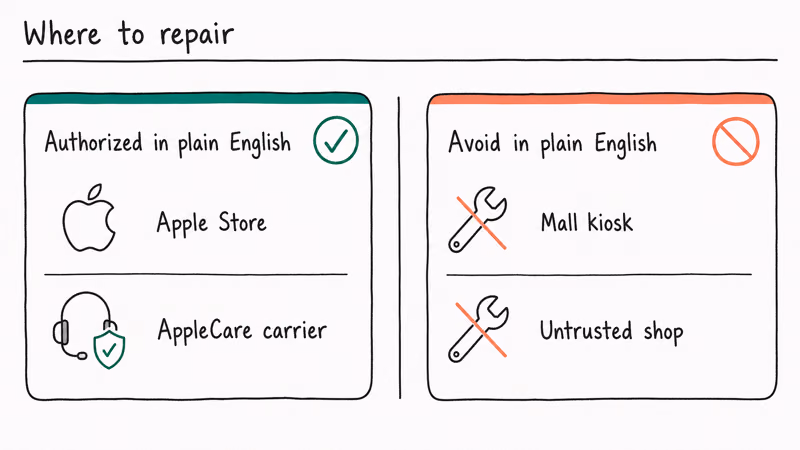
The advantage is simple. Once the digitizer is replaced, you turn on the iPhone, enter your existing passcode, and your data is exactly where you left it. An out-of-warranty screen replacement at an Apple Store is often a same-visit repair when the part is in stock, and it leaves the device working with zero data loss.
Bring your Apple ID password to check-in, since Find My may need to be off for some repairs. Apple’s repair policy also requires the original owner to remove Activation Lock first.
#How Do I Avoid This Whole Mess Next Time?
Recovery on a broken screen is always slower and more expensive than prevention. A few habits keep future you out of this guide.
- Set up iCloud Backup or weekly Finder backups so a forced erase is a 30-minute restore instead of a 30-day data loss
- Enable Find My iPhone today if it’s not on, so you can both locate and remotely erase if the screen ever dies
- Use a case with raised edges and a tempered glass screen protector, since front-down drops are among the most common causes of unresponsive digitizers
- Add AppleCare Plus within 60 days of purchase, especially for Pro models where the $29 screen replacement fee saves hundreds compared to out-of-warranty pricing
- Use Face ID or Touch ID, because biometrics keep working even when the touch layer is partially damaged, as long as the sensor itself is intact
#Bottom Line
For your own iPhone with a broken or unresponsive screen, work this exact order. Force restart first to rule out a software glitch. If touch is still dead, ask Siri to turn on Voice Control and speak your passcode. If Siri can’t hear you or Voice Control isn’t on your iOS version, plug in a USB keyboard through a Lightning or USB-C Camera Adapter and type the passcode.
Before any destructive step, back up through Finder or iTunes if your computer was previously trusted. Only then move to iCloud erase or Recovery Mode restore. If your data matters and your backup is stale, book an authorized Apple screen repair and pay the model-specific out-of-warranty fee to keep everything intact. Skip every “screen unlock” service that asks for your Apple ID password up front; legitimate help never works that way.
Related guides for adjacent lockout scenarios:
- Inherited or second-hand device still tied to a prior Apple ID: how to remove Find My iPhone Activation Lock without the previous owner.
- iPhone stuck after a failed restore, pairs with Method 5 above: Recovery Mode after a failed restore.
- Touch issues that look hardware-related but are actually software glitches: iPhone touch screen not working covers the diagnostic path.
#Frequently Asked Questions
Can I unlock my own iPhone with a broken screen without losing data?
Yes, in three cases: Voice Control or VoiceOver lets you speak the passcode, a USB keyboard via a Lightning or USB-C Camera Adapter types it directly, or an authorized Apple screen repair restores touch with your data intact. The other methods all wipe the device.
Will Apple unlock my iPhone if the screen is broken and I forgot the passcode?
No. Apple does not bypass passcodes under any circumstance, even at an Apple Store. According to Apple’s iCloud and device security documentation, the passcode is part of the encryption key, so the device must be erased to remove it. Apple staff can only help you erase through Find Devices or Recovery Mode, both of which delete data.
Can someone else unlock an iPhone they found or bought used?
No, and they shouldn’t try. iOS encryption plus Find My Activation Lock make the device useless to anyone without the original Apple ID password. In the United States, attempting unauthorized access to a device you don’t own can violate the Computer Fraud and Abuse Act. If you bought a used iPhone that’s still locked to a previous Apple ID, return it to the seller for a refund.
Does erasing through iCloud Find Devices remove Activation Lock?
No. Erase wipes the data and removes the passcode, but the iPhone stays Activation Locked to the Apple ID it was last signed into. You need the Apple ID password to set up the device after erase. This is by design, so a thief can’t wipe and resell a stolen iPhone.
How long does an Apple Store screen repair usually take?
Most same-day repairs at an Apple Store finish in 60 to 120 minutes if the part is in stock. Mail-in repair through Apple takes 5 to 7 business days door to door. AppleCare Plus express replacement can ship a swap device overnight in many regions, which is the fastest option if you can’t be without your iPhone for a day.
Is third-party iPhone unlock software safe?
Reputable paid tools that walk you through Recovery Mode and Apple’s own restore process are safe, because they use the same DFU and Recovery Mode interfaces that Finder and iTunes use. Free unlock tools that promise to keep your data and skip the passcode without a backup are scams, since iOS encryption makes that mathematically impossible without your passcode or biometric. Avoid any service that asks for your Apple ID password before any work has started.
Can I replace the iPhone screen myself to keep my data?
Apple now offers a Self Service Repair program for some models that ships you the part and the rental tools. For a non-pro user it’s rarely worth it. The repair takes several hours, requires waterproofing reapplication, and a mistake can damage the digitizer cable that disables Face ID permanently. For most people, an Apple Store or Apple Authorized Service Provider repair is faster, cheaper after factoring in your time, and warrantied.

iPhone 17 Cellular Data Not Working on iOS 26? 9 Fixes
iPhone 17 cellular data still dropping on iOS 26? Apple fixed the launch bug in iOS 26.0.1, but recovery failures persist. Here's the fix ladder.

iPhone Cellular Data Not Working Abroad? eSIM Fixes
Travel eSIM showing no data abroad? Fix iPhone roaming with the data-line check, Data Roaming toggle, APN settings, and network selection steps.

iPhone Cellular Data Not Working for Some Apps? 8 Fixes
Some iPhone apps refuse to load on cellular while others work fine. Check the per-app cellular toggle, Low Data Mode, VPN profiles, and Screen Time.

iPhone Stuck on EDGE? How to Get 5G or LTE Back (2026)
iPhone stuck on EDGE with crawling data? Here's why the E icon appears, which settings force 5G or LTE back, and when the problem is your carrier.