iPhone Stuck on Restore Screen? 6 Methods That Work
iPhone stuck on the restore screen? Force restart, recovery mode, and DFU steps that work for iPhone 6s through iPhone 16, with a clear escalation order.

Quick AnswerIf your iPhone froze mid-restore on the cable-and-laptop screen, force restart first: press Volume Up, press Volume Down, then hold the Side button until the Apple logo appears. If the screen returns, plug into a computer running the latest Finder or Apple Devices app and choose Update before Restore so your data has a chance of surviving.
An iPhone stuck on the restore screen usually means iOS aborted partway through an update and can’t finish booting. This six-step ladder starts with the least destructive fixes and escalates only when needed. Methods cover iPhone 6s through iPhone 16, both iTunes and the new Apple Devices app on Windows.
- Force restart can clear the cable-and-laptop screen without erasing data.
- Pick Update before Restore in Finder or the Apple Devices app, only Update preserves your photos, messages, and apps.
- Recovery mode and DFU mode are different: recovery still talks to iOS, DFU bypasses iOS entirely and is the last software step.
- Apple’s iOS download for the restore is roughly 7 to 8 GB, so a stable Wi-Fi connection and at least 30 minutes are realistic.
- If the restore loops twice in a row with error 4013 or 9, the cable, port, or logic board is the suspect, not your data.
#What Causes the Restore Screen to Freeze?
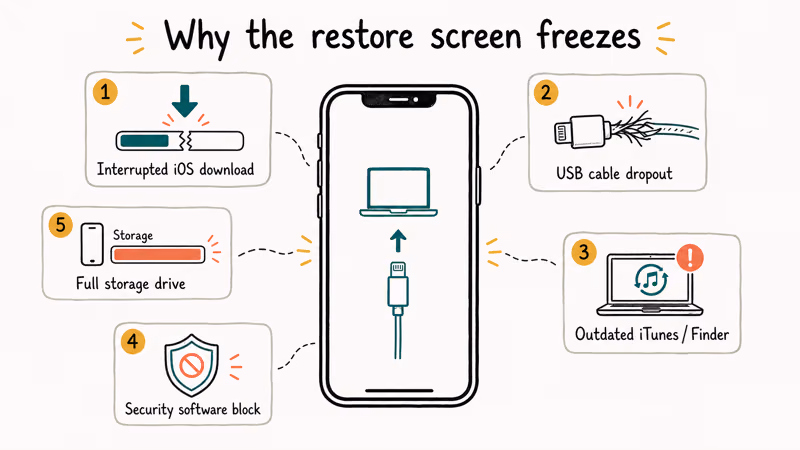
The restore screen is iOS asking a computer for a fresh copy of the operating system. According to Apple’s iTunes and update error guide, the most common triggers are an interrupted iOS download, a USB cable that drops sync mid-transfer, outdated iTunes or Finder versions, and security software on the computer blocking Apple’s update servers. Jailbreak attempts and a full storage drive round out the list.
Start with the non-destructive checks: force restart, a known-good cable, and a direct USB port. If those fail, move to computer-based Update before considering any erase-and-restore path.
A second thing worth knowing: the cable-and-laptop graphic and the spinning Apple-logo screen are not the same state. The cable graphic means the phone is in recovery mode and waiting for a computer. A frozen Apple logo with no progress bar usually means the boot sequence stalled. The fixes overlap, but if you see a progress bar that has not moved in 20 minutes, that is closer to an iPhone stuck on the loading screen than a true restore freeze.
#Method 1: Force Restart Before Anything Else
A force restart is quick, leaves your data alone, and can clear a temporary restore-screen hang. Do this before plugging into a computer.
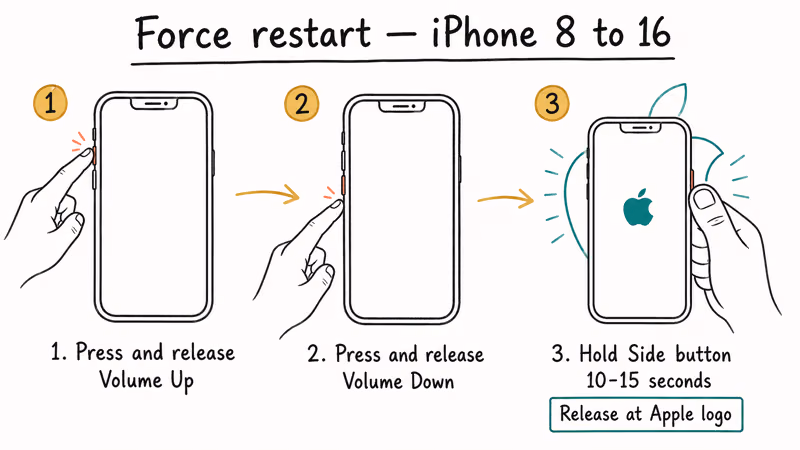
iPhone 8 through iPhone 16 (including SE 2nd and 3rd gen):
- Press and quickly release Volume Up.
- Press and quickly release Volume Down.
- Press and hold the Side button. Keep holding past the slider, past the black screen, and only let go when the Apple logo appears.
iPhone 7 and 7 Plus:
- Press and hold the Side button and Volume Down together.
- Release both when the Apple logo appears.
iPhone 6s, SE 1st gen, and earlier:
- Press and hold the Home button and the Side or Top button together.
- Release both at the Apple logo.
The Side button hold runs about 10 to 15 seconds. If you let go too early, the phone returns to the restore screen. According to Apple’s force restart guide for iPhone, this hard reboot does not erase data, it only interrupts whatever software state is hanging.
If the restore screen comes back quickly after booting, the iOS install is likely still broken and you need Method 2.
#Method 2: Update Through Finder, iTunes, or the Apple Devices App
If a force restart does not stick, the phone needs a fresh copy of iOS from a computer. Pick Update first, only fall back to Restore if Update fails.
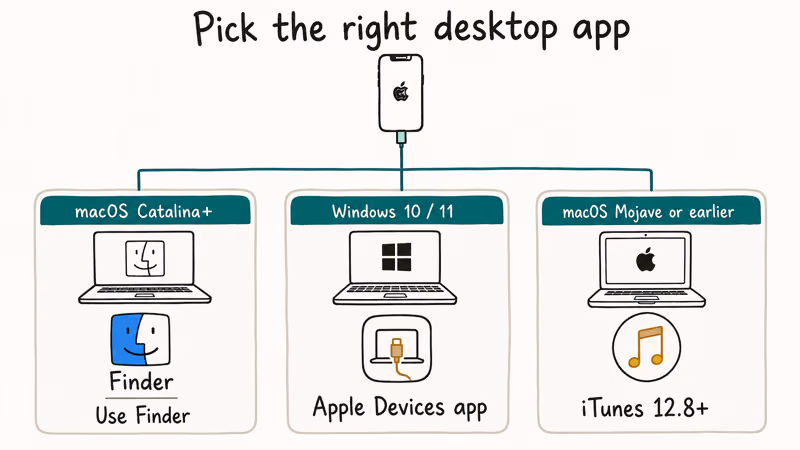
- macOS Catalina and later: Use Finder. Plug the iPhone in, click it in the sidebar.
- Windows 10 and 11: Use the Apple Devices app from the Microsoft Store (Apple’s replacement for iTunes on Windows 11) or iTunes 12.13+ on Windows 10.
- macOS Mojave and earlier: Use iTunes 12.8 or later.
Steps once the phone is detected:
- Plug the iPhone into the computer with an Apple-certified Lightning or USB-C cable. The cable that came in the box is the safest first choice, because some third-party cables charge but don’t pass data reliably.
- The computer shows a dialog: “There is a problem with the iPhone that requires it to be updated or restored.”
- Click Update, not Restore. Update reinstalls iOS while keeping your data.
- Wait. The download alone runs 7 to 8 GB and typically takes 10 to 30 minutes on home Wi-Fi.
Update has a 15-minute window. If iOS does not finish downloading inside that window, the phone exits restore mode and you start over. Faster fiber connections can shorten the download stage noticeably.
If Update fails twice, move to Restore in the same dialog. Check your last iCloud backup date first. The same order applies if you also see an iPhone stuck on the iTunes logo prompt.
#Why Does Recovery Mode Fail Where iTunes Does Not?
Recovery mode and the basic restore screen look similar but differ in one respect: in recovery mode you trigger the screen yourself, which forces iOS to listen for a computer connection from a known good state. Use this when the phone keeps dropping out of restore mode mid-download.
To enter recovery mode manually:
- Plug the iPhone into your computer first.
- Open Finder, the Apple Devices app, or iTunes.
- Trigger the same button sequence as Method 1’s force restart, but keep holding the Side button (or Home + Side on older models) past the Apple logo until you see the cable graphic.
- The computer will pop a fresh dialog. Choose Update.
According to Apple’s iPhone recovery mode documentation, recovery mode supports both Update and Restore, and the same data-preservation rule holds: Update first, Restore only if the first attempt fails or errors out.
If you keep getting kicked out of recovery mode, the cable is usually to blame. Swap to a different Apple-certified cable, plug directly into the computer (not a hub), and try a different USB port. If errors persist, iPhone won’t restore in recovery mode covers the deeper cable, port, and driver troubleshooting.
#Method 4: DFU Mode for Stubborn Cases
DFU (Device Firmware Update) mode bypasses the iOS bootloader entirely and lets the computer write firmware to the phone at a lower level. It’s the last software-only step, and it always erases data. Use it when:
- Recovery mode keeps failing.
- The phone shows error 4013, 9, or 14 repeatedly.
- The screen stays black with no Apple logo at all.
Entering DFU mode is timing-sensitive. The button sequence is the same as recovery mode, but you release the Side button at a precise moment so the screen stays completely black. The Apple Wiki’s DFU mode guide has model-by-model timing, including the exact second counts for iPhone 8 through iPhone 16.
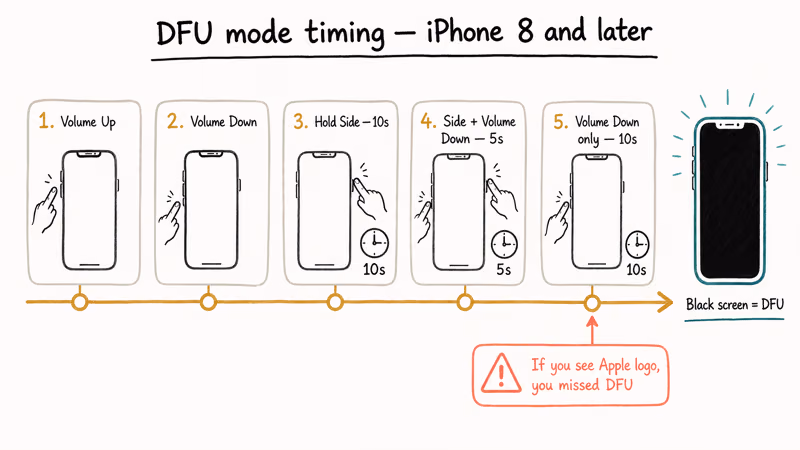
The general flow on iPhone 8 and later:
- Plug the iPhone into the computer.
- Press and release Volume Up, press and release Volume Down.
- Hold the Side button for 10 seconds until the screen goes black.
- Keep holding Side and add Volume Down for 5 more seconds.
- Release Side, keep holding Volume Down for another 10 seconds.
If you see an Apple logo at any point, you missed DFU and need to start over. A successful DFU has a black screen plus a Finder or iTunes dialog announcing “iTunes has detected an iPhone in recovery mode.” Click Restore from there. Expect the full restore to take 30 to 45 minutes.
DFU restore is powerful, but it has limits: if your battery is below 20 percent or the phone has water damage, DFU can leave you in a worse state. Charge to at least 50 percent first.
#Method 5: When Third-Party Repair Tools Save Time
For people who don’t want to deal with cables, error codes, and 30-minute downloads, a one-click iOS repair tool can be faster, and several preserve user data through the standard repair mode.
Common paid iOS repair options include:
- Tenorshare ReiBoot, a polished option with a Standard Repair mode that aims to preserve data.
- Dr.Fone System Repair, which offers guided iOS repair flows and clear progress screens.
- iToolab FixGo, a lower-cost option for simpler recovery-mode and boot-loop cases.
Some links on this page are affiliate links, which means fone.tips may earn a commission at no extra cost to you.
These tools cost roughly $30 to $60 for a one-month license, which is fair compared to a Genius Bar appointment that may not be available locally for a week. They’re not magic. If the underlying issue is hardware, no software tool will save the phone.
If the phone keeps cycling back to the restore screen after every method including paid tools, the issue is more likely a stuck-on-Apple-logo failure caused by failing storage or battery rather than a software corruption a tool can patch.
#Method 6: When the Hardware Is the Real Problem
Software fixes only work on software problems. Signs the issue has crossed into hardware:
- Two consecutive restore attempts both fail with error 4013, 9, 14, or 4014.
- Phone gets noticeably warm during the restore and shuts off.
- Visible damage: dropped recently, cracked back, water exposure, swelling battery.
- Lightning or USB-C port has lint, debris, or bent pins.
Apple Support reports that error 4013 and 9 in particular are usually cable, USB controller, or logic-board faults rather than software bugs. Their iTunes error code reference confirms that swapping the cable, USB port, and computer is the recommended first triage before booking a repair.
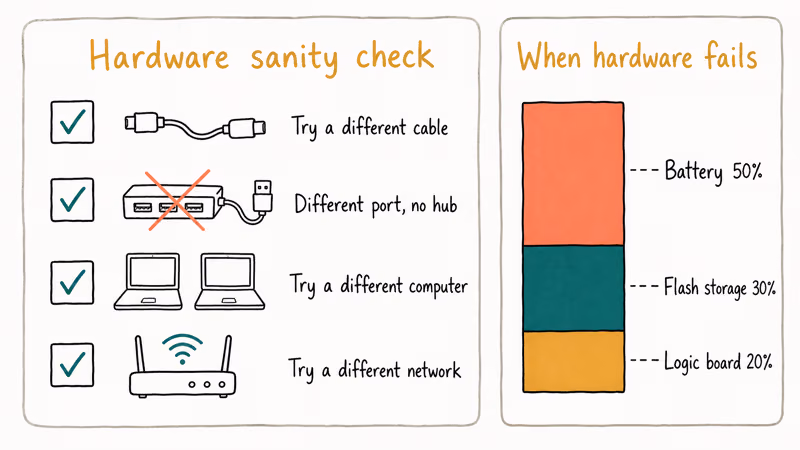
Before you book, run this short hardware sanity check:
- Try a different cable, ideally a brand-new Apple-certified one.
- Try a different USB port directly on the computer, no hubs, no extension cables.
- Try a different computer entirely if you have access to one.
- Try restoring on a different network. Some corporate firewalls block Apple’s update CDN.
If the same error appears on three different cable + port + computer combinations, your phone’s hardware is the constant. Book Apple Support, an Apple Authorized Service Provider, or a trusted local repair shop.
#Bottom Line
Force restart first, since it works on most phones and costs nothing. If the screen returns within seconds, plug into Finder or the Apple Devices app and click Update, not Restore, so your data survives. Drop to recovery mode if Update fails, DFU mode only if recovery fails. Once two attempts fail with the same error code, hardware is now the suspect.
#Frequently Asked Questions
Will a restore erase my photos and messages?
It depends which option you pick. Update reinstalls iOS without touching your data. Restore wipes the phone clean and installs a factory copy of iOS, and DFU restore behaves the same way. Always pick Update first.
How long should the restore take before I worry?
A normal Update takes 15 to 30 minutes. A full Restore or DFU Restore runs 30 to 45 minutes. If nothing moves for over an hour, force restart and start again.
Do I need an original Apple cable?
Yes for restores, ideally. Use the cable that came with the phone, or buy MFi-certified.
What if the phone goes back to the restore screen right after I force restart?
That’s iOS hitting the same corrupted file and panicking. Plug into a computer and run Update. If the screen returns after a successful Update, the storage chip is the suspect.
Are paid iOS repair tools safe to use?
The well-known ones are. Tenorshare, iToolab, and Wondershare are signed binaries that use Apple’s own restore protocols under the hood. They can’t work miracles a hardware tech couldn’t pull off, and they share the same data-erasure risk as Restore once Standard mode fails. For one-time DIY fixes, try Apple’s free path twice before paying.
What does error 4013 actually mean?
Error 4013 is iTunes telling the computer that the cable connection between phone and computer dropped during the restore handshake. Apple’s iTunes error reference states that 4013 and the closely related 4014 are usually cable, USB port, or logic-board issues, not software corruption. The fix order is the same: new cable, different port, different computer, then service if all three fail.
Can I downgrade iOS during a restore?
Only to a version Apple still signs, usually the most recent one or two releases. Once Apple stops signing, Finder and iTunes reject the IPSW. Roll back within the first week if you must.
Should I try iCloud restore instead?
Only after the iOS reinstall finishes and the phone reaches the Hello setup screen. iCloud restore loads your data on top of a clean iOS install, so it doesn’t fix the restore-screen lockup itself. Once your phone is on Wi-Fi during setup, choose Restore from iCloud Backup. If the iCloud restore itself stalls, our guide on restoring an iPhone without losing settings covers the workaround order.

iPhone 17 Cellular Data Not Working on iOS 26? 9 Fixes
iPhone 17 cellular data still dropping on iOS 26? Apple fixed the launch bug in iOS 26.0.1, but recovery failures persist. Here's the fix ladder.

iPhone Cellular Data Not Working Abroad? eSIM Fixes
Travel eSIM showing no data abroad? Fix iPhone roaming with the data-line check, Data Roaming toggle, APN settings, and network selection steps.

iPhone Cellular Data Not Working for Some Apps? 8 Fixes
Some iPhone apps refuse to load on cellular while others work fine. Check the per-app cellular toggle, Low Data Mode, VPN profiles, and Screen Time.

iPhone Stuck on EDGE? How to Get 5G or LTE Back (2026)
iPhone stuck on EDGE with crawling data? Here's why the E icon appears, which settings force 5G or LTE back, and when the problem is your carrier.