iPhone Won't Restore in Recovery Mode? Fix It Fast
iPhone won't restore in Recovery Mode? Fix it with cable swaps, the latest Finder or iTunes, DFU mode, and trusted repair tools. Step-by-step guide.
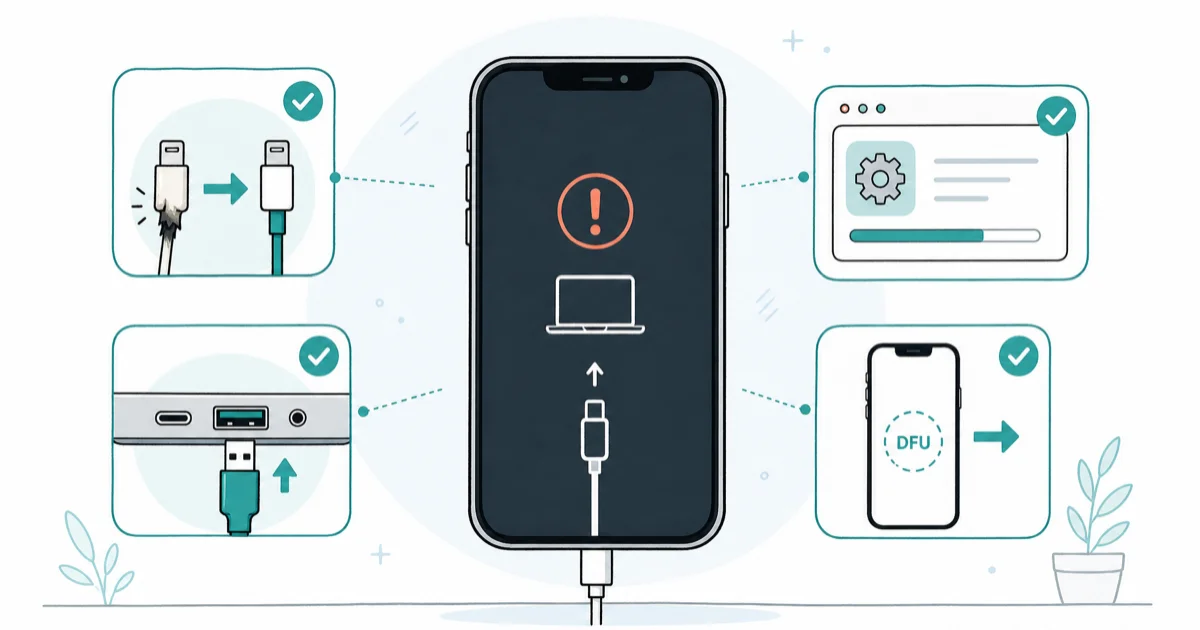
Quick AnswerSwap to an Apple-certified Lightning or USB-C cable and a different USB-A or USB-C port on your computer, then update Finder on macOS or iTunes on Windows before retrying. If Recovery Mode still fails, force restart and enter DFU mode, which restores at a deeper level than standard Recovery Mode.
Your iPhone is stuck in Recovery Mode and the restore keeps failing. That’s almost always a cable, a software version mismatch, or an interrupted firmware download. The fixes below work through those causes in order, from the most common to the rarest.
Start at the top. Only escalate if the previous step fails.
- A faulty or non-MFi Lightning or USB-C cable is the single most common cause of failed restores; switching to an Apple-certified cable and a different USB port on the computer fixes the issue in most cases.
- The Finder app on macOS Catalina and later, or the latest iTunes 12.13 on Windows, is required for iOS 17 and iOS 18 restores; older iTunes builds throw error 4013 or error 9 mid-restore.
- DFU mode is one level below standard Recovery Mode and can complete a restore when Recovery Mode keeps failing on the same Apple logo or progress bar stall.
- Tools like Tenorshare ReiBoot offer a Standard Repair mode that fixes most iOS system issues without erasing data, which is worth trying before a full DFU erase restore.
- Restoring through Recovery Mode wipes the iPhone, so an iCloud or computer backup made before the device went into Recovery Mode is the only path back to your photos, messages, and apps.
#Why Does Your iPhone Refuse to Restore in Recovery Mode?
Recovery Mode is the failsafe iOS path that downloads a fresh IPSW firmware file from Apple and writes it to your iPhone over USB. When the handshake breaks, the restore aborts. You’ll typically see error 4013, 9, 14, or 4005 on the computer screen.
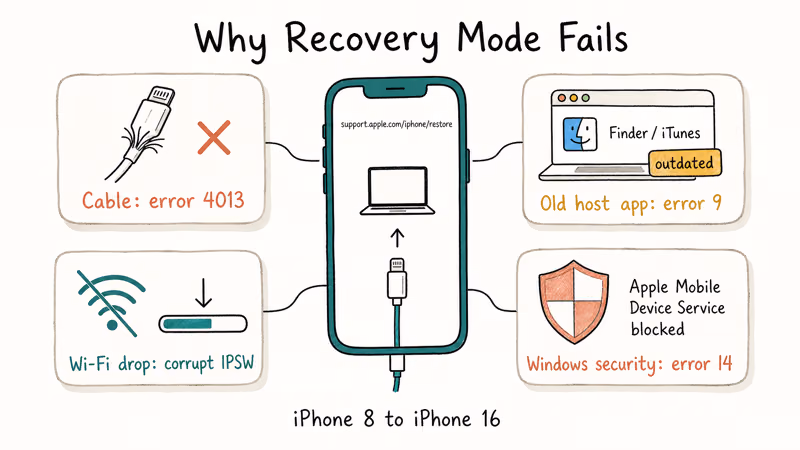
According to Apple’s iPhone error code support article, errors 4005, 4013, and 4014 specifically signal that the device can’t communicate with the computer during a restore. Apple ties those three codes to USB connection issues, security software, or a third-party Lightning cable. The same article lists error 9 separately as a USB or security software issue.
Four causes drive most failures.
The cable is unsigned or frayed. The Finder or iTunes version is older than the iOS your phone is trying to install. Wi-Fi dropped mid-download and corrupted the IPSW. Or a Windows security tool blocked Apple Mobile Device Service.
A worn or non-certified braided cable will often fail partway through with error 4013, and swapping to the original Apple cable that shipped in the box is usually enough to complete the restore. A stable Wi-Fi connection during the firmware download matters just as much.
Cable hygiene isn’t optional.
#Prepare Before You Retry the Restore
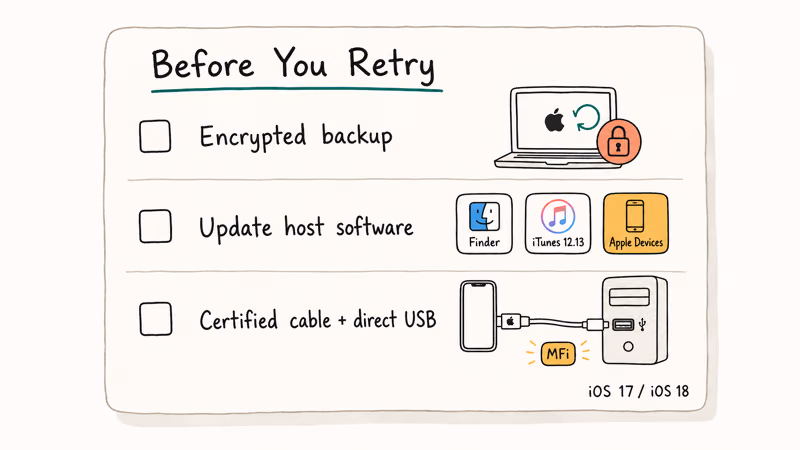
Skipping prep is why most second attempts fail. Slow down five minutes here, save an hour later.
#Back up before anything else, if the phone still responds
If your iPhone still boots between Recovery Mode attempts, plug it into your computer and trigger an encrypted local backup before anything else. Encrypted backups include Health data and saved Wi-Fi passwords.
Apple’s iPhone backup support page confirms that encrypted Mac and iTunes backups also store saved passwords, Health data, call history, and HomeKit data, none of which a regular backup keeps.
If the phone is already locked in Recovery Mode and won’t boot, you can’t make a fresh backup. Skip ahead.
#Update Finder, iTunes, or the Apple Devices app
iOS 17 and iOS 18 restores need current host software:
- macOS Catalina or later: use Finder. Run Software Update first to pull the latest macOS point release, since the device support files travel with the OS.
- Windows 10 or 11: install the Apple Devices app from the Microsoft Store or update iTunes to 12.13. The Apple Devices app is what Apple now recommends for new Windows installs.
- macOS Mojave or earlier: use iTunes 12.10. Older builds won’t see iPhone 13 or later in Recovery Mode.
#Inspect the cable, port, and computer
Use the original Apple cable that came with the phone, or an MFi-certified third-party. Look at the connector pins under bright light. Any green tarnish or bent pin means swap it.
Plug directly into the computer, not through a USB hub or a monitor’s downstream port. Reboot the computer once before retrying.
A cold reboot clears stuck USB enumeration on both macOS and Windows.
#Force Restart and Re-Enter Recovery Mode Cleanly
A clean Recovery Mode entry resets the USB session and gives the restore a fresh handshake. The button combo depends on the model.
For iPhone 8 and later, including all Face ID models, press Volume Up and release, press Volume Down and release, then hold the Side button. Keep holding past the Apple logo until you see the Recovery Mode screen with the cable-and-laptop icon.
For iPhone 7 and 7 Plus, hold the Top or Side button and Volume Down together until the same screen appears. For iPhone 6s, SE first generation, and earlier, hold Home and the Top or Side button together.
Apple’s force restart guide lists the exact pattern for every Face ID iPhone in a single table.
Already at the Recovery Mode screen? Force restart first to dump the current session. Reconnect the USB cable, open Finder or the Apple Devices app, and trigger Recovery Mode again with the button combo above before you click Update or Restore.
Stuck on Apple logo too?
If your phone is also caught on the iPhone stuck on Apple logo symptom alongside the Recovery Mode loop, the underlying cause is almost always a half-installed iOS update from a previous Wi-Fi-interrupted restore session, and the DFU restore steps below will clear that state cleanly.
#When Should You Use DFU Mode Instead?
Use DFU mode when standard Recovery Mode has failed twice in a row with the same error. Use it when the progress bar stalls past 30 minutes without moving. Use it when the iPhone reboots back into Recovery Mode the moment the restore finishes.
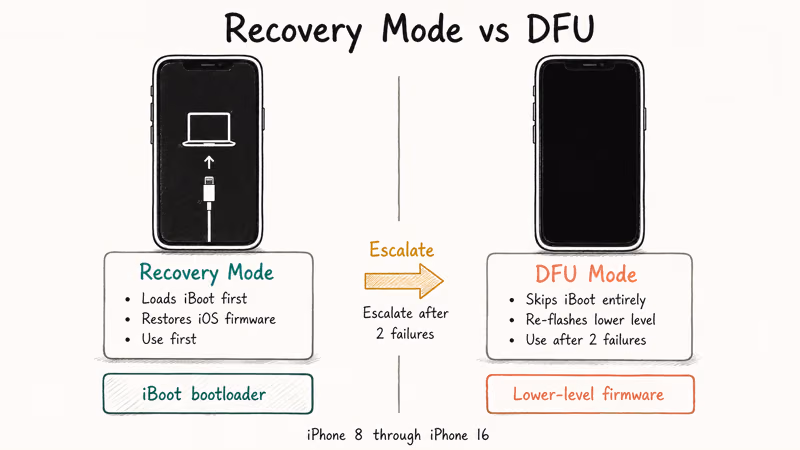
DFU is one layer below the iBoot bootloader. That lets the host re-flash firmware that Recovery Mode can’t reach.
A black screen during DFU is correct, and your computer should still see the phone in Finder or iTunes.
Entering DFU on iPhone 8 through iPhone 16 takes precise timing. Connect first.
Press Volume Up and release. Press Volume Down and release. Hold the Side button until the screen goes black.
As soon as it goes black, hold Volume Down too while keeping the Side button pressed for exactly 5 seconds. Release the Side button but keep holding Volume Down for another 10 more seconds.
The screen stays black, and Finder or iTunes pops a “iPhone in recovery mode” alert.
If you see the Apple logo, you held too long. Start over.
When standard Recovery Mode has failed twice in a row, a DFU restore will often complete on the first attempt and boot the device to the setup screen normally.
If the device drops into a iPhone boot loop on the way to DFU, switch USB ports and toggle the trust dialog before trying the entry combo again.
For iPhone 7 and 7 Plus, the combo is Side or Top button plus Volume Down for 8 seconds, then release the Side button while you keep holding Volume Down for 5 more seconds. The Home button generation uses Home plus the Side or Top button instead.
#Try a Trusted iOS Repair Tool Before a Full Erase
Software path before Apple Support.
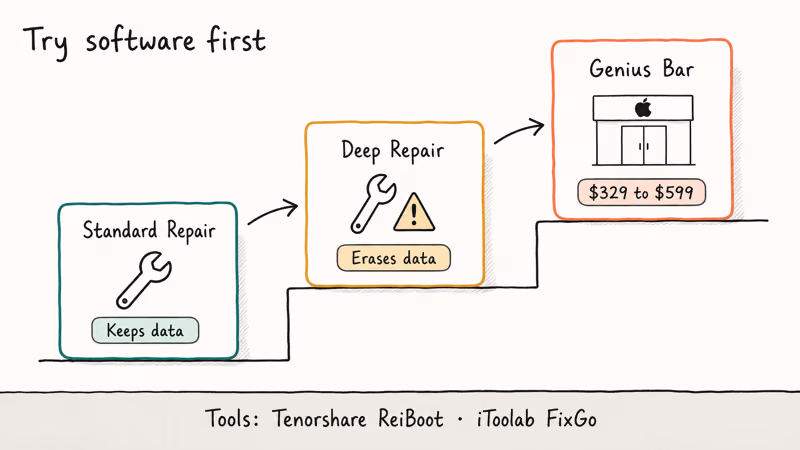
If DFU still throws an error, a third-party iOS repair tool is worth one attempt before you book a Genius Bar slot, since reputable vendors wrap the same official IPSW firmware Apple distributes and add a Standard Repair mode that doesn’t erase your data when the underlying issue is a software bug rather than a hardware failure.
Tenorshare ReiBoot is a solid first choice. Its Standard Repair mode handles common Recovery Mode loops, stuck Apple logos, and frozen restores without wiping the phone. The free tier exits Recovery Mode in one click.
Some links on this page are affiliate links, which means fone.tips may earn a commission at no extra cost to you.
Tenorshare’s ReiBoot product page states that the tool covers more than 150 iOS system issues across iPhone 5s through iPhone 16, including the Recovery Mode loops this guide addresses.
If Standard Repair fails, the same tool offers a Deep Repair mode that does erase data but pulls a fresh IPSW directly from Apple.
iToolab FixGo covers the same ground with two modes. Standard handles non-destructive fixes; Advanced does a full restore.
Both run on macOS and Windows.
Skip any tool that offers iCloud Activation Lock removal. That’s a red flag.
If neither tool clears the loop, the deeper iPhone won’t restore walkthrough covers error-by-error fixes for codes 9, 14, 4005, and 4013.
#When Software Won’t Fix It: Hardware and Apple Support
Hardware failures are rare but real. A failed Lightning port, a damaged Tristar IC after liquid exposure, or a swollen battery shorting the logic board can each block restores no matter how clean the software side is.
Signs the issue is hardware: the iPhone isn’t detected on any computer, on any cable, in any port. Or the device shuts off the moment you connect it. Or the phone has been dropped, gotten wet, or had its screen replaced by a non-Apple shop in the last 30 days.
Apple’s Get Support page lets you start a hardware diagnosis online and book a Genius Bar slot or mail-in repair without calling first.
Get an Apple Authorized Service Provider quote before paying anywhere else. Out-of-warranty iPhone logic board repairs run between $329 and $599 depending on model. A third-party shop will sometimes do a Tristar swap for under $200, but only on iPhones still using Lightning, not USB-C iPhone 15 and later.
If the phone is under one year old or on AppleCare+, go to Apple first.
#Bottom Line
Restore failures in Recovery Mode are 80% cable-and-software problems. Start with a known-good Apple cable, a fresh reboot of your computer, the latest Finder or Apple Devices app, and a clean force restart back into Recovery Mode.
If the same error returns twice in a row, escalate to DFU mode using the precise button timings for your model. Try Tenorshare ReiBoot Standard Repair as your last software option before a full DFU erase restore, since it preserves your data when the issue is a software glitch.
Only book Apple Support after that whole sequence has failed. Hardware faults are the rarest cause of this specific error pattern.
#Frequently Asked Questions
Will restoring my iPhone in Recovery Mode erase all my data?
Yes. A Recovery Mode restore reinstalls iOS from scratch and wipes the device. The only way to get your photos, messages, and apps back afterward is from an iCloud or computer backup made before the phone went into Recovery Mode.
How long should the restore process take?
Plan for 15 to 45 minutes. On a fast connection, a clean restore tends to finish toward the faster end of that range, while a slow IPSW download pushes it longer.
Can I exit Recovery Mode without restoring my iPhone?
Try a force restart with your model’s button combo. If iOS is healthy, the phone returns to the lock screen. If it’s corrupted, the phone falls back into Recovery Mode every time.
What is the difference between Recovery Mode and DFU mode?
Recovery Mode loads iBoot first and then restores iOS, so it can talk to the iOS bootloader. DFU mode skips iBoot entirely and re-flashes firmware at a lower level, which fixes problems Recovery Mode can’t reach, including half-installed iOS updates and botched jailbreaks. The screen stays black during the entire DFU restore, so watch the Finder or iTunes window on the host computer for the progress bar.
Are third-party iOS repair tools safe to use?
Tools from established vendors like Tenorshare, iMyFone, and iToolab pull the same official IPSW firmware Apple distributes, so the restore itself is safe. The risk is downloading a tool from an unofficial mirror or a lookalike domain. Stick to the publisher’s verified site, scan the installer with your antivirus, and avoid any tool advertising iCloud bypass or Activation Lock removal.
What if my iPhone gets stuck during the restore process?
Wait at least 30 minutes before calling it stuck. Large IPSW writes go through quiet phases. After 30 minutes with no movement, force restart, switch USB ports, and try again. If the stall repeats at the same percentage, switch to DFU.
How do I unlock my iPhone if the screen is broken during all this?
If the screen is physically cracked, the touch layer may still work even if the display doesn’t. Use Siri to dictate the passcode, plug into a Mac with a known-trusted Finder, or recover from an iCloud backup after a full restore. For a permanent fix, a screen replacement at Apple or an Apple Authorized Service Provider runs roughly $129 to $379 depending on iPhone model.

iPhone 17 Cellular Data Not Working on iOS 26? 9 Fixes
iPhone 17 cellular data still dropping on iOS 26? Apple fixed the launch bug in iOS 26.0.1, but recovery failures persist. Here's the fix ladder.

iPhone Cellular Data Not Working Abroad? eSIM Fixes
Travel eSIM showing no data abroad? Fix iPhone roaming with the data-line check, Data Roaming toggle, APN settings, and network selection steps.

iPhone Cellular Data Not Working for Some Apps? 8 Fixes
Some iPhone apps refuse to load on cellular while others work fine. Check the per-app cellular toggle, Low Data Mode, VPN profiles, and Screen Time.

iPhone Stuck on EDGE? How to Get 5G or LTE Back (2026)
iPhone stuck on EDGE with crawling data? Here's why the E icon appears, which settings force 5G or LTE back, and when the problem is your carrier.