iPhone Is Disabled: How to Unlock and Prevent It in 2026
iPhone disabled after wrong passcodes? Unlock it with Recovery Mode, iCloud Find My, Finder, or the iOS 15.2+ Erase option. Step-by-step fix.
Quick AnswerConnect the disabled iPhone to a computer, force it into Recovery Mode, and pick Restore in Finder or iTunes to wipe the device, then sign back in to restore your iCloud or computer backup. On iOS 15.2 and later you can also tap Erase iPhone directly on the lock screen if you remember your Apple ID password.
An “iPhone is disabled” message means iOS hit its passcode-attempt limit and locked you out. The fix is always the same shape. Erase the device, then restore from a backup. The steps below cover every supported recovery path on current and older iPhones, so they match what you’ll actually see on screen in 2026.
This guide is for unlocking your own device; bypassing a passcode on a phone you don’t legally own is illegal in most jurisdictions.
- iOS locks the iPhone for 1 minute after the sixth wrong passcode and ramps up to a permanent disable after the tenth attempt, per Apple’s support documentation.
- Recovery Mode plus a Mac or PC restores the device even if it has never synced before, which is why Apple lists it as the default fix.
- iCloud’s Erase iPhone tool only works when Find My was switched on before the lockout and the device can reach a network during the wipe.
- iOS 15.2 and later show an Erase iPhone link directly on the lock screen, so you can reset the phone with cellular or Wi-Fi alone, no computer needed.
- Every unlock path wipes the device, so a recent iCloud or Finder backup decides whether you keep your photos and texts after the reset.
#Why Does an iPhone Get Disabled?
Wrong passcode tries pile up fast. The first five misses go through silently. The sixth attempt locks the phone for 1 minute, the seventh shows a 5-minute timer, the eighth jumps to 15 minutes, and the ninth holds you out for a full hour.

According to Apple’s support article on a forgotten iPhone passcode, the tenth wrong attempt either disables the device entirely or wipes it, depending on whether you’ve turned on Erase Data in Settings > Face ID & Passcode. Apple states that the same 10-attempt cap applies on every model from the iPhone 5s through the iPhone 16, with iOS 17 adding the named “Security Lockout” screen.
The lockout exists because a four-digit passcode has only 10,000 combinations. Without these timers, a thief could brute-force the device in minutes. Past the tenth wrong attempt, the screen flips from “iPhone Unavailable” to “Security Lockout” and the only on-screen action left is Erase iPhone.
A few situations trigger the lockout without any malicious intent:
- A toddler tapping the screen until it gives up.
- A pocket dial that wakes the phone and registers swipes as failed entries.
- A passcode you changed, forgot, or confused with your old one after restoring from a backup.
- A water-damaged or cracked digitizer that misreads taps as wrong digits.
#Which Unlock Method to Try First
Pick a method based on three questions. Do you remember your Apple ID password? Is Find My turned on? Do you have a Mac or PC handy?
The decision tree below skips dead ends so you don’t waste 40 minutes on a path that can’t work for your setup.
| Your situation | Best first move | Time estimate |
|---|---|---|
| iOS 15.2+, you know your Apple ID password | Tap Erase iPhone on the lock screen | 10-20 minutes |
| Find My was on, you remember your Apple ID | Erase from iCloud.com or another Apple device | 15-30 minutes |
| You have a Mac (Catalina+) or a PC with iTunes | Recovery Mode restore via Finder or iTunes | 25-45 minutes |
| iPhone is stuck in a boot loop after a failed restore | DFU Mode restore | 30-60 minutes |
| Nothing else works and you have no backup | Apple Store appointment | Same-day usually |
The on-device Erase iPhone option on iOS 15.2 and later is the fastest path when it appears, because it skips the cable and the desktop software. Apple confirms that this option appears on the lock screen starting with iOS 15.2 once the device shows the Security Lockout screen, and only if Find My was set up first.
Important: every method below permanently erases the iPhone. There is no Apple-supported way to bypass the passcode without wiping the device, and tools that claim otherwise are usually scams.
Restore your backup right after the unlock and most data comes back.
#How to Unlock a Disabled iPhone with Finder or iTunes
This is Apple’s default recommendation when you have access to a computer and the device isn’t synced for the on-device erase. Finder handles iPhones on macOS Catalina (10.15) and later. Windows and macOS Mojave or older still use iTunes.
- Plug the iPhone into the computer with a Lightning or USB-C cable that supports data, not a charge-only cord.
- Open Finder on macOS, or open iTunes on Windows or older macOS, then select the device when it appears in the sidebar.
- Force the iPhone into Recovery Mode using the button combo for your model:
- iPhone 8, X, 11, 12, 13, 14, 15, 16, or later: Press and release Volume Up, press and release Volume Down, then hold the Side button until the Recovery Mode cable icon appears.
- iPhone 7 / 7 Plus: Hold Volume Down and the Side button together until the cable icon appears.
- iPhone 6s, SE (1st gen), or older: Hold Home and the Top/Side button until the cable icon appears.
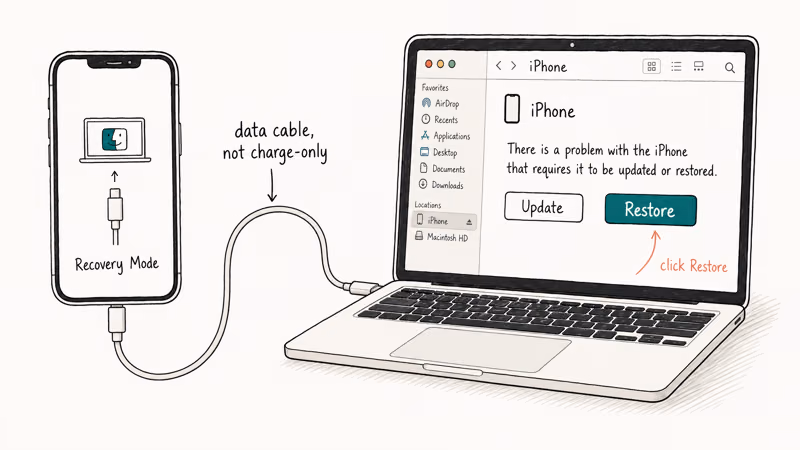
- When the alert reads “There is a problem with the iPhone that requires it to be updated or restored,” click Restore, not Update. Update keeps the passcode in place.
- Wait for the firmware download. The multi-gigabyte download takes several minutes on a fast connection. If it stalls past the 15-minute mark, the phone exits Recovery Mode and you’ll have to redo step 3.
- The iPhone reboots to the Hello setup screen. Sign in with the Apple ID that was last used on the device to clear Activation Lock, then choose Restore from iCloud Backup or Restore from Mac or PC during setup.
If the restore fails partway through, our walkthrough on why an iPhone won’t restore in Recovery Mode covers the cable, port, and firmware fixes that solve most cases.
#How to Erase a Disabled iPhone Through iCloud
Find My makes iCloud a remote wipe button.
Use this when the iPhone is at home and you’re at work, or when no computer is nearby. Apple recommends this method for any device that supports Find My, sits on iOS 8 or later, and shows up online in the device list.
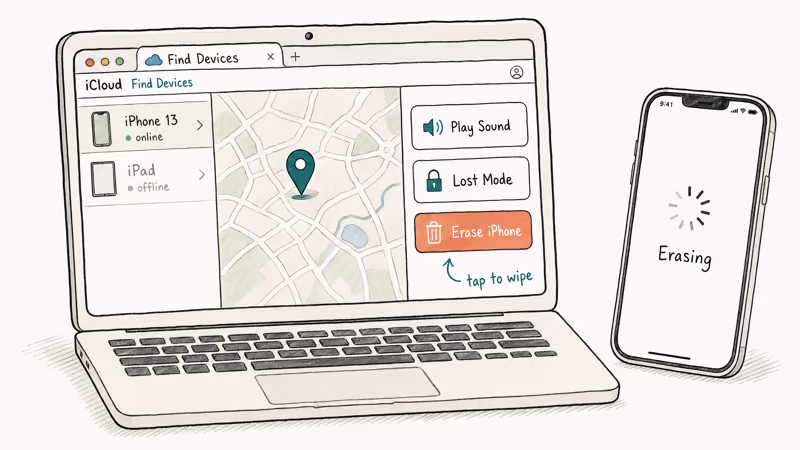
- From any browser, go to iCloud.com/find and sign in with the Apple ID and password used on the disabled iPhone.
- Click All Devices at the top of the map, then pick the iPhone in the list. A green dot means it’s online and reachable.
- Click Erase iPhone, confirm with your Apple ID password, and add the trusted phone number you want shown on the lock screen.
- Wait for the device to come back online. The wipe runs the moment iOS reaches Apple’s servers, so a phone in airplane mode keeps the queue until it reconnects.
- After the iPhone restarts to the Hello screen, sign in with the same Apple ID and pick a backup to restore.
If the iPhone has no data connection at the time, the wipe stays queued until Wi-Fi or cellular comes back, then finishes without further trouble.
If iCloud rejects your password mid-flow, our guide on Apple ID verification failures covers two-factor codes, account suspensions, and stale trusted devices.
#How to Use the iOS 15.2+ Erase iPhone Lock-Screen Option
Apple added an on-device escape hatch starting in iOS 15.2 that handles the lockout without a computer. The option only appears after the iPhone says Security Lockout or iPhone Unavailable, which happens once the cumulative wait time pushes past 15 minutes.
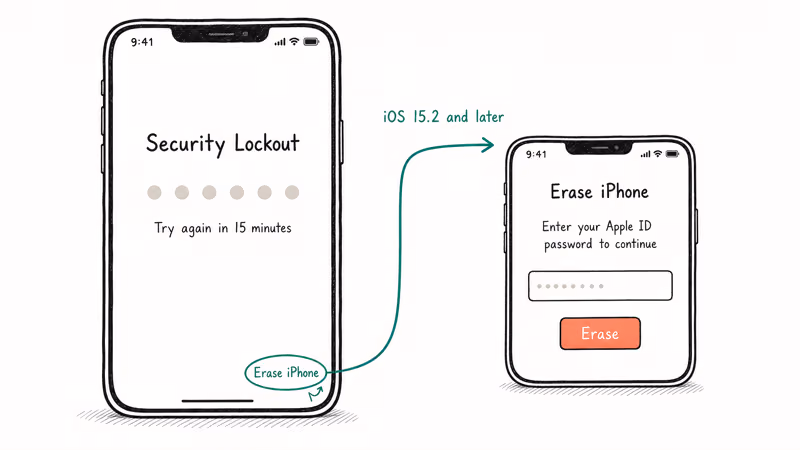
- Wait for the lock screen to show Erase iPhone in the bottom-right corner. If you only see a timer and no Erase link, keep waiting until the lockout escalates.
- Tap Erase iPhone, then Erase iPhone again on the confirmation screen.
- Enter the Apple ID password tied to the device. iOS uses this to clear Activation Lock immediately after the wipe.
- The phone restarts and runs through the standard setup flow. Pick Restore from iCloud Backup when the option appears.
This path needs an active cellular plan or a Wi-Fi network the iPhone has joined before.
With an active SIM or a saved Wi-Fi network, the whole erase finishes quickly, from tap to Hello screen. If you don’t have either connection, the shortcut on how to reset an iPhone without a passcode or computer explains the fallbacks.
#What If the iPhone Won’t Enter Recovery Mode?
Some lockouts also break Recovery Mode access, usually after a failed iOS update or a cracked Lightning port.
The escalation path is DFU (Device Firmware Update) Mode, which talks to the iPhone at a lower level than Recovery Mode and reflashes the firmware from scratch. DFU bypasses the bootloader entirely, so it can recover phones stuck in a Recovery Mode boot loop, phones that show only the Apple logo on power-up, and phones that refuse to enter standard Recovery Mode after a failed update.
- Plug the iPhone into the computer and open Finder or iTunes.
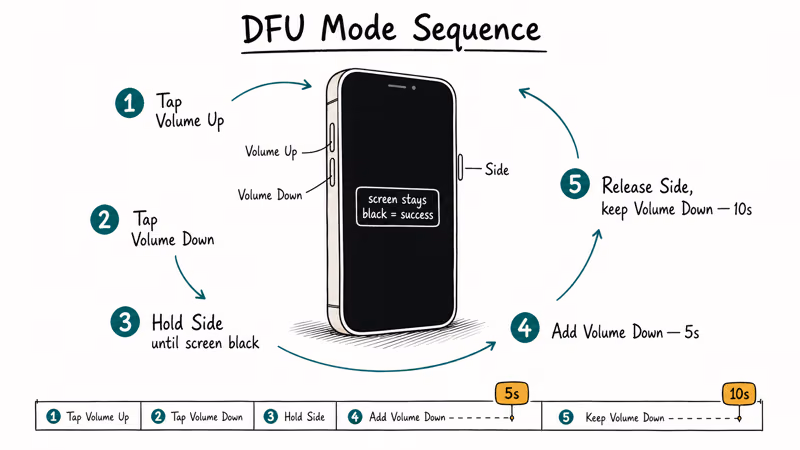
- Press and release Volume Up, press and release Volume Down, then hold the Side button until the screen turns black.
- Keep holding Side, then add Volume Down for 5 seconds. Release Side but keep holding Volume Down for 10 seconds.
- The screen stays black if you did it right. Finder shows an “An iPhone has been detected in recovery mode” alert. Click Restore.
- If the screen flashes the Apple logo or the Recovery cable, you held one button too long. Start over from step 2.
DFU restores can take 40 minutes and need a stable USB-A or USB-C connection because adapters and unpowered hubs cause “Error 4013” mid-flow. If you only need to escape a Recovery Mode loop instead of doing a full DFU, the stuck-in-Recovery-Mode walkthrough is faster.
#When a Third-Party Tool Like Tenorshare 4uKey Makes Sense
Reputable third-party tools are useful when the iPhone refuses to enter Recovery or DFU Mode and Apple Store wait times stretch into days. Tenorshare 4uKey is a solid option to keep on hand because it walks through DFU automatically, downloads the matching firmware, and surfaces clear errors when something fails.
Some links on this page are affiliate links, which means fone.tips may earn a commission at no extra cost to you.
The tool still wipes the device, that part is unavoidable. But it removes the need to memorize button combos under stress.
A few honest caveats worth knowing:
- 4uKey doesn’t bypass Activation Lock on its own. You still need the Apple ID and password the device was registered with.
- The free trial scans the phone and previews the unlock; the actual wipe is paywalled, currently around $35.95 for a one-month license.
- The download is roughly 350 MB and the unlock itself takes 15 to 25 minutes once the firmware lands.
If your problem is an Apple ID lock instead of a passcode lock, our guide on resolving accounts disabled in the App Store and iTunes is the right next step.
#How to Stop the iPhone From Disabling Again
A few habits cut the odds of a repeat lockout to almost zero.
- Set a six-digit numeric passcode, not four. Go to
Settings>Face ID & Passcode>Change Passcode>Passcode Options> 6-Digit Numeric Code. The pool jumps from 10,000 to one million combinations. - Enable Face ID or Touch ID with two faces or fingers. A second registered face stops Face ID from falling back to the passcode every time you wear sunglasses or a hat.
- Turn off Erase Data unless you actually want a wipe after ten attempts. Pocket dials are the leading reason people lose their photos to this setting.
- Add a Recovery Contact and a Recovery Key. Go to
Settings>Apple ID>Sign-In & Security. Apple recommends adding a Recovery Contact so you have a way back into the account even if the device is gone, and notes the contact must be 13 or older and use an Apple device on iOS 15 or later. - Back up nightly. iCloud backs up automatically when the iPhone is locked, charging, and on Wi-Fi. Confirm it works in
Settings>Apple ID> iCloud > iCloud Backup.
If you share an iPhone with kids or a partner, also see our iPhone passcode reset guide for tips on rotating passcodes safely.
#Bottom Line
Start with the on-device Erase iPhone option if you’re on iOS 15.2 or later and remember your Apple ID. It’s the fastest path that doesn’t need a cable. If you’re on an older iOS or the option never appears, plug into a Mac or PC and run a Recovery Mode restore through Finder or iTunes. Keep Tenorshare 4uKey as a backup when the standard buttons stop responding, and back up nightly so the next lockout costs you minutes, not memories.
#Frequently Asked Questions
What does “iPhone is disabled” actually mean?
It means iOS counted enough wrong passcodes to trigger the security lockout. The phone isn’t damaged or hacked. After the tenth wrong attempt the lockout is permanent until you erase the device and set it up again.
Can I unlock a disabled iPhone without losing data?
Not through an Apple-supported route. Every official path wipes the device, which is why a recent backup matters more than the unlock method itself. iCloud backups, Finder backups, and encrypted iTunes backups all restore Photos, Messages, and most app data once the iPhone is set up again.
How long does the unlock take?
Most users finish in 30 to 45 minutes.
Can I unlock a disabled iPhone without a computer or another Apple device?
Yes, if you’re running iOS 15.2 or later, remember the Apple ID password, and the iPhone can reach Wi-Fi or cellular. Tap Erase iPhone on the lock screen after the Security Lockout shows up. Older iOS versions still need a Mac, PC, or another iCloud-enabled device.
Are paid unlock tools safe to use?
Reputable vendors like Tenorshare and iMyFone automate Recovery and DFU rather than jailbreaks or bypasses, which makes them safe in the technical sense. Avoid anything that promises to unlock a disabled iPhone without erasing it.
Does the disable timer reset if I leave the iPhone alone?
No. The counter only resets after a successful passcode entry, so a 24-hour cooldown still leaves you on the same step in the lockout schedule.
What happens if my iPhone is stolen, not just locked?
Use Find My to mark the device as Lost before doing anything else. Lost Mode keeps Activation Lock on so the thief can’t wipe and resell the phone, and it shows your contact number on the screen if someone tries to return it. Then file a police report with the IMEI from your Apple ID device list and contact your carrier to suspend service.

iPhone 17 Cellular Data Not Working on iOS 26? 9 Fixes
iPhone 17 cellular data still dropping on iOS 26? Apple fixed the launch bug in iOS 26.0.1, but recovery failures persist. Here's the fix ladder.

iPhone Cellular Data Not Working Abroad? eSIM Fixes
Travel eSIM showing no data abroad? Fix iPhone roaming with the data-line check, Data Roaming toggle, APN settings, and network selection steps.

iPhone Cellular Data Not Working for Some Apps? 8 Fixes
Some iPhone apps refuse to load on cellular while others work fine. Check the per-app cellular toggle, Low Data Mode, VPN profiles, and Screen Time.

iPhone Stuck on EDGE? How to Get 5G or LTE Back (2026)
iPhone stuck on EDGE with crawling data? Here's why the E icon appears, which settings force 5G or LTE back, and when the problem is your carrier.