How to Fade Audio in Adobe Premiere Pro: 4 Methods (2026)
Fade audio in Premiere Pro with Exponential Fade, keyframes, the 2024 fade handles, or the default shortcut. Step-by-step guide with pro timing tips.
Quick AnswerThe fastest way to fade audio in Premiere Pro is to drag Effects > Audio Transitions > Crossfade > Exponential Fade onto the end of your clip, then drag the edges to set duration. For precise control, hover over the top corner of a clip in Premiere 2024 and pull the fade handle, or keyframe the Volume level in Effect Controls.
Learning how to fade audio in Premiere Pro turns amateur cuts into clean, broadcast-ready edits. Premiere Pro gives you preset crossfades, timeline fade handles, Volume keyframes, and a default-transition shortcut, so the best method depends on the edit.
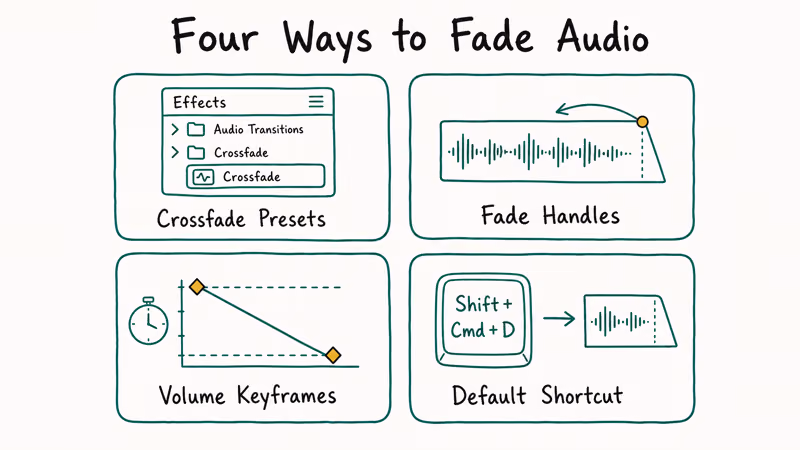
- Three crossfades ship with Premiere: Constant Gain, Constant Power, Exponential Fade
- Premiere 2024 added fade handles on clip corners, skipping the Effects panel
- A 2 to 4 second fade fits most content (300 ms for speech, 6+ seconds for music tails)
- Default transition shortcut: Shift + Cmd + D (Mac), Shift + Ctrl + D (Windows)
- Volume keyframes in Effect Controls give frame-accurate fades and mid-clip dips
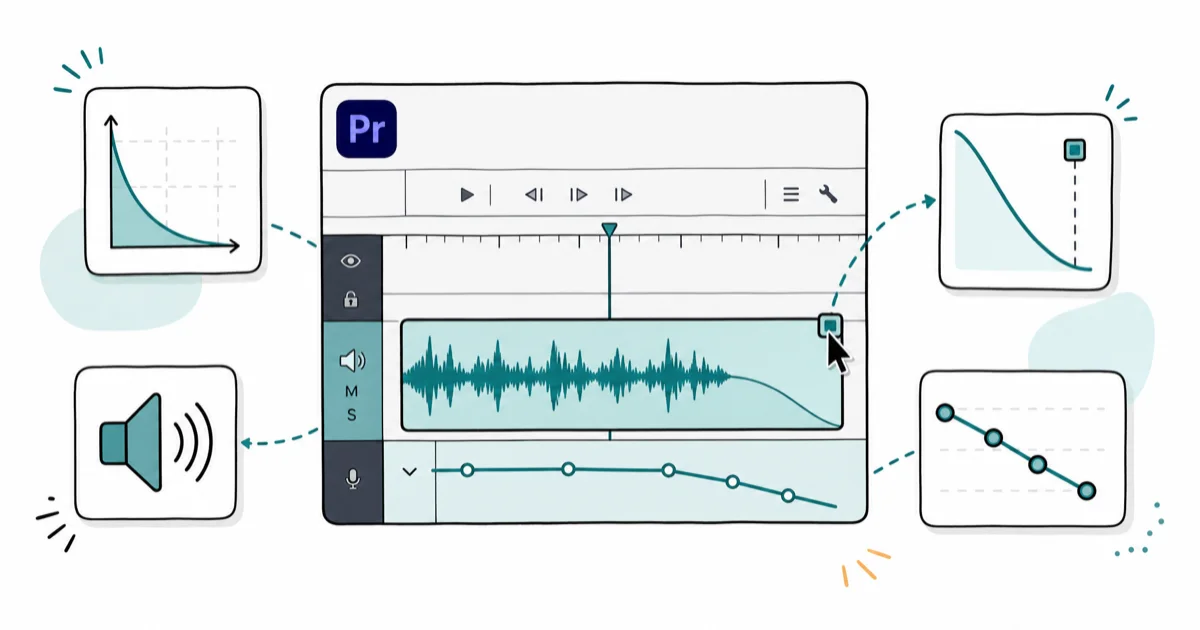
#Audio Fades in Premiere Pro Explained
An audio fade is a gradual volume change at the start, middle, or end of a clip. Wikipedia’s fade article states the technique dates to the 1950s.
Premiere Pro handles fades four different ways: preset crossfade transitions, interactive fade handles on the timeline, Volume keyframes in Effect Controls, and the default-transition keyboard shortcut. Each method targets a different speed-versus-precision tradeoff, and most professional editors rotate through all four depending on what the edit needs that day, so it’s worth knowing each one.
According to Adobe’s audio transitions documentation, the three crossfade presets use different mathematical curves, so the choice changes how the fade sounds even when the duration is identical. Constant Gain sounds abrupt on music because it drops perceived loudness unevenly; Constant Power holds perceived loudness longer before falling off; Exponential Fade tapers slowly at first, then drops quickly.
#Which Audio Transition Should You Use?
Pick the transition based on the material, not personal habit. The wrong curve makes dialogue sound jumpy or leaves music trailing too long.
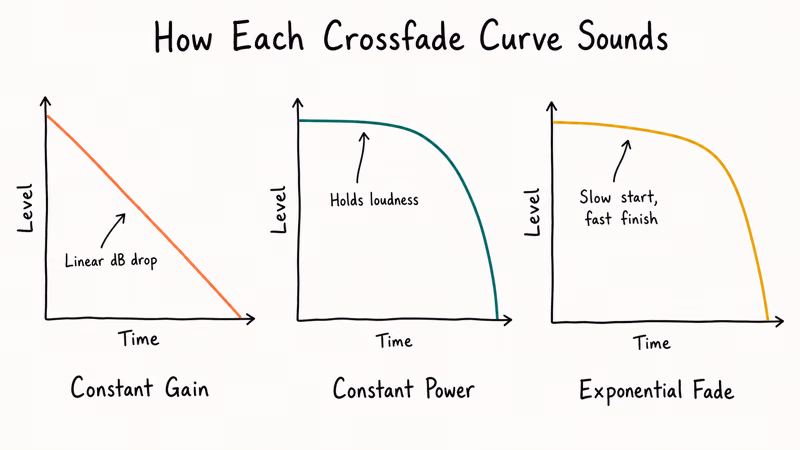
- Constant Gain suits sound effects and hard cuts where you want a linear, predictable drop
- Constant Power works best for dialogue, interviews, and narration, keeping the voice present longer before fading
- Exponential Fade is the right pick for music beds and emotional scene closers because it matches how the ear processes music tails
For music beds, Exponential Fade usually sounds smoother than Constant Gain because it tapers slowly at first, then drops quickly. Constant Gain is more useful when you want a simple linear drop on a sound effect.
#Applying a Crossfade Transition Step by Step
Open the Effects panel through Window > Effects. Expand Audio Transitions > Crossfade. Drag your chosen preset onto the clip. Placement matters:
- Drag to the start of a clip for a fade-in
- Drag to the end for a fade-out
- Drag to the seam between two clips for a crossfade that overlaps both
Adjust duration by dragging either edge of the transition. Double-click the transition icon in the timeline to open its settings and type an exact duration in seconds or frames. Setting Default Duration in Preferences > Timeline saves time on long projects — set it to 1500 ms and every transition you drop in is already close to the right length.
#Using Interactive Fade Handles (Premiere Pro 2024+)
The 2024 release rebuilt how fades feel on the timeline. According to Adobe’s Premiere Pro release notes, interactive fade handles are part of the reworked timeline interaction model. Here is the workflow:
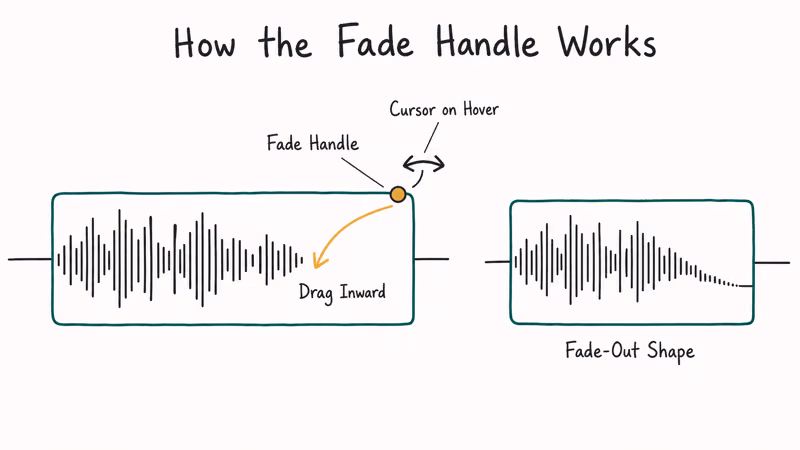
First, zoom the audio track until the waveform is tall enough to see the top corner. Then hover over the top-left or top-right corner of the clip. When the cursor becomes a curved arrow, drag inward across the clip, then release to set the length. Drag the handle up or down to reshape the curve.
The handle approach skips the Effects panel entirely, which is why many editors use it for routine fades. It’s especially fast when you need to add the same fade shape across several clip edges.
#Creating Custom Fades With Keyframes
Keyframes give you frame-accurate control and let you fade in the middle of a clip, not just at the edges. This is how you duck music under dialogue without splitting the clip.

Select the audio clip on the timeline and open Window > Effect Controls. Click the stopwatch next to Volume > Level to enable keyframing. Move the playhead to the fade start and add a keyframe, then move to the fade end and drag the Level down to -∞ dB.
The result is a straight-line fade between the two keyframes. To reshape the curve, right-click a keyframe and choose Ease In or Ease Out for a smoother ramp. This workflow is useful when the material has no natural tail, such as a voice recording that ends mid-sentence. It also works well when you remove reverb from audio and need to mask the effect processing on fade-out.
#Keyboard Shortcut: Default Audio Transition
The fastest fade method in the whole app is the default audio transition shortcut.
- macOS: Shift + Cmd + D
- Windows: Shift + Ctrl + D
Park the playhead on the clip edge where you want the fade and press the shortcut. Premiere applies whichever transition is currently set as your default (Constant Power out of the box). Change the default by right-clicking any audio transition in the Effects panel and choosing Set Selected as Default Transition.
According to Adobe’s transition overview, setting a default transition helps editors who work at speed because the shortcut applies identical fades across hundreds of clips without touching the mouse. Set Exponential Fade as the default for music-heavy projects and Constant Power for podcast edits.
#How Long Should an Audio Fade Be?
Fade duration is a creative choice, but there are safe defaults for common situations:
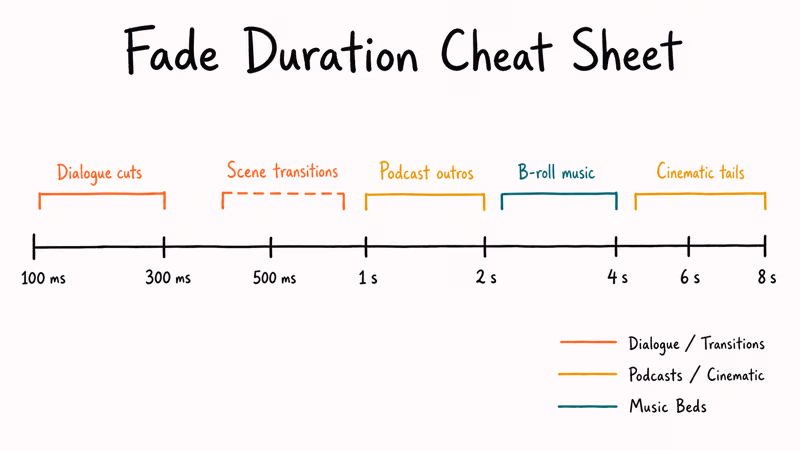
- Dialogue cuts run 100 to 300 ms, long enough to avoid clicks but short enough to feel instant
- Podcast or interview outros sit at 1 to 2 seconds
- YouTube B-roll music swells land at 2 to 4 seconds
- Cinematic music tails run 4 to 8 seconds, sometimes longer for scored drama
- Hard scene transitions pair with a video crossfade at 500 to 1000 ms
For podcast dialogue, 1 to 2 second Constant Power fades between hosts often sound natural and avoid the subtle room-tone jump that a straight cut produces. A longer fade can feel dragged. The right number changes with tempo; check your fade against the picture before committing.
#Fixing Common Fade Problems in Premiere Pro
Fades fail for predictable reasons. Walk through this list before blaming the software.
The transition won’t drop onto the clip. You probably don’t have enough media handles — extra frames beyond the clip’s in/out points. Trim the clip in before adding the transition, or use keyframes instead of a preset.
The fade sounds clicky at the start. Your fade is too short for the sample rate. Bump the duration to at least 50 ms. Clicks at transition edges also happen when two clips on the same track overlap a single frame; nudge the second clip one frame later.
Volume keyframes don’t show up. Switch to Clip at the top of Effect Controls, not Track.
The fade resets after moving the clip. Locked keyframes in some older Premiere builds unlink from the clip when you drag it. Update to the current release, or switch to the transition-based approach, which stays anchored.
Adobe’s troubleshooting audio documentation covers deeper playback issues like sample-rate mismatches and driver conflicts if the problem is not a fade mechanic. For workflow issues that span multiple apps, our guide to DaVinci Resolve audio shows a different model for reference.
#Pro Workflow Tips From the Edit Bay
A few habits that save time once you build long edits:
- Name your default and set the transition you use most, not what Adobe ships with
- Batch-select with Marquee across clip edges, then press the shortcut to fade them at once
- Group by intent: dialogue on A1-A2, music on A3, SFX on A4
- Preview with headphones because laptop speakers hide subtle Constant Gain dips
- Export at 48 kHz and 24-bit since 16-bit at 44.1 kHz can quantize fade tails
If you also cut with other tools, the same principles transfer to iMovie audio fades and to DaVinci Resolve vs Premiere Pro workflows, although the exact menus differ.
#Integrating Fades Into a Larger Edit
Fades rarely live alone. Combine them with picture edits for the polished feel viewers expect:
- Pair an audio fade-out with a Cross Dissolve on the video track for a clean scene close.
- Pair a J-cut (audio starts before picture) with a fade-in on the incoming clip for interview sequences.
- Pair an L-cut (audio lingers after picture) with a fade-out on the outgoing clip for narrative pacing.
This is the rhythm used in marriage video editing projects where audio from vows overlaps the kiss shot, or in vlog app exports where background music fades as the host starts talking.
The same pattern applies when assets move between tools. Use it for reversing clips in Premiere Pro or adding text in Sony Vegas before those edits feed back into your master timeline.
#Bottom Line
For day-to-day editing in Premiere Pro 2024 or later, use the interactive fade handles on the timeline for 80% of fades and reach for Volume keyframes only when you need mid-clip dips or frame-accurate control. Set Exponential Fade as your default for music-heavy edits and Constant Power for dialogue-heavy edits, then lean on the Shift + Cmd + D shortcut to apply fades at speed. Skip Constant Gain unless you specifically want a linear dB drop on a sound effect.
#Frequently Asked Questions
Can I fade audio in the middle of a clip?
Yes. Add two Volume keyframes and drop the Level between them. This ducks music under narration without splitting the clip.
How long should a fade-out be?
Most fade-outs land between 2 and 4 seconds. Use 100 to 300 ms for tight dialogue cuts, 1 to 2 seconds for podcast outros, and 4 seconds or more for cinematic music tails. Match the fade duration to the tempo and emotion of the scene, not a fixed number.
Does fading audio in Premiere change the original file?
No. Premiere Pro’s fades are non-destructive and only live inside the project file.
Why won’t the crossfade transition drop onto my clip?
You likely don’t have enough media handles. A crossfade needs extra frames beyond the clip’s in and out points. Trim the clip in by half the transition length, or switch to keyframe fades, which don’t need handles.
Can I save a custom fade as a preset?
Yes. Create your fade using keyframes, right-click the effect in the Effect Controls panel, and choose Save Preset. Premiere stores the preset in the Effects panel under Presets, ready to drag onto any clip.
Should I use Constant Power or Exponential Fade for music?
Exponential Fade usually sounds better on music because it tapers slowly at first, then drops off quickly, matching how the human ear perceives loudness. Constant Power also works but keeps the track present longer, which can feel too slow on up-tempo songs. Audition both on your own material at the same duration and pick the one that doesn’t draw attention to itself.
Can I fade multiple audio tracks at the same time?
Yes. Select clip edges across several tracks with a marquee drag, then press the default audio transition shortcut. Premiere applies your chosen fade to every selected edge simultaneously, which saves real time on complex mixes with dialogue, music, and effects on separate tracks.
Do fade handles work in older versions of Premiere Pro?
No. The interactive fade handles require Premiere Pro 2024 (version 24.x) or later. Older releases rely on the Effects panel transitions and Volume keyframes. Update through the Creative Cloud app if you want the handle workflow on your timeline.

Apps Crashing After iOS 27 Update? Fix Order (2026)
Apps crashing after the iOS 27 update? Update the app in the App Store first, then offload and reinstall to clear stale cache, then restart. The fix order.

Do AI Translation Earbuds Work Offline? What to Know
Do AI translation earbuds work offline? A few do with downloaded language packs, but most need the cloud. Here's what works offline and what you give up.

How to Set Up Translation Earbuds (Pairing and Modes)
How to set up translation earbuds: charge, install the app, pair over Bluetooth, pick two languages, and choose a mode. A step-by-step first-use guide.

Translation Earbuds Not Translating? How to Fix Them
Translation earbuds not translating? Usually it's the app, the internet, or the language settings. Here's how to fix pairing, sound, and lag fast.