How to Fade Audio in iMovie on Mac, iPhone, and iPad (2026)
Fade audio in iMovie on Mac, iPhone, and iPad in under a minute. We cover fade handles, the audio inspector, crossfades, and fixes when handles disappear.

Quick AnswerOn Mac, hover over an audio clip and drag the gray fade handle inward to set fade-in or fade-out length. On iPhone or iPad, tap the clip, tap the speaker icon, then tap Fade and drag the yellow triangles.
If your iMovie soundtrack starts or ends abruptly, fade handles fix it in under a minute. You drag a small gray dot at the edge of any audio clip, and iMovie ramps the volume up or down across that span. The same tool exists on Mac and on iOS, but the gestures differ enough that switching between them trips up most editors.
The steps below focus on the current iMovie for Mac and iMovie for iOS layouts, not legacy versions.
- Fade handles are the fastest path for most Mac and iOS edits
- On Mac, fade handles only appear after you turn on Show Audio Waveforms in the View menu
- On iPhone and iPad, fades hide inside the speaker icon panel, not the trim view
- iMovie’s one-click audio crossfade lives at
Modify>Fade To>Audio Crossfadeon Mac - If fade handles refuse to appear, the clip is usually attached to video — run
Modify>Detach Audiofirst
#How to Fade Audio in iMovie on Mac with Fade Handles
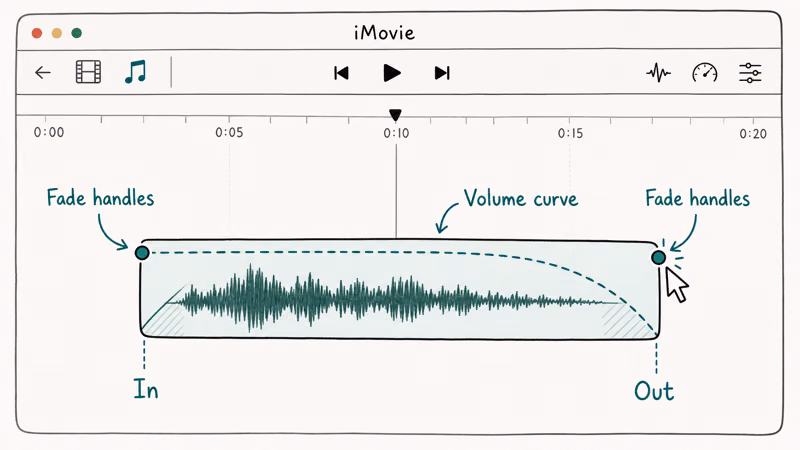
Fade handles are the easiest method, and they ship hidden on every audio clip by default. Apple’s iMovie for Mac user guide confirms that 2 hidden fade handles attach to every audio clip, but they only appear once you turn on Show Audio Waveforms through the View menu.
Here’s the exact sequence:
- Open your project and click an audio clip in the timeline.
- Click View in the top menu and turn on Show Audio Waveforms.
- Hover over the clip’s left or right edge. A small gray dot appears about a quarter inch in from the edge.
- Drag that dot inward. The line above it curves into a fade ramp.
- Release at the length you want.
A 2-second fade is the sweet spot for music transitions. Voiceovers usually sound natural at 0.5 to 1 second. Anything longer than 3 seconds on a short clip feels sluggish and signals “this is fading on purpose,” which you usually don’t want.
The fade is non-destructive. You can drag the same handle back out to undo it, or pull it past the midpoint of the clip to fade the entire span.
#When Fade Handles Don’t Appear on Mac
Fade handles usually refuse to show up in three situations:
- The clip is grouped with its parent video. Click
Modify>Detach Audiofirst. The audio drops onto its own track with handles enabled. - Audio Waveforms is turned off in the View menu. This is the most common cause — Apple ships iMovie with waveforms off by default.
- You’re hovering over the audio inspector window, not the timeline. Handles only live on the timeline strip.
Apple’s iMovie support documentation confirms that detaching audio is the standard fix for grouped clips. If detaching doesn’t help, quit iMovie completely (Command-Q) and reopen the project. A stale render cache hides the handles on some Apple Silicon builds, and a fresh launch clears it.
#Using the iMovie Audio Inspector for Numeric Fade Control
The audio inspector gives you numeric control instead of dragging. It’s worth using when you need an exact fade length, like a 1.5-second ramp to match a beat or a 0.3-second voiceover lead-in.
- Select the clip in the timeline.
- Click the audio inspector icon (the speaker) in the top-right preview window.
- Look for the Fade In and Fade Out controls. They appear as sliders with time values.
- Drag each slider or type a value in seconds.
- Click somewhere else to commit the change.
The inspector also has a Manual and Automatic toggle. Manual keeps your fade values intact when you trim the clip. Automatic re-applies a uniform fade based on the new clip length, which helps when you’re batch-processing many clips of similar duration but ruins intentional fades the moment you trim.
For tracks with hiss, run the background noise removal walkthrough first. Clean audio fades better.
#How to Fade Audio in iMovie on iPhone and iPad
iMovie for iOS hides the fade controls behind the speaker icon, which is where most new users get stuck. Apple’s iMovie user guide for iPhone states that fade controls sit inside the audio inspector path, but the screenshots there assume you already know where the inspector bar lives.
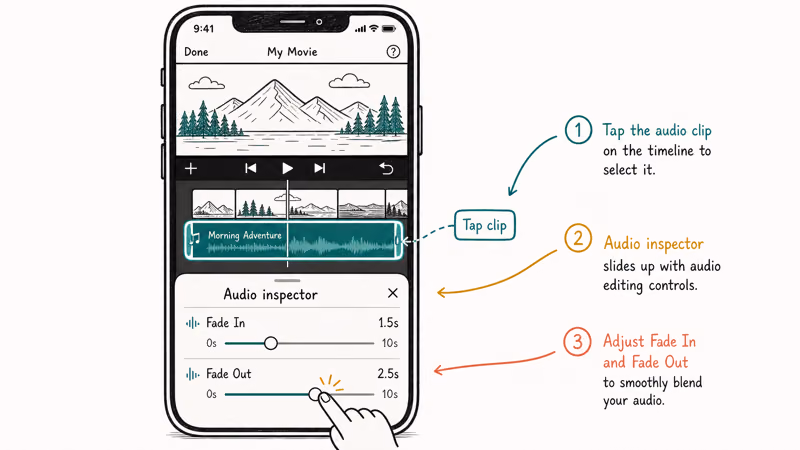
- Open the project and tap the audio clip in the timeline. A yellow outline confirms selection.
- Tap the speaker icon in the inspector bar at the bottom. iOS shows the volume slider.
- Tap Fade at the right end of the inspector bar.
- Drag the yellow triangles at the start and end of the clip’s audio bar to set fade-in and fade-out lengths.
- Tap Done in the top-right corner.
On iPhone and iPad, the yellow triangles snap to coarse increments. Drag controls don’t give precise sub-second timing. If you need that precision, edit on Mac and share the project back to iOS via iCloud, or move to a desktop editor. The iMovie vs Final Cut Pro comparison covers the trade-offs if you’re outgrowing iMovie altogether.
The iOS fade behavior differs for background music tracks. Music auto-ducks under voice clips by default. Tap the music clip and toggle the Ducking option off if your manual fade is fighting the auto-ducker. If a fade seems broken, check Ducking before rebuilding the edit.
#How to Crossfade Audio Between Two Clips in iMovie
A crossfade overlaps the end of one audio clip with the start of the next, so neither one drops to silence between them. iMovie has a one-click version on Mac.
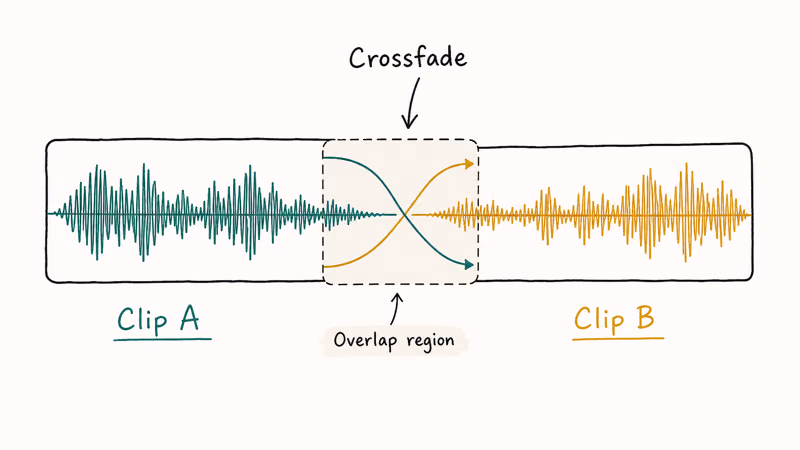
On Mac:
- Place the two audio clips on the same track, butted edge to edge.
- Click between them so the playhead sits on the boundary.
- Go to
Modify>Fade To>Audio Crossfade.
iMovie ramps the first clip down and the second clip up over a 1-second overlap by default. Drag the fade handles at the boundary to extend or shorten that overlap.
On iPhone or iPad:
The iOS version of iMovie doesn’t have a dedicated crossfade button. You have to fade out the first clip manually, then fade in the second, with about a half-second overlap on the timeline. It’s clunkier than the Mac flow but workable for simple cuts.
If you cut a lot of music transitions and the iMovie crossfade feels too coarse, how to fade audio in Premiere covers a more precise alternative with the constant-power crossfade option.
#Why Are My iMovie Fade Handles Missing or Greyed Out?
Three causes account for almost every report on Apple’s iMovie community forum:
1. Audio Waveforms is disabled. Without waveforms, iMovie hides the fade handles to avoid visual clutter on the audio strip. Turn waveforms back on through View > Show Audio Waveforms.
2. The clip is part of a grouped video clip. iMovie locks fade handles on grouped audio so you don’t accidentally desync them. Click the clip, then Modify > Detach Audio. The audio moves to its own track with handles enabled.
3. The clip sits on a connected overlay track, not the main timeline. A handful of users reported fade handles disappearing on cutaway clips. Apple states that cutaway audio behaves the same as primary audio for fades, but a few macOS Sonoma builds shipped a bug that broke this. Updating iMovie to the latest App Store version usually fixes it.
Use this recovery sequence for stuck projects: detach the audio, quit iMovie, reopen the project, and re-enable waveforms. That four-step recipe addresses the common missing-handle cases and is faster than rebuilding the timeline from scratch. For broader iMovie issues that go beyond audio fades (rendering errors, missing clips, broken share targets), the iMovie problems and solutions reference walks through the full troubleshooting tree.
Worth noting: this recovery only works on local projects. If your library lives on iCloud Drive, sync the project locally first.
#Is There a Better Audio Fade Tool Than iMovie?
For most home video work, iMovie’s fade controls are plenty. Where iMovie hits its limits:
- Multi-clip mixing. iMovie has 3 audio tracks. Anything more complex (interview audio plus B-roll plus music plus sound effects) outgrows it fast.
- Sub-frame precision. iOS fades snap to half-second increments, and even Mac fades are limited to one decimal place in the inspector. Pro work often needs frame-accurate fades.
- Audio effects on the fade itself. iMovie can’t crossfade with a low-pass filter or apply EQ during the fade ramp.
DaVinci Resolve’s free tier and Final Cut Pro both add those features without an Adobe subscription. The DaVinci Resolve audio guide walks through the equivalent fade workflow there, including the constant-power vs equal-gain crossfade choice that Resolve exposes but iMovie hides.
Wondershare Filmora is another option some Mac users prefer for its larger transition library and Windows parity. Its fade-out controls work similarly to iMovie’s: drag a handle, set a time. Filmora doesn’t replace iMovie inside the Apple ecosystem, but it makes sense when you also edit on Windows and need the same project to open on both platforms.
#Bottom Line
Use fade handles for most iMovie audio fades. They’re faster than the inspector and accurate enough for music, voiceover, and B-roll. Switch to the audio inspector only when you need a specific fade length or want consistent fade automation across many clips. On iPhone and iPad, find the speaker icon and the Fade button before you start a project, since the gesture isn’t where most editors expect it.
If fade handles vanish, run the recovery sequence: turn Audio Waveforms back on, detach the audio with Modify > Detach Audio, then quit and reopen iMovie. That fixes the most common missing-handle cases.
#Frequently Asked Questions
How long should an audio fade in iMovie be?
For background music, 1 to 2 seconds works for most cuts. Voiceover fades typically need 0.3 to 0.5 seconds; anything longer sounds laggy. Sound effects rarely need fades over 1 second since the listener notices long SFX fades as a mistake rather than a transition.
Can you fade audio in iMovie without fading the video?
Yes. Detach the audio first with Modify > Detach Audio, then fade the audio clip alone.
Why does my iMovie fade sound choppy?
Choppy fades usually mean one of two problems: clipping in the original audio, or a sample rate mismatch between the project and the file. Open the clip in the audio inspector and look at the waveform shape. If the peaks look squared off rather than rounded, the source is already clipped and no fade will smooth it. Re-export the original at minus-3 dB headroom, set the sample rate to 48 kHz, then re-import and reapply.
Can iMovie fade audio in the middle of a clip?
Only with a workaround. Split the clip at the start and end of the section you want to fade, then apply fade-in to the second segment and fade-out to the third. Mac users with iMovie 10.4 can also use the volume keyframes inside the audio inspector for mid-clip dips without splitting.
Does iMovie support automatic ducking like Premiere?
Yes, on both Mac and iOS. Open the audio inspector and toggle Auto under ducking.
Is iMovie’s fade feature destructive to the original file?
No. iMovie stores fade values as project metadata, and the fade ramp gets baked into the audio only at export. The original file on disk stays untouched, so you can remove, modify, or extend a fade at any point without losing fidelity. This is the same non-destructive model that Final Cut Pro and DaVinci Resolve use, so the workflow concept carries over if you migrate.
Can I copy a fade from one clip to another in iMovie?
On Mac, yes. Right-click a clip with the fade you want, choose Copy, then right-click the target clip and select Paste Adjustments > Audio. iOS doesn’t have a paste-adjustments command, so you have to redo fades clip by clip on iPhone and iPad.

iPhone 17 Cellular Data Not Working on iOS 26? 9 Fixes
iPhone 17 cellular data still dropping on iOS 26? Apple fixed the launch bug in iOS 26.0.1, but recovery failures persist. Here's the fix ladder.

iPhone Cellular Data Not Working Abroad? eSIM Fixes
Travel eSIM showing no data abroad? Fix iPhone roaming with the data-line check, Data Roaming toggle, APN settings, and network selection steps.

iPhone Cellular Data Not Working for Some Apps? 8 Fixes
Some iPhone apps refuse to load on cellular while others work fine. Check the per-app cellular toggle, Low Data Mode, VPN profiles, and Screen Time.

iPhone Stuck on EDGE? How to Get 5G or LTE Back (2026)
iPhone stuck on EDGE with crawling data? Here's why the E icon appears, which settings force 5G or LTE back, and when the problem is your carrier.