How to Add Text in Sony Vegas Pro: Step-by-Step (2026)
Add and customize text in Sony Vegas Pro with Media Generators, Titles and Text, ProType Titler, lower thirds, subtitles, and keyframe animation.
Quick AnswerTo add text in Sony Vegas, go to the Media Generators tab, select Titles & Text, drag a preset onto the timeline, then double-click the event to customize the font, size, color, and animation in the editor window.
Adding text in Sony Vegas Pro takes just a few clicks once you know where to look. The core workflow runs through Media Generators and the Titles & Text tools.
- All text comes from
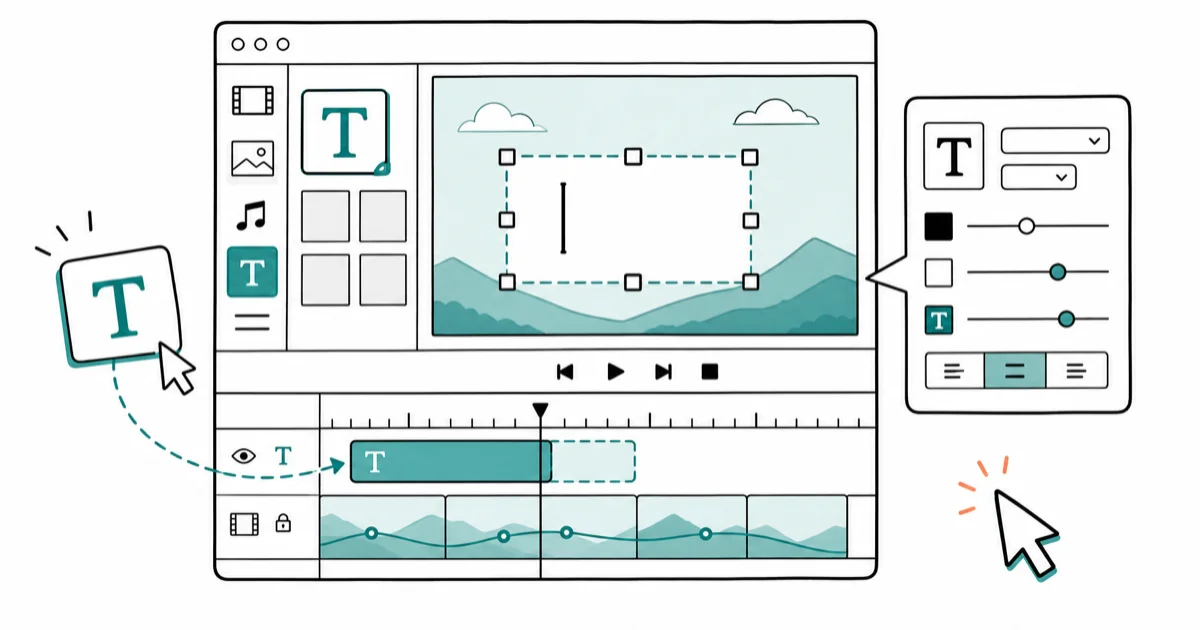
Media Generators>Titles and Text - Press ALT+9 to open Media Generators instantly
- Drag a text preset onto the timeline to create a new track above your video
- Video Event FX controls color and opacity; double-click the preview for font changes
- Keyframe animation creates smooth entry and exit effects via position and opacity
#Accessing the Text Tools in Sony Vegas
Sony Vegas stores all text options inside the Media Generators panel. Here’s how to open it:
Open your project, then go to View > Media Generators (or press ALT+9). Click Titles & Text in the left sidebar.
Drag any text preset directly onto your timeline, and Vegas creates a new video track automatically. According to PCMag, Media Generators remains the single entry point for all generated media, so this workflow applies regardless of which release you’re running.
#How Do You Customize Text Properties?
Once your text clip sits on the timeline, double-click it to open the Generated Media editor.

Font and size. Select text in the preview area, then use the toolbar to change the font family, point size, and style. After installing new typefaces, restart Vegas so the font menu and renderer can pick them up cleanly.
Color and opacity. Open Video Event FX (click the FX icon on the timeline event) to access the color picker. Set fill, outline, and shadow colors independently, and drag the opacity slider for watermark effects.
Positioning. Click and drag text directly in the Video Preview window.
Shadows and outlines. In Video Event FX, check Shadow or Outline and adjust thickness, offset, and blur. A thin black outline on white text usually works well over busy footage because it separates the letters from the background video. Increase the blur for a softer drop shadow effect that looks less harsh on tutorial-style content.
#Text Animation Techniques
Static text works for subtitles, but titles and lower thirds benefit from motion. Sony Vegas offers two approaches.

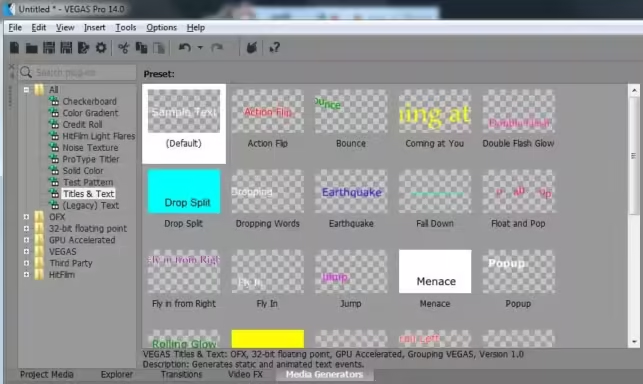
#Using Built-In Presets
Go to Titles & Text in Media Generators and browse the subcategories. Hover over any preset to preview its animation. Drag it to the timeline and customize the content while keeping the animation intact.
#Building Custom Keyframe Animations
For full control, create keyframes manually. Add a default text clip to the timeline, double-click it, and enable the keyframe timeline at the bottom of the Generated Media editor.
Set the text’s starting position (off-screen or transparent) at the first keyframe, then move the playhead forward and set the final position at a second keyframe. Vegas interpolates between them automatically. Right-click any keyframe and switch from Linear to Smooth for natural easing — this single change makes a dramatic difference in how professional the motion looks.
Smooth interpolation works especially well for basic slide-in titles and other simple motion-graphics reveals.
#What Types of Text Can You Create?
Sony Vegas handles four main categories, each with different setup needs.
Titles and opening credits. Use large, bold fonts with entrance animations and keep duration between 3 and 5 seconds.
Subtitles and captions. Create individual text events for each line and position them in the bottom 10% of the frame. Time each subtitle to start slightly before the spoken word and end about half a second after. The same careful timing matters when reversing clips in Premiere Pro or syncing text to audio in any NLE, so getting the rhythm right here builds transferable skills.
Lower thirds. Place in the lower-left corner with a 10% margin from the edge.
Scrolling credits. Go to Media Generators > Titles & Text > Credit Roll, type your credits, and Vegas scrolls them automatically. A 30-second event for 20 lines produces comfortable reading speed.
#Using ProType Titler for Advanced Effects
ProType Titler is Vegas Pro’s advanced text engine. Find it under Media Generators > ProType Titler.
To create a 3D title, open ProType Titler, type your text, and switch to the 3D tab. Adjust extrusion depth, lighting angle, and surface material. The results won’t match Cinema 4D, but they handle YouTube intros and event videos well. For projects that involve combining multiple video sources on screen, ProType Titler’s transparency options make text overlay straightforward across all the layers.
Per-character animation is the strongest feature — select individual characters and assign different entry timings for staggered letter-by-letter reveals.
#Exporting Videos With Text
After finishing your text work, export the project:
Go to File > Render As and pick MP4 (H.264) for web or MOV for editing pipelines — Sony Vegas handles MOV files natively. According to MAGIX documentation, VEGAS Pro can encode video up to 8K resolution through its HEVC encoder, and its codec overview confirms that an MP4 (H.264) export stays universally compatible for the web. Select a matching preset and click Render.
Preview at full resolution first. Switch the Preview window dropdown to Best/Full quality before rendering. Text that looks fine at Draft can show aliasing at full resolution, and half-resolution previews can hide subtle kerning issues that only show up at full zoom.
For quick text on thumbnails, try apps to add text to photos on Android. A video grabber tool also helps when sourcing reference footage.
#Bottom Line
Sony Vegas Pro’s text tools are straightforward once you learn the Media Generators workflow. Start with Titles & Text presets for speed, graduate to custom keyframes for polished animations, and use ProType Titler when you need 3D or per-character effects. Always preview at full quality before rendering. For most YouTube and social media projects, built-in presets combined with basic keyframe adjustments produce professional results without a separate motion graphics app.
#Frequently Asked Questions
Can I import custom fonts into Sony Vegas?
Yes. Install any TrueType (.ttf) or OpenType (.otf) font on your system, then restart Vegas Pro. The font appears in the editor dropdown. If it doesn’t show up, install system-wide rather than user-only.
How do I make text fade in and out?
Set two opacity keyframes in the Generated Media editor — 0% at the clip start, 100% about half a second in. Reverse the process at the end for a fade-out. You can also drag a fade transition directly onto the text event edges, which is faster but gives less control over timing curves.
Can I save custom text styles as presets?
Yes. Click the Save Preset icon after customizing, name it, and it appears in Titles & Text for all future projects.
Why does my text look blurry after export?
Blurry text usually means your project resolution doesn’t match render settings. Check File > Properties to confirm 1920x1080 or your target, then select a matching render preset. Text smaller than 24pt tends to break down during H.264 compression because thin strokes lose definition at lower bitrates.
How do I add a background behind text?
Use Media Generators > Solid Color on a track between your video and text. Set opacity to 50-70%.
Does Sony Vegas support motion-tracked text?
Vegas Pro doesn’t include built-in motion tracking, so you’ll need to keyframe the text position manually or use a third-party plugin like Boris FX. For simple linear movement, manual keyframing takes about 5 minutes per 10-second clip, which isn’t bad for occasional use but becomes tedious on longer sequences with complex camera moves.

Apps Crashing After iOS 27 Update? Fix Order (2026)
Apps crashing after the iOS 27 update? Update the app in the App Store first, then offload and reinstall to clear stale cache, then restart. The fix order.

Do AI Translation Earbuds Work Offline? What to Know
Do AI translation earbuds work offline? A few do with downloaded language packs, but most need the cloud. Here's what works offline and what you give up.

How to Set Up Translation Earbuds (Pairing and Modes)
How to set up translation earbuds: charge, install the app, pair over Bluetooth, pick two languages, and choose a mode. A step-by-step first-use guide.

Translation Earbuds Not Translating? How to Fix Them
Translation earbuds not translating? Usually it's the app, the internet, or the language settings. Here's how to fix pairing, sound, and lag fast.