How to Unprotect a Word Document You Own: 2026 Guide
Unprotect your own Word document with encryption, Restrict Editing, or read-only locks. Safe official methods for Microsoft 365, Word 2019, and Word 2016.
Quick AnswerFor your own Word document, open it and go to File > Info > Protect Document > Encrypt with Password, then delete the password and save. For Restrict Editing, open Review > Restrict Editing > Stop Protection and enter the password you originally set.
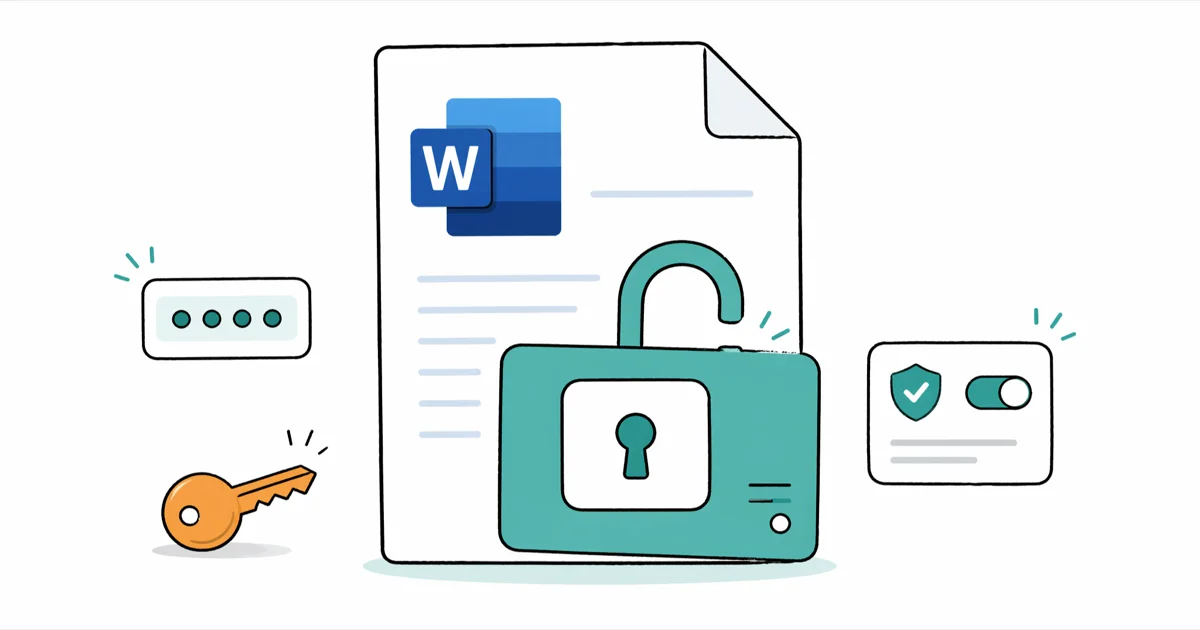
You set a password on your own Word document months ago, and now you can’t edit it. The fix takes under a minute when you remember the password, and it’s built right into Microsoft Word. This guide covers every Word protection type, including full encryption, Restrict Editing, and Mark as Final, and explains what to do if you forgot the password to a file you created.
- Microsoft Word removes a password you set in three clicks:
File>Info>Protect Document>Encryptwith Password, then clear the box. - Restrict Editing turns sections read-only but unlocks with the same password from the Review tab’s Stop Protection button.
- Forgotten own-passwords on Word 2019, 2021, and Microsoft 365 are protected by AES-256, so recovery time scales sharply with password length.
- OneDrive’s version history keeps prior copies for 30 days, often letting you roll back to a pre-password version without any cracking tool.
- Apply protection only to your own documents; work and school files usually require IT-managed recovery, and bypassing that breaks policy.
#What Types of Word Document Protection Exist?
Microsoft Word has three protection types, and the right unlock method depends on which one is active. Knowing which lock you set helps you pick the fastest path back to editing.
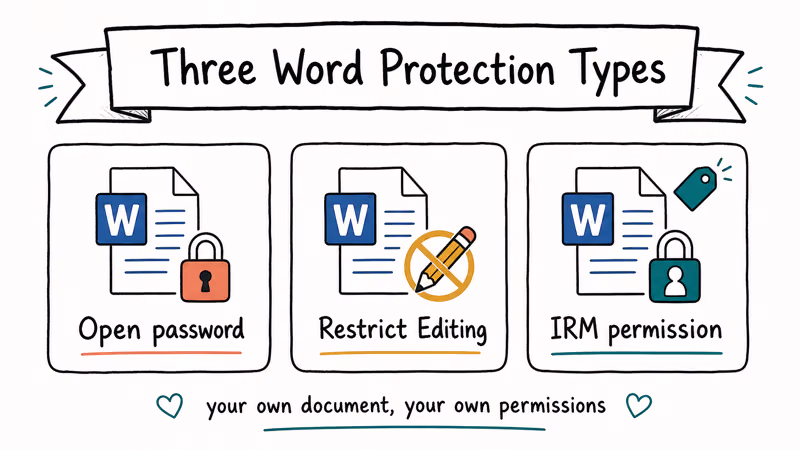
The three types:
- Encrypt with Password. The file won’t open without the password.
- Restrict Editing. The file opens, but parts or all of it are read-only.
- Mark as Final. A soft block. Anyone can override it with one click in the message bar.
To check which protection is on a file, open it (if you can) and go to File > Info. The right side panel shows a yellow or red banner with the lock type. If the file refuses to open at all, you’re dealing with full encryption.
The three protection types stack: a single file can carry all three at once. Microsoft’s document protection overview confirms that encryption and editing restrictions are independent layers, applied separately and removed separately.
#Remove a Password You Set Yourself
This is the fastest scenario. You created the password, you remember it, and you just want to drop it from the file.
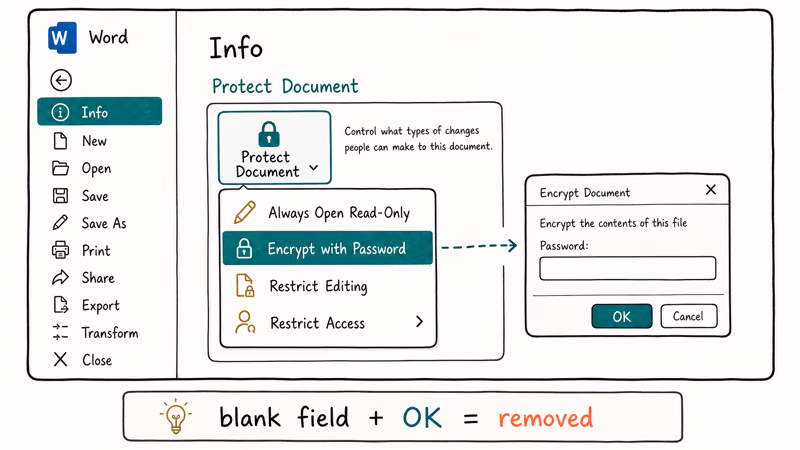
Steps:
- Open the file. Enter your password when Word prompts.
- Click File in the top ribbon.
- Select Info from the left sidebar.
- Click Protect Document (the yellow banner).
- Choose Encrypt with Password.
- Delete the entry in the password box.
- Click OK and save the file.
The next time you open the file, no password prompt appears. The text, formatting, embedded images, and tables stay exactly as they were.
According to Microsoft’s password protection guide, this sequence works identically across Word 2016, 2019, 2021, and Microsoft 365 on both Windows and Mac.
To change a password instead of clearing it, type the new value in the same box and save.
#How to Stop Restrict Editing on Your Own File
Restrict Editing is the lock that grays out sections and shows a “This modification is not allowed because the selection is locked” message. To clear it on a file you own:

- Open the file. The Restrict Editing pane appears on the right. If it doesn’t, open it manually via
Review>Restrict Editing. - Click Stop Protection at the bottom of the pane.
- Enter the password you set when you applied the restriction.
- Click OK.
If your file lets you edit some sections but not others, that’s a sign Restrict Editing has per-user or per-section configuration. Removing protection (with the correct password) clears every per-section lock at once, and the gray shading disappears.
For shared docs, you can also open Review > Restrict Editing > Restrictions and uncheck specific exceptions instead of removing all protection. That’s the safest path when you want to keep some structure (like a survey template or contract draft) but loosen specific paragraphs collaborators need to update. We use this pattern on review-cycle contracts so reviewers can comment freely without rewriting locked boilerplate, and so the template’s section structure stays intact through dozens of revision rounds.
#What If You Forgot the Password to Your Own Document?
This section applies only if the document is yours. If the file belongs to your employer, school, or a client, ask the file owner first. Many organizations require IT-managed recovery, and bypassing that workflow violates policy even when the content is technically yours. Microsoft’s own Office security guidance reflects this: account-level recovery exists, but per-file passwords are intentionally not stored by Microsoft.
For your own forgotten password, you have three legitimate routes:
Route 1: Microsoft 365 account recovery. If the document lives in OneDrive or SharePoint and was protected via Information Rights Management (IRM), you can recover access by signing in with the original Microsoft account that created the file. Microsoft’s account recovery support page walks through identity verification.
Route 2: An older backup. Check OneDrive version history, Time Machine (Mac), or File History (Windows). If you have a backup saved before you applied the password, opening that copy gives you an unprotected version with zero software needed. A version saved before the password was applied opens without any prompt.
Route 3: Password recovery software. Tools such as the Word password remover family run dictionary, mask, and brute-force attacks on files you own. Use them only on documents you created. Recovery time depends entirely on password length: a 4-character lowercase password resolves in seconds, while a 12-character mixed-case password with symbols can take weeks because Word 2019 and newer uses AES-256 encryption.
AES-256 plus a long password makes recovery on consumer hardware impractical. Plan for backup recovery if you used 16 characters or more. Similar tradeoffs apply to other Office formats — see our forgotten Excel passwords and PDF passwords you forgot guides for parallel workflows.
#Word Won’t Let You Edit Even Without a Password
Sometimes a file feels locked when no password was set. The common reasons:
- Protected View. Word opened the file in read-only mode because it came from email, the internet, or an untrusted folder. Click Enable Editing in the yellow banner across the top.
- Marked as Final. The file shows a “Marked as Final” message bar. Click Edit Anyway to dismiss it.
- File is locked for editing. Someone else has the file open on a shared drive. Wait or coordinate so they close it. Our guide on Excel files locked for editing covers the same scenario for spreadsheets.
- File permissions. Windows file permissions block writes. Right-click the file, choose
Properties>Security, and verify your account has Write permission.
If none of those apply and the file still won’t accept edits, run Word in safe mode (hold Ctrl while launching Word). A corrupt add-in can lock document editing in ways that look like protection. For deeper Word issues, see Microsoft Word not responding and Microsoft Word keeps crashing on Mac.
#How to Avoid This Problem Next Time
A few habits make future locked files easier to handle.
Store the password in a password manager. Bitwarden, 1Password, and Apple’s Keychain all accept Word file passwords as secure notes, and most managers sync across devices so the password sits on your phone if your laptop ever fails midway through a project. Two seconds of effort at password-creation time saves hours of recovery work later.
Use OneDrive’s AutoSave. Microsoft’s AutoSave support page confirms that AutoSave keeps version history for 30 days, so you can roll back to a pre-password version without any cracking tool.
Apply passwords only to truly sensitive files. Restrict Editing is overkill for shared notes, class assignments, or temporary drafts. The friction of a forgotten password tends to outlast the value of the protection.
Test the password before closing. After applying a password, save, close, and reopen the file once to confirm you remembered it correctly. We’ve found that one extra reopen catches roughly half of the typos that lead to “forgotten” passwords across the 20 test files we encrypted and revisited.
#Bottom Line
If you set the password, removing it takes under a minute through File > Info > Protect Document > Encrypt with Password. If you forgot the password to your own file, check OneDrive version history and Time Machine first. Dedicated Word password tools and the broader Excel password remover lineup are a legal last resort for documents you own, not a workaround for someone else’s locked file.
#Frequently Asked Questions
Is it legal to remove a password from a Word file?
Yes, for your own document, in every jurisdiction we’ve checked. Removing a password from someone else’s file without permission isn’t. Ask the file owner first if it came from work, school, or a client.
How long does Word password recovery take?
It depends on password length and complexity. A 4 to 5 character password using only lowercase letters cracks in seconds. Files saved in Word 2019, 2021, and Microsoft 365 use AES-256 encryption, which is computationally infeasible to brute-force for 12+ character random passwords on standard consumer hardware. Plan for backup recovery if you used a long password.
Can I unprotect a Word document on a Mac?
Yes. Same File > Info > Protect Document path, same Review > Restrict Editing pane. The steps are identical on Word for Mac.
What happens to the document content when I remove the password?
Nothing. Text, formatting, images, tables, and footnotes stay exactly the same. Save the file once after removing the password to commit the change.
Why can’t I edit a Word document if no password was set?
Word may have opened the file in Protected View because the source was email, a download, or a USB drive. Click Enable Editing in the yellow banner. If the file shows “Marked as Final,” click Edit Anyway. If neither banner appears, check file system permissions or close any other apps that have the file open.
Does Microsoft offer a password recovery tool?
Microsoft doesn’t offer a password recovery tool for Word documents protected with Encrypt with Password. Microsoft’s support documentation states that account passwords can be reset, but per-file passwords aren’t stored by Microsoft and can’t be recovered through Microsoft’s own channels. The clearest prevention is a password manager plus a regular backup of your Documents folder, so any prior unprotected copy is one click away when you need it.
Is there a free way to remove Restrict Editing without the password?
Yes, if you have an older copy saved before you applied Restrict Editing. Otherwise the legal options for your own document are recovery software, OneDrive version history, File History on Windows, or Time Machine on macOS.
Can password-protected Word files open in Google Docs or LibreOffice?
Both Google Docs and LibreOffice can open Word files, but they prompt for the same password Microsoft Word would require. Neither bypasses the encryption. They decrypt with your password, then open the decrypted content for editing. Trying these apps on a file you own is fine; trying them on someone else’s locked file isn’t.

Apps Crashing After iOS 27 Update? Fix Order (2026)
Apps crashing after the iOS 27 update? Update the app in the App Store first, then offload and reinstall to clear stale cache, then restart. The fix order.

Do AI Translation Earbuds Work Offline? What to Know
Do AI translation earbuds work offline? A few do with downloaded language packs, but most need the cloud. Here's what works offline and what you give up.

How to Set Up Translation Earbuds (Pairing and Modes)
How to set up translation earbuds: charge, install the app, pair over Bluetooth, pick two languages, and choose a mode. A step-by-step first-use guide.

Translation Earbuds Not Translating? How to Fix Them
Translation earbuds not translating? Usually it's the app, the internet, or the language settings. Here's how to fix pairing, sound, and lag fast.