Fix SIM Failure on iPhone: 6 Proven Methods (2026)
Your iPhone shows No SIM, Invalid SIM, or SIM Failure? 6 step-by-step fixes covering iPhone 13, 14 Pro, and 15. Find the one that works for you.
Quick AnswerPower off your iPhone, eject the SIM tray, wipe both the card and the tray with a dry cloth, and reinsert the card so the notched corner aligns with the tray. Restart and wait 2 minutes for the carrier name to appear. If the error stays, install any pending Carrier Settings Update, then run Reset Network Settings.
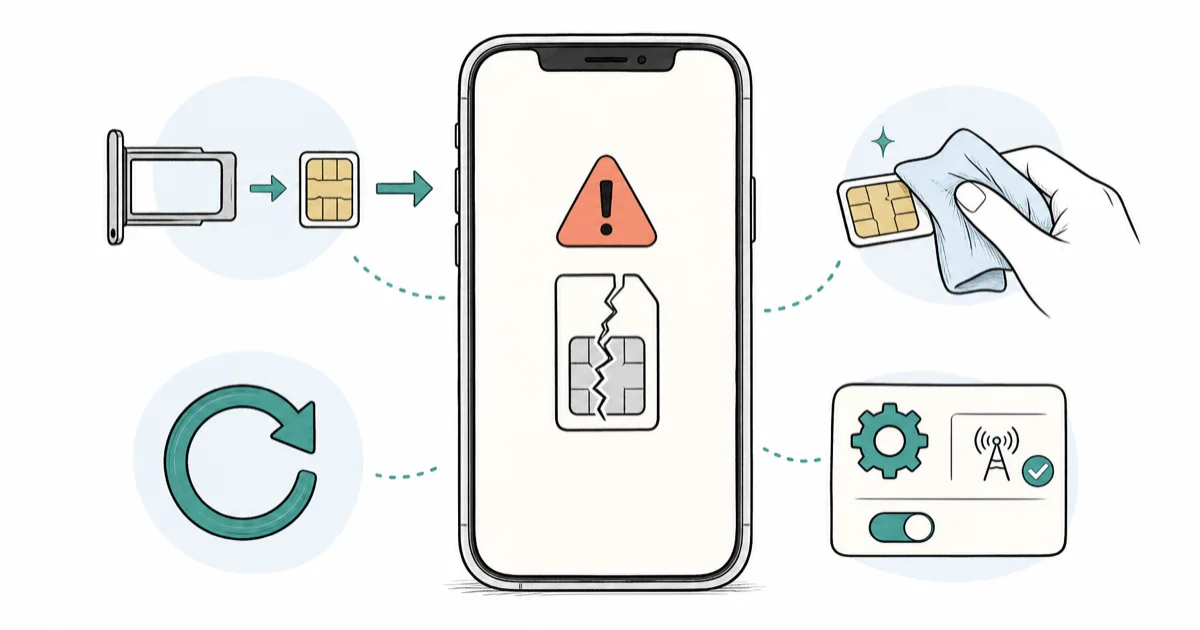
A SIM failure on iPhone turns your phone into a Wi-Fi-only device. No calls, no texts, no cellular data. The “No SIM,” “Invalid SIM,” or “SIM Failure” message almost always points to dust on the contacts, an outdated carrier profile, or a stale network state in iOS. The six fixes below cover recent models like the iPhone 13, 14 Pro, and 15 across several iOS releases.
This guide is for your own iPhone or a device you have explicit permission to service. Resetting another person’s phone or pulling their SIM without consent crosses into US wiretap and computer-fraud territory. Stick to your own hardware.
- “No SIM,” “Invalid SIM,” and “SIM Failure” all point to the same three root causes: dirty contacts, outdated carrier settings, or a stuck iOS network state.
- Reseating the SIM card with a dry-wipe of the contacts is the fastest fix and works on most physical-contact failures.
- A Carrier Settings Update applies new authentication keys from your provider and often clears “Invalid SIM” after iOS upgrades.
- Reset Network Settings rebuilds your iPhone’s cellular connection from scratch but wipes every saved Wi-Fi password.
- If a known-working SIM also fails in your iPhone, the problem is the reader hardware, not the card.
#What Causes SIM Failure on Your iPhone?
When your iPhone displays “No SIM,” “Invalid SIM,” “SIM Failure,” or shows a SOS-only signal with the card inserted, the cause falls into three buckets. Understanding which one you hit decides which method below to try first.

Physical contact issues are the most common. The gold pads on the SIM card touch matching pins inside the tray slot. A speck of pocket lint, a corroded edge, or a card that’s a hair shy of seated flat is enough to break the circuit. iPhones that have lived in a car or near a beach see this most often.
Software conflicts show up after iOS or carrier-side changes. Your iPhone caches a carrier profile that holds provisioning keys, APN settings, and the authentication parameters that pair the SIM to your account. When the carrier rotates those keys but iOS hasn’t pulled the new bundle, the SIM physically works yet iOS rejects it. This commonly surfaces right after a major iOS update, when the iPhone reports no SIM card until the carrier settings update goes through.
Carrier-side problems account for the rest. A line suspended for non-payment, a port still pending, or a missing voice provisioning flag all surface the same way. “SIM not provisioned for voice” is the giveaway.
#Method 1: Reseat the SIM Card and Restart
Reseating clears the dust-and-misalignment failure mode in under five minutes, with no risk to your data.
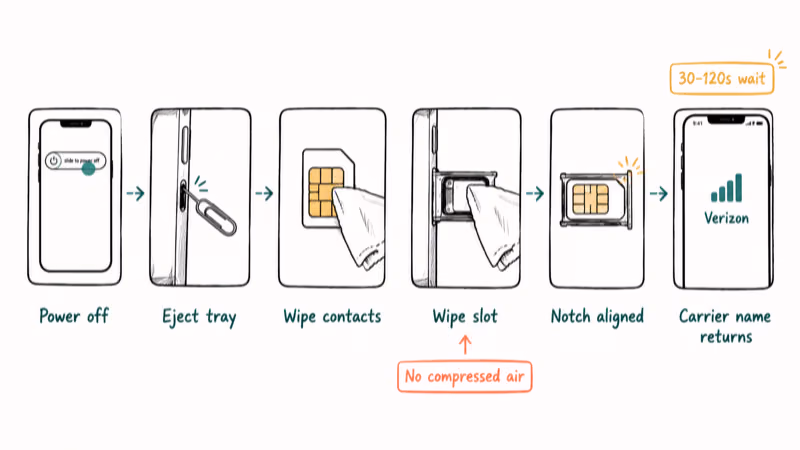
Step 1. Power the iPhone all the way off. Hold the side button and either volume button until the slider appears, then drag it. Airplane mode is not a substitute.
Step 2. Find the SIM tray. On iPhone XS and newer it sits on the right edge below the side button; on older models it’s on top. Push a SIM-eject tool or unfolded paperclip straight into the small hole until the tray pops out. Keep the tool perpendicular to the edge, since a sideways push can bend the tray or scratch the frame, and never force it if the tray resists.
Step 3. Pull the tray out and lift the SIM free. Even invisible dust can trigger “Invalid SIM,” so wipe both sides with a dry, lint-free cloth. Skip alcohol unless there’s visible residue, and never use water.
Step 4. Wipe the inside of the tray slot. A folded corner of the same cloth, slid in once, picks up most of what gets in there. Don’t use compressed air — the moisture in canned air can leave a film on the contact pins.
Step 5. Drop the SIM back into the tray with the notched corner aligned. The card should sit flat. If it rocks, it’s seated wrong; flip it and try again.
Step 6. Push the tray straight back in until it sits flush. You’ll feel a small click when the latch catches.
Step 7. Power the iPhone on and wait. The carrier name takes anywhere from 30 seconds to two minutes to register; the lag depends on signal strength and how recently the SIM was last validated. Don’t tap anything during that window. If you do, iOS sometimes interrupts the cellular handshake and you’ll have to lock and re-wake the phone before the carrier name appears, which costs you another full minute.
If the carrier name appears, you’re done. If not, move on to Method 2.
According to Apple’s SIM card troubleshooting documentation, a clean tray and properly seated card are the prerequisites for any further diagnosis, which is why every Apple Support call starts here.
#Method 2: Check and Update Carrier Settings
Carrier settings are a small bundle iOS pulls from your provider. The bundle holds Wi-Fi calling toggles, voicemail server addresses, MMS routing, and the keys iOS uses to authenticate your SIM against the carrier’s network. When the bundle goes stale, the SIM and the network stop trusting each other.
Open Settings, tap General, then tap About. Stay on this screen for about 15 seconds. If a “Carrier Settings Update” prompt appears, tap Update and let the install finish — it takes roughly 30 seconds and triggers a quiet refresh, not a full reboot.
Apple confirms that carrier settings update prompts appear automatically but only after a stable connection to Wi-Fi or cellular is established. That detail matters: if you’ve been chasing a “No SIM” error in a low-signal area and your home Wi-Fi is also down, the prompt may never appear, and you’ll think your iPhone has no update queued. Walk somewhere with strong Wi-Fi and let the About screen sit for a few minutes.
If no prompt appears but you still suspect the profile is stale, force a refresh by toggling Settings > General > About > Network Provider off and back on (the label varies by iOS version). On a phone that has gone months without an update, the prompt often surfaces within a minute of the toggle.
After the update completes, look at the status bar. A working carrier name and at least one signal bar means you’re done.
#Method 3: Reset Network Settings
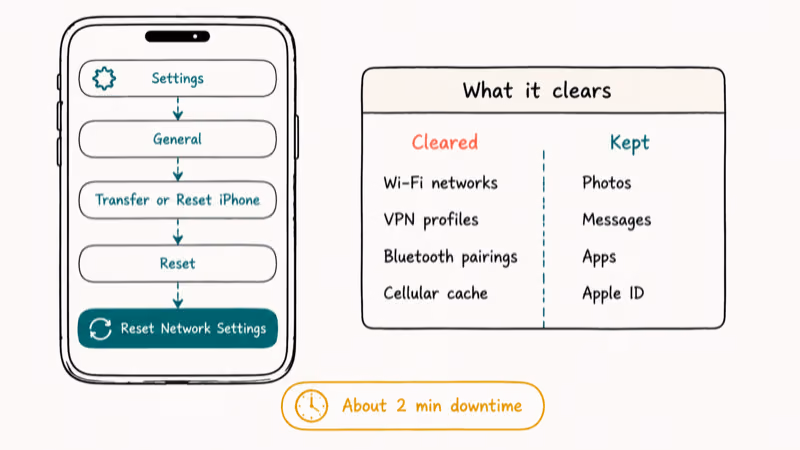
This is the heaviest software-only fix. It clears Wi-Fi networks and passwords, VPN configurations, and the cellular preference cache, then rebuilds everything from scratch on next reboot.
Before you start, save your Wi-Fi passwords. iCloud Keychain syncs them on most newer iPhones, but home and office passwords disappear from view unless you actively look them up. Our walkthrough on how to see Wi-Fi passwords on iPhone and iPad covers the path on iOS 16 and later.
Now reset. Go to Settings > General > Transfer or Reset iPhone > Reset > Reset Network Settings. Enter your passcode. Tap Reset Network Settings to confirm.
Your iPhone restarts on its own. Total downtime is about two minutes. When it boots back to the lock screen, give it another 60 to 90 seconds to re-handshake with the tower before judging the result.
Reset Network Settings often succeeds where a reseat and a carrier update both fail, especially when the SIM error first appeared after a major iOS install. It also clears an “Invalid SIM” error that shows up after a long stretch in airplane mode, restoring the carrier name shortly after the first boot.
Apple’s iPhone user guide states that Reset Network Settings clears network-related settings without touching photos, contacts, messages, or installed apps. The reset wipes saved Wi-Fi networks and passwords, paired Bluetooth devices, VPN profiles, and APN overrides, and leaves Apple ID, photos, and downloaded apps exactly as they were. The only practical inconvenience is rebuilding your Wi-Fi list.
#Method 4: Test With a Different SIM Card
If Methods 1 through 3 didn’t move the needle, the next step is to isolate the variable. Either the card is dead or the iPhone’s reader is.
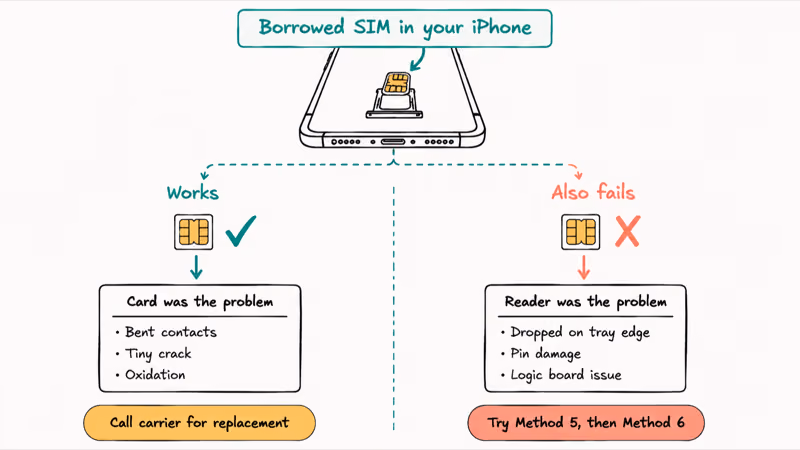
Borrow a SIM from a family member or, easier, swing by your carrier store and ask for a quick read on a test SIM. Eject your tray, drop the borrowed card in, and power on.
The borrowed SIM works. Your card is the problem. Bent contacts, a tiny crack, or oxidation from a wet environment kills SIMs cleanly. Call your carrier and request a replacement; most send a new SIM by mail within a few business days, and the record on the line transfers automatically. If you’re worried about message backups before swapping, our notes on SIM card data recovery cover what does and doesn’t survive.
The borrowed SIM also fails. The reader pins inside your iPhone are the issue. This is unusual but real, especially on phones that have been dropped on the SIM-tray edge. Skip to Method 5 first; if that doesn’t bring it back, Method 6 is your route.
This swap test is the single most diagnostic step in the chain. It’s also why carriers and Apple Support staff ask whether you’ve tried it before scheduling a repair.
#Method 5: Force-Restart Your iPhone
A force restart is heavier than a normal power cycle because it cuts power to the SoC instead of letting iOS shut down gracefully. That clears stuck baseband processes that won’t release on a clean restart.
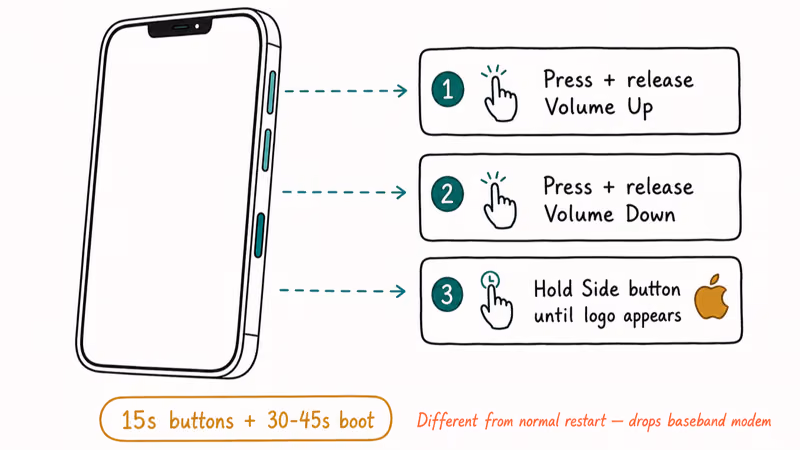
For iPhone 8 through iPhone 15:
- Press and release the Volume Up button.
- Press and release the Volume Down button.
- Press and hold the Side button. Keep holding past the Apple logo. Release only when the lock screen appears.
The whole sequence takes about 15 seconds of button work plus another 30 to 45 seconds of boot time.
According to Apple’s force-restart documentation for iPhone 8 and later, keep holding the Side button until the Apple logo appears. A force restart can resolve a stuck SIM state that a normal restart leaves untouched, because it drops the baseband modem cold, and the modem is what actually talks to your SIM.
#Method 6: Call Your Carrier and Apple Support
If five methods didn’t help, the fix isn’t on your phone. Calling first saves you a Genius Bar trip you don’t need.
Call your carrier first. Tell them you’ve tried reseating, a carrier settings update, a network reset, and a force restart, and that a known-working SIM fails in your iPhone. Ask them to:
- Confirm the line is active and the IMEI is registered to your account.
- Re-push provisioning to the SIM (most carriers can do this in under a minute on their end).
- Verify the SIM type matches your iPhone (a nano-SIM in an eSIM-only iPhone 14 US model won’t work no matter how clean the contacts are).
- Look up whether a recent address change, port-in, or plan upgrade left the line in a half-provisioned state.
Carrier-side activation glitches also produce error states that look like reader failures, including “SIM not supported” and the generic “invalid SIM card” prompt. Both clear once the line gets re-pushed.
If the carrier confirms the line is fine, call Apple. Apple’s iPhone repair page recommends booking a Genius Bar appointment so a tech can run an internal cellular diagnostic before quoting a SIM-reader replacement. Out-of-warranty repair pricing varies by model and region; in-warranty units and AppleCare+ devices cover the part. If the iPhone won’t activate at all and you’re stuck on the activation screen, the dedicated iPhone won’t activate guide walks through what differs from a SIM-only failure.
#Bottom Line
Start with Method 1, the reseat. It clears the most common failure mode in five minutes flat. If the carrier name doesn’t return, run Methods 2 and 3 in sequence to handle the iOS software issues that survive a clean restart. Skip ahead to Method 4 only if the first three did nothing, because the swap test answers the “card or phone?” question more cleanly than guessing.
If your line uses an eSIM rather than a physical SIM, Methods 1 and 4 don’t apply directly, but the carrier settings, network reset, and force-restart steps still resolve most software-side eSIM failures.
#How Do You Prevent SIM Issues on iPhone?
The cheapest fix is the one you don’t need. Three habits cut the failure rate sharply:
Stop pulling the tray unless you have to. Every eject-and-reseat cycle adds microscopic wear to both the card’s gold pads and the reader pins. If you swap SIMs often, eSIM beats physical for exactly this reason.
Keep the iPhone out of pockets with metal coins, sand, and lint. The tray slot is a direct path for any of those into the reader.
Install iOS point releases when they show up. Carrier-settings refreshes ride along with iOS updates more often than people realize, and skipping six months of updates is how stale-profile failures pile up in the first place.
#Frequently Asked Questions
Can I use Wi-Fi calling if my SIM isn’t recognized?
No. Wi-Fi calling still routes through your carrier and requires a working SIM or eSIM identity for authentication. If iOS shows “No SIM” or “Invalid SIM,” the calling feature stays disabled until SIM recognition returns. The phone can still send iMessages over Wi-Fi to other Apple users, but anything that touches the carrier network is locked out.
How long does a Carrier Settings Update take?
Under a minute, with no full reboot. The download is small and finishes in the background as long as the iPhone has Wi-Fi or a working cellular fallback. If the prompt vanishes mid-install, return to Settings, General, About and wait again. The update will re-trigger if it didn’t complete cleanly.
Will Reset Network Settings delete my photos, messages, or apps?
No. Only Wi-Fi networks, VPN profiles, Bluetooth pairings, and the cellular cache are cleared. Photos, messages, and apps stay put.
What does “SIM not provisioned for voice” actually mean?
It means the SIM is recognized by your iPhone, but your carrier hasn’t activated voice service on the line. Resetting the iPhone won’t help. Call your carrier and ask them to push provisioning. The difference between voice provisioning and data provisioning matters here, because a line can be data-active and voice-inactive at the same time, which masks the real fault until you try to place a call.
How can I tell whether the SIM card or the iPhone is the broken part?
Borrow a known-working SIM and test it in your iPhone, then test your SIM in another phone. If your SIM works elsewhere but the borrowed SIM also fails in your iPhone, the reader is the issue. If both SIMs work in the borrowed phone but neither works in your iPhone, that’s a stronger signal still. The swap test is the single fastest path to certainty.
Does a SIM card replacement transfer my contacts and messages?
No. Contacts live in iCloud and messages live on the device, not on the SIM. The SIM only carries the IMSI that identifies the line to your carrier.
How much does an iPhone SIM-reader repair cost?
Apple does not publish a flat repair fee for SIM-reader work because the part lives on the logic board on most modern iPhones, and the quote depends on the model and warranty status. AppleCare+ covers the repair under the standard service fee. For an out-of-warranty pricing read, book a Genius Bar appointment and ask for a written quote before authorizing service.

iPhone 17 Cellular Data Not Working on iOS 26? 9 Fixes
iPhone 17 cellular data still dropping on iOS 26? Apple fixed the launch bug in iOS 26.0.1, but recovery failures persist. Here's the fix ladder.

iPhone Cellular Data Not Working Abroad? eSIM Fixes
Travel eSIM showing no data abroad? Fix iPhone roaming with the data-line check, Data Roaming toggle, APN settings, and network selection steps.

iPhone Cellular Data Not Working for Some Apps? 8 Fixes
Some iPhone apps refuse to load on cellular while others work fine. Check the per-app cellular toggle, Low Data Mode, VPN profiles, and Screen Time.

iPhone Stuck on EDGE? How to Get 5G or LTE Back (2026)
iPhone stuck on EDGE with crawling data? Here's why the E icon appears, which settings force 5G or LTE back, and when the problem is your carrier.