Nvlddmkm.sys Error in Windows: 9 Fixes That Actually Work
Nvlddmkm.sys errors crash gameplay and trigger BSODs. Use this 9-step fix order: clean Nvidia driver reinstall, SFC, DISM, TdrDelay, PSU and RAM tests.

Quick AnswerThe nvlddmkm.sys error means the Nvidia kernel driver stopped responding. Fix it by clean-installing the latest GeForce driver with DDU, then run SFC and DISM, increase the TDR registry timeout, and reset any GPU overclock. Hardware faults (PSU, RAM, PCIe slot) account for the rest.
The nvlddmkm.sys error throws Windows into a black screen, a “Display driver stopped responding and has recovered” toast, or a full BSOD with the file name on the stop screen. The fix order below starts with the most common software causes before moving into hardware isolation.
- The crash points at nvlddmkm.sys, the Nvidia kernel mode display driver that pipes data between Windows and the GPU.
- A clean driver reinstall with Display Driver Uninstaller is the first fix to try after a failed or messy driver update.
- TDR timeouts (the watchdog that kills a hung GPU after 2 seconds) trigger this error when a card is overclocked or under-powered.
- Bad RAM, a failing PSU, or a damaged PCIe slot can reproduce the error even after Windows has been reinstalled.
- If SFC, DISM, driver reinstall, and TDR adjustment all fail, swap the GPU into a known-good system before buying new hardware.
#What Is the Nvlddmkm.sys Error?
Nvlddmkm.sys stands for Nvidia Longhorn Display Driver Model Kernel Mode. It’s the kernel mode component of the GeForce display driver and one of the few drivers that runs at ring 0 with direct GPU access. When Windows reports Display driver nvlddmkm stopped responding and has successfully recovered, the kernel watched the driver miss its deadline and forcibly reset it through the Timeout Detection and Recovery (TDR) mechanism. When recovery itself fails, you get the blue screen.
According to Microsoft’s TDR registry keys documentation, the default TdrDelay is 2 seconds. Anything beyond that and the OS assumes the GPU is hung. That short fuse is why a marginal overclock or a struggling power supply produces this exact error instead of a generic system crash.
#What Causes Nvlddmkm.sys to Fail?
There are six recurring causes. Walk through them in this order before you spend money on parts.

- Stale or corrupt Nvidia driver. A failed update or a leftover from an old card.
- Damaged Windows system files. Bad sectors, interrupted updates, or malware can break files in
C:\Windows\System32\drivers\. - GPU overclock or factory boost too aggressive. A factory-OC card can push past stable clocks under sustained load.
- PSU sag. A power supply that can’t hold 12 V under transient loads starves the GPU mid-frame.
- RAM faults. Memory errors corrupt the data the driver hands to the GPU.
- PCIe contact issues. Dust, a bent slot pin, or a half-seated card breaks the link between motherboard and GPU.
Start with driver corruption and Windows system files, then move to clock, power, memory, and PCIe checks if the crash continues. If you are also seeing related crashes like video TDR failure or system thread exception not handled, the underlying GPU subsystem is almost certainly the source.
#Fix 1: Clean Reinstall the Nvidia Driver With DDU
This is the single highest-yield fix. Driver leftovers from old GeForce releases or a different vendor (AMD, Intel) corrupt the install. Display Driver Uninstaller (DDU) wipes everything and lets you start fresh.
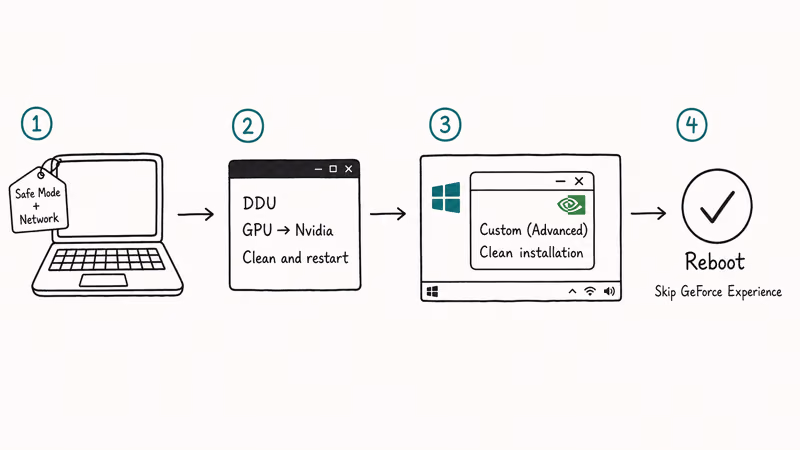
- Download the latest Game Ready or Studio driver from Nvidia’s driver download page for your specific GPU model.
- Download Display Driver Uninstaller from the official Wagnardsoft site.
- Boot Windows into Safe Mode (
msconfig→ Boot tab → Safe boot → Network). - Run DDU, choose GPU, then Nvidia, then Clean and restart.
- After reboot, run the Nvidia installer you downloaded and pick Custom (Advanced) → Perform a clean installation.
Skip GeForce Experience if you want to minimize the surface area; the bare driver’s enough for troubleshooting.
#Fix 2: Run SFC and DISM to Repair Windows
Corrupted system files break the driver loader before nvlddmkm.sys even runs. Microsoft recommends running these two commands in order when drivers misbehave.
Open Command Prompt as administrator, then run:
sfc /scannowWhen it finishes, run:
DISM /Online /Cleanup-Image /RestoreHealthDISM pulls clean copies from Windows Update, so leave it running even if it sits at 20%. The whole pass takes 15 to 30 minutes on a SATA SSD. Restart and check whether the crash repeats.
If SFC reports it couldn’t fix some files, run DISM first and then SFC again. Order matters when component store damage is the root cause.
#Fix 3: Increase the TDR Timeout
If clocks are stable but the driver still gets killed under heavy load, the 2-second TDR window is too tight. Set it to 8 seconds, which Microsoft’s documentation lists as a safe diagnostic value.
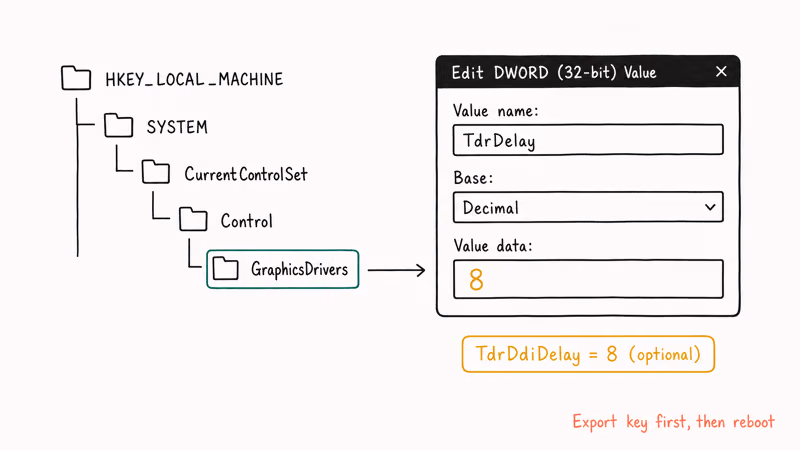
Editing the registry can break Windows. Export the key to a
.regfile before changing anything.
- Press Win + R, type
regedit, press Enter. - Go to
HKEY_LOCAL_MACHINE\SYSTEM\CurrentControlSet\Control\GraphicsDrivers. - Right-click the right pane → New → DWORD (32-bit) Value → name it
TdrDelay. - Double-click it, switch Base to Decimal, set Value data to
8. - Repeat for
TdrDdiDelayset to8if you also want to extend the DDI call timeout. - Restart Windows.
This trades a longer black-screen on a true hang for fewer false-positive driver resets. If 8 seconds still triggers the crash, you have a real GPU stability problem, so move to Fix 4.
#Fix 4: Roll Back GPU Overclock and Reset MSI Afterburner
Factory overclocks and any custom MSI Afterburner profile can push the card past what your specific silicon and PSU can sustain. Identical GPU models can still differ in stable core clock under the same cooler.
- In MSI Afterburner, click the Reset icon to clear core, memory, and voltage offsets.
- Untick Enable low-level IO driver under Settings → General to stop the secondary access path that conflicts with newer Nvidia drivers.
- If your card has a dual-BIOS switch, flip it to the silent or stock position.
- Reboot and stress test with FurMark for 10 minutes to confirm the crash is gone.
Start with a small underclock, then raise clocks only after the crash stops.
#Fix 5: Test the Power Supply
Nvidia’s own driver troubleshooting guidance confirms that an unstable 12 V rail produces driver timeouts that look identical to a software crash. RTX 30-series and 40-series cards have brutal transient spikes, where a 350 W average load can spike to 600 W for milliseconds.
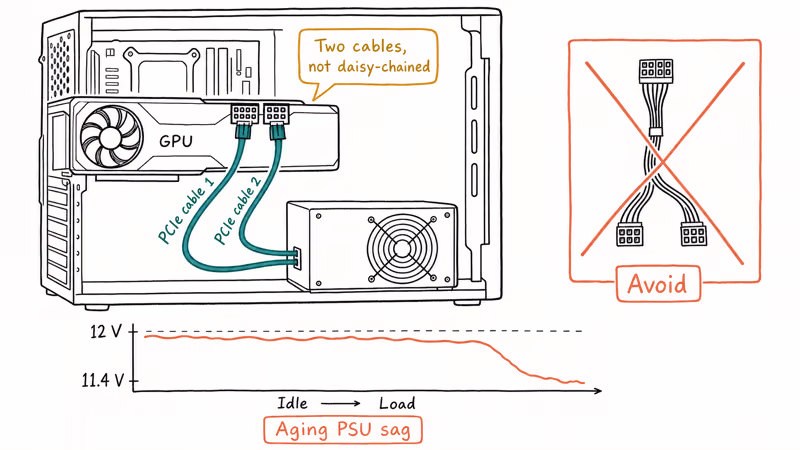
- Confirm your PSU wattage exceeds the GPU’s recommended minimum by 100 W or more.
- Use two separate PCIe cables, not a single cable with a daisy-chained second connector.
- Check that the 8-pin connectors are fully seated; an audible click is required.
- If your PSU is older than 5 years, swap it with a known-good unit before buying a new GPU.
PSU age is invisible to software diagnostics, so don’t skip this step on older builds.
#Fix 6: Run Windows Memory Diagnostic
Bad RAM corrupts the buffers the driver passes to the GPU and triggers nvlddmkm.sys errors that look exactly like driver problems. Microsoft ships a free built-in memory diagnostic that catches most cell failures.
- Press Win + R, type
mdsched.exe, press Enter. - Choose Restart now and check for problems.
- Let the test run two full passes, about 20 minutes per 16 GB stick.
- Windows logs results in Event Viewer → Windows Logs → System under source
MemoryDiagnostics-Results.
If the test reports a hardware problem, reseat the modules first. If errors persist, run MemTest86 from a USB stick for a deeper test, since it catches faults that the built-in tool misses. The same diagnostic flow applies to kernel data inpage errors and other memory-adjacent BSODs.
#Fix 7: Reseat the GPU and Clean the PCIe Slot
Dust, oxidation, or a loose card breaks the GPU’s PCIe link. The link negotiates down to x4 and triggers driver timeouts.

- Power off, unplug, and press the case power button for 10 seconds to drain residual charge.
- Remove the GPU’s retention screws and the slot release latch.
- Pull the card straight up, blow out the slot with compressed air, and wipe the gold contacts with isopropyl alcohol on a lint-free cloth.
- Reseat firmly until the latch clicks, then re-secure the screws.
Try the secondary PCIe x16 slot if you have one. A failing primary slot can mimic a bad graphics card.
#Fix 8: Disable Link State Power Management
Windows aggressively cuts power to PCIe devices when idle, and on some boards that puts the GPU into a state the Nvidia driver does not recover from cleanly. Turning the feature off raises idle power draw by a few watts but eliminates this failure mode.
- Open Control Panel → Hardware and Sound → Power Options.
- Click Change plan settings next to your active plan.
- Click Change advanced power settings.
- Expand PCI Express → Link State Power Management.
- Set both On battery and Plugged in to Off.
- Apply and reboot.
Pair this with disabling the High Precision Event Timer in Device Manager only if the crashes happen during gameplay; the side effect is reduced timer resolution that some games rely on. If the Nvidia Control Panel keeps closing after the change, reset its preferences before assuming this fix failed.
#Fix 9: Check for Conflicting Drivers and BIOS Updates
Two issues land here that the previous fixes don’t catch: outdated motherboard BIOS and conflicting third-party drivers (especially older AMD chipset drivers, virtualization tools, and capture card drivers).
- Check your motherboard vendor’s support page for a BIOS update from the last 12 months. Updates often include AGESA and Intel ME revisions that fix PCIe stability.
- In Device Manager, look for any device with a yellow exclamation mark, since those will fight the GPU for resources.
- Uninstall ASUS GPU Tweak, EVGA Precision X1, and other vendor utilities one at a time to isolate conflicts.
- If you recently installed a USB or storage driver, roll it back via Device Manager → driver → Roll Back Driver.
This is the same isolation flow used for thread stuck in device driver and DPC watchdog violation crashes, since all three share the same kernel-level driver-conflict root cause.
#Hardware Replacement Decision Criteria
Replace the GPU only after these three signals all point the same way: the crash repeats on a clean Windows install, the card fails in a second known-good machine, and stress tests like FurMark or Heaven Benchmark trigger the error within 10 minutes. Anything less and you risk replacing a working card while the actual fault is in the PSU or motherboard.
If the GPU is under warranty (most consumer cards carry 3 years), open an RMA before troubleshooting any further. Nvidia and most board partners require unmodified BIOS, so flash back to stock if you have a custom BIOS installed.
#Bottom Line
Run DDU clean reinstall first, then SFC and DISM, then TDR timeout.
If they don’t, the cause is hardware (PSU, RAM, or PCIe contact). The diagnostic time pays off because you isolate the failing part before buying a replacement. Don’t skip the memory test; it catches faults that driver tools can’t see.
For closely related crashes on the same machine, also work through our dxgkrnl.sys and video_dxgkrnl_fatal_error guides, since fixing one often resolves the others.
#Frequently Asked Questions
Can the nvlddmkm.sys error damage my GPU?
No, not directly. The error is a software-level driver reset.
The risk hides in the underlying cause.
A failing PSU sending unstable voltage, sustained thermal throttling, or hardware-level memory corruption can shorten component life if left unresolved for months. The card itself is rarely the casualty. Fix the root cause soon instead of letting repeated crashes continue.
Does the fix order change for laptops?
Yes. On laptops, skip Fix 7 (you can’t reseat the GPU) and start with Fix 1, then jump directly to Fix 4 because thermal throttling on undersized coolers is the most common cause. Many laptops also disable manual TDR adjustment, so Fix 3 may not stick. Use the laptop vendor’s official driver instead of Nvidia’s generic one when possible.
Why does the error happen only during gaming or video editing?
Heavy 3D loads push the GPU into its highest power and clock state, exposing weaknesses that idle workloads never see.
A failing PSU holds 12 V at 100 W draw but droops at 350 W. A marginal overclock looks stable in Windows but breaks under Cyberpunk 2077 within minutes. Use FurMark or Heaven Benchmark to reproduce the error on demand and shorten your debug loop.
Will reinstalling Windows fix this?
Maybe. A clean install rules out software corruption.
It won’t fix hardware faults. Reinstall only after Fix 1 through Fix 3 fail. If the crash returns on a clean install with a stock driver, you’ve confirmed it’s hardware.
Is GeForce Experience required?
No. GeForce Experience adds telemetry and a game optimizer but isn’t required for the driver to work. Install only the bare driver while troubleshooting. Fewer background services means fewer variables when isolating crashes.
How do I tell if my BSOD was actually nvlddmkm.sys?
Open Event Viewer → Windows Logs → System and filter by Event ID 41 (Kernel-Power) or look for Display driver nvlddmkm stopped responding warnings tagged source nvlddmkm. The dump file at C:\Windows\Minidump\ confirms it. Open it with WinDbg or BlueScreenView and the failing module column will show nvlddmkm.sys if this is your problem.
Should I disable Hardware-Accelerated GPU Scheduling?
Try it. HAGS shifts scheduling work from the CPU to the GPU and stresses the driver in ways some cards don’t handle well. Toggle it under Settings → System → Display → Graphics → Change default graphics settings. Test for 24 hours after the change before assuming it helped or didn’t.

Bluetooth Not Working on Snapdragon X? Fixes for 2026
Bluetooth not working on your Snapdragon X Copilot+ PC? Generic audio, mice, and keyboards work, but vendor apps often lack an ARM build. Fixes inside.

Docker Desktop and WSL2 Not Working on Snapdragon X? Fix It
WSL2 runs fine on Snapdragon X, but Docker Desktop ARM is Early Access and throws WSL errors. Use WSL2 plus native ARM64 Ubuntu and Docker Engine.

Does iTunes Work on Snapdragon X? ARM Windows 11 Guide
Yes, iTunes runs on Snapdragon X laptops through Prism emulation, but the Apple Devices app is the smoother route. Here is what to install on ARM.

Does OBS Studio Work on Snapdragon X? ARM64 Build Guide
Yes, OBS Studio has an experimental ARM64 build since version 31.1, but x64 plugins won't load and hardware encoding is missing. Here is what works.