TiWorker.exe High CPU on Windows: 8 Fixes That Work
Fix TiWorker.exe high CPU on Windows 10 and 11 with safe Windows Update checks, SFC, DISM, cache cleanup, and driver troubleshooting steps for PCs.

Quick AnswerTiWorker.exe is the Windows Modules Installer Worker that processes Windows Update components, and high CPU drops once SFC and DISM finish repairing the component store, the SoftwareDistribution cache is cleared, and pending updates fully install. Most cases settle within 30 to 60 minutes.
TiWorker.exe is Windows Modules Installer Worker, the helper process that stages Windows Update components, and the spike you’re seeing in Task Manager is almost always tied to an in-progress or broken update. The fix order matters: let the update finish, then repair the component store, then chase corrupted files or drivers.
- TiWorker.exe lives at C:\Windows\winsxs and runs under the TrustedInstaller service, so killing it from Task Manager will only relaunch it on the next update tick.
- Active Windows Update sessions can pin 1 to 4 CPU cores for 20 to 60 minutes; let the update finish before you start troubleshooting.
- The Windows Update troubleshooter resolves the most common stuck-state cases without touching system files.
- SFC and DISM repair the Component-Based Servicing store that TiWorker uses, and both must complete before the high-CPU loop will end.
- Clearing the SoftwareDistribution cache forces Windows to redownload update metadata, which fixes corrupted update payloads in one step.
#What Is TiWorker.exe and Why Does It Spike CPU?
TiWorker.exe stands for Trusted Installer Worker. It’s the worker process spawned by the Windows Modules Installer service. It runs whenever Windows is installing, removing, or verifying optional components, cumulative updates, or driver packages.
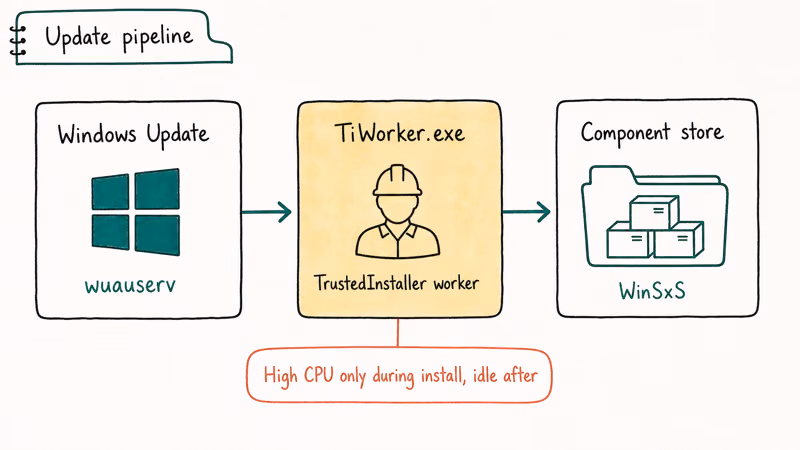
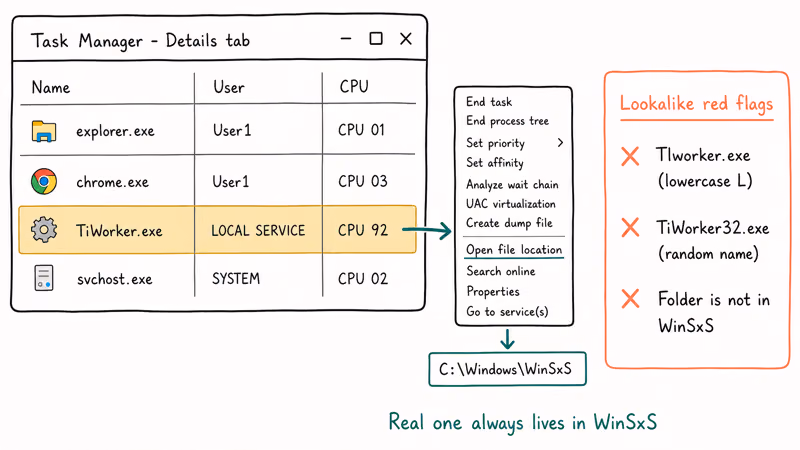
The binary lives at C:\Windows\winsxs and is signed by Microsoft.
As Microsoft’s servicing stack documentation explains, the component-based servicing stack is the engine behind DISM, SFC, and feature changes, so TiWorker can run for a long stretch during a major update, sometimes for an hour or more before it settles.
The CPU spike usually has one of three causes. Active update work is the friendly version: a cumulative update or .NET runtime is staging, and Windows is verifying file hashes against the catalog. Corrupted Component-Based Servicing files are the painful version: TiWorker tries to repair the store, fails, retries, and the loop pegs CPU until you intervene.
Driver installations triggered by Windows Update are the sneaky third cause. An unsigned or mismatched driver can keep TiWorker churning every time the service starts. You can confirm which one you’re dealing with by opening Task Manager and right-clicking TiWorker.exe.
If “Go to service” lands on TrustedInstaller and the service status is Running, an update is in flight. If TiWorker.exe restarts within seconds of you ending the task, the cycle is stuck on something it can’t finish alone.
#How Do You Know TiWorker.exe Is the Real Culprit?
Don’t trust the CPU column alone. Three quick checks confirm TiWorker is the actual problem and not a symptom of something else.
First, open Event Viewer and look under Windows Logs > Setup. A TiWorker stall often leaves a CBS error in this log. The most common entry text is “CBS_E_STORE_CORRUPTION” or “CBS_E_NOT_APPLICABLE.” A clean spike from an active install shows no errors and a string of informational events.
Second, check pending update state. Open Settings > Windows Update and look for a stuck “Preparing to install” banner or a stalled download.
A stuck “Initializing” banner can mean Windows needs the SoftwareDistribution cache cleared by hand. After clearing the cache, start a fresh download from Settings > Windows Update > Check for Updates and let TiWorker stage the new payload from scratch.
Third, run wmic process where name="TiWorker.exe" get WorkingSetSize,KernelModeTime from an elevated Command Prompt. KernelModeTime climbing past 30 minutes of clock time with no progress in Settings is the signature of a stuck loop, not normal install work.
#Fix 1: Let the Update Finish Before You Touch Anything
Killing TiWorker mid-job is the most common mistake people make, and on a slow spinning disk that mistake gets ugly fast because the service has to redo every staged hash check from scratch. Microsoft confirms that 45 to 90 minutes of high CPU is normal during a feature update on a 5400 RPM drive, and older SATA II machines can take longer. The full sequence lives in Microsoft’s Windows Update troubleshooting guide.
Open Settings > Update & Security > Windows Update and check the status banner. If it says “Downloading,” “Installing,” or “Preparing to restart,” walk away for 60 minutes. Plug the laptop into power. Watch the percentage tick up in 10-minute intervals.
This single step resolves many short-lived update spikes.
#Fix 2: Run the Windows Update Troubleshooter
If the update banner says “Failed” or hasn’t moved in over an hour, run the built-in troubleshooter before anything else. It’s safe, it’s automatic, and it fixes service-state mismatches that account for most stuck-update loops.
On Windows 10, go to Settings > Update & Security > Troubleshoot > Additional troubleshooters > Windows Update > Run the troubleshooter. On Windows 11, go to Settings > System > Troubleshoot > Other troubleshooters > Windows Update > Run. The tool stops the relevant services, resets the BITS queue, clears small bits of cache, and restarts everything in the right order. The whole pass takes 3 to 5 minutes.
When it finishes, restart the PC and watch Task Manager for 10 minutes. If TiWorker still spikes above 50 percent without any visible update progress, move to the next fix.
#Fix 3: Clear the SoftwareDistribution Folder
SoftwareDistribution is C:\Windows\SoftwareDistribution, the staging area where Windows holds downloaded update payloads, BITS download queues, and the manifest files the servicing stack reads during a CBS pass. Corruption inside this folder is a common cause of a stuck TiWorker loop, and the cleanup is a short command sequence you can run from an elevated Command Prompt.
Right-click Start>Terminal(Admin) or Command Prompt (Admin).- Run
net stop wuauservand wait for the success message. - Run
net stop bitsand wait again. - Open File Explorer, go to C:\Windows\SoftwareDistribution, and delete everything inside the folder. Keep the folder itself.
- Back in the elevated prompt, run
net start wuauservand thennet start bits. Open Settings>Windows Update andclick Check for Updates. Windows will rebuild the cache and redownload anything that was queued.
The first redownload pass will spike CPU again for 10 to 20 minutes; that’s expected because TiWorker is staging the fresh payload. After that pass, the high-CPU loop should be gone.
#Fix 4: Run SFC and Then DISM in Order
System File Checker and Deployment Image Servicing and Management are the two tools Microsoft ships for repairing the files TiWorker depends on. Run them in this order: SFC first, then DISM. If you run DISM first on a system with damaged servicing files, DISM itself can fail.
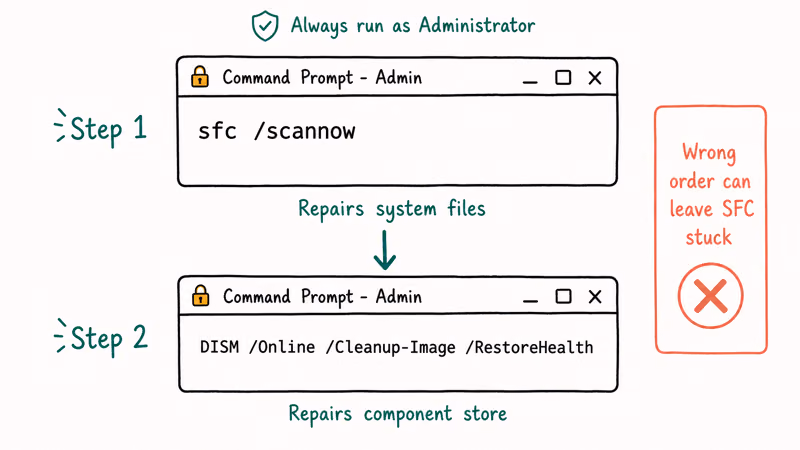
Open an elevated Command Prompt and run:
sfc /scannowThe scan takes 15 to 45 minutes on most systems. The tail of the output tells you what happened:
- “Windows Resource Protection did not find any integrity violations”: move to DISM as a precaution.
- “Windows Resource Protection found corrupt files and successfully repaired them”: restart and recheck Task Manager.
- “Windows Resource Protection found corrupt files but was unable to fix some of them”: DISM is the next step.
Now run DISM:
DISM /Online /Cleanup-Image /RestoreHealthDISM downloads replacement components from Windows Update, so the PC needs internet access. Microsoft’s DISM repair documentation recommends running DISM /RestoreHealth before reattempting any failed update, and notes the scan can take a while to complete. The pass may appear to stall partway through, so let it finish.
When DISM finishes, run sfc /scannow one more time. A clean second pass is the signal that the component store is healthy and TiWorker won’t get stuck again.
#Fix 5: Pause and Resume Windows Update
This sounds too simple to work, but it’s a low-risk queue reset before you reach for nuclear options. Pausing Windows Update for 7 days, restarting, and unpausing forces the service to rebuild its queue from scratch without touching system files.
Go to Settings > Windows Update > Pause for 1 week. Restart the PC. Wait 5 minutes after the desktop fully loads, then go back to the same Settings page and click Resume Updates, then click Check for Updates. The pause and unpause forces Windows to throw away the half-staged metadata that was wedging TiWorker, and the fresh scan rebuilds the queue from the current Microsoft catalog.
The first scan after a resume is heavier than usual because Windows reconciles what it has against the current catalog. Expect 5 to 10 minutes of moderate CPU from TiWorker.
That’s normal behavior. Sustained 90+ percent for over 30 minutes after the resume points back to a corrupted component store, and you should go back to Fix 4.
#Fix 6: Run the System Maintenance Troubleshooter
Less famous than the Windows Update troubleshooter, the System Maintenance pass cleans up broken shortcuts, fixes time/timezone mismatches, and resets some servicing flags that TiWorker reads on startup. Microsoft confirms in its Windows Update troubleshooting guide that the troubleshooter is still shipped and supported on both Windows 10 and 11.
Open Control Panel > Troubleshooting > System and Security > System Maintenance, then click Next. The pass takes about 2 minutes. After it completes, restart the PC and watch Task Manager. If TiWorker still spikes, you’ve now ruled out two of the most common service-state causes.
#Fix 7: Update Drivers, Especially Storage and Chipset
Driver-related TiWorker loops are the sneaky ones because nothing in Task Manager points at the driver itself, only at TiWorker doing the staging work. A mismatched chipset, storage, or graphics driver keeps Windows Update returning the same package every cycle, and TiWorker re-stages it every time the service ticks. The fix is to install the vendor driver directly, which stops Windows Update from re-offering the broken package.
Start with storage and chipset drivers because they touch every disk write TiWorker performs. For laptops, grab the OEM bundle from Dell, HP, Lenovo, or ASUS support.
Skip the third-party “driver updater” tools. They install generic drivers, can downgrade existing working ones, and create the exact mismatch that triggers TiWorker loops. Microsoft’s Windows Update FAQ recommends getting drivers directly from your device maker, since OEM packages account for the bulk of compatible Windows 10 and 11 driver installs.
After updating storage and chipset drivers, restart the PC, give it 10 minutes idle, and recheck Task Manager.
#Fix 8: Restart Windows Update and Related Services
When clearing SoftwareDistribution doesn’t stick, the underlying services may be in a half-started state. Reset them all at once with this five-command sequence in an elevated Command Prompt:
net stop wuauserv
net stop cryptSvc
net stop bits
net stop msiserver
net stop trustedinstaller
ren C:\Windows\SoftwareDistribution SoftwareDistribution.old
ren C:\Windows\System32\catroot2 catroot2.old
net start wuauserv
net start cryptSvc
net start bits
net start msiserver
net start trustedinstaller
This stops every update-adjacent service, renames the two folders Windows uses for update payloads and security catalog signatures, and restarts everything. Windows recreates fresh folders on the next update check. The rename approach is safer than delete because if anything breaks, you can rename the .old folders back.
After running the block, open Settings > Windows Update and click Check for Updates. TiWorker will spike for 10 to 30 minutes as the fresh staging happens, then settle.
For related Windows performance issues, our guides on WSAPPX high CPU and Service Host Local System high CPU follow the same diagnostic logic, and we also cover WMI Provider Host high CPU and Desktop Window Manager high CPU separately.
If TiWorker fixes don’t stick and your PC feels sluggish in general, our Windows 10 slow troubleshooting guide covers the broader checks.
#How to Tell If TiWorker.exe Is Malware
Real TiWorker.exe is a Microsoft-signed file at C:\Windows\winsxs. Anything pretending to be TiWorker outside that path is a red flag. Three checks confirm authenticity in under a minute.
Open Task Manager, right-click TiWorker.exe, choose Open file location, and confirm the path contains C:\Windows\winsxs. Right-click the binary, choose Properties > Digital Signatures, and confirm Microsoft Windows is the signer with a valid date. Run Get-AuthenticodeSignature -FilePath "C:\Windows\winsxs\...\TiWorker.exe" in an elevated PowerShell to confirm Status is “Valid.”
If any check fails, or the file is at a path like C:\Users\YourName\AppData or C:\Temp, run a full Windows Defender Offline scan from Settings > Update & Security > Windows Security > Virus & threat protection > Scan options > Microsoft Defender Offline scan. The scan reboots the PC and runs from outside Windows, which catches malware that hides while the OS is running.
#Bottom Line
Start with Fix 1 and give the update an honest 60 minutes. Then run the Windows Update troubleshooter. If TiWorker still spikes, the right sequence is clear the SoftwareDistribution cache, run SFC, run DISM /RestoreHealth, and re-run SFC.
That four-step chain resolves many corrupted Component-Based Servicing cases. If the spike persists after a clean DISM pass, the cause is almost always a bad driver, not Windows itself, and the fix is the chipset or storage driver from your PC’s manufacturer.
A WHEA uncorrectable error or potential Windows update database error can keep TiWorker stuck forever, so fix either one first.
For background on the parent service that owns TiWorker, our TrustedInstaller guide explains why you can’t just disable it, and why the Elara app and similar OEM helpers sometimes trigger update-related CPU spikes.
#Frequently Asked Questions
Can I disable TiWorker.exe permanently?
No. Don’t try. TiWorker is required for Windows Update.
How long should TiWorker.exe run at high CPU?
A normal update cycle pins 1 to 4 CPU cores for 20 to 60 minutes during install. After that window, TiWorker should drop to under 5 percent CPU and stay there. Anything sustained over an hour without visible update progress is a stuck loop, not normal work, and Fix 3 (clearing SoftwareDistribution) ends most stalled cycles within another hour.
Will killing TiWorker.exe in Task Manager fix the spike?
It won’t. Windows respawns TiWorker the moment the TrustedInstaller service has work to do, and force-killing it mid-install can corrupt the component store.
Why does TiWorker.exe spike after every restart?
If TiWorker ramps up within 1 to 2 minutes of every login, an update or driver install failed and Windows is retrying it on boot. Run SFC and DISM, then check Settings > Windows Update for any update stuck on “Failed” or “Pending restart.”
Is high CPU from TiWorker dangerous to my hardware?
No, modern CPUs throttle before they damage themselves. The real risks are battery drain on laptops and a frozen-feeling disk.
Does pausing Windows Update permanently stop TiWorker.exe?
Pausing only delays new updates. Existing in-flight work continues, so TiWorker may still run for a while. After the pause expires (Windows 10 caps it at 35 days, Windows 11 at 5 weeks), all the queued updates resume at once and TiWorker can spike hard.
Can a corrupted driver be the only cause of TiWorker.exe high CPU?
Yes. A single-driver mismatch can keep TiWorker active every time Windows Update scans, even with an otherwise healthy component store. The chipset, storage, and audio drivers are the most common culprits because they ship through Windows Update on a regular cadence. When that pattern shows up, the fix is to install the vendor driver directly from Intel, AMD, or the OEM, then hide the offending Windows Update driver entry using the official “wushowhide” troubleshooter from Microsoft.
Should I use third-party tools to fix TiWorker.exe?
Stick with the Microsoft-provided ones: Windows Update troubleshooter, SFC, DISM, and Defender.

Bluetooth Not Working on Snapdragon X? Fixes for 2026
Bluetooth not working on your Snapdragon X Copilot+ PC? Generic audio, mice, and keyboards work, but vendor apps often lack an ARM build. Fixes inside.

Docker Desktop and WSL2 Not Working on Snapdragon X? Fix It
WSL2 runs fine on Snapdragon X, but Docker Desktop ARM is Early Access and throws WSL errors. Use WSL2 plus native ARM64 Ubuntu and Docker Engine.

Does iTunes Work on Snapdragon X? ARM Windows 11 Guide
Yes, iTunes runs on Snapdragon X laptops through Prism emulation, but the Apple Devices app is the smoother route. Here is what to install on ARM.

Does OBS Studio Work on Snapdragon X? ARM64 Build Guide
Yes, OBS Studio has an experimental ARM64 build since version 31.1, but x64 plugins won't load and hardware encoding is missing. Here is what works.