TrustedInstaller in Windows: What It Is, Why It Matters
TrustedInstaller owns Windows system files and runs Windows Update. Here's what it does, why it spikes CPU, and how to repair files the safe way.

Quick AnswerTrustedInstaller is the Windows Modules Installer service account that owns protected system files and runs Windows Update. It's a legitimate Windows component, not a virus, and you shouldn't disable or delete it.
TrustedInstaller is the Windows account that owns system files and runs Windows Update. Disabling it breaks Windows Update; understanding it saves you a panicked uninstall. Here’s what it actually does and how to fix the symptoms people blame on it.
- TrustedInstaller is a built-in Windows account, not a process you started, and it owns most files in C:\Windows and C:\Program Files.
- The matching executable is TrustedInstaller.exe at C:\Windows\servicing, and the on-disk size is roughly 100 to 200 KB on Windows 10 and 11.
- High CPU after a Windows Update is normal for a short window, since the service is staging the new component store.
- SFC and DISM are the two repair tools Microsoft ships for damaged TrustedInstaller-owned files, and they run from an elevated Command Prompt.
- Adjust ownership only on the specific file or folder you must change, and switch ownership back to TrustedInstaller when you’re done.
#What Is TrustedInstaller in Windows?
TrustedInstaller is the built-in security principal that owns protected Windows system files. The service running under that account is Windows Modules Installer, and the executable on disk is TrustedInstaller.exe inside C:\Windows\servicing. Open Task Manager and you’ll see it as TrustedInstaller.exe. Open Properties on any folder under C:\Windows and you’ll see it as the listed owner.
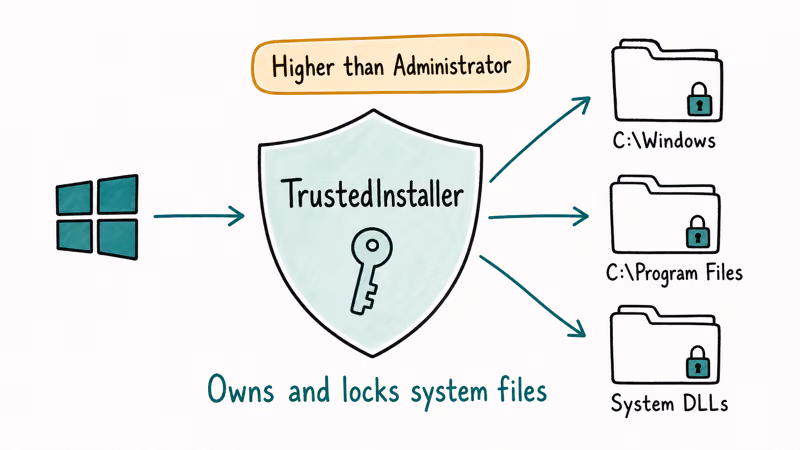
Isolation is the whole point. By giving system files to a separate account, Windows stops normal administrators and regular users from rewriting Notepad, Defender, or update components by mistake. According to Microsoft’s security identifier reference, TrustedInstaller has a fixed SID, S-1-5-80-956008885-3418522649-1831038044-1853292631-2271478464, that Windows generates at install time. You can’t log in as TrustedInstaller and you don’t need to.
The service stays silent most of the time. It wakes up when Windows Update has new components to apply, when an in-place upgrade runs, or when you trigger a repair tool such as SFC.
Wondered what actually writes the bits during a feature update? That’s it.
#Is TrustedInstaller a Virus or Just a Resource Hog?
TrustedInstaller isn’t a virus when it lives in C:\Windows\servicing and is signed by Microsoft.
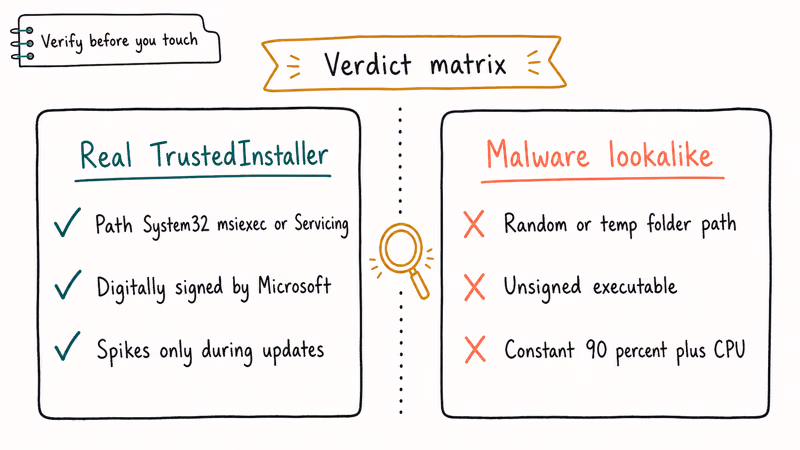
Confirm this in Task Manager: right-click TrustedInstaller.exe, pick Properties, and open the Digital Signatures tab. The signer should read Microsoft Windows. If the file lives in C:\Users, C:\Temp, or any random AppData subfolder, treat it as suspect, scan with Windows Security plus a second-opinion scanner, and quarantine.
The real complaint is resource use, not malware. TrustedInstaller.exe can pull heavy CPU for a stretch after a cumulative update finishes downloading, then drop back to idle. That pattern is normal. It can also spike later when servicing tasks prune the WinSxS component store.
A quick sanity check: open Task Manager, sort by CPU, and look for the parent process. If it’s Service Host: Windows Modules Installer or TiWorker.exe, the work belongs to the update pipeline. If TrustedInstaller.exe is the only process burning cycles for hours with no recent Windows Update activity, the file location check above is your next move, and a full antivirus scan is the right response.
For a similar but distinct background component, the Service Host: Local System high disk and CPU write-up walks through reading svchost groupings the same way.
#Common Symptoms and What They Mean
People search for TrustedInstaller for three reasons. The fixes differ.
One pattern is the message You require permission from TrustedInstaller to make changes to this file. That’s Windows refusing to let an administrator overwrite a system file. The fix is to adjust ownership on that one file or folder, make your change, and put ownership back. Microsoft documents the flow in the icacls command reference, which is how the same change runs from an elevated Command Prompt.
Another pattern is high CPU or high disk by TrustedInstaller.exe that doesn’t clear up after a reboot. The usual cause is a stuck Windows Update job. Microsoft recommends running the Windows Update troubleshooter before doing anything drastic, since it resets the update components automatically.
A third pattern is Windows Resource Protection could not perform the requested operation when running sfc /scannow. That error means the Windows Modules Installer service is stopped or damaged, and the same fix is in our walkthrough for the Windows Resource Protection could not perform the requested operation message.
None of these point to malware on their own. They point to update plumbing.
#How to Adjust Ownership of a Protected File Safely
Sometimes you actually need to replace one Windows-owned file, for example a custom theme resource or a stale OEM driver. Do this on the single file or single folder you need, never on C:\Windows as a whole. Wholesale changes break Windows Update and feature upgrades.
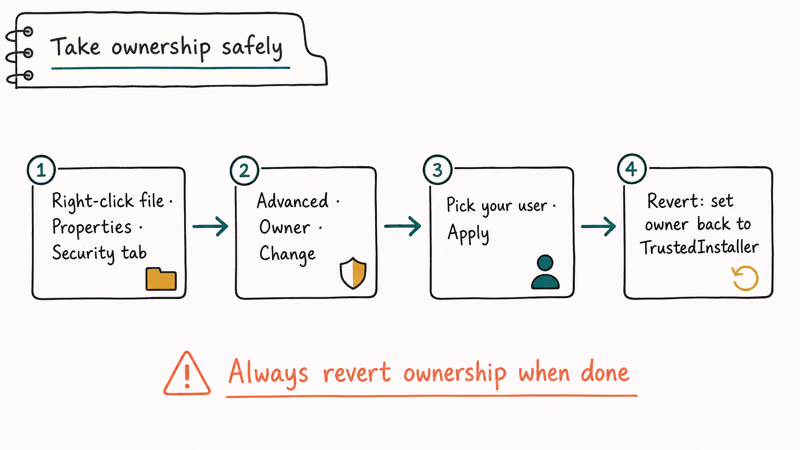
- Open File Explorer and locate the file. Right-click it and pick Properties.
- Go to the Security tab and click Advanced.
- Next to Owner: TrustedInstaller, click Change.
- Type your account name (or Administrators), click Check Names, then OK.
- Back in the Advanced dialog, click Add, add your account with Full control, then Apply and OK.
When you’re finished, open the same Advanced dialog and change ownership back to NT SERVICE\TrustedInstaller. That last step matters.
If TrustedInstaller stops owning the file, Windows Update can refuse to patch it the next time Microsoft pushes an update for that component. Restoring ownership gives Windows Update permission to service the protected file again.
Prefer the command line? The icacls command linked above plus takeown /F "C:\path\to\file" accomplishes the same thing. Same caution: revert ownership when you’re done.
For permission errors elsewhere on the system, our guide to you need permission to perform this action covers the variant that isn’t actually about TrustedInstaller.
#Using SFC and DISM to Repair Windows Components
If TrustedInstaller-owned files are damaged, repair the component store from an elevated Command Prompt.
- Press the Windows key, type cmd, right-click Command Prompt, and pick Run as administrator.
- Run
sfc /scannow. The verification usually takes 5 to 15 minutes on an SSD. - If SFC reports it couldn’t fix something, run
DISM /Online /Cleanup-Image /RestoreHealthnext. Microsoft’s DISM servicing command reference confirms that this command repairs Windows 10 and Windows 11 component stores using Windows Update as the source by default. - Re-run
sfc /scannow. With the component store healthy, SFC can now fix the files it couldn’t touch on the first pass.
DISM /RestoreHealth can take a while because it checks the component store and may pull repair files from Windows Update. The follow-up SFC scan can then repair protected files that the first SFC pass logged as unrecoverable.
If DISM can’t reach Windows Update, point it at a local source. Mount a Windows ISO that matches your current build and run DISM /Online /Cleanup-Image /RestoreHealth /Source:WIM:D:\sources\install.wim:1 /LimitAccess, replacing D: with your mount letter. The official SFC reference and the DISM image management reference cover the full flag set.
For more general background, our piece on how to fix corrupted files covers what to do when both tools run clean but errors persist.
#When to Use Windows Recovery and Update Tools
If SFC and DISM can’t reach a healthy state, escalate in this order.
- Windows Update troubleshooter.
Settings>System>Troubleshoot>Othertroubleshooters > Windows Update. It clears the SoftwareDistribution and catroot2 folders and restarts the Windows Modules Installer service for you. - Windows Update Reset Components script. Microsoft publishes the exact
net stop wuauservand rename sequence on the same Windows Update troubleshooter support page. Running it manually fixes cases where the troubleshooter alone gives up. - Windows Recovery Environment. Hold Shift while clicking Restart, then go to
Troubleshoot>Advancedoptions. Microsoft’s recovery options in Windows guide states that Startup Repair, System Restore, and Reset This PC are all available there without installation media. - In-place upgrade. Mount the latest Windows ISO from the Software Download site, run setup.exe, and choose Keep personal files and apps. This reinstalls every TrustedInstaller-owned file while preserving your data and installed programs.
Each step is reversible up to the in-place upgrade. Start with the troubleshooter, then try DISM, then move to the recovery menu if the update queue still won’t clear.
Same recovery flow applies if a feature-update install stalls instead; the Modern Setup Host high disk usage guide walks through the setup engine that takes over once TrustedInstaller hands off.
#Bottom Line
Leave TrustedInstaller alone in normal operation. The single most useful fix for almost every TrustedInstaller-related symptom is to run sfc /scannow, then DISM /Online /Cleanup-Image /RestoreHealth, then SFC again. That order repairs the component store, then the protected files that depend on it.
If you must adjust ownership on a specific file, do it for that file only and switch ownership back to TrustedInstaller as soon as the change is in place. Disabling Windows Modules Installer to “stop” TrustedInstaller is the worst answer; it stops Windows Update and breaks future feature upgrades.
#Frequently Asked Questions
Can I safely disable or delete TrustedInstaller.exe?
No. TrustedInstaller is required for Windows Update, in-place upgrades, and protected file repair. Disabling the Windows Modules Installer service breaks all three.
Why does TrustedInstaller use so much CPU after a Windows Update?
Right after an update installs, the service is staging files and pruning the component store. On a typical PC this finishes in 10 to 30 minutes, then drops to idle. If it lasts hours with no recent update activity, run the Windows Update troubleshooter first.
How long does sfc /scannow usually take?
It runs in about 5 to 15 minutes on an SSD and a bit longer on a spinning drive. Times depend on how many protected files Windows has and how much repair work is needed. Don’t interrupt it before it reaches 100 percent.
Is the WinSxS folder linked to TrustedInstaller?
Yes. WinSxS is the component store, and TrustedInstaller owns the files inside it. Don’t manually delete anything in WinSxS. To shrink it, use DISM /Online /Cleanup-Image /StartComponentCleanup instead.
Will adjusting file ownership cause problems later?
It can. If TrustedInstaller no longer owns a file Windows expects to update, future cumulative updates may fail or skip that file. Switch ownership back to NT SERVICE\TrustedInstaller after your change so Windows Update can patch the file again.
What is the difference between TrustedInstaller and Windows Modules Installer Worker?
TrustedInstaller is the security account and the service host. Windows Modules Installer Worker, also called TiWorker.exe, is the worker process that does the actual install work the service requests. You’ll often see both names in Task Manager during an update.
Is there a way to stop the high CPU usage permanently?
Stopping it permanently is the same as stopping Windows Update. The right answer is to let the service finish, then keep the system patched so future updates are smaller and faster. Pausing updates from Settings is the only sanctioned way to delay the work, and you should resume them within the 35-day cap Microsoft allows.

Bluetooth Not Working on Snapdragon X? Fixes for 2026
Bluetooth not working on your Snapdragon X Copilot+ PC? Generic audio, mice, and keyboards work, but vendor apps often lack an ARM build. Fixes inside.

Docker Desktop and WSL2 Not Working on Snapdragon X? Fix It
WSL2 runs fine on Snapdragon X, but Docker Desktop ARM is Early Access and throws WSL errors. Use WSL2 plus native ARM64 Ubuntu and Docker Engine.

Does iTunes Work on Snapdragon X? ARM Windows 11 Guide
Yes, iTunes runs on Snapdragon X laptops through Prism emulation, but the Apple Devices app is the smoother route. Here is what to install on ARM.

Does OBS Studio Work on Snapdragon X? ARM64 Build Guide
Yes, OBS Studio has an experimental ARM64 build since version 31.1, but x64 plugins won't load and hardware encoding is missing. Here is what works.