Fix the Potential Windows Update Database Error Detected
Fix the potential Windows update database error detected with the troubleshooter, SoftwareDistribution reset, sfc /scannow, and DISM RestoreHealth steps.
Quick AnswerRun the Windows Update troubleshooter, then reset SoftwareDistribution and catroot2 after stopping wuauserv and cryptSvc. Most database errors clear within one reboot.
The “potential Windows update database error detected” message means the troubleshooter spotted inconsistencies inside the local update store. The practical fix path follows the same sequence Microsoft support materials point users toward: troubleshooter, service reset, sfc, DISM, and a clean install pass.
- The error is a checksum or registry mismatch inside
%SystemRoot%\SoftwareDistribution, not a hardware fault. - Microsoft’s built-in Windows Update troubleshooter resolves it on the first pass for most home PCs.
- Manually resetting
SoftwareDistributionandcatroot2after stoppingwuauservandcryptSvcclears stuck downloads. sfc /scannowfollowed byDISM /Online /Cleanup-Image /RestoreHealthrepairs corrupted servicing files in roughly 15 minutes.- Skip third-party “registry cleaner” apps. Only run tools signed by Microsoft so the servicing stack stays intact.
#What Triggers the Potential Windows Update Database Error?
The Windows Update database lives at C:\Windows\SoftwareDistribution\DataStore\DataStore.edb. It’s an ESE database that tracks which packages have been downloaded, staged, and installed.
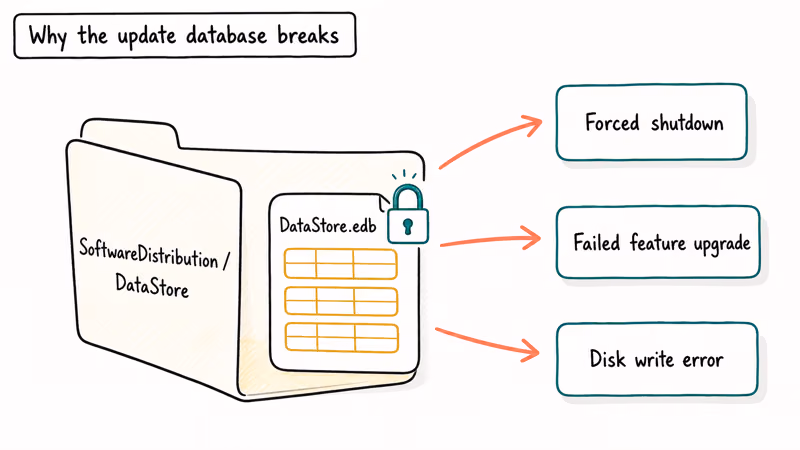
According to Microsoft’s Windows Update troubleshooting guide, 3 root causes show up most often: a forced shutdown during an update, a failed feature upgrade, or disk write errors during the servicing transaction.
The troubleshooter labels any of these as “potential” because it can’t always tell whether the database is unreadable or just locked by a stuck wuauserv process. Either way, the fix path is the same: reset the database, repair system files, and let Windows rebuild the catalog on the next scan.
The message commonly appears after a cumulative update rolls back, a feature upgrade stalls, or the machine loses power mid-install. Start with the troubleshooter, then reset the update folders manually if the error returns.
If your PC also throws disk-related stop codes alongside the update error, work through our bad pool caller guide first to rule out memory corruption.
#Solution 1: Run the Windows Update Troubleshooter First
Always start here. The built-in troubleshooter resets components, restarts services, and re-registers DLLs in the right order. Microsoft recommends running it before any manual command-line work.
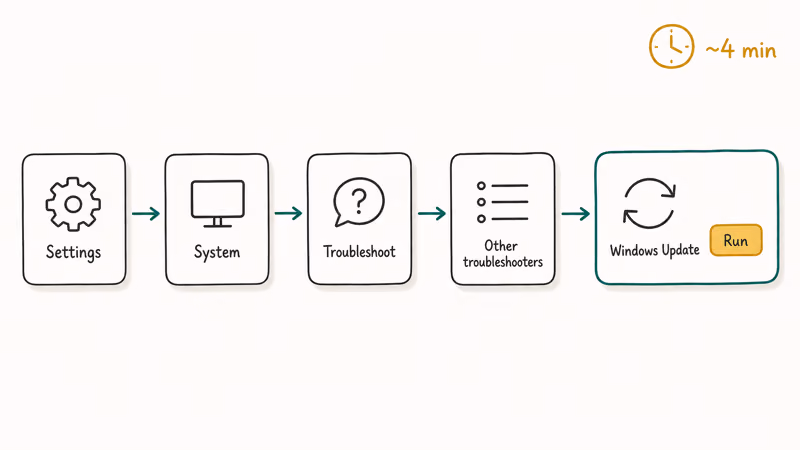
On Windows 11, go to Settings > System > Troubleshoot > Other troubleshooters and click Run next to Windows Update. On Windows 10, the path is Settings > Update & Security > Troubleshoot > Additional troubleshooters > Windows Update.
The wizard takes about 4 minutes. Reboot. Run a fresh update check at Settings > Windows Update > Check for updates. If the database error reappears, move to Solution 2.
#Solution 2: Reset the SoftwareDistribution and catroot2 Folders
This is the manual version of what the troubleshooter does. Use it when the troubleshooter reports “potential errors detected” but can’t fix them automatically. Skip nothing in the sequence; the order matters because wuauserv keeps a write lock on the database while it runs.
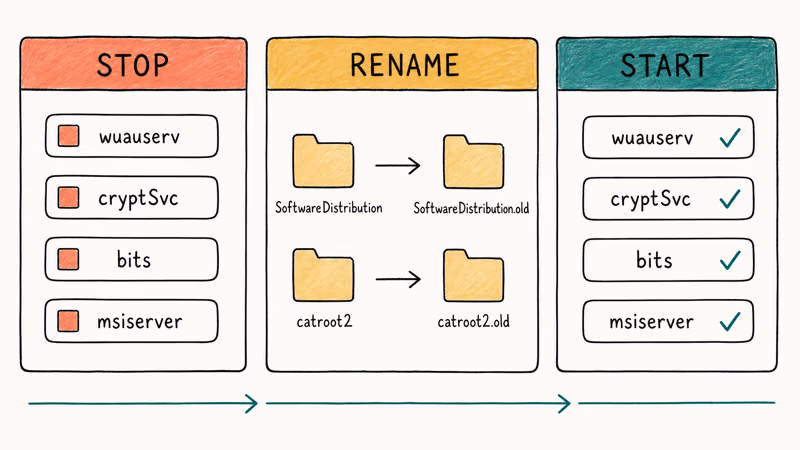
Open an elevated Command Prompt. Press the Windows key, type cmd, right-click Command Prompt, and choose Run as administrator.
Run these commands in order:
net stop wuauserv
net stop cryptSvc
net stop bits
net stop msiserver
ren C:\Windows\SoftwareDistribution SoftwareDistribution.old
ren C:\Windows\System32\catroot2 catroot2.old
net start wuauserv
net start cryptSvc
net start bits
net start msiserver
Renaming beats deleting. Windows rebuilds fresh copies on the next update scan, and you can roll back by renaming the .old folders if anything goes sideways. Older hard drives can take longer because the rename has to wait for cached writes to flush before the service can release its file handles.
Reboot once after the services restart, then check for updates again. Errors like 0x8007001f and 0x80070020 usually clear at the same time because they share this database root cause.
#Solution 3: Run sfc /scannow and DISM RestoreHealth
When the database corruption goes deeper than the cache folder, the servicing component store itself may be damaged. Microsoft’s DISM documentation confirms that DISM /Online /Cleanup-Image /RestoreHealth repairs the component store using fresh files pulled from Windows Update.
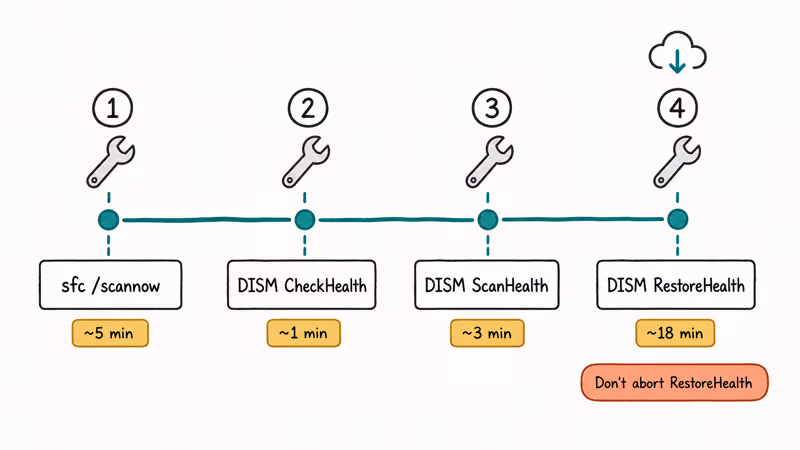
Microsoft’s documentation found that 4 commands handle most repair scenarios. Open Command Prompt as administrator and run:
sfc /scannow
DISM /Online /Cleanup-Image /CheckHealth
DISM /Online /Cleanup-Image /ScanHealth
DISM /Online /Cleanup-Image /RestoreHealth
sfc usually finishes faster than DISM. The DISM RestoreHealth step is the slow one because it downloads replacement payloads on demand. Leave it alone; aborting halfway can damage the component store.
When both tools finish, run sfc /scannow one more time. A clean second pass means the servicing stack is healthy. Try the update again. If sfc itself reports “Windows Resource Protection could not perform the requested operation,” follow our dedicated Windows Resource Protection fix before retrying.
#Solution 4: Use the Microsoft Update Catalog for the Stuck Patch
If only one specific patch keeps failing, sideload it from the Microsoft Update Catalog. This bypasses the local database for that single update.
Find the failed update’s KB number under Settings > Windows Update > Update history > Quality updates. Copy the KB string, paste it into the Catalog search box, and pick the build that matches your architecture. Run systeminfo | findstr /B /C:"System Type" first to confirm whether you’re on x64 or ARM64.
Download the .msu file, double-click it, and let the Standalone Installer apply the patch directly. This is useful when Windows Update keeps failing on one known KB while the rest of the system is healthy.
#Solution 5: Repair Install With the Media Creation Tool
When the previous four solutions all fail, do an in-place upgrade. This rebuilds Windows system files while keeping your apps, files, and settings intact.
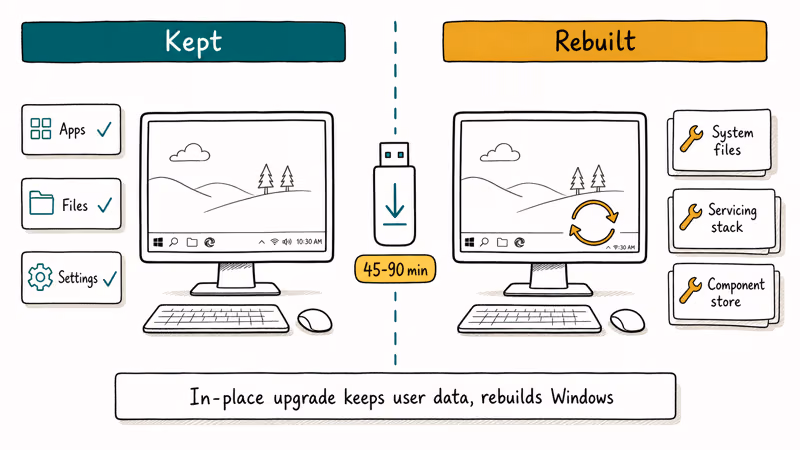
Download the Media Creation Tool from Microsoft, then run it and accept the license. Choose Upgrade this PC now and pick Keep personal files and apps when the wizard asks. The repair install takes 45-90 minutes depending on disk speed and current build.
Reserve this for cases where DISM /RestoreHealth itself reports 0x800f081f source-not-found errors. Backing up to OneDrive or an external drive first is still smart, even though personal files are preserved. If the repair install loops back into automatic recovery instead, our Windows 10 automatic repair loop walkthrough covers what to try next.
#Why Should You Avoid Third-Party Update Repair Tools?
Registry cleaners and “Windows fixer” apps often touch signed Windows Update keys. A bad write can block future updates entirely.
Microsoft’s registry cleaner support policy states that the company doesn’t support the use of any registry cleaning utility. These tools can strip update services while trying to “free up RAM,” then leave the machine on an outdated security baseline.
Stick with the five solutions above. If they all fail, the right move is either a clean install with bootable USB media or a paid Microsoft Support ticket, never a free download from a software portal that promises to “repair Windows updates” in two clicks. The portal route routinely installs an unsigned driver alongside its cleaner, which then triggers a separate WHQL violation the next time you reboot.
#Bottom Line
Start with the Windows Update troubleshooter. If it fails, reset the SoftwareDistribution folder, then run sfc /scannow and DISM /RestoreHealth. Save the in-place upgrade for last, and never substitute a third-party registry cleaner for the official Microsoft path.
Still stuck after all five? Open a free Microsoft Support chat. The technician can pull WindowsUpdate.log and see what the database is actually choking on.
#Frequently Asked Questions
Is the potential Windows update database error dangerous?
No data loss. But it does block every future security patch until you fix it.
How long does the troubleshooter take?
About 4 minutes on a modern SSD. On a 5400 RPM hard drive, plan for 8-10 minutes because the troubleshooter has to scan and reset several services in sequence, then re-register a half-dozen DLLs that broker between wuauserv and the BITS download manager. That second register pass is what eats the extra time on slower disks; you’ll see the spinner sit on “Resolving problems” for a full minute before it advances.
Can I delete SoftwareDistribution instead of renaming it?
You can, but renaming is safer.
Does sfc /scannow fix the update database directly?
Not exactly. sfc /scannow repairs protected system files, including the binaries that read and write the update database. It often fixes the root cause indirectly. Pair it with DISM /RestoreHealth for the servicing stack itself, and run sfc a second time afterward so any newly-restored payloads get verified against their catalog signatures before the next update attempt.
What if DISM RestoreHealth fails with 0x800f081f?
DISM can’t reach the source files. Switch to a wired connection and rerun.
Should I disable Windows Update to avoid this error?
Disabling the service leaves the machine open to the same vulnerabilities the next cumulative patch would close, including the kernel and SMB fixes that ship every Patch Tuesday. The right move is to fix the database, then schedule active hours under Settings > Windows Update > Advanced options so updates install at 3 AM instead of mid-meeting.
How can I prevent this from happening again?
Close updates cleanly with Update and shut down from the Start menu. Keep at least 20 GB of free space on the system drive.

Bluetooth Not Working on Snapdragon X? Fixes for 2026
Bluetooth not working on your Snapdragon X Copilot+ PC? Generic audio, mice, and keyboards work, but vendor apps often lack an ARM build. Fixes inside.

Docker Desktop and WSL2 Not Working on Snapdragon X? Fix It
WSL2 runs fine on Snapdragon X, but Docker Desktop ARM is Early Access and throws WSL errors. Use WSL2 plus native ARM64 Ubuntu and Docker Engine.

Does iTunes Work on Snapdragon X? ARM Windows 11 Guide
Yes, iTunes runs on Snapdragon X laptops through Prism emulation, but the Apple Devices app is the smoother route. Here is what to install on ARM.

Does OBS Studio Work on Snapdragon X? ARM64 Build Guide
Yes, OBS Studio has an experimental ARM64 build since version 31.1, but x64 plugins won't load and hardware encoding is missing. Here is what works.