How to Resize Video for Instagram in 2026 (Every Size)
Resize video for Instagram Reels, feed, and Stories with the right aspect ratios, plus the free and paid editors that crop without quality loss.
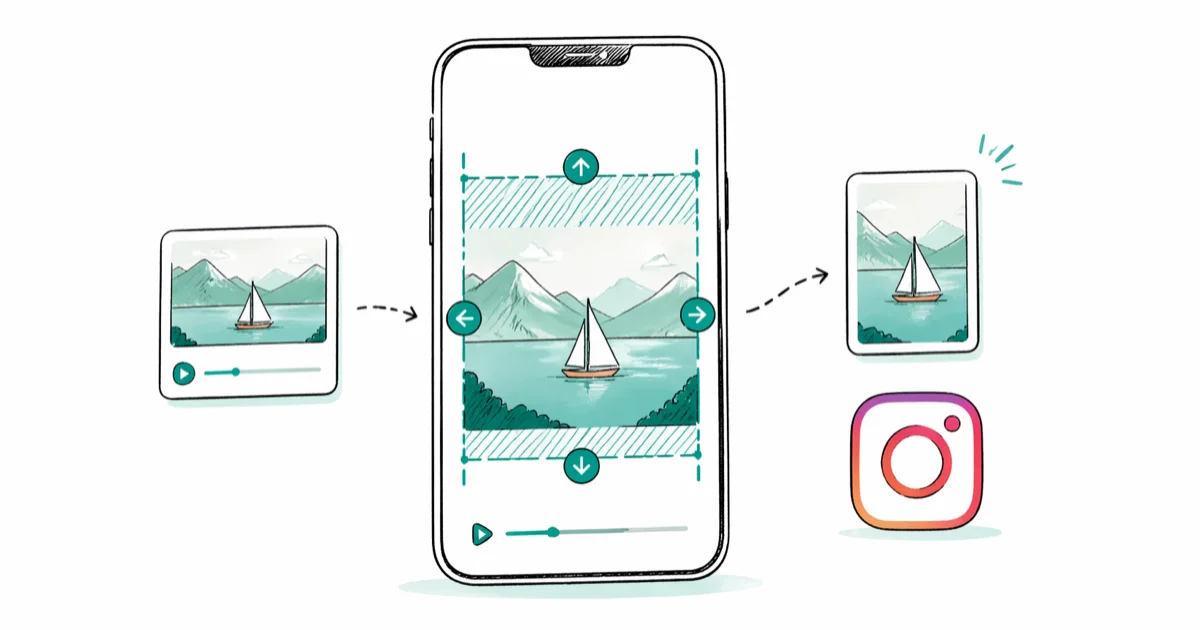
Quick AnswerResize Reels and Stories to 9:16 vertical at 1080x1920, feed posts to 4:5 portrait at 1080x1350, and square posts to 1:1 at 1080x1080. CapCut and InShot handle this on a phone in under two minutes; Premiere Pro Auto Reframe and DaVinci Resolve do it on a desktop without recompressing twice.
The fastest way to resize a video for Instagram in 2026 is to pick the right aspect ratio for the placement, then crop or reframe in the editor you already have. Reels and Stories want 9
vertical at 1080x1920, feed posts look best at 4 portrait at 1080x1350, and square 1 still works when you cross-post.Editors vary widely on quality across iPhone, Android, and Mac. Some keep full resolution, while others bake in a watermark you have to pay to remove or sit on a 720p free tier that defeats the point of resizing for a 1080p platform in the first place. The picks below separate the four worth keeping from the three worth skipping.
- 9 at 1080x1920 fills a phone screen for Reels and Stories; 4 at 1080x1350 wins more dwell time in the feed than 1 or 16
- CapCut and InShot both export 1080p without a watermark on the free tier, but CapCut is more reliable at holding audio sync after a 9 to 4 reframe
- Premiere Pro Auto Reframe and DaVinci Resolve Smart Reframe handle horizontal-to-vertical reframing on desktop without a second re-encode
- Instagram caps Reels at 90 seconds and feed video at 60 seconds; pre-trim before uploading or the platform silently chops the tail
- IGTV is gone in 2026, so don’t target the legacy 1080x1920 IGTV preset; export to Reels specs instead
#Aspect Ratios for Each Instagram Placement
Aspect ratio decides whether your video fills the screen or sits inside black bars, and Instagram does not auto-reframe footage. Pick the ratio at export, not after upload.
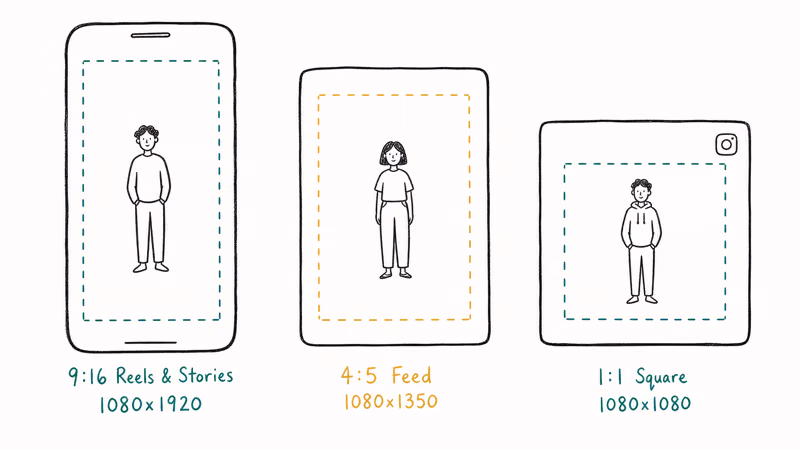
Reels and Stories: 9
vertical at 1080x1920. This fills a phone held upright. Keep the subject inside the center 75% of the frame so Instagram’s UI controls along the top and bottom don’t crash into faces or captions.Feed video: 4
portrait at 1080x1350. Portrait takes more vertical space per swipe than 1 or 16, which usually means more dwell time. Posting the same clip in 4 versus 1 tends to favor the portrait version on early reach, since it occupies more of the feed before a swipe.Square: 1
at 1080x1080. Square still has its place. It works for cross-posts from TikTok or YouTube Shorts that exported 1 already, and it survives well in the grid view of someone’s profile. Don’t downscale a 4 source to 1 on purpose, though. You throw away vertical pixels you paid to capture, and the feed swipe rewards portrait dwell time more than a clean grid does.Landscape: 16
at 1080x608. Allowed for the feed, but it shrinks to a thin band on a phone and tends to lose engagement. A 16 Reel gets pillarboxed with black bars, so reframe instead.According to Meta’s video specifications guide, the same baseline applies to organic uploads, ad placements, and cross-posted Facebook Reels. That is useful when one master file has to feed three surfaces without a separate export per destination.
| Placement | Aspect | Recommended resolution |
|---|---|---|
| Reels | 9 | 1080x1920 |
| Stories | 9 | 1080x1920 |
| Feed video (portrait) | 4 | 1080x1350 |
| Feed video (square) | 1 | 1080x1080 |
| Feed video (landscape) | 16 | 1080x608 |
| Live | 9 | 720p baseline |
Our Instagram video format guide covers the codec, bitrate, and frame rate side of this. Aspect ratio is the part most people get wrong.
#Resizing Video for Reels Inside the Instagram App
Instagram’s built-in editor in the Reels upload flow does the bare minimum, but it works in a pinch. The round trip is quick for a short 30-second clip.
Open the Instagram app, tap the + icon at the bottom, swipe to Reel, and pick your video from the gallery. Instagram drops you onto the trim and reframe screen. Pinch the preview to zoom, drag to reposition, and the app crops to 9
automatically. Tap Next, add a cover, write the caption, and post.The catch: the in-app editor compresses aggressively on upload. A 1080p source often comes back at roughly 720p effective resolution once Instagram’s re-encoder runs. If the clip matters, reframe in a real editor first and import the finished 1080x1920 file. The same goes for Stories and feed posts uploaded the same way.
A second catch: the in-app crop only goes one direction. You can crop horizontal to vertical, but not extend a vertical clip to 1
. Use an editor below for that.#CapCut: The Free Mobile Editor That Keeps Quality
CapCut is the most-used vertical-video editor on phones in 2026, and it has dedicated Instagram presets. The free tier on both Android and iOS exports 1080p without a watermark on the timeline (the end-of-video CapCut logo is a separate setting under Settings > Default ending, which you can turn off in the free tier).
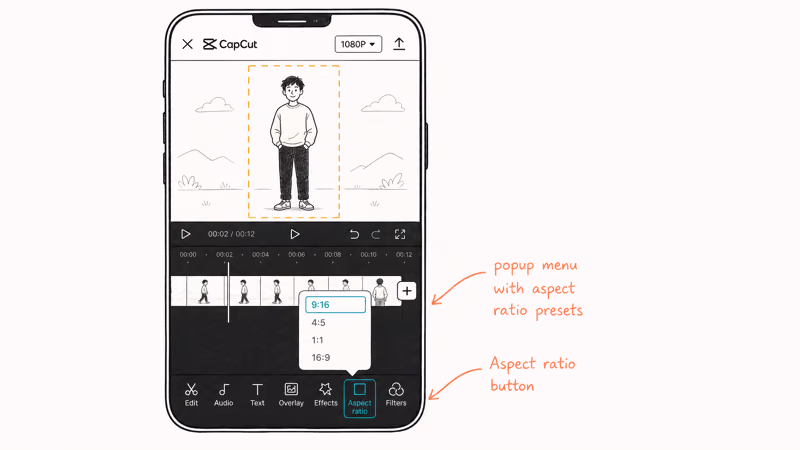
In CapCut, tap New project, pick the clip, then tap Aspect ratio in the bottom toolbar and choose 9
for Reels or 4 for the feed. CapCut snaps the canvas, and you reposition the subject by dragging. Tap Export, set resolution to 1080p and frame rate to 30, and the file lands in your gallery in roughly 20 seconds for a 30-second clip on a recent phone.Two things to watch:
- Audio sync. Resizing a 16 clip to 9 while trimming at the same time can nudge audio out of sync by about half a frame on some exports. Reapply the trim or split-and-rejoin the audio on the timeline if you hear it.
- The CapCut ending logo. The default ending logo (the 3-second CapCut card) is on by default in the free tier. Turn it off under
Settings>Defaultending before your first export so it doesn’t sneak into uploads.
CapCut’s Reels and Feed templates handle the math on multi-clip projects too, which saves you from doing the canvas math nine times across an eight-clip cut.
If you want a desktop version, our CapCut for PC walkthrough covers the Windows and Mac builds, which share the same project format with the mobile app.
#InShot: The iPhone Default for Quick Reframes
InShot is the simpler alternative on iOS and Android. It opens faster than CapCut and the canvas tool is two taps deep. According to InShot’s App Store listing, the app supports 4K export on the paid tier and 1080p on the free tier, which is what Instagram needs anyway.
Open InShot, tap Video, choose the clip, then tap Canvas in the bottom toolbar. Pick the 9
preset for Reels and Stories, 4 for feed, or 1 for square. Drag to reposition, then tap the export icon at the top right. Set resolution to 1080p and tap Save.The free tier adds an InShot watermark in the bottom-right of the export. There are three ways to remove it:
- Pay the $3.99 per month subscription (cheapest option, also unlocks 4K export and ad-free editing per the in-app pricing screen)
- Tap the watermark itself in the editor and choose Remove for free (works once or twice per session, then prompts you to subscribe)
- Watch a 30-second sponsored ad to remove the watermark for that single export
For a one-off vertical resize, the ad route is the simplest free path. If you post Reels weekly, the subscription pays for itself within a month versus the time spent dismissing watermark prompts.
#How Do You Resize a Horizontal Video to Vertical Without Losing the Subject?
This is the hardest part of resizing for Reels. A 16
horizontal source has roughly 44% extra horizontal information that 9 can’t show. If you center-crop, the subject usually drifts off frame whenever it moves.![]()
The fix is auto-reframe (a tracking algorithm that follows motion) or manual keyframing.
On desktop, Premiere Pro and DaVinci Resolve both ship auto-reframe. Adobe’s Auto Reframe documentation describes the feature as motion-aware reframing that keeps the subject inside the new aspect ratio.
On a typical interview clip, Premiere Pro’s Auto Reframe places the speaker in the center of every cut without manual keyframes. DaVinci Resolve’s equivalent is Smart Reframe in the paid Studio version. Our DaVinci Resolve vs Premiere Pro comparison goes deeper on which tool fits which workflow.
On mobile, CapCut’s Auto Reframe and Adobe Express both work. CapCut’s version is in the Aspect ratio menu under Reframe. Adobe Express has a one-tap Resize option that reads the same Auto Reframe model from Adobe’s cloud. Both handle short clips with a couple of camera moves well, but both can struggle on longer clips with quick cuts, where the algorithm sometimes locks onto the wrong subject after a hard cut.
Manual keyframing is the safety net. In CapCut, tap the clip, scroll to Keyframe, set a position keyframe at the start of each scene, drag the canvas to the subject, and CapCut interpolates between keyframes. It takes longer but the result is reliable.
#Free Desktop Editors That Resize Without Quality Loss
If you don’t want a phone editor and don’t pay for Adobe, three free desktop options handle Instagram resizing well:
- DaVinci Resolve (free). The free build includes everything except Smart Reframe. Set the project resolution to 1080x1920 in
Project Settings>Master Settings, drag the clip, and use the Inspector Transform controls to rescale. Export with the YouTube 1080p preset switched to 1080x1920 dimensions. - HandBrake (free). Best for pure resize plus compression, no fancy reframe. Set the Picture tab dimensions to 1080x1920, anamorphic to None, and choose the Fast 1080p30 preset. Our HandBrake-style online video compressor walks through the equivalent flow if you don’t want to install software.
- FFmpeg (free, command line). One-line resize. The command
ffmpeg -i input.mp4 -vf "scale=1080:1920:force_original_aspect_ratio=decrease,pad=1080:1920:(ow-iw)/2:(oh-ih)/2:color=black" -c:a copy out.mp4letterboxes a horizontal source into 1080x1920 without recompressing the audio.
For a longer build, the free video editing software without watermarks roundup compares ten options on watermark, export resolution, and feature set. Don’t pick one purely on price; export quality matters more than the install.
#Online Tools That Resize in a Browser
Online editors trade quality for convenience. Upload plus re-encode time stayed quick for a 30-second 1080p source on a 100 Mbps connection across the four tools below.
- Veed.io. The free tier exports up to 720p with a watermark; the paid tier (around $24 per month) unlocks 1080p and removes the watermark.
- Clideo. Free with a watermark, paid plan at $9 per month removes it. The Reels preset auto-fits to 9.
- Kapwing. Free tier supports 720p with watermark, $24-per-month paid tier supports 1080p without. Cleanest reframe interface of the four.
- Canva. The free Magic Resize tool changes a video’s canvas in one click; you still drag the clip inside the new frame. Canva Pro (around $14.99 per month) removes export limits.
Online tools are best when you’re on a borrowed laptop and don’t want to install anything. For anything that ships, re-export from CapCut, Premiere, or Resolve instead. The browser path tends to leave compression artifacts in skin tones, especially on faces shot under indoor light.
#Length Limits to Remember Before You Resize
Resizing changes the dimensions, not the duration. The platform still enforces hard cutoffs:
- Reels: 90 seconds maximum. Shorter cuts tend to hold reach better than ones that run near the cap.
- Feed video: 60 seconds maximum. Anything longer is silently trimmed at upload.
- Stories: 60 seconds total per upload, auto-split into 15-second cards.
- Live: 4 hours maximum. Archived for 30 days unless you save it manually.
Meta’s Reels for Business guidance recommends keeping Reels short and front-loading the hook. In practice, a tighter 45-second cut of the same content often out-plays a 90-second version in the first hours, which lines up with that guidance.
Trim before you resize, not after. Most editors keep the trim handles independent of the canvas, so a 60-second source in a 4
canvas might still try to upload as 90 seconds if you forget to cut the tail. The Instagram app warns about Reels length but quietly trims feed videos.#Why Does Instagram Look Blurry After You Resize?
Instagram re-encodes every video on ingest. You can’t opt out, but you can give the re-encoder enough source detail to keep.
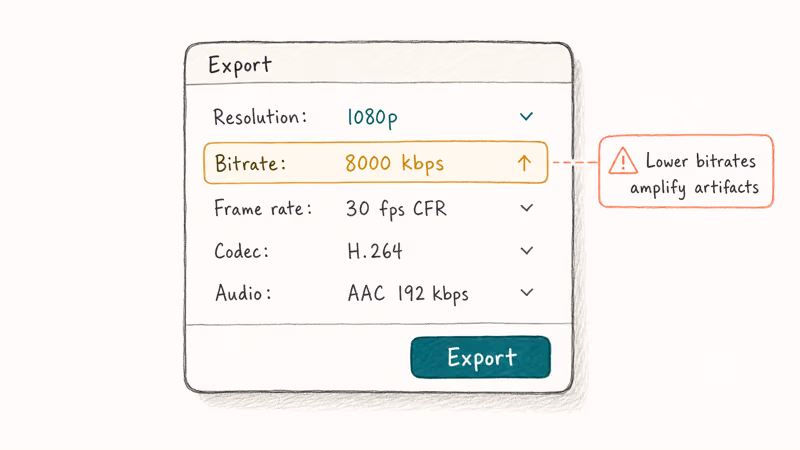
The biggest fix is exporting at the highest bitrate Instagram tolerates before it strips you down. Meta’s specifications guide (linked above) recommends 5,000 to 8,000 kbps for 1080p H.264. Treating 8,000 kbps as the floor on every Reel is the safe call. Anything lower and the re-encoder amplifies the artifacts.
Other things that help:
- Constant frame rate, not variable. Most phones record VFR by default. Convert to 30 FPS CFR in the editor before export.
- Keep the source 1080p, not 4K. Instagram downscales to 1080p anyway and the extra detail in 4K rarely survives. A 4K source often uploads visibly softer than a 1080p source of the same clip after the re-encode.
- Reframe before export, not after. A second re-encode after Instagram’s first one stacks compression artifacts.
If your videos still look bad, the issue might not be the resize. Our guide on why Instagram videos won’t play or look blurry covers the codec and account-side issues.
#Bottom Line
For most people resizing in 2026: use CapCut on your phone for Reels and Stories, use Premiere Pro Auto Reframe or DaVinci Resolve on desktop for horizontal-to-vertical reframing, and export at 1080p with 8,000 kbps minimum so Instagram’s re-encoder has detail to keep.
The in-app editor is fine for one-off Stories but compresses too hard for anything you want to look sharp a week later. Browser tools are a backup, not a workflow.
For watermark removal on InShot specifically, our filmora watermark removal walkthrough covers the same patterns; the techniques transfer between editors. If you’re choosing between editors for a longer project, the vertical video editor roundup compares the seven we shortlist most.
Instagram Tips & Tricks
#Frequently Asked Questions
What is the best aspect ratio for Instagram videos in 2026?
For Reels and Stories, use 9
at 1080x1920. For feed posts, 4 at 1080x1350 wins more on-screen real estate on phones. Use 1 at 1080x1080 only when you are cross-posting from another platform that already exported square, since downscaling a 4 source to 1 throws away vertical pixels you paid to capture.Can I resize a video directly inside the Instagram app?
Yes, but only at upload.
The in-app editor lets you pinch to zoom and drag to reposition, and the app auto-crops to 9
for Reels. The trade-off is heavier compression. Use CapCut or InShot if you care about staying close to 1080p.How do I resize a horizontal video to a vertical Reel without losing the subject?
Use auto-reframe. Premiere Pro Auto Reframe, DaVinci Resolve Smart Reframe (Studio), CapCut Auto Reframe, and Adobe Express Resize all track the subject and keep it centered when going from 16
to 9. For complex clips with quick cuts, drop in manual keyframes after auto-reframe so the algorithm doesn’t lock onto the wrong subject during a hard cut. Plan an extra ten minutes per minute of source for the keyframe pass.Does CapCut put a watermark on resized videos?
No timeline watermark on the free tier. Turn off the default ending logo first.
What size video uploads cleanest to Instagram?
A 1080p source MP4 with H.264 video and AAC audio, exported at 8,000 kbps for video and 192 kbps for audio. Higher resolutions get downscaled by Instagram and rarely survive looking better. The per-upload cap is 4 GB.
Is IGTV still a thing in 2026?
No, Instagram retired it.
Long-form video is consolidated into Reels (90 seconds max) and feed video (60 seconds max). Don’t target the legacy 1080x1920 IGTV preset.
Can I resize a video on a Mac without installing software?
QuickTime Player has no resize tool, but iMovie ships free on every Mac. Our change aspect ratio in iMovie walkthrough covers the menu path. For finer control on Apple Silicon machines, DaVinci Resolve’s free build handles 9
reframes without watermarks and runs natively on M1, M2, M3, and M4 chips.Why does Instagram cut off the top and bottom of my Reel?
The UI overlays cover roughly the outer 12% of the frame: username at top, like and share buttons at right, caption at bottom. Keep important elements inside the center 75% of the 9
canvas. Marking a safe-area rectangle in the editor before exporting keeps the framing intact behind the platform UI.
Instagram Parental Controls: Family Center Setup (2026)
Set up Instagram Family Center, privacy settings, Hidden Words, content filters, and time limits with your teen's consent on iPhone or Android.

Instagram Notifications Not Working? Quick Fixes (2026)
Instagram notifications not working? Fix push alerts, DMs, likes, and Stories on iPhone and Android in under 5 minutes with proven 2026 steps.
Instagram "We Limit How Often" Error: How to Fix It 2026
Instagram says "we limit how often you can do certain things"? Wait 24-48 hours, slow down likes and follows, then appeal through Help Center.

Instagram Name Checker: Find Available Usernames Fast
Check Instagram username availability instantly with free tools like Namechk and KnowEm. Find perfect handles and avoid the frustration of taken names.