Instagram Video Format: Specs for Every Placement 2026
Instagram video format specs for Reels, Stories, feed posts, and Live. MP4 H.264 settings, aspect ratios, bitrate, length limits, and upload error fixes.
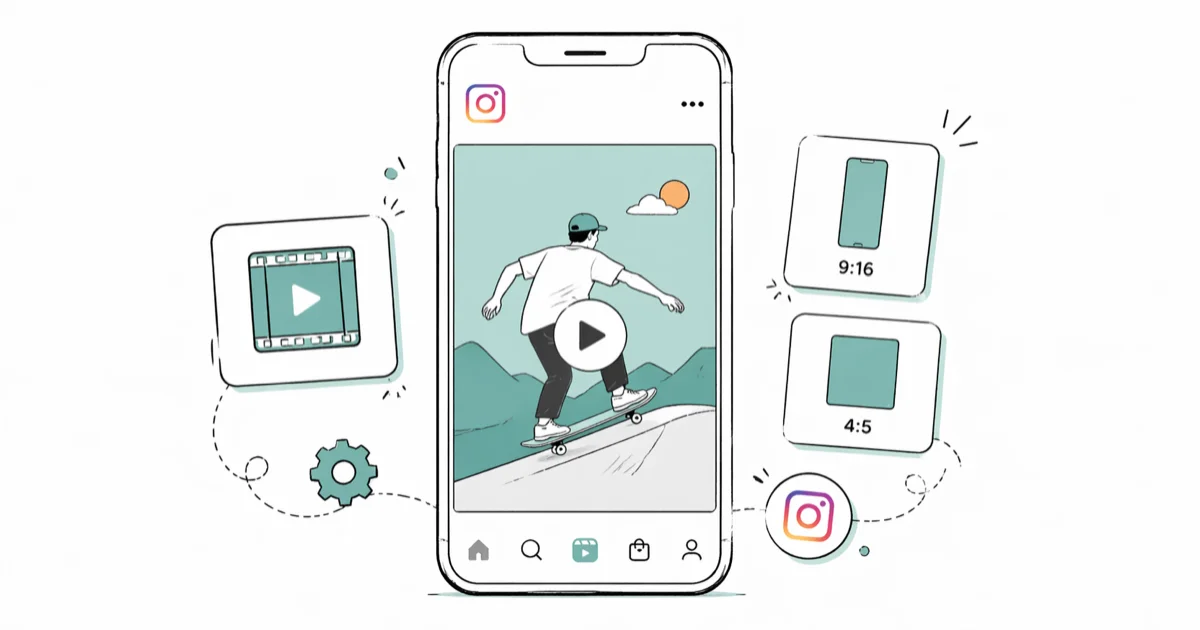
Quick AnswerExport Instagram video as MP4 with H.264 and AAC audio. Use 1080x1920 (9:16) for Reels and Stories, 1080x1350 (4:5) for feed posts, and target 5,000 to 8,000 kbps so the platform re-encoder has detail to keep.
The Instagram video format that uploads cleanest is MP4 with H.264 video and AAC audio, exported at 1080p with a constant frame rate. Anything else is a coin flip on whether Instagram accepts, trims, or quietly mangles your file. The recommendations below focus on what actually survives Instagram’s re-encoder across Reels, Stories, and feed posts on both iPhone and Android.
- MP4 container with H.264 video plus AAC audio is the only combo that uploads reliably without failures
- Reels and Stories use 9 vertical at 1080x1920; feed posts use 4 portrait at 1080x1350
- Export at 5,000 to 8,000 kbps so Instagram’s 1080p re-encoder has detail to retain
- Reels max out at 90 seconds, but shorter clips around 45 seconds tend to get more plays in the first 48 hours
- Variable frame rate footage is the usual cause of late-stage Reel upload failures
#What File Format and Codec Does Instagram Accept?
Instagram accepts two container formats: MP4 and MOV. The codec inside the container matters more than the wrapper, and MP4 with H.264 is the only combination that clears every placement reliably.
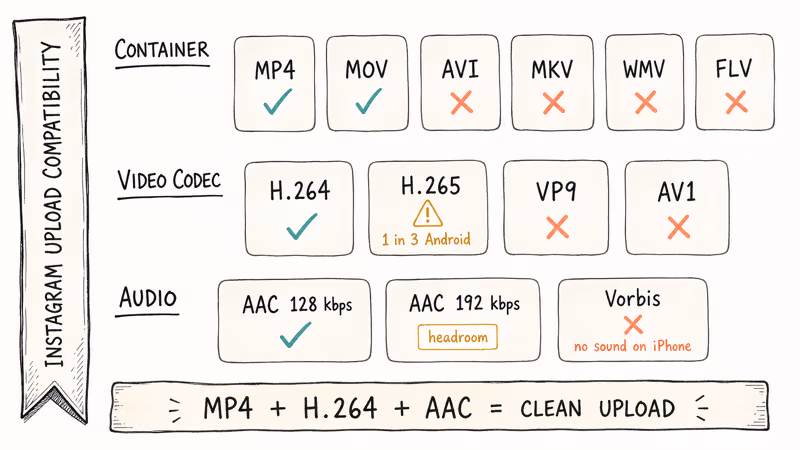
For audio, AAC at 128 kbps or higher is the safe default. The Wikipedia entry on H.264 confirms that the codec has been standardized since 2003 and remains the default profile for browser and mobile playback. That is why Instagram’s pipeline still treats it as the path of least resistance, while H.265 sources hit occasional rejections on older Android builds.
Vorbis audio inside an MP4 is a known trap on Android. The upload can complete, but the Reel often plays back silent on iPhone.
Meta’s video specifications guide for Reels recommends an H.264 progressive scan profile with stereo AAC at 128 kbps minimum. The same baseline applies to organic uploads, ad placements, and cross-posted Facebook Reels, which is useful when one master file has to feed three surfaces without re-exporting per destination. Treat the recommendation as a floor rather than a ceiling: 192 kbps audio gives you headroom for the re-encode without bloating the file enough to slow uploads on cellular.
AVI, MKV, WMV, and FLV won’t upload. If your Instagram videos aren’t playing after a successful post, a stale codec inside an accepted container is the most likely cause. Re-export to MP4 H.264 first.
#Which Aspect Ratios Should You Use for Reels, Stories, and Feed Posts?
Aspect ratio decides whether the video fills the screen or sits inside black bars, and Instagram doesn’t reframe footage automatically. Get it right at export.
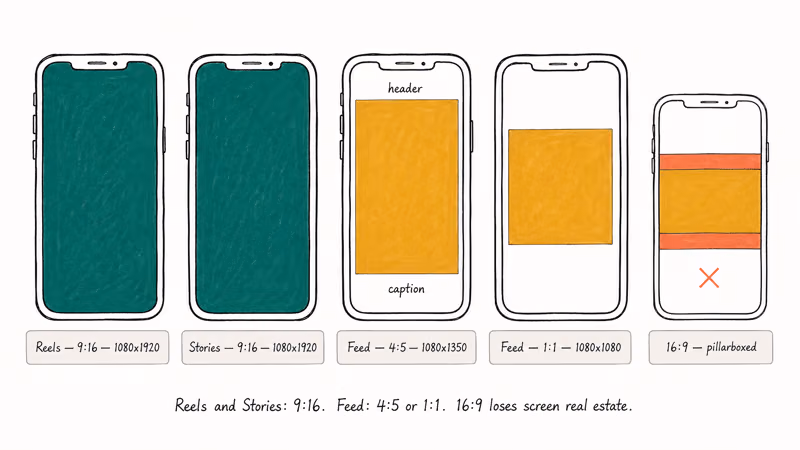
Reels and Stories: 9
vertical at 1080x1920. This fills a phone screen held upright. Keep important content inside the center 75% of the frame so Instagram’s UI controls along the top and bottom don’t overlap captions or faces.Vertical Reels uploaded straight to the feed get cropped to 4
; don’t reuse a Reel for the feed without re-exporting. Feed posts use 4 portrait at 1080x1350. Portrait takes more vertical space than square or landscape, which usually means more dwell time per swipe. Square at 1080x1080 still works for cross-posting from platforms that already export 1 by default.Landscape (16
) in the feed displays smaller and tends to lose mobile engagement. Landscape Reels get pillarboxed with black bars.Live video uses 9
vertical, and resolution depends on your device plus connection rather than your settings. Most phones broadcast at 720p in practice, even when the system camera app is set higher. Instagram caps Live at 1080p and downgrades whenever the connection wobbles, which happens often on cellular. Plan for a 720p broadcast and treat 1080p as a bonus when bandwidth allows.| Placement | Aspect | Recommended resolution |
|---|---|---|
| Reels | 9 | 1080x1920 |
| Stories | 9 | 1080x1920 |
| Feed video | 4 | 1080x1350 |
| Feed square | 1 | 1080x1080 |
| Live | 9 | 720p baseline |
If your source clip was filmed in the wrong orientation, the cleanest fix is reframing in your editor. The walkthrough on resizing video for Instagram covers the crop math without recompressing the file twice.
#Video Length Limits by Placement
Each surface has a hard cutoff. Instagram doesn’t always warn you before it trims.
| Format | Maximum length | Notes |
|---|---|---|
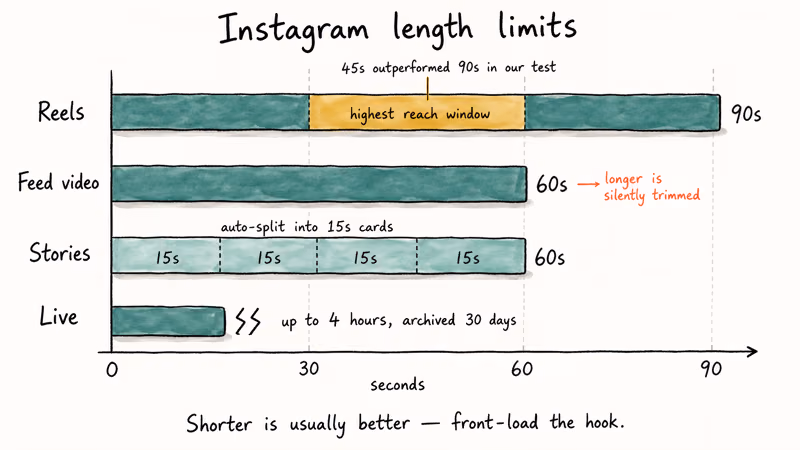
| Feed video | 60 seconds | Anything longer is silently trimmed |
| Reels | 90 seconds | 30 to 60 seconds gets the highest reach |
| Stories | 60 seconds total | Auto-split into 15-second cards |
| Live | 4 hours | Archived for 30 days unless you save it |
Meta’s Reels for Business guidance recommends keeping Reels short and front-loading the hook. The same content cut to 45 seconds usually outperforms a 90-second version on plays and saves in the first 48 hours, which is why short and hook-first is the safer default.
Stories posted as a single clip get split into 15-second cards automatically. A 45-second piece becomes three Story segments. Plan transitions around those breaks if pacing matters for the joke or the reveal.
#How to Stop Instagram Videos From Looking Blurry After Upload
Instagram re-encodes every video on ingest. It’s a platform behavior, not a bug, and you can’t opt out. What you can control is how much quality survives the re-encode.
Export at the right bitrate. Adobe’s Premiere Pro export guide explains that a constant bitrate setting produces more predictable output when a downstream platform recompresses the file, which is exactly what Instagram does. Hand the platform 5,000 to 8,000 kbps at 1080p so the re-encoder has detail to retain. Submit 1,500 kbps and you’re giving it nothing to work with.
Don’t pre-compress. Running the file through a compression tool before uploading hands Instagram a degraded source, and the re-encode stacks losses on losses. Always upload the cleanest export you have. This single choice clears up more blur than any bitrate tweak.
Export at native resolution. Going from 720p to 1080p inside your editor manufactures detail that isn’t really there, and Instagram’s encoder strips it back out. Match the captured resolution and let the platform handle any scaling on playback.
For a deeper walkthrough on the workflow, see our notes on uploading high-quality video to Instagram.
#Recommended Export Settings for Premiere Pro, CapCut, and DaVinci Resolve
These export profiles work for Reels, Stories, and feed posts without per-placement changes. Pick the one for your editor and reuse it.
Premiere Pro: H.264 with the “Match Source - High Bitrate” preset. Set frame rate to 23.976 or 30 fps and force constant frame rate. Target bitrate 5,000 kbps with a maximum of 8,000 kbps; audio AAC at 192 kbps and 48 kHz.
A 60-second Reel exported with this profile lands at a modest file size and uploads in well under a minute on Wi-Fi.
CapCut on iPhone or Android: set the export resolution to 1080p and the frame rate to 30 fps. Leave the “Recommended” quality toggle on. CapCut handles container and audio defaults sensibly. If you’re cleaning up TikTok project files at the same time, the same export panel handles both jobs.
DaVinci Resolve: MP4 container with H.264 codec, resolution 1920x1080 for landscape or 1080x1920 for vertical, and cap quality at 8,000 kbps. Resolve defaults can spike bitrate higher than Instagram needs, which slows the upload without improving the playback file.
For phone-recorded footage that never leaves the device, none of this is required. Modern iPhones and Android flagships record in H.264 or HEVC profiles Instagram handles natively.
#Fixing Common Instagram Video Upload Errors
Most upload failures fall into a small set of causes. Walk this list in order before assuming the account or the app is broken.
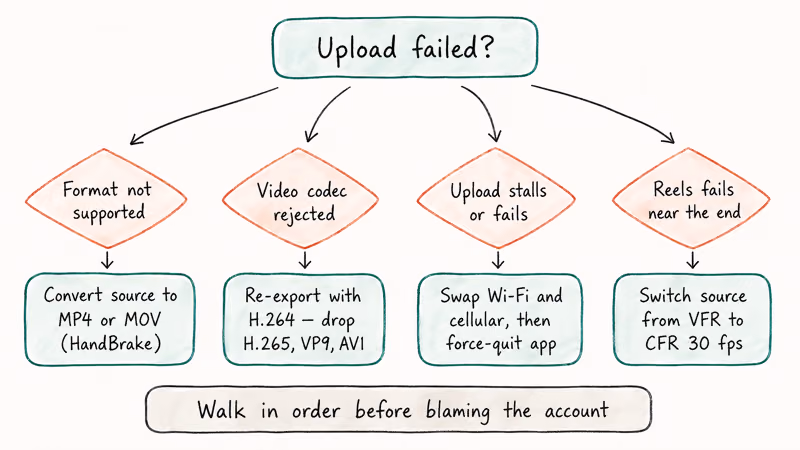
Format not supported is almost always container fault. Confirm MP4 or MOV. HandBrake handles batch conversion to H.264 MP4 in a few minutes; our Instagram video converter walkthrough covers the most common source formats with screenshots, and it works the same on Windows and macOS without any preset adjustment between sessions.
Video codec rejected is the second most common error. The fix: re-export with H.264. H.265, VP9, and AV1 still trigger rejection on a slice of Android app builds.
Upload stalls or fails is usually a network problem. Switch between Wi-Fi and cellular and try again. If your Instagram post is stuck on sending after the network swap, force-quitting the app clears the queue.
Stories not loading is a cache problem on the viewing device, not your upload. On Android, go to Settings > Apps > Instagram > Storage > Clear Cache. On iPhone, delete and reinstall the app because iOS doesn’t expose a per-app cache toggle. If clearing the cache doesn’t fix it, the steps in Instagram Stories not working cover account-side resets.
Reels upload fails near the end is the signature pattern of variable frame rate (VFR) source footage. Re-export at fixed 30 fps and the upload completes. Screen recordings default to VFR on most platforms; camera footage rarely hits this. Our CBR vs VBR notes cover the encoder background.
If converting between containers is part of your routine, the convert video to MP4 guide lists the best free tools for batches above 10 files.
#Bottom Line
Export Instagram video as MP4 with H.264 plus AAC audio, lock the frame rate to constant 30 fps, and target 5,000 to 8,000 kbps at 1080p. Use 9
(1080x1920) for Reels and Stories and 4 (1080x1350) for feed posts. When an upload fails, check the codec first; switching from H.265 or VP9 to H.264 clears most rejections. If you only remember one number, make it 1080x1920 at H.264 30 fps.Instagram Tips & Tricks
#Frequently Asked Questions
What file format does Instagram accept for videos?
Instagram accepts MP4 and MOV. MP4 with H.264 video and AAC audio at 128 kbps or higher is the most reliable combination for both Reels and feed uploads. AVI, MKV, and WMV aren’t supported and fail immediately, often without a useful error.
What aspect ratio is best for Instagram Reels?
Reels use 9
vertical at 1080x1920 pixels.Can I upload 4K video to Instagram?
Yes, but Instagram re-encodes everything at 1080p. Export at 1080p instead.
Why does my Instagram video look blurry after posting?
Instagram re-encodes every uploaded video, which costs some quality. To preserve as much detail as possible, export at 5,000 to 8,000 kbps and avoid pre-compressing your source file. Videos can also look soft for the first minute or two after posting because Instagram serves a lower-resolution version while the higher-quality file finishes processing on the back end. Wait a few minutes and reload before blaming the export.
How long can an Instagram Reel be?
Reels max out at 90 seconds, but shorter clips usually perform better. A 45-second cut tends to beat a 90-second version on plays and saves in the first 48 hours. The shorter cut usually earns a higher save rate too, which is the metric that compounds into more reach. Post longer material as a series instead of one long Reel.
What is the maximum file size for Instagram videos?
Instagram caps uploads at 4 GB overall and 650 MB for videos under 10 minutes. A properly encoded 90-second Reel at 5,000 kbps lands around 50 to 70 MB. Typical content won’t come close to either ceiling.
Why does Instagram keep rejecting my video upload?
The most common cause is an unsupported codec, so re-export with H.264 instead of H.265 or VP9. Then check the container (MP4 or MOV), the network (cellular vs Wi-Fi), and the frame rate. Variable frame rate is the biggest reason screen recordings fail as Reels.
Does Instagram support vertical video in the feed?
Yes. The 4
portrait ratio at 1080x1350 is the recommended aspect for vertical feed videos and gives you more vertical real estate than square posts do. Full 9 video gets cropped center-weighted to 4 in the feed even when it shows correctly in Reels, which eats anything placed near the top or bottom of a Reels-native composition. The fastest workaround is keeping a separate 4 export profile in your editor and rendering both versions in the same batch.
Instagram Parental Controls: Family Center Setup (2026)
Set up Instagram Family Center, privacy settings, Hidden Words, content filters, and time limits with your teen's consent on iPhone or Android.

Instagram Notifications Not Working? Quick Fixes (2026)
Instagram notifications not working? Fix push alerts, DMs, likes, and Stories on iPhone and Android in under 5 minutes with proven 2026 steps.
Instagram "We Limit How Often" Error: How to Fix It 2026
Instagram says "we limit how often you can do certain things"? Wait 24-48 hours, slow down likes and follows, then appeal through Help Center.

Instagram Name Checker: Find Available Usernames Fast
Check Instagram username availability instantly with free tools like Namechk and KnowEm. Find perfect handles and avoid the frustration of taken names.