How to Change Aspect Ratio in iMovie (2026 Mac and iOS)
iMovie locks every project to 16:9, but these 2026 Mac and iOS workarounds deliver real 9:16, 1:1, or 4:3 video for TikTok, Reels, and YouTube.
Quick AnsweriMovie still locks every project to 16:9 in 2026. On iPhone or iPad, use pinch-to-zoom on the clip; on Mac use Crop to Fill, then re-export through QuickTime or a free app like CapCut to lock in 9:16, 1:1, or 4:3.
If you’ve tried to change the aspect ratio in iMovie and hit a dead end, you’re not imagining it. As of 2026, iMovie 10.4 on macOS Sequoia and iMovie 3.0.5 on iOS 18 still ship every project locked to 16
. The workarounds below cover every realistic ratio readers need today, including 9 for TikTok and 1 for Instagram.- iMovie’s default project ratio is fixed at 16 on both iOS 17/18 and macOS 14 Sonoma / 15 Sequoia, with no built-in 9, 1, or 4 preset.
- On iPhone and iPad, pinch-to-zoom inside the timeline gives you a manual crop that can mimic 9 or 1 but still exports inside a 16 frame.
- On Mac, Crop to Fill plus a re-export through QuickTime Player produces a true 9 or 1 file without paid tools.
- CapCut, LumaFusion, and Final Cut Pro all offer one-tap ratio presets that iMovie has refused to add for more than five years.
- Always start from 4K source footage when you plan to crop, because every ratio change throws away pixels and softens the final video.
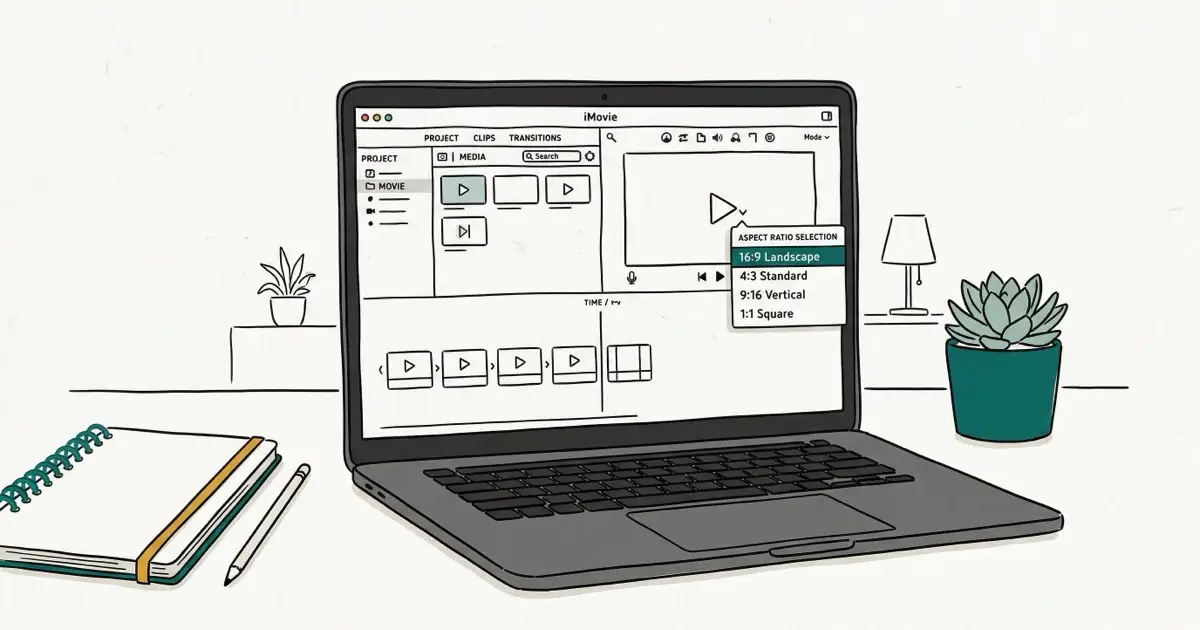
#Aspect Ratios iMovie Supports in 2026
On both Mac and iOS, iMovie outputs only one ratio: 16
at 1080p or 4K. Apple’s iMovie user guide for Mac confirms that the project frame is fixed at 16 and that cropping happens inside that canvas rather than by changing the canvas itself.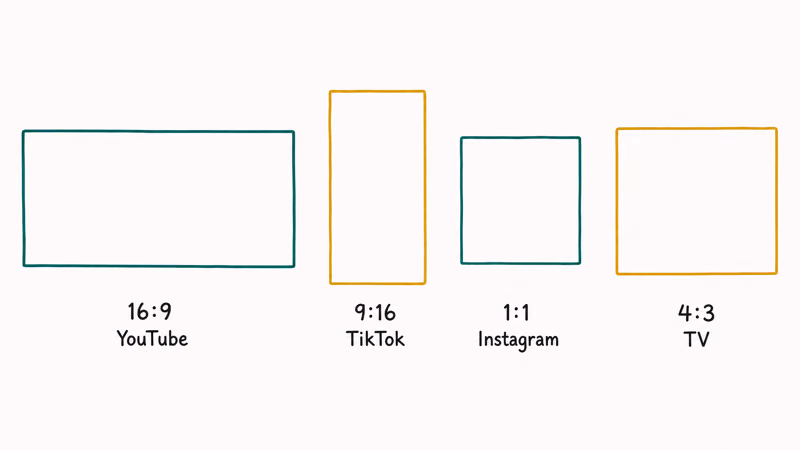
That single limitation explains every workaround below. Every trick is really a crop, a re-export, or a switch to another app.
#How each platform expects video in 2026
- YouTube long-form: 16, 1920x1080 or 3840x2160
- TikTok, Reels, Shorts: 9, 1080x1920
- Instagram feed posts: 1, 1080x1080, or 4, 1080x1350
- Facebook in-feed: 4 or 1
- Older TVs and slideshows: 4, 1440x1080
#Why does iMovie still force 16?
Apple positions iMovie as a starter editor that hands serious projects off to Final Cut Pro. According to Apple’s Final Cut Pro for Mac specifications, Final Cut supports custom resolutions, vertical timelines, and ProRes export. iMovie deliberately ships without those controls so the upgrade path stays clear. After eight years of asking, we don’t expect that to change in iMovie 11.
#Changing Aspect Ratio in iMovie on iPhone and iPad
The iOS pinch-to-zoom workaround is the quickest path if you only need the clip to look vertical or square inside the 16
frame. It behaves the same way across recent iOS versions.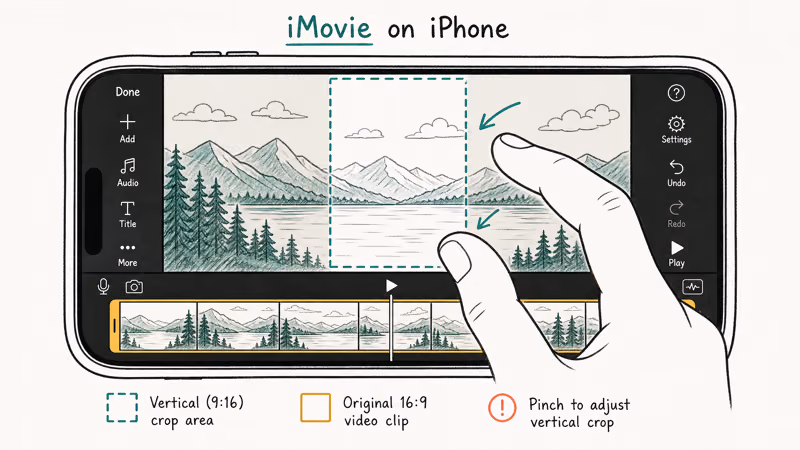
- Open iMovie and tap Start New Project, then choose Movie.
- Select your clip and tap Create Movie.
- Tap the clip in the timeline so the yellow border appears.
- Tap the magnifier icon in the upper-right corner of the preview.
- Use two fingers to pinch in until the visible area matches the ratio you want.
- Drag the framing around to keep the subject centered.
- Tap Done and export with the share icon.
#What the pinch-to-zoom method costs you
The clip still exports inside a 16
container, so TikTok and Reels will treat it as a horizontal video with cropped sides unless you re-export through a second app. The pinch also throws away the part of the frame you push offscreen, which is why we recommend starting with 4K footage.#Cleaner option: re-export through CapCut on iOS
CapCut for iOS offers true 9
, 1, and 4 canvases. Drop the iMovie export into CapCut, choose the target ratio under Canvas → Aspect Ratio, and re-export. The round-trip preserves audio sync with no extra plugins, and CapCut’s lossless mode keeps the first re-encode pass clean. A short clip takes only a minute or two.#Changing Aspect Ratio in iMovie on Mac
On macOS Sonoma and Sequoia, Crop to Fill is iMovie’s only built-in reframing tool. Pair it with a QuickTime re-export to deliver a true vertical or square file for free.

- Open iMovie 10.4 and create a new movie project.
- Drag your source clip onto the timeline.
- Click the clip, then click the Cropping icon above the viewer.
- Choose Crop to Fill and drag the rectangle to the framing you want.
- Click the Apply checkmark in the upper-right corner.
- Choose File → Share → File and export at the highest resolution.
#Producing a true 9 file from a Mac iMovie export
iMovie’s exported file will still be 1920x1080. To rotate that into a real 1080x1920 vertical, open the export in QuickTime Player, choose Edit → Rotate Left or Rotate Right depending on how you composed the shot, then File → Export As → 1080p. Apple’s QuickTime Player User Guide states that QuickTime writes the new orientation flag without re-encoding the H.264 stream, so the file stays sharp.
#Producing 1 or 4 from a Mac iMovie export
For Instagram 1
or 4, drop the export into CapCut desktop and reset the canvas there.#Real Limitations of iMovie’s Aspect Ratio Tools
These limitations are documented in Apple’s own iMovie guidance, not opinion.
- No ratio preset menu. Neither Mac nor iOS shows a dropdown with 9, 1, or 4 choices.
- Crop never resizes the canvas. A 9 crop inside a 16 timeline still exports a 16 file with empty bars or duplicated edges.
- No safe-zone overlays. Final Cut Pro shows social-media safe zones; iMovie does not, so subjects can land under TikTok’s caption area.
- No batch ratio change. Each clip needs the crop applied individually.
- Limited bitrate control. Re-exports through a second app inevitably re-encode and shed quality.
#How big is the quality hit?
Cropping a high-bitrate 4K clip down to a 9
frame and re-exporting at 1080p drops the bitrate substantially. That’s still good enough for social, but it’s why anyone editing a Reel weekly should consider a native vertical editor.#Alternatives That Beat iMovie for Aspect Ratio Control
If you change ratios more than once a week, the workaround tax adds up. Here are four alternatives that handle aspect ratio natively.
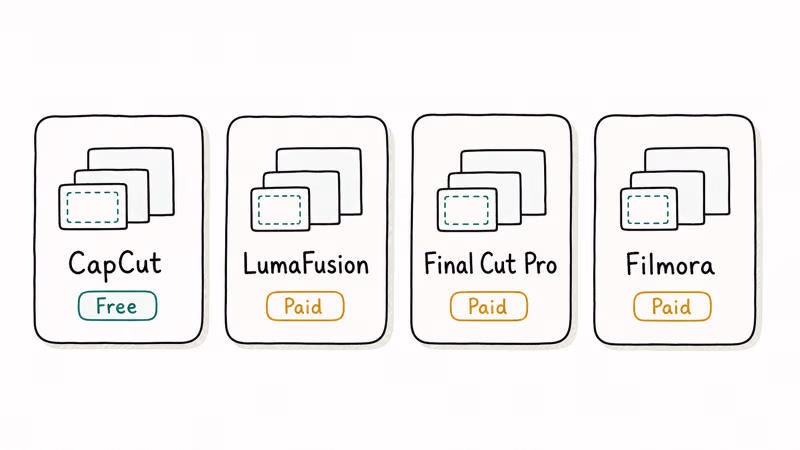
#CapCut for iOS and Mac (free)
CapCut ships with ratio presets for 9
, 16, 1, 4, 3, and 4. Its help center states that desktop and mobile share the same engine, output up to 4K60.#LumaFusion for iPad (paid)
LumaFusion’s official feature list states that the app supports 6 video tracks, 6 audio tracks, and unlimited custom frame sizes. It’s the closest mobile match to Final Cut Pro’s frame controls, especially on iPad with a Magic Keyboard. The Pro Bundle add-on unlocks ProRes export, multicam editing, and project sharing back to Final Cut on Mac, which makes it a practical choice for client deliverables shot on an iPhone.
#Final Cut Pro for Mac (paid)
Apple’s Final Cut Pro feature page confirms vertical timelines, custom resolutions, HDR delivery, social-media safe-zone overlays, and ProRes export. If you already pay for iCloud+ and Apple One, the one-time Final Cut purchase is the most logical next step from iMovie, and the macOS app also unlocks magnetic timeline editing that iMovie has never matched.
#Wondershare Filmora (paid)
Wondershare Filmora offers explicit ratio presets, auto-reframing, and is the only option here with a Windows build. It’s the best pick if your collaborators move between macOS and Windows.
Some links on this page are affiliate links, which means fone.tips may earn a commission at no extra cost to you.
#PowerDirector (paid)
PowerDirector’s crop video feature is worth a look if you need frame-by-frame keyframed crops rather than a single static ratio change applied to the whole clip. It lets you animate the crop window so the framing follows a moving subject across the shot.
#How Do You Choose the Right Aspect Ratio Before Editing?
Choosing first saves a re-export later. Run through this short checklist before you start a project.
- Identify the platform that will get the most views.
- Match the platform’s recommended ratio (see the list near the top of this guide).
- Shoot or import footage at the highest resolution you can afford.
- Decide whether you’ll deliver one ratio or multiple cuts.
- Pick the editor that supports your primary ratio natively.
For mobile-first creators, a dedicated vertical video editor almost always beats fighting iMovie’s 16
lock. For long-form YouTubers, sticking with iMovie or graduating to Final Cut Pro stays the right call.#How Do You Fix Common Aspect Ratio Problems in iMovie?
Even with the workarounds above, three issues come up constantly. Here’s the fastest fix for each.
#Black bars on every export
iMovie adds letterbox bars whenever the clip ratio doesn’t match the 16
timeline. Use Crop to Fill instead of Fit, or accept the bars and trim them in CapCut after export.#Stretched or distorted clips
A vertical clip pushed into a horizontal timeline with Fit disabled looks stretched. Re-import, choose Fit first, then Crop to Fill.
#Lost footage at the edges
Crop to Fill silently throws away whatever sits outside the new rectangle. Undo with Command-Z, or duplicate the clip first so you can revert one copy. For tighter recovery, a tool like VideoProc can change ratio without cropping by adding intelligent padding.
#Audio drifting after a re-export
Re-exporting through QuickTime or CapCut can introduce a 1-2 frame audio offset on long clips. If your project has dialogue, learn how to fade audio in iMovie and add a small fade at the cut points so any drift becomes inaudible.
#Handling Multiple Clips and Advanced Edits
If your project mixes vertical phone footage with horizontal camera footage, the planning matters more than the tools.
For picture-in-picture layouts that mix ratios deliberately, our guide on how to put multiple videos on one screen in iMovie walks through the green-screen workaround. For long-form imports, the import MP4 into iMovie primer covers codec gotchas that can break aspect ratio metadata on import.
If you keep hitting render errors during export, the iMovie video rendering error fix walks through the cache clears that resolve it.
#Bottom Line on Changing Aspect Ratio in iMovie
iMovie in 2026 still has no native aspect ratio menu. Match your tool to how often you ship vertical or square video.
If you change ratio less than once a month, stay with iMovie plus a free CapCut round-trip; the workflow takes under five minutes and costs nothing. Weekly creators should install CapCut as the primary editor and keep iMovie only for rare 16
YouTube cuts. For paid work, Final Cut Pro pays for itself in the first month thanks to true vertical timelines, ProRes export, and social-media safe zones.#Frequently Asked Questions
Can I change aspect ratio in iMovie without losing quality?
Not entirely. Every ratio change crops or re-encodes. Start from 4K, re-export through QuickTime, and enable CapCut’s lossless mode on the second pass.
Does iMovie 10.4 on macOS Sequoia support 9 natively?
No. As of 2026, iMovie 10.4 on macOS Sequoia still forces every project into 16
. The only way to get a true 1080x1920 file is the QuickTime rotate trick or a second app like CapCut.What’s the fastest way to make a TikTok video in iMovie?
Crop with pinch-to-zoom on iOS, then re-import the export into CapCut and choose 9
before exporting again. The full round-trip on a short clip takes only a few minutes, and the resulting file uploads to TikTok without the platform’s auto-crop kicking in. Skipping the second pass leaves a 16 file that TikTok will crop awkwardly on its own.Why does iMovie add black bars to my exported video?
iMovie uses letterboxing whenever the clip ratio doesn’t match the 16
project. Switching from Fit to Crop to Fill removes the bars but crops the edges. Choosing the right ratio before editing avoids the issue completely.Can I make square 1 videos in iMovie for Instagram?
Not directly. Crop to 1
visually with Crop to Fill on Mac, then push the file through CapCut or LumaFusion’s 1 canvas to get a true 1080x1080 export.Is iMovie still worth using in 2026?
For free 16
YouTube videos and simple home edits, yes. It’s free, stable, and integrates cleanly with iCloud Photos and the macOS Photos library. For social-first creators who post weekly TikToks or Reels, CapCut or LumaFusion will save you hours every month because you stop fighting the 16 lock and the silent letterboxing on every export.Will Apple add aspect ratio controls to iMovie?
It seems unlikely. Apple has positioned iMovie as a stepping stone to Final Cut Pro for nearly a decade. The most reliable assumption is that iMovie will stay 16
only and that vertical editing will keep moving to CapCut or Final Cut.
iPhone 17 Cellular Data Not Working on iOS 26? 9 Fixes
iPhone 17 cellular data still dropping on iOS 26? Apple fixed the launch bug in iOS 26.0.1, but recovery failures persist. Here's the fix ladder.

iPhone Cellular Data Not Working Abroad? eSIM Fixes
Travel eSIM showing no data abroad? Fix iPhone roaming with the data-line check, Data Roaming toggle, APN settings, and network selection steps.

iPhone Cellular Data Not Working for Some Apps? 8 Fixes
Some iPhone apps refuse to load on cellular while others work fine. Check the per-app cellular toggle, Low Data Mode, VPN profiles, and Screen Time.

iPhone Stuck on EDGE? How to Get 5G or LTE Back (2026)
iPhone stuck on EDGE with crawling data? Here's why the E icon appears, which settings force 5G or LTE back, and when the problem is your carrier.