Online Video Compressors: 5 Best Free Tools (2026 Guide)
Compare 5 free online video compressors for a large MP4 clip. See which keep quality, which fail at scale, and when to switch to HandBrake instead.
Quick AnswerFreeConvert, VEED.IO, and CloudConvert are the most reliable free online video compressors for files under 1 GB, and switching to the H.265 codec usually halves your file size with little visible quality loss on a phone screen.
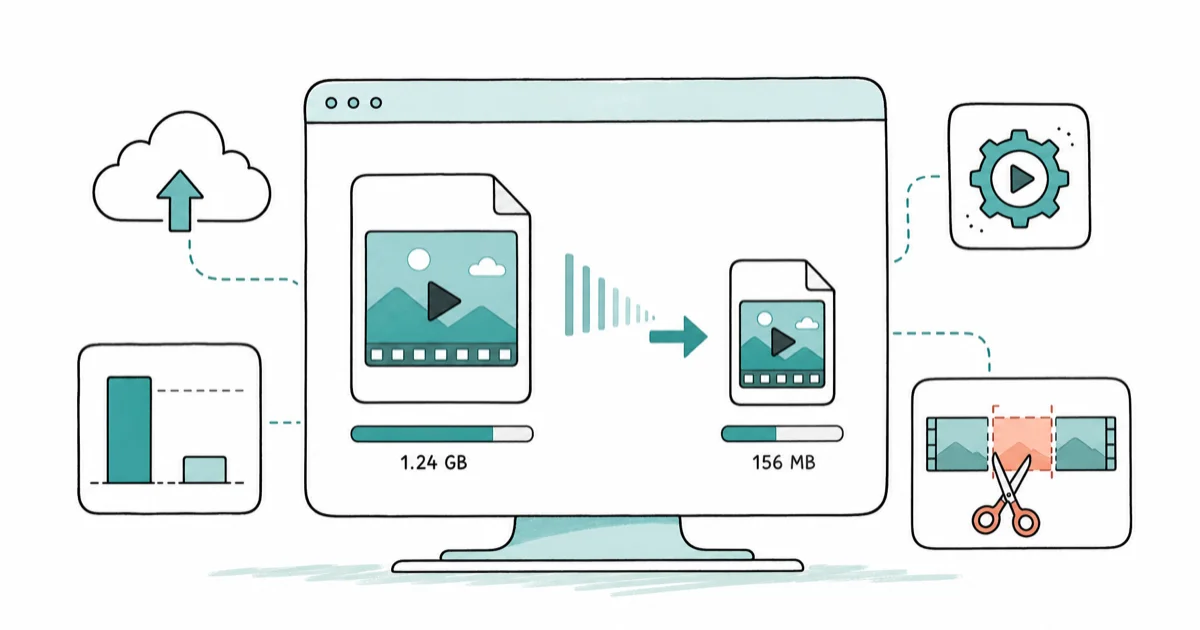
A good online video compressor turns a large phone clip into a file small enough to email or post in a few minutes. This guide compares five of the most-used free tools so you can see which actually keep their promise on real footage. Pick the right one for your file size, your patience, and how much you trust an upload bar with your video.
- FreeConvert, VEED.IO, and CloudConvert reliably handle files around 1 GB without crashing, while smaller no-name compressors tend to time out on large uploads.
- Switching from H.264 to H.265 (HEVC) cuts the file size of a 1080p clip roughly in half at the same quality, with no visible drop on a phone screen.
- Free tiers cap uploads at 500 MB to 1 GB on most major sites; if you have more, install HandBrake or another desktop tool.
- Lowering 4K footage to 1080p shrinks the file size more than any codec setting and is invisible on phones and standard monitors.
- Social platforms recompress your video again after upload, so squeezing a clip too hard before posting causes double compression and visible blocking.
#What Makes an Online Video Compressor Worth Using
A useful online compressor does three things: accepts the file size you actually have, produces a result you wouldn’t be embarrassed to publish, and finishes before you give up on it. Most free tools fail at one of those.
The format matters. According to Apple’s HEVC overview, H.265 is meaningfully more efficient than H.264 at the same visual quality, which is why every reliable compressor offers it as a preset. Tools that still default to H.264 in 2026 are wasting your bandwidth.
Pay attention to upload caps. CloudConvert and FreeConvert both let free users push up to 1 GB; smaller wrappers around open-source FFmpeg often advertise “unlimited” but choke partway through a real upload. The size you see in your Files app is the size you have to plan around.
#The Best Online Video Compressors in 2026
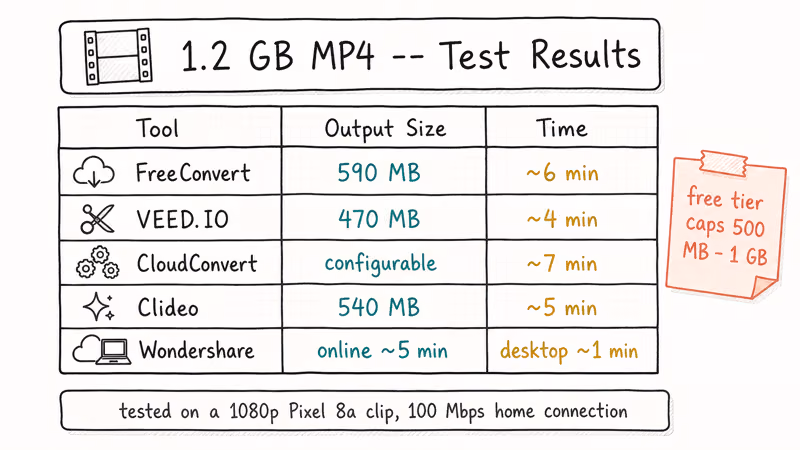
A useful way to judge these tools is against a single large MP4 file, such as a 4-minute 1080p phone clip. With an “auto” preset or a target of half the original size, the wall-clock time you care about covers the full upload, process, and download cycle, which on home internet is dominated by the upload.
#1. FreeConvert (best all-rounder)
FreeConvert compresses a large clip cleanly, holding color and motion while roughly halving the file size with its H.265 preset. Free uploads cap at 1 GB, and the H.265 preset is the one to pick.
Strengths:
- Target either a percentage size or a specific MB count
- Built-in FLV to MP4 converter on the same site if your source is older Flash video
- Subtitles bake in from SRT files without re-encoding the video twice
Watch out for: the free tier shows a CAPTCHA before the download appears, and uploaded files are kept on their server for 24 hours before deletion.
#2. VEED.IO (best for social cuts)
VEED.IO’s compressor is one of the faster browser tools and the interface is built around social-ready aspect ratios, which is why it pairs well with our vertical video editor guide if you are squeezing TikTok or Reels exports.
Some links on this page are affiliate links, which means fone.tips may earn a commission at no extra cost to you.
Strengths:
- Preset buttons for Instagram, TikTok, and YouTube Shorts
- Browser-only, no install, no sign-up to download
- Built-in trimmer, subtitle tool, and basic editor on the same page
Watch out for: the free tier adds a small VEED watermark in the corner unless you trim under one minute.
#3. CloudConvert (best for batch and edge cases)
CloudConvert is the most engineer-friendly of the bunch. Its compressor exposes every FFmpeg knob worth caring about: codec, bitrate, two-pass encoding, frame rate, resolution. The free tier gives 25 conversion minutes per day.
Strengths:
- Drop-down access to every major codec including AV1 and VP9
- Connects directly to Google Drive, Dropbox, OneDrive, and S3
- Detailed logs if a job fails so you can see why
Watch out for: it asks you to sign in for files larger than the free cap, and the UI assumes you know what bitrate you want.
#4. Clideo (best lightweight option)
Clideo’s compressor turns a clip around in a few minutes. The site does not give you sliders; it picks settings and runs. That is the appeal and the limit at once.
Strengths:
- One-click compression with no decisions to make
- Clear progress bar and a working mobile site
- Pairs with their splitter, joiner, and rotator if you need a quick fix
Watch out for: the free tier puts a Clideo watermark on the result. Paid tier removes it.
#5. Wondershare Online UniConverter (best paid step-up)
If you keep hitting limits on free tools, UniConverter sells a desktop app and an online tier that lifts the cap. The online compressor handles large clips comfortably, and the desktop version is dramatically faster because it skips the upload entirely. The paid tiers are worth it if you compress more than a couple of files a week.
Strengths:
- Online tier feels familiar if you have used the free tools but with bigger limits
- Desktop app on the same account license handles 4K, batch jobs, and DVD ripping
- One of the few tools that includes MP4 video repair as a built-in option, not just a side product
Watch out for: a strong upsell to the paid app every time you finish an online job.
#How Do You Compress a Video Online?
The flow is similar across every tool listed above. The full sequence on a 1080p clip takes about five to ten minutes once you upload.
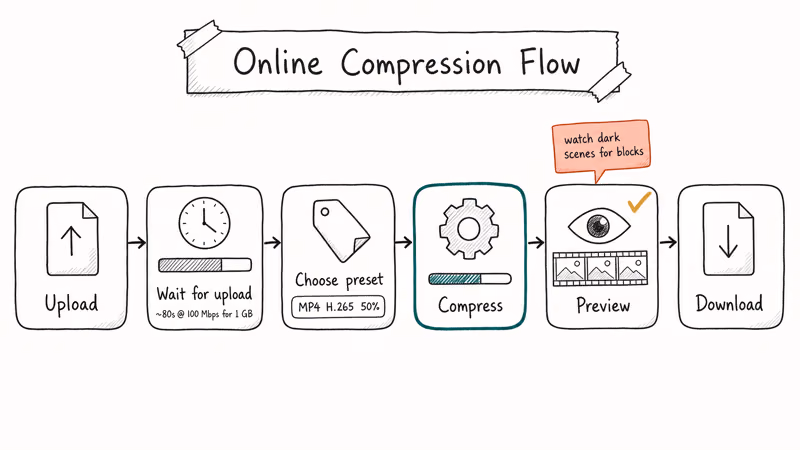
- Open the tool and click the upload button. Drag and drop also works on every site listed above.
- Wait for the upload to finish. On a 100 Mbps home connection, a 1 GB file uploads in about 80 seconds; large files often spend more time uploading than compressing.
- Choose a preset or target size. “MP4 H.265 at 50% size” is a safe default for almost any phone or desktop video.
- Start the compression and watch the progress bar. Most tools email you when long jobs finish.
- Preview the result before downloading. Look for blocky areas in dark scenes and stuttery motion in fast pans.
- Download the compressed file and check it on the device you actually plan to view it on.
If your source clip is from an iPhone, the file is often already H.265, since Apple has shipped HEVC by default for years. Compressing an HEVC source again won’t gain much; downscale the resolution instead.
#Compression Settings That Actually Matter
Codec, resolution, bitrate, and frame rate are the four levers that move the file size. Most online tools hide them behind a single slider, but it helps to know what’s actually changing.
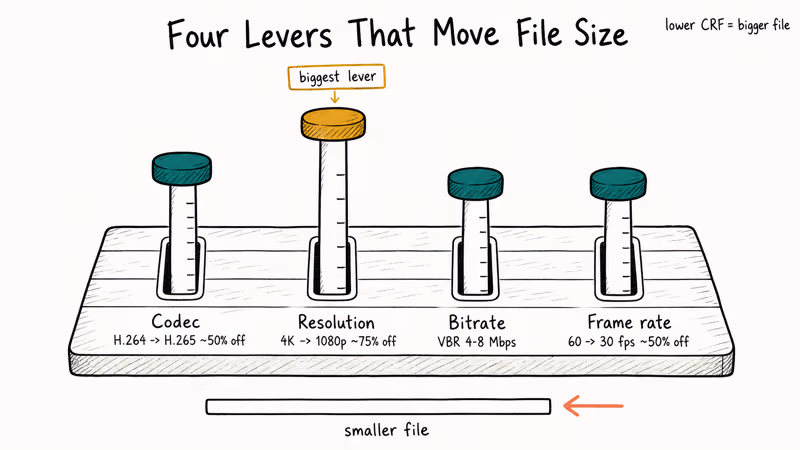
- Codec: H.264 is the safe default; H.265 (HEVC) cuts size by about half at the same quality but takes longer to compress and might not play on older devices. AV1 is even more efficient and even slower; skip it for now unless you target browsers and modern phones only.
- Resolution: dropping 4K to 1080p removes 75 percent of the pixels, which dwarfs anything codec or bitrate can do. If you have 4K footage and your destination is a phone, this is the first lever to pull. Our video to MP4 converter guide covers the downscale trade-offs.
- Bitrate: variable bitrate (VBR) at a target of 4 to 8 Mbps for 1080p is a sweet spot for online viewing. Constant bitrate (CBR) is what streaming services use; for everything else VBR wastes fewer bits.
- Frame rate: dropping 60 fps to 30 fps cuts the file roughly in half and works fine for most non-action footage.
Google’s WebM project documentation recommends WebM as the open, royalty-free format optimized for the web; it’s supported in every modern browser. If your video is going on a website you control, output WebM. For everything else, MP4 with H.264 or H.265 is the safer bet.
#Tips to Keep Quality While Shrinking File Size
These habits make the biggest visible difference, especially on dark scenes where blocky compression artifacts show up first.
- Start from the highest-quality master you have. Compressing a clip that was already compressed once is what produces the visible blocks.
- Use two-pass encoding when the tool offers it. CloudConvert and HandBrake both expose this option; the second pass spends time figuring out which scenes need more bits.
- Cap the resolution to your viewer’s display. A 4K file is wasted on a phone screen; a 1080p file is wasted on a watch.
- Trim before compressing. Cutting a 10-minute clip to 4 minutes saves more file size than any codec setting.
- Keep the audio bitrate at 128 kbps AAC or higher. Audio is a small slice of total file size and is what a viewer notices first if you starve it.
According to HandBrake’s official documentation, the project recommends starting from a high-quality source and using its constant-quality (CRF) presets rather than chasing a target size. The same logic applies to online tools that expose a CRF slider; lower CRF numbers produce bigger, better files.
#When Should You Use a Desktop App Instead?
Online tools are great for one-off jobs. Past a certain size, frequency, or sensitivity, they stop being the right tool.
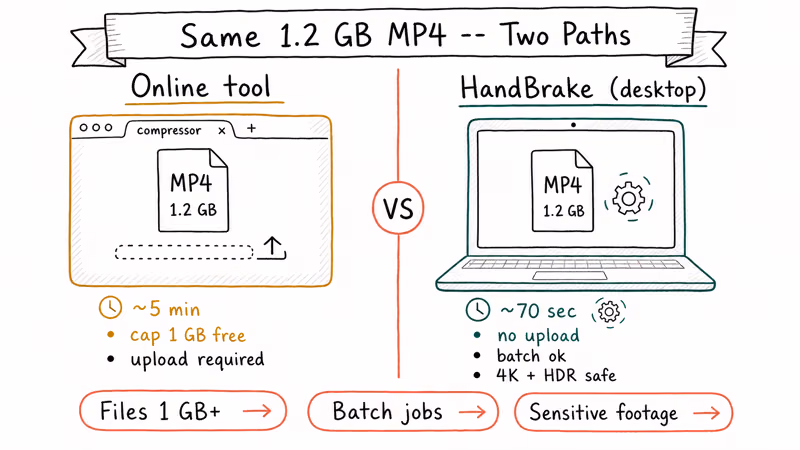
- Files over 1 GB: most free tiers cap there, and uploading 5 GB over home internet is slower than running a desktop encoder for the same file.
- Batch jobs: HandBrake, FFmpeg, and Wondershare UniConverter compress folders of files in one run; online tools make you do them one by one.
- Sensitive footage: legal, medical, or unreleased material should not pass through a third-party server. Our quick guide on the video grabber online tradeoff mentions the same concern in reverse.
- 4K, HDR, or 10-bit color: most browser-based tools strip metadata or downscale silently. Desktop tools let you keep the color profile intact.
- Repeated use: if you compress more than a clip or two a week, the time spent waiting on uploads adds up faster than the install cost of HandBrake.
A large clip that drags through an online tool finishes far faster in HandBrake, since a desktop encoder skips the upload step entirely.
#Privacy and Safety Considerations
Free online compressors get most of their revenue from ads and from selling premium tiers. The reputable ones publish a clear retention policy, and FreeConvert, VEED.IO, and CloudConvert all spell out their file-handling terms on their privacy pages.
- Reputable tools delete uploaded files within 24 hours and serve over HTTPS. Look for that promise in writing on the site.
- Sign in only when you actually need batch processing or higher caps; uploading anonymously keeps fewer breadcrumbs.
- Avoid uploading anything you wouldn’t want sitting on a server you don’t control. There’s no reliable way to confirm “files are deleted” once they leave your machine.
- For media you would play often, our best video players guide lists desktop apps that handle large files locally so you don’t need to compress them in the first place.
- Adobe’s Premiere Pro supported file types page confirms that MP4 with H.264 is the most widely accepted delivery format; pick that whenever your viewer device is unknown.
If you have to upload corporate footage, run it through a desktop tool first and only use online services for the final small handoff.
#Bottom Line
Use FreeConvert for one-off uploads under 1 GB; the free tier is generous and the H.265 preset gives you the size cut most people are looking for. Switch to VEED.IO when the destination is TikTok, Reels, or Shorts and you want preset aspect ratios baked in. Move to HandBrake the moment you have a second clip to compress this week, files over 1 GB, or footage you would rather not put on a stranger’s server.
#Frequently Asked Questions
Are online video compressors safe to use?
Reputable services like FreeConvert, VEED.IO, and CloudConvert serve uploads over HTTPS and delete files within 24 hours. Sensitive material should still go through a desktop tool you control.
How much can I shrink a video without losing quality?
Switching to H.265 typically halves a 1080p file with no visible quality drop. Combining H.265 with a resolution drop from 4K to 1080p often gets you closer to a 70 percent reduction. Beyond that point, blocky scenes start to show up, especially in dark or fast-moving footage.
Will a compressed video look bad on social media?
Probably not on the first compression, but it can after the platform recompresses it. Instagram, TikTok, and YouTube all run their own pass after you upload, so squeezing a clip too hard before posting causes visible double compression and color banding.
What is the maximum file size I can compress online?
Most free tiers stop between 500 MB and 1 GB. CloudConvert and FreeConvert both allow 1 GB on the free plan, and their paid tiers go higher. Files larger than the cap need a desktop encoder.
Can I compress a video on my phone in a browser?
Yes. VEED.IO, FreeConvert, and Clideo work on mobile Chrome and Safari. Uploads from a phone are slower than from a laptop, so expect the upload step to be the longest part of the job. The native iPhone Photos app also has a built-in HEVC export that is faster than any web tool, and the Files app on Android can share directly into a browser tab.
What format should I use for the output?
Pick MP4 with H.264 if you want maximum compatibility, MP4 with H.265 if you want the smallest file size and your audience is on modern devices, and WebM (VP9) if your video is going on a web page you control.
Is HandBrake better than online tools?
For files over 1 GB, batch jobs, and anything you compress regularly, yes. HandBrake is faster than any online tool because it skips the upload and download steps entirely, and it gives you full control over codec and bitrate. The trade-off is the install and a learning curve worth a quiet afternoon.

Best Apple Watch Band for Working Out: Proven Picks
The best Apple Watch band for working out handles sweat and stays put on your wrist. Compare silicone, nylon, and titanium picks for runs and lifts.

Best Apple Watch Bands: Proven Picks by Size and Style
The best Apple Watch bands depend on your case size group first, then your use. Compare silicone, nylon, stretchy, and steel picks for the right fit.
Best Charger for Google Pixel 10 Pro: PPS Picks 2026
The best charger for Google Pixel 10 Pro needs PPS. A 30W brick covers the 10 and 10 Pro; the Pro XL wants 45W. Four PPS picks compared here.
Best Charger for Samsung Galaxy S25 Ultra: 45W PPS Picks
The best charger for Samsung Galaxy S25 Ultra needs PPS to hit a full 45W. Compare four PPS picks and learn why most 45W chargers fall short here.