How to Replace Footage in After Effects: 6 Methods (2026)
Replace footage in After Effects with Project panel swap, Alt-drag, Reload Footage, missing-file relink, proxies, and safer workflow checks.
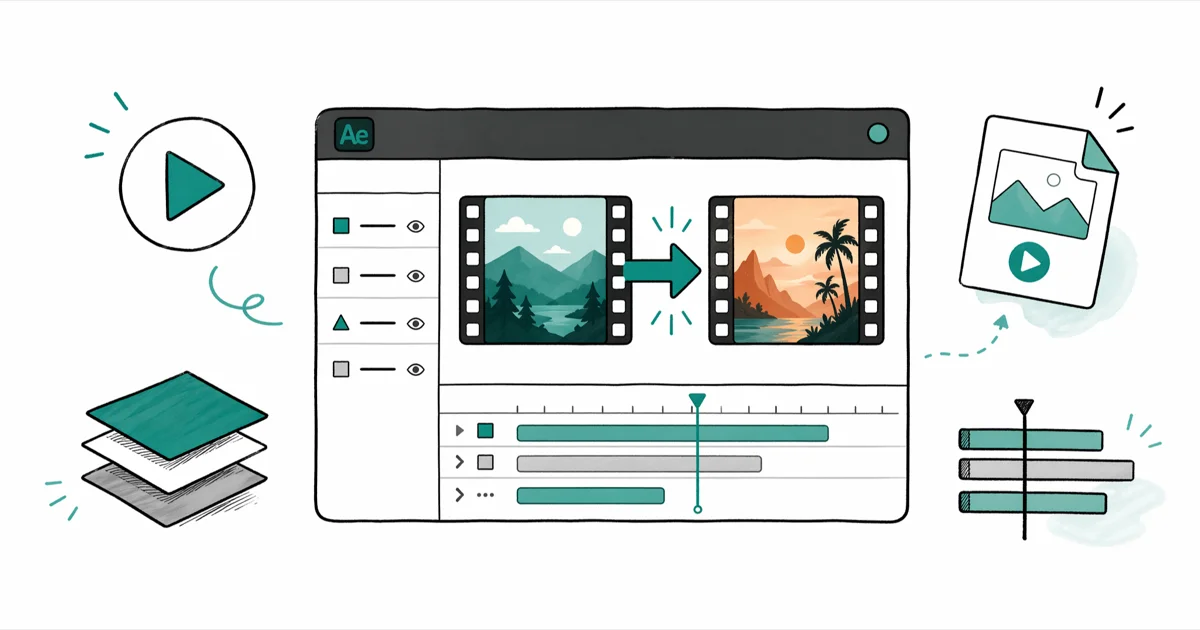
Quick AnswerRight-click a clip in the Project panel, choose Replace Footage then File, pick the new file, and click Open. Every composition that used the old clip now points to the new file, and your effects, masks, and keyframes stay attached to the layer.
Replacing footage in After Effects takes about ten seconds once you know where to look. The swap keeps every effect, mask, expression, and keyframe attached to the layer, so you don’t lose any of your existing work.
Each replacement method solves a slightly different problem in a real motion-graphics workflow. The Project panel method handles the global swaps you do every day. Alt-drag is the surgical option for one-layer changes. Reload Footage saves you from re-importing after a Photoshop edit, and Find Missing Footage rescues a project after the source folder moves drives.
- Right-click footage in the Project panel and choose Replace Footage then File to swap a clip across every composition in one move
- Hold Alt on Windows or Option on macOS while dragging from the Project panel onto a timeline layer to replace just that one instance
- File then Reload Footage refreshes a clip when you re-export it from Photoshop, Illustrator, or another app without resetting the import
- File then Dependencies then Find Missing Footage relinks every red placeholder after a project moves drives or folders rename
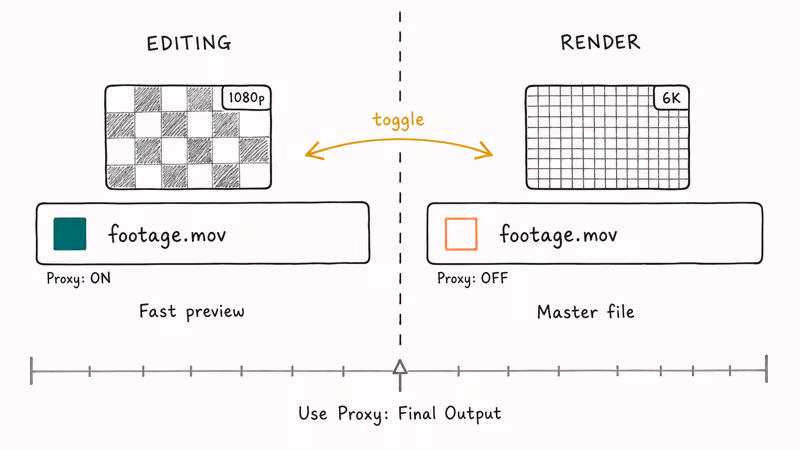
- Set Proxy lets you swap a low-resolution stand-in for editing, then toggle back to the master file before final render
#How Do You Replace Footage in the Project Panel?
This is the workhorse method. It rewrites the source file pointer for one footage item, and every layer that referenced that item updates at the same time.
Step 1. Open the Project panel, usually docked on the upper-left side of the standard workspace.
Step 2. Find the footage you want to swap. Big projects with hundreds of imports get hard to scroll through, so use the search field at the top of the panel and type a few characters of the filename.
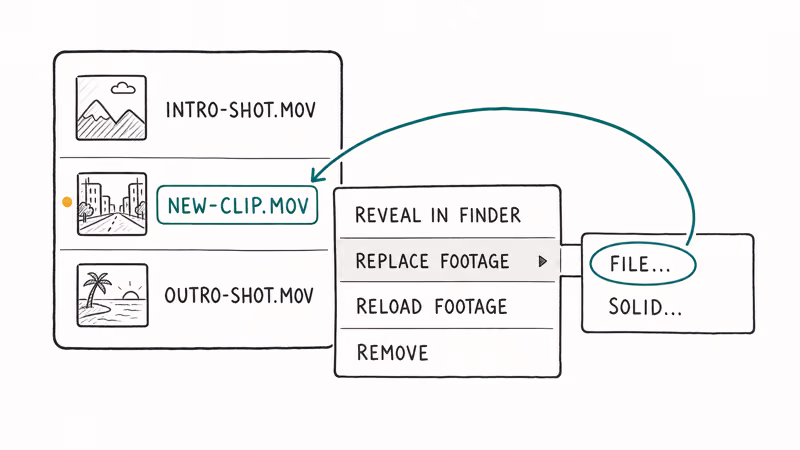
Step 3. Right-click the footage item and choose Replace Footage > File. The keyboard shortcut is Cmd+H on macOS or Ctrl+H on Windows.
Step 4. Pick the replacement file in the dialog and click Open.
Every composition using that footage now points to the new file. Effects, keyframes, masks, blend modes, expressions, and time-stretch values stay attached to the layer because After Effects only swaps the source pointer, not the layer itself.
According to Adobe’s footage import documentation, the Replace Footage dialog accepts the same file types as the original Import command, so you can swap a ProRes master for an H.264 proxy, or trade a still for a video clip without re-importing.
One thing to watch. If the new file has different pixel dimensions or a different frame rate, After Effects won’t warn you. Position keyframes that were tuned for the old clip can drift after a size change. Open each affected comp and spot-check the layer’s Scale and Position values after a global swap.
If you’re weighing whether to stay in After Effects at all, our roundup of After Effects alternatives covers the closest competitors and what each one does well.
#How Do You Replace Footage on a Single Layer?
Sometimes the Project panel is too aggressive. Alt-drag is the surgical alternative.
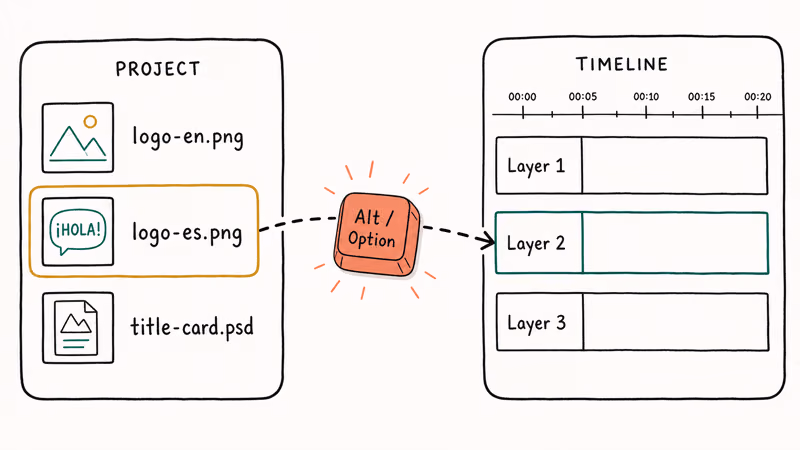
- Select the target layer in the Timeline panel
- Hold Alt on Windows or Option on macOS
- Drag the replacement footage from the Project panel onto the selected layer
The layer keeps its In/Out points, opacity keyframes, transform animations, masks, and effect parameters. Only the source file changes. Release the modifier key after the layer accepts the drop.
There’s a no-mouse version of the same trick. Pick the layer in the Timeline, click the replacement clip in the Project panel, then press Ctrl+Alt+/ on Windows or Cmd+Option+/ on macOS. The swap happens with no dialog, which is the fastest way to chew through a list of layers that each need a different file.
When you’re doing the same single-layer logic in another NLE, the muscle memory carries over. Our walkthrough on reversing a clip in Premiere Pro shows the Premiere equivalent of layer-level edits without disturbing project-wide assets.
Use it when localizing a comp by swapping an English title for the Spanish version, or when a client approves one shot at full resolution while the rest still need proxies. The same Alt-drag rule applies to dragging a precomp from the Project panel onto a layer. Drop with the modifier held, and you’re swapping the layer for a precomposed version that keeps every effect parameter pinned to the original.
#Replace Source Through the Edit Menu
A third way to do single-layer replacement lives in the Edit menu. Select a layer in the Timeline, then go to Edit > Replace Source and pick a file.
Same end result as Alt-drag, but the Edit menu version works when the replacement file is not already imported. The dialog acts as an Import + Replace combo. Useful when a client just emailed you a final asset and you don’t want to drag the import wizard through Project panel housekeeping first.
The Replace Source command has lived in the Edit menu since After Effects CC 2018, according to Adobe’s release notes archive, and it behaves the same in 2025. The shortcut is the same as Project panel swap. The difference is that Edit > Replace Source acts on a Timeline layer selection, while right-click > Replace Footage acts on a Project panel selection.
After Effects has shipped this pattern since version 1.0 in 1993, per the Adobe After Effects entry on Wikipedia. Muscle memory you build here transfers to every modern Creative Cloud release.
#Reload Footage After Editing It in Another App
Reload Footage refreshes a changed source file without a new import.
Open the Project panel, right-click the footage, and choose Reload Footage. Or hit the keyboard shortcut Ctrl+Alt+L on Windows or Cmd+Option+L on macOS. The footage refreshes from disk and every comp that uses it picks up the new version on the next preview.
This is faster than Replace Footage because you skip the file-picker step. The path stays the same, the import settings stay the same, and only the bytes get re-read. It’s especially useful when iterating on Illustrator artboards or After Effects precomps that come in through Dynamic Link.
For audio changes, the same shortcut works; our fade-audio-in-Premiere walkthrough covers Premiere Pro’s equivalent.
#Find Missing Footage After a Project Moves
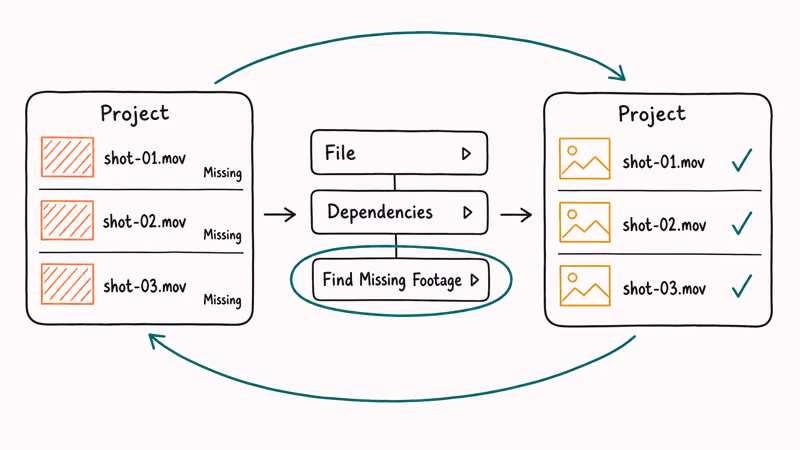
You moved the project to a different drive, or someone renamed the source-clips folder. After Effects opens the file and shows red color bars where the footage should be. Each missing item gets a “Missing” status in the Project panel.
Step 1. Open the Project panel and look for items with a colored bar instead of a thumbnail.
Step 2. Go to File > Dependencies > Find Missing Footage. The Project panel filters down to just the missing items, which makes audit faster on big projects.
Step 3. Right-click the first missing item and choose Replace Footage > File, then point at the new location.
Step 4. If your missing files are all in the same new folder, After Effects can auto-relink the rest after you fix the first one.
Adobe’s footage items documentation recommends running File > Dependencies > Collect Files before any major drive move, which copies every imported asset into one folder next to the .aep file. That avoids the Find Missing Footage scramble entirely.
If a Photoshop file shows missing because the layer structure changed, Reload Footage often fixes it without needing a new file path. Try Reload first.
#Using Proxies for Faster Editing on Slow Hardware
Proxies are low-resolution stand-ins that After Effects swaps in during editing and swaps back out at render time. The workflow is old, but it’s still useful in 2026 when source footage runs 6K and 8K, storage is remote, or a laptop can’t preview heavy codecs smoothly.
To set a proxy:
- Select a footage item in the Project panel
- Go to
File>Set Proxy>File - Choose a smaller version of the same footage and click Open
A small square appears next to the footage name. Filled square means the proxy is active. Click it to toggle back to the original file when you want to spot-check at full quality.
To create a proxy from scratch:
- Select the footage and go to
File>Create Proxy>Movie - After Effects opens the Render Queue with proxy settings preloaded
- Adjust the output module if needed, then click Render
According to Pond5’s After Effects proxy guide, proxies cut preview render times significantly depending on the source resolution and codec. The speed difference is most noticeable when you scrub through the timeline or step through keyframes.
Before final render, set Use Proxy to “Final Output” so After Effects renders from the master files.
If your machine simply can’t keep up with 4K previews even with proxies enabled, our list of the best laptops for video editing under $1,000 has options that handle After Effects without thermal throttling.
#Tips for Replacing Footage Without Breaking Your Project
Footage replacement looks harmless on paper. A handful of details can ruin a comp if you skip them:
- Match dimensions when possible. Swapping 1080p for 4K throws off masks and position keyframes because After Effects doesn’t auto-scale replacements. If the new file is a different size, expect to reset Scale and Position on at least one layer.
- Watch frame rates. Replacing low-frame-rate footage with higher-frame-rate footage can change animation rhythm on text animations and motion graphics. Time-remapped layers drift more.
- Check expressions. Expressions that read width, height, or duration properties can break silently after a swap.
Run File>Dependencies>Reveal Expression Errorsto surface the broken ones. - Save incrementally.
File>Save Asbefore any global swap creates a rollback point in three seconds. Worth it. - Collect Files for big swaps. When you’re about to relink a project that moved between drives, run
File>Dependencies>Collect Filesfirst to lock in a known-good copy.
For editors weighing the broader landscape, our DaVinci Resolve vs Premiere Pro comparison explains how each NLE treats footage swaps. After Effects is unusually graceful here. Most timeline-based editors only touch one instance at a time.
#Common Errors When Replacing Footage
A few error states show up often enough during footage swaps that they deserve their own checklist:
- “Missing Footage” warning persists after Find Missing Footage. The new file path probably has different access permissions, or the drive is mounted as read-only. Verify the file opens in Finder or Explorer first.
- Color shift after replacement. ProRes and H.264 use different chroma subsampling, so a swap between them can change skin tones and gradients.
Open File>Project Settings>Color andconfirm the working color space matches your source. - Audio disappears. Embedded audio doesn’t always carry through a footage swap. Re-import the audio track separately and parent it to the same layer if needed.
- Replace Footage greyed out. You probably have nothing selected in the Project panel, or the selected item is a composition rather than a footage source. Compositions can’t be Replace-Footaged. They use Replace With Comp instead.
Leaving Adobe entirely? Our guide on canceling an Adobe subscription covers early-termination fees, and the roundup of free video editing software without watermarks lists alternatives.
#Bottom Line
For global swaps, right-click the clip in the Project panel and pick Replace Footage > File. That’s the right move 80 percent of the time. For one-off layer changes, Alt-drag from the Project panel onto a timeline layer keeps the swap surgical.
Run Reload Footage when you only re-saved the source file in Photoshop or Illustrator. Use File > Dependencies > Find Missing Footage to rescue projects after a drive move. Set proxies on anything 4K or larger if your machine struggles, and flip Use Proxy to “Final Output” before final render.
One rule prevents most footage-swap disasters. Always File > Save As before a global Replace.
#Frequently Asked Questions
Can I replace footage with a different aspect ratio?
Yes, but After Effects won’t auto-scale or crop the new clip. Swapping a 16
file for a 4 file leaves black bars or crops the frame depending on your composition settings, and the same is true for vertical-to-horizontal swaps. Adjust the layer’s Scale and Position properties after the swap, and double-check any masks that were tuned to the old footage extents because mask paths don’t reflow automatically when the source aspect changes.Does replacing footage affect keyframes and effects?
No. Keyframes, effects, masks, and expressions stay on the layer. Only the source file changes. If the new file has different pixel dimensions, position-based keyframes can look shifted, so check those after swapping.
Can I undo a footage replacement?
Yes. Press Ctrl+Z on Windows or Cmd+Z on macOS. Already saved? Use File > Revert.
How do I replace footage in multiple layers at once?
If the layers all reference the same source footage, replace that single item in the Project panel. Every layer updates at once. For layers with different sources, swap one at a time using Edit > Replace Source or Alt-drag.
What happens when I replace footage with a different frame rate?
The composition’s frame rate stays the same. After Effects interpolates or drops frames to match the comp settings. Keyframe timing holds because keyframes live on the layer, not on the source. Visual rhythm can change, so check Time Stretch if playback looks wrong.
Can I replace footage with an image sequence instead of a video file?
Yes. Choose Replace Footage > File, select the first image in your sequence, and check “Force Alphabetical Order” in the import dialog. After Effects treats the sequence as a single footage item. If the frame rate of the sequence doesn’t match what you expect, right-click the footage and choose Interpret Footage > Main to override it.
Does replacing footage change the file size of my .aep project?
No. The .aep stores references to footage, not the footage itself. Swapping a 50MB clip for a 500MB one doesn’t change the project file size at all.
Can I use Replace Footage with Dynamic Link compositions?
Yes. The Dynamic Link itself doesn’t break. Adobe’s Dynamic Link documentation confirms that linked compositions stay live across both applications during a swap. If the replacement footage has different duration or frame rate, the Premiere Pro timeline can need manual re-trim afterward.

Apps Crashing After iOS 27 Update? Fix Order (2026)
Apps crashing after the iOS 27 update? Update the app in the App Store first, then offload and reinstall to clear stale cache, then restart. The fix order.

Do AI Translation Earbuds Work Offline? What to Know
Do AI translation earbuds work offline? A few do with downloaded language packs, but most need the cloud. Here's what works offline and what you give up.

How to Set Up Translation Earbuds (Pairing and Modes)
How to set up translation earbuds: charge, install the app, pair over Bluetooth, pick two languages, and choose a mode. A step-by-step first-use guide.

Translation Earbuds Not Translating? How to Fix Them
Translation earbuds not translating? Usually it's the app, the internet, or the language settings. Here's how to fix pairing, sound, and lag fast.