How to Fix iTunes Wi-Fi Sync Not Working in 2026 Guide
Fix iTunes Wi-Fi sync not working with 8 proven methods for connection drops, device not found, and failed syncs on iPhone, iPad, and iPod touch.
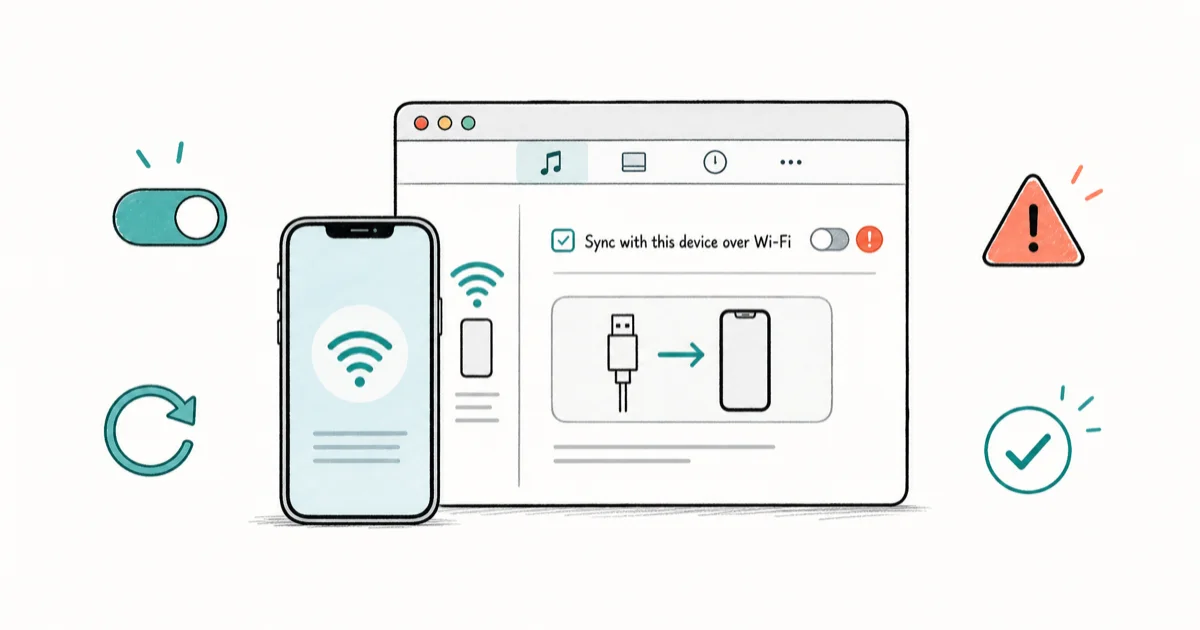
Quick AnswerTo fix iTunes Wi-Fi sync not working, connect your iPhone to iTunes via USB, check Sync with this iPhone over Wi-Fi in the Summary tab, click Apply, and keep both devices on the same Wi-Fi network. A USB re-sync restarts the wireless handshake nine times out of ten.
iTunes Wi-Fi sync not working is one of the older Apple bugs that still bites in 2026, especially on Windows 10 and 11 where antivirus tools step on Apple Mobile Device Service and Bonjour. This guide walks through eight fixes in the order that clears the most common causes first, starting with the quick USB re-sync and ending with a full reinstall.
- Wi-Fi sync only works when both devices sit on the same Wi-Fi network and the iPhone appears in iTunes via USB at least once after enabling the setting.
- Apple’s iTunes guide confirms the checkbox is labeled “Sync with this [device] over Wi-Fi” and states the computer must stay powered on during wireless sync sessions.
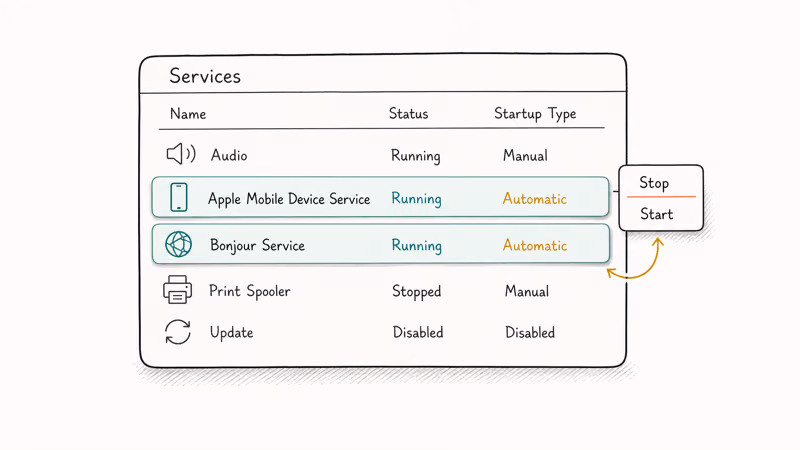
- Apple Mobile Device Service and Bonjour Service must both be running in Windows Services, set to Automatic, or iTunes can’t see the iPhone over the LAN.
- Third-party antivirus and firewall tools block the exact ports iTunes needs; Apple’s own support doc lists this as a known cause of devices not appearing in iTunes.
- A USB re-connect plus Apply fixes Wi-Fi sync in most cases, and a clean iTunes reinstall clears the rest when Bonjour is corrupted.
#Why iTunes Wi-Fi Sync Keeps Breaking
Wi-Fi sync is more fragile than USB because it stacks three systems on top of each other: iTunes, Bonjour for local network discovery, and the Apple Mobile Device Service for the actual data transfer. If any one of those stalls, the iPhone vanishes from the iTunes sidebar and the Settings > General > iTunes Wi-Fi Sync screen on your phone shows a grayed-out Sync Now button.
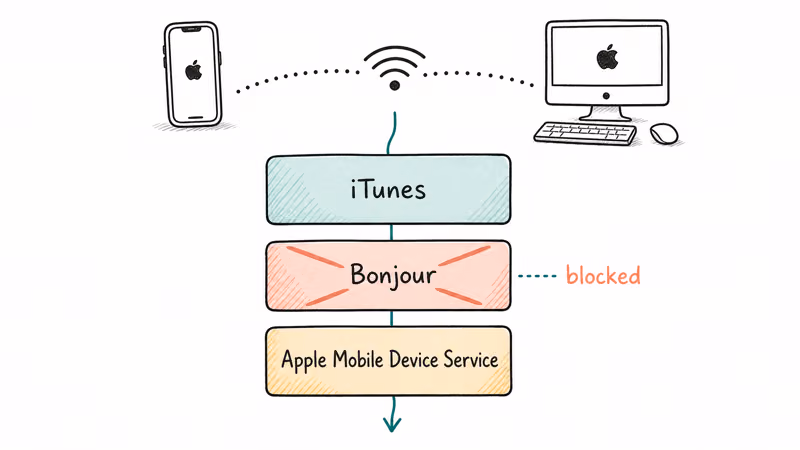
A routine antivirus update can silently block Bonjour without any warning, so start with the services on your computer, not the iPhone.
According to Apple’s iTunes Wi-Fi syncing guide, your computer and device must be connected to the same Wi-Fi network, and the device needs to be connected to a charger and plugged in to an electrical outlet for automatic syncing to begin.
Apple also states that iOS 5 or later is required and the computer must remain powered on during wireless sync sessions. If any of those conditions slip, Wi-Fi sync fails quietly rather than throwing a clear error.
#Quick Fix: Re-Enable Wi-Fi Sync Over USB
Start here because it clears the issue for most readers in under two minutes, and it rules out the most common cause before you touch anything complicated.
- Plug your iPhone, iPad, or iPod into the computer with the original Lightning or USB-C cable.
- Open iTunes on Windows or the Apple Devices app on newer Windows builds. On Mac, open Finder and select the device in the sidebar.
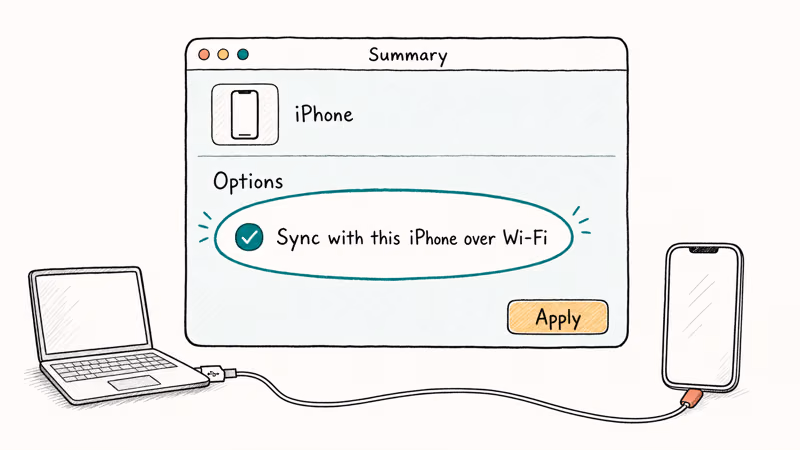
- Click the small device icon in the upper-left corner of iTunes, then open the Summary tab.
- Scroll to the Options section and tick Sync with this iPhone over Wi-Fi (the exact label Apple uses, according to its official guide).
- Click Apply in the bottom-right corner and wait for the sync cycle to finish.
- Unplug the cable. On your iPhone, go to
Settings>General> iTunes Wi-Fi Sync and tap Sync Now.
If the Sync Now button is still grayed out or says “waiting for Wi-Fi to connect,” move to the network checks in the next section. When the pairing refreshes correctly, the button becomes active within a few seconds of clicking Apply on the computer.
If the “Back Up Now” button is greyed out in iTunes, that usually points to the same Apple Mobile Device Service issue we cover below, not a Wi-Fi sync problem.
#Is Your Computer Actually on the Same Network?
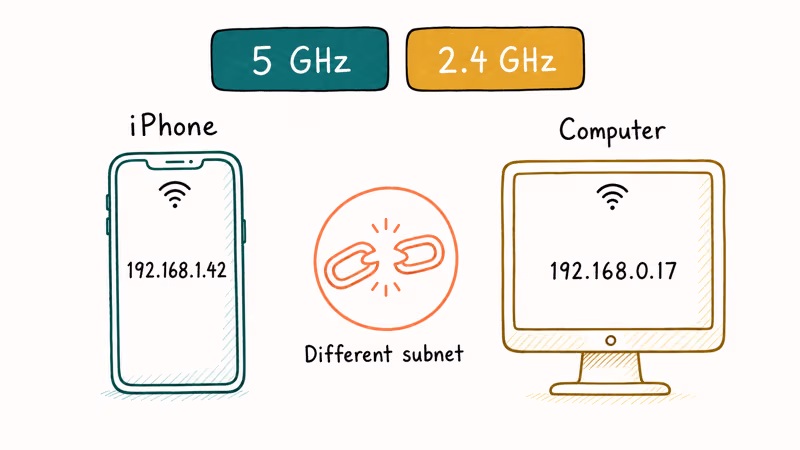
This sounds obvious, but mesh routers, guest networks, and 5 GHz/2.4 GHz splits catch people out constantly. Even when both devices “say” they’re on the same SSID, they may be on different radios or VLANs that don’t allow multicast. Bonjour needs multicast to find your iPhone.
- On your iPhone, open
Settings>Wi-Fiand tap the (i) next to the connected network. Note the IP address (for example, 192.168.1.42). - On Windows, open Command Prompt and run
ipconfig. On Mac, openSystem Settings>Network>Wi-Fi>Detailsand check the IP. - Compare the first three octets. If the phone is on 192.168.1.x and the computer is on 192.168.0.x, they’re on different subnets and Wi-Fi sync won’t work.
- If your router broadcasts separate 2.4 GHz and 5 GHz SSIDs, connect both devices to the 5 GHz band. Mixed-band setups sometimes block Bonjour packets.
- Turn off any VPN app on the PC or iPhone for the test, because VPN tunnels reroute traffic away from the local network.
On mesh systems like eero, moving the iPhone off a guest SSID and onto the main SSID often restores Wi-Fi sync instantly without any iTunes changes, because guest networks usually block the multicast traffic Bonjour relies on.
If your iPhone won’t connect to Wi-Fi at all, resolve that first, because no Wi-Fi means no Wi-Fi sync.
#Restart Apple Mobile Device Service on Windows
The Apple Mobile Device Service (AMDS) is the background service iTunes uses to talk to your iPhone. If it crashes or hangs, iTunes will show your device when connected by cable, but Wi-Fi sync will never start.
Apple’s own security-software troubleshooting article, Resolve issues between iCloud for Windows or iTunes and third-party security software, confirms that devices not being recognized and sync failures are common symptoms when AMDS gets blocked.
- Close iTunes.
- Press Win + R, type
services.msc, and press Enter. - Scroll down to Apple Mobile Device Service.
- Right-click it and choose Properties.
- Set Startup type to Automatic, click Stop, wait five seconds, then click Start.
- Click OK, reopen iTunes, and reconnect the iPhone with USB first.
Do the same for Bonjour Service. It must be set to Automatic and running. Bonjour is what broadcasts your iPhone’s presence on the LAN over mDNS; without it, iTunes sees nothing even when the phone is fully awake on the same network. In Windows Services it appears as Bonjour Service, and its executable is mDNSResponder.exe, the exact process most firewalls and antivirus suites love to block.
If iTunes itself crashes on launch, see our guide on how to fix iTunes won’t open on Windows 10. That same fix applies to Windows 11.
#Firewall and Antivirus: The Silent Wi-Fi Sync Killer
Third-party security tools are one of the most common causes of iTunes Wi-Fi sync failures. Apple recommends that Windows users work with their security software vendors to whitelist Apple’s list of ports and services, or temporarily disable the security software to isolate the issue.
The Apple article specifically lists devices that can’t back up, restore, update, or sync as symptoms of this exact problem. That covers almost every iTunes-over-Wi-Fi failure mode you’ll hit.
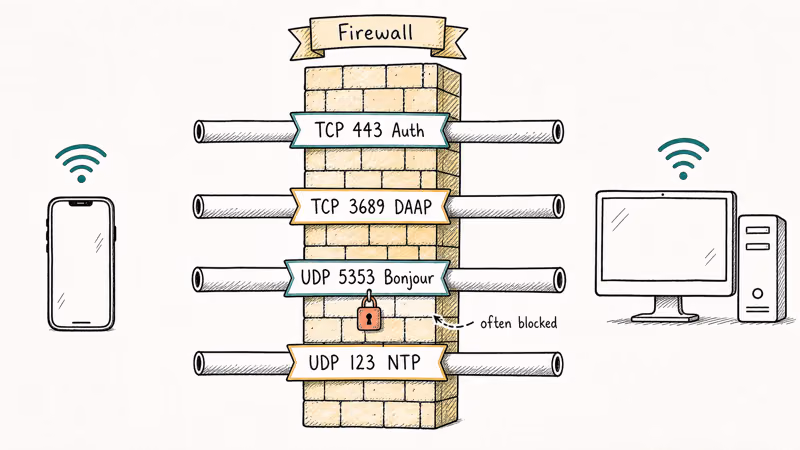
iTunes Wi-Fi sync needs these ports open on every device between the iPhone and the computer:
- TCP 443 for Apple activation and authentication servers.
- TCP 3689 for Digital Audio Access Protocol (DAAP), the core of iTunes sharing.
- UDP 5353 for mDNS/Bonjour local network discovery.
- UDP 123 for Network Time Protocol, used by iTunes to verify certificates.
To unblock these on Windows Defender:
- Open
Control Panel>System and Security>Windows Defender Firewall. - Click Allow an app or feature through Windows Defender Firewall.
- Click Change settings, then check the boxes next to iTunes and Bonjour Service for both Private and Public networks.
- If you run Norton, McAfee, Kaspersky, or Bitdefender, open that app and add iTunes.exe and mDNSResponder.exe (Bonjour) to the trusted applications list. Temporarily disabling the firewall for 60 seconds is a faster test: if Wi-Fi sync starts working, you know the culprit.
- Restart the PC after changes. Antivirus tools often hold their rules in memory until reboot.
Many security suites block UDP 5353 by default on the “Public” network profile while leaving it open on “Private.” Switching your home network to “Private” in Windows settings can fix sync without any antivirus changes, which is the fastest workaround if you’d rather not disable your security software at all.
#Update iOS and iTunes to Matching Versions
Version mismatches break Wi-Fi sync more often than people expect. Apple dropped legacy iTunes versions from macOS Catalina onward, and Windows iTunes now ships as Apple Devices and Apple Music preview apps on Windows 11.
According to Apple’s iOS update guide, wireless updates require the device to connect to the internet with Wi-Fi, and Apple recommends keeping iOS on the latest version for sync compatibility.
- On iPhone/iPad: Go to
Settings>General>Software Updateand install any available update. Restart the device after. - On Windows (iTunes 12): Open iTunes, click
Help>Check for Updates, and install the newest build. - On Windows 11 (Apple Devices app): Open Microsoft Store, click your profile, and use Downloads and updates to force-update Apple Devices.
- On Mac (macOS Catalina or later): iTunes has been replaced by Finder. Go to
System Settings>General>Software Updateto make sure Finder is current.
After updating, reconnect the iPhone via USB once to refresh the trust pairing, then re-enable Wi-Fi sync.
#Advanced: Reinstall iTunes to Rebuild Bonjour
If Wi-Fi sync is still broken after the checkbox fix, network verification, AMDS restart, firewall changes, and software updates, the last reliable fix is a clean reinstall. Apple’s iTunes support page for Windows confirms that a clean reinstall using cleanup utilities resolves persistent sync issues.
- Back up your iTunes library first. If you’ve forgotten your iTunes backup password, solve that before you uninstall anything.
- On Windows, go to
Settings>Apps>Installedapps and uninstall in this order: iTunes, Apple Software Update, Apple Mobile Device Support, Bonjour, Apple Application Support 32-bit, Apple Application Support 64-bit. - Restart your PC. This is not optional, because installer residue causes half of failed reinstalls.
- Download the latest iTunes from Apple’s website (not the Microsoft Store build, which has a different Bonjour implementation).
- Install iTunes, reboot one more time, then connect the iPhone via USB and re-enable Wi-Fi sync.
Our full walk-through on how to reinstall iTunes covers the component order and common reinstall errors. On Mac, you can’t reinstall iTunes on Catalina or later, but you can delete the Finder preferences plist and reboot, which has the same effect.
#When Should You Give Up and Use Alternatives?
Wi-Fi sync is legacy tech. Apple hasn’t added a new feature to it since iOS 12, and the company’s focus is clearly on iCloud and third-party tools.
If you’ve run through every fix and sync still fails, it’s time to switch rather than keep fighting. Apple’s iTunes content syncing overview still lists Wi-Fi sync as supported, but the company recommends iCloud for most content types on newer iPhones.
- iCloud Drive, Photos, and Music sync over any Wi-Fi or cellular connection with no iTunes involvement. Enable them at Settings > [Your Name] > iCloud.
- iMazing is a paid iTunes replacement that handles Wi-Fi sync, backup, and transfer reliably on both Windows and Mac. It works without Bonjour, which sidesteps most network issues.
- AnyTrans offers one-click transfer between iPhones and computers, plus selective backup. It’s a solid fallback if iMazing is out of budget.
- Finder on Mac (Catalina+) replaces iTunes entirely and handles Wi-Fi sync with the same checkbox, often more reliably than iTunes on Windows.
Some links on this page are affiliate links, which means fone.tips may earn a commission at no extra cost to you.
If your iPhone shows up in iTunes over USB but never over Wi-Fi, and you’ve confirmed the services and firewall are clean, the cable-only workflow is perfectly fine for occasional syncing. Plug in once a week, sync, and move on.
For related sync trouble, our guide on iTunes could not connect to this iPhone covers the pairing handshake failures that often show up alongside Wi-Fi sync problems. And if you’re tempted to roll back iOS to fix a sync bug, read our downgrade iOS without iTunes guide first, because it rarely helps.
#Bottom Line
Start with the USB re-enable fix: plug in, tick Sync with this iPhone over Wi-Fi, click Apply. That alone clears the problem for most readers in under two minutes.
If it doesn’t, move straight to the Apple Mobile Device Service restart and Bonjour check on Windows, because those two services account for the large majority of real Wi-Fi sync failures. Skip straight to iMazing if you’ve tried everything twice and still get nothing, since Wi-Fi sync isn’t worth a third hour of your life.
#Frequently Asked Questions
Does resetting network settings on my iPhone erase any data?
No. Resetting network settings only clears saved Wi-Fi passwords, VPN configurations, and cellular preferences. Your photos, messages, apps, and iCloud data stay exactly where they’re stored now.
Can I sync my iPhone with two different computers over Wi-Fi?
No. iTunes Wi-Fi sync is limited to one authorized computer per device at a time. You’ll need to plug in and re-authorize Wi-Fi sync separately on each computer, and the most recent one overwrites the previous pairing.
How long should a normal Wi-Fi sync take?
An incremental sync of a few songs or photos usually finishes in about 30 to 60 seconds on a 5 GHz Wi-Fi network. Initial syncs of large music or video libraries can take 20 minutes to several hours, depending on library size and network speed. If your sync hangs past 30 minutes, cancel it and re-sync over USB once to reset the queue.
Does Wi-Fi sync work when my PC or Mac is asleep?
No. The computer must be awake, iTunes or the Apple Devices app must be running, and the iPhone must be plugged into power. Apple’s iTunes guide explicitly states the computer must remain powered on during wireless sync sessions. Set your PC’s sleep timer to “Never” if you plan to sync overnight.
Can I use cellular data instead of Wi-Fi for iTunes sync?
No. iTunes Wi-Fi sync requires both devices to be on the same local Wi-Fi network. Cellular data is not supported because Bonjour discovery only works on a shared LAN. Use iCloud or iMazing if you need over-cellular syncing.
Why is the Sync Now button grayed out on my iPhone?
That usually means iTunes can’t currently see the iPhone on the network. Either the iPhone was never paired over Wi-Fi via USB first, the computer is asleep, iTunes is closed, or Bonjour Service is blocked by antivirus. Re-enable Wi-Fi sync over USB, then confirm Apple Mobile Device Service and Bonjour are running in Windows Services.
Will my iPhone sync automatically when it connects to my home Wi-Fi?
Yes, but only if three conditions are met: the iPhone is plugged into a charger, the computer is awake with iTunes running, and both devices are on the same Wi-Fi network. Remove any one of those and automatic sync waits until you trigger it manually. Open Settings > General > iTunes Wi-Fi Sync on the phone, tap Sync Now, and watch the progress bar on the iPhone’s status line to confirm the handshake actually started instead of silently stalling again.
Does iTunes Wi-Fi sync still exist on macOS Sonoma and Sequoia?
Yes, through Finder. On macOS Catalina and later, Apple replaced iTunes with Finder, and Wi-Fi sync moved with it. Connect your iPhone via USB once, select the device in Finder’s sidebar, tick Show this iPhone when on Wi-Fi, and click Apply. The mechanism is identical to iTunes on Windows, just relabeled.

iPhone 17 Cellular Data Not Working on iOS 26? 9 Fixes
iPhone 17 cellular data still dropping on iOS 26? Apple fixed the launch bug in iOS 26.0.1, but recovery failures persist. Here's the fix ladder.

iPhone Cellular Data Not Working Abroad? eSIM Fixes
Travel eSIM showing no data abroad? Fix iPhone roaming with the data-line check, Data Roaming toggle, APN settings, and network selection steps.

iPhone Cellular Data Not Working for Some Apps? 8 Fixes
Some iPhone apps refuse to load on cellular while others work fine. Check the per-app cellular toggle, Low Data Mode, VPN profiles, and Screen Time.

iPhone Stuck on EDGE? How to Get 5G or LTE Back (2026)
iPhone stuck on EDGE with crawling data? Here's why the E icon appears, which settings force 5G or LTE back, and when the problem is your carrier.