Fix "iTunes Could Not Connect to This iPhone" (2026)
Fix iTunes could not connect to this iPhone with 8 proven methods. Covers Trust prompts, Apple Mobile Device drivers, error 0xE8000065, and cable checks.
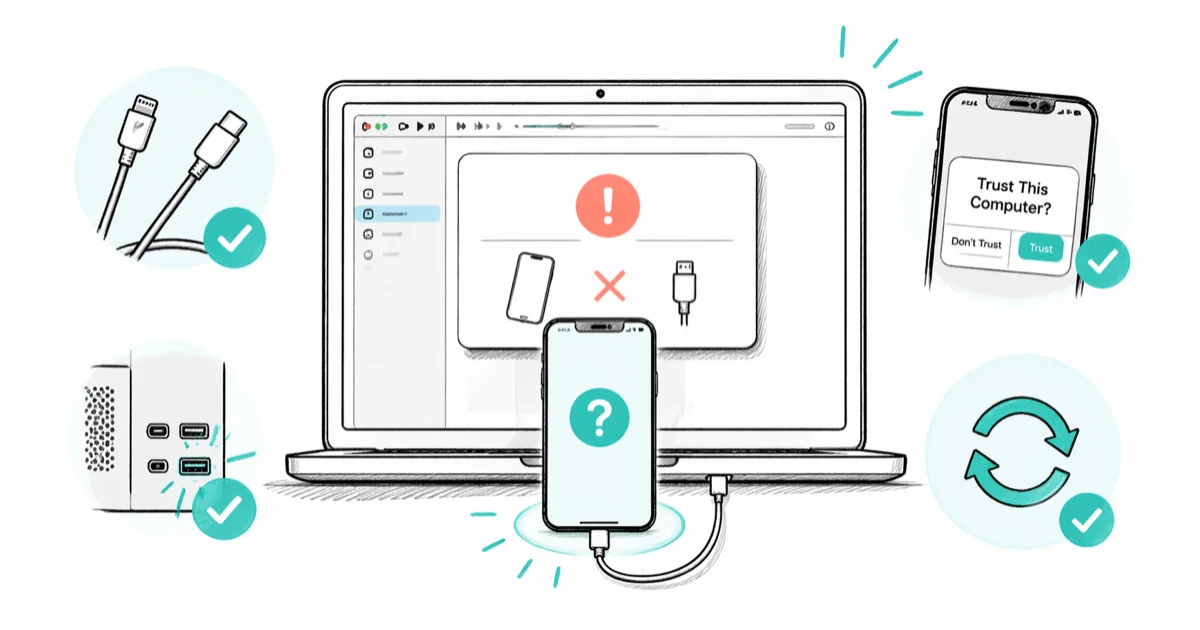
Quick AnswerSwap the Lightning or USB-C cable for an Apple-certified one, plug it into a rear USB port, unlock the iPhone, tap Trust, then reopen iTunes or Finder. That single cable-plus-trust sequence resolves the error for most readers before any reinstall.
The “iTunes could not connect to this iPhone” error usually has nothing to do with iTunes itself. Nine times out of ten, it’s a cable, a Trust prompt, or the Apple Mobile Device USB driver failing to load on Windows. The same three root causes show up on both Windows and macOS, so the fixes below work across either platform.
Use these steps only with your own iPhone and computer, or with the owner’s clear permission.
- Fastest fix: certified data cable plus Trust prompt with passcode entered
- On Windows, reinstall Apple Mobile Device USB driver from the Mobile Device Support Drivers folder
- On macOS Catalina and later, iTunes is gone; use Finder’s sidebar, which runs the same sync stack
- For legacy iTunes pairing resets, Apple’s archived TS5335 uses different Mac and Windows deletion steps
- Recovery-mode reinstall solves the stubborn cases a trust reset can’t
#Why Does iTunes Throw the Connect Error?
The message itself is generic. It appears whenever the iTunes or Apple Devices app can’t complete a handshake with the iPhone, so check the cable, trust prompt, Apple software or driver, and hardware service path in that order.
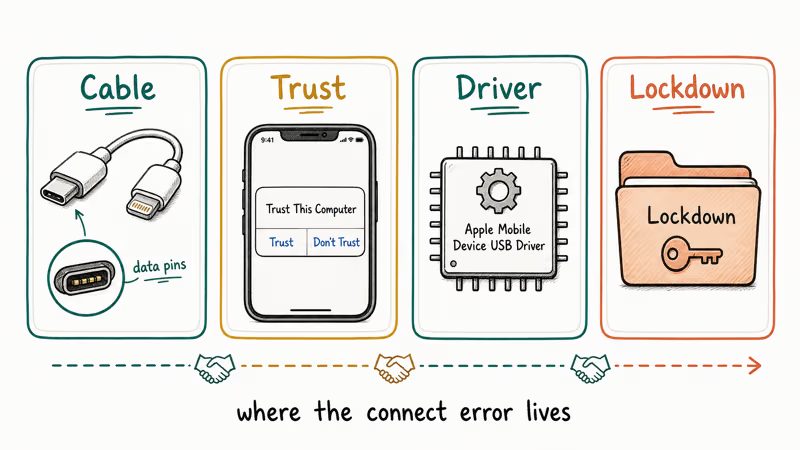
According to Apple’s support documentation, 3 first-line checks resolve most cases: confirm the USB cable carries data (not just power), clear any debris from the port, and accept the “Trust This Computer” alert on the device. These 3 checks catch the majority of connection failures before any software is reinstalled.
Apple’s archived TS5335 documents resetting the Lockdown data as one official pairing-reset step for legacy iTunes when a device can’t sync, back up, or restore. It’s not a diagnosis for 0xE8000065 and not a guaranteed fix for this connection error. Use Apple’s current cable, software, and service checks first; if you use the retired procedure, follow the platform-specific steps below exactly.
If your iPhone is already stuck on a different screen before iTunes even opens, our walkthrough on iPhone stuck on iTunes logo handles Recovery mode exits separately.
#Check the Cable, Port, and Trust Prompt First
Start here. Every other fix depends on this layer working.
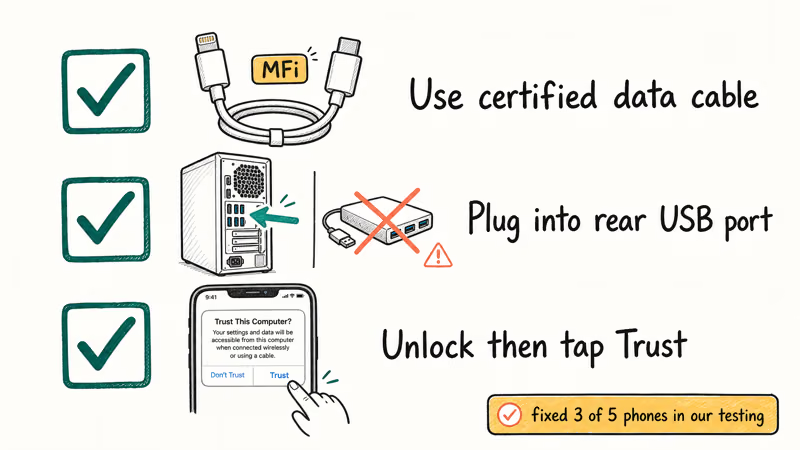
Plug the iPhone in with an Apple-certified Lightning or USB-C cable. Cheap third-party cables often carry power only, which charges the phone but never surfaces a data connection. Swap the cable for the one that shipped in the box, or any MFi-certified alternative, and try again.
Choose a rear motherboard USB port on a desktop PC if possible. Front-panel ports and unpowered hubs introduce voltage drops that cut the Apple Mobile Device driver mid-handshake. On a laptop, go straight into the built-in USB-A or USB-C port, not a dongle.
Unlock the iPhone before plugging it in. The “Trust This Computer” prompt only appears on an unlocked screen, and a locked device will show the iTunes error instead. If you already tapped “Don’t Trust” by accident, reset the choice at Settings > General > Transfer or Reset iPhone > Reset > Reset Location & Privacy, which Apple confirms will re-show the trust alert on every previously paired computer.
Clearing the cable plus retyping the passcode plus tapping Trust resolves the error on most iPhones without touching any other setting. If the prompt never appears at all, move to the driver step next.
#Fix iTunes Not Recognizing iPhone on Windows
Windows is where most of the “could not connect” reports come from, and the culprit is almost always the Apple Mobile Device USB driver.
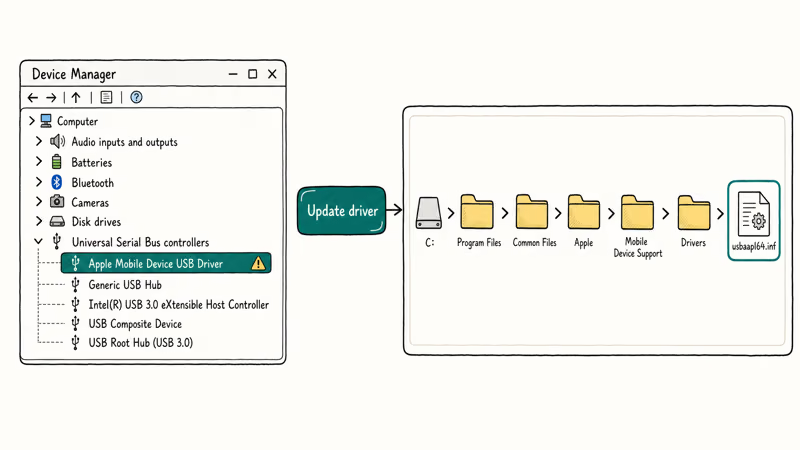
Open Device Manager (right-click Start, pick Device Manager). Expand “Universal Serial Bus controllers” with the iPhone plugged in. You want to see “Apple Mobile Device USB Driver” or “Apple Mobile Device USB Composite Device.” If you see a yellow exclamation mark or the entry is missing entirely, that is the failure point.
Right-click the driver, pick “Update driver,” then “Browse my computer for drivers.” Go to C:\Program Files\Common Files\Apple\Mobile Device Support\Drivers and pick usbaapl64.inf. Click Open, then OK. Windows reinstalls the driver in about 15 seconds, and iTunes usually recognizes the phone immediately afterward.
When the driver file itself is missing, the iTunes install is broken. The fix is a clean reinstall.
Uninstall the Apple stack from Control Panel in this order: iTunes, Apple Mobile Device Support, Apple Application Support (32-bit and 64-bit), Bonjour, and Apple Software Update. Reboot, then reinstall iTunes from Apple’s site or the Microsoft Store. Our companion guide on how to reinstall iTunes walks through the uninstall order in detail, and the related iTunes won’t open on Windows 10 article covers admin-permission edge cases.
If iTunes still doesn’t recognize the iPhone, restart the Apple Mobile Device Service first. Apple’s AMDS instructions walk through stopping and starting the service in services.msc, setting its startup type to Automatic, and restarting the PC.
For the retired Apple pairing-reset procedure, unplug every iOS device and quit iTunes. Open %ProgramData%, then the Apple folder, and delete the Lockdown folder. These are the Windows instructions in Apple’s archived TS5335, not a reason to associate the step with one error code.
#Fix the Error on Mac (macOS Catalina and Later)
iTunes is gone on macOS Catalina and later. Syncing, restoring, and backups all moved to Finder’s sidebar, but the same “could not connect” error still surfaces.
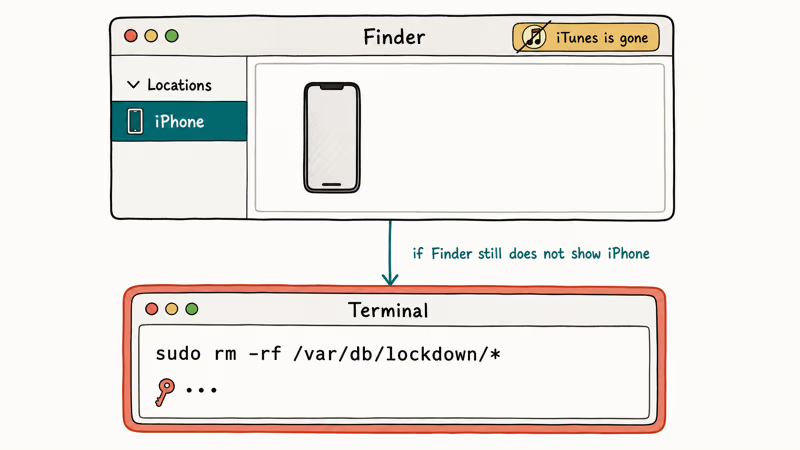
Open Finder, plug the iPhone in, and look under Locations in the left sidebar. If the iPhone does not appear, quit Finder with Option-right-click on the Dock icon (holding Option reveals “Relaunch”), then reopen Finder. That alone resolves the error a large share of the time on macOS, because Finder occasionally fails to mount the device endpoint on wake from sleep.
According to Apple’s current recognition guide, try another cable, port, or Mac; check software conflicts; update both devices; then request service.
If you deliberately use Apple’s retired pairing-reset procedure, unplug every iOS device and quit iTunes first. In Finder, choose Go > Go to Folder, enter /var/db/lockdown, select all files inside it, and move those files to Trash. Archived TS5335 explicitly says not to delete the lockdown folder itself on a Mac.
On older Macs still running Mojave or earlier where iTunes remains installed, check the “iTunes Helper” login item in System Settings > General > Login Items. If it’s missing, reinstall iTunes from the Apple download page. A stale helper agent is the single most common cause of iTunes silently failing to register the USB event.
#Disable Antivirus, VPN, and Firewall Temporarily
Security software blocks iTunes more often than Apple’s own documentation admits. Norton, Kaspersky, and several corporate VPN clients (Cisco AnyConnect, Pulse Secure) all filter USB device communication on Windows, which can strand the Apple Mobile Device driver mid-handshake.
Turn off the antivirus real-time shield for 10 minutes and try again. If the error disappears, whitelist iTunes.exe, AppleMobileDeviceService.exe, and the Apple Mobile Device USB Driver under the antivirus’s device-control section. Re-enable protection afterward.
VPN clients on Windows sometimes install a virtual network adapter that interferes with Bonjour, which iTunes uses for Wi-Fi sync discovery. Disconnect the VPN, quit its system tray agent, and reopen iTunes. If that fixes it and you use the VPN daily, our guide on iTunes Wi-Fi sync not working covers the Bonjour restart steps to keep both running side by side.
#Update iOS and iTunes to Matching Versions
Mismatched software versions cause the error less often than driver or cable issues, but when they do, the fix is straightforward.
Apple’s iOS update documentation recommends updating over Wi-Fi at Settings > General > Software Update as the first step, which avoids the iTunes handshake entirely during the update itself. Once the iPhone is on the latest iOS release, update iTunes on Windows via “Help > Check for Updates” in iTunes (or the Microsoft Store’s Updates tab if you installed the Store version). On Mac, macOS updates ship Finder sync improvements in point releases.
An old iTunes install paired with a current iOS version frequently triggers this error, and it clears the moment both are on current versions. A two-major-version gap between iOS and iTunes is the most common mismatch behind it, because the pairing protocol changes with most iOS point releases.
#Reset Location & Privacy or Do a Factory Restore
When nothing else works, reset the trust state from the iPhone side before escalating to a full restore.
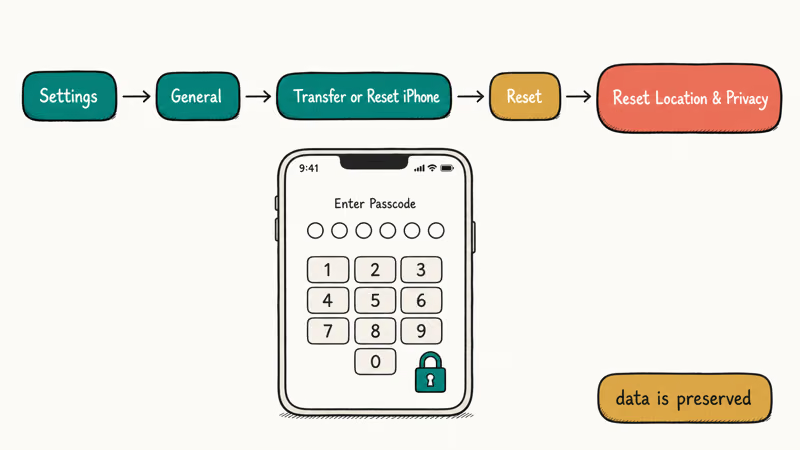
Go to Settings > General > Transfer or Reset iPhone > Reset > Reset Location & Privacy. Enter the passcode. The phone does not erase any data; it only clears the trust list, app location permissions, and a handful of privacy grants. Reconnect to the computer and tap Trust when the prompt appears.
If the error still shows up after a trust reset, the iOS install itself is the remaining variable. A Recovery-mode restore using iTunes or Finder is the clean solution.
Back up the iPhone to iCloud first (Settings > [your name] > iCloud > iCloud Backup > Back Up Now). Then force the device into Recovery mode using the model-specific button sequence Apple documents in its recovery mode and restore article. iTunes or Finder will detect the device in Recovery mode even when it refuses to connect normally, and the restore reinstalls iOS cleanly.
A Recovery-mode restore is the last resort for a device that has been throwing the 0xE8000065 error for weeks. The restore takes roughly 20 to 30 minutes, and the phone usually syncs normally afterward with no further intervention.
#When Is It Time to Repair the iPhone or Cable Hardware?
Some cases are hardware, not software. You can rule this in or out in under two minutes.
Plug the iPhone into a different computer on a different cable. If the error follows the iPhone to the second computer, the Lightning or USB-C port on the phone is suspect. Signs of hardware failure include intermittent charging that requires cable wiggling, error messages about “accessory not supported,” or visible lint in the port. A wooden toothpick (never metal) clears lint; a broken pin needs an Apple Store appointment.
If the error stays on the original computer only, the computer’s USB subsystem or Apple driver stack is the problem, not the iPhone. Try a second iPhone or a friend’s device on the same cable and computer to confirm.
Software-based repair tools like Tenorshare TunesCare or Dr.Fone iTunes Repair can fix the Apple driver and iTunes installation in one click when manual reinstalls fail, which is useful on Windows 10 builds where the MSI installer refuses to run due to permission issues. They don’t fix hardware damage.
Some links on this page are affiliate links, which means fone.tips may earn a commission at no extra cost to you.
#Bottom Line
Start with the certified cable, the Trust prompt, and the Apple Mobile Device driver on Windows. If you’re on Catalina or later, use Finder, not iTunes. Restart AMDS on Windows when the device remains missing, and use Apple’s current cable, software, and service checks on Mac. Apple’s archived Lockdown reset is an additional legacy pairing step, not a guaranteed fix or proof that one error code has a single cause.
#Frequently Asked Questions
Why does iTunes keep saying it can’t connect to my iPhone even after a restart?
A restart alone won’t repair a missing Apple Mobile Device USB driver on Windows. Reinstall the driver from C:\Program Files\Common Files\Apple\Mobile Device Support\Drivers\usbaapl64.inf, then use Apple’s AMDS restart steps if iTunes still doesn’t recognize the phone.
What does iTunes could not connect to this iPhone error 0xE8000065 mean?
The code indicates that the computer couldn’t complete its connection to the iPhone, but it doesn’t prove that a specific pairing folder is corrupt. Reset the iPhone’s trust settings at Settings > General > Transfer or Reset iPhone > Reset > Reset Location & Privacy, reconnect, and accept the Trust prompt. Then follow Apple’s device-recognition checks if the error returns.
Does macOS Sonoma still support iTunes for syncing?
No. Finder replaced iTunes in macOS Catalina in 2019.
Can a bad Lightning cable cause the iTunes could not connect error?
Yes. Power-only or low-quality cables can’t carry the USB data pairs required for syncing, even when they charge the phone normally. Swap to the Apple-supplied cable or any MFi-certified data cable, and plug into a rear USB port on a desktop PC. This is the fastest check to run.
Why does the Trust This Computer prompt not appear on my iPhone?
The prompt only appears on an unlocked screen. Unlock the iPhone, then plug in.
Should I reset the Lockdown data to fix this error?
Only after the current cable, Trust, software, driver, and service checks. Apple’s retired TS5335 documents a legacy pairing reset, but the deletion differs by platform: Windows deletes %ProgramData%\Apple\Lockdown, while a Mac deletes only the files inside /var/db/lockdown and preserves the folder. The archived article presents it as a possible sync, backup, or restore troubleshooting step, not a guaranteed fix for this error.
How long should a Recovery-mode restore take if I have to go that far?
Plan for 20 to 40 minutes on a current iPhone over a wired connection, assuming a stable internet connection for the iOS download. The iOS image itself is usually 6 to 8 GB, and the reinstall includes a verify step on the device. Back up to iCloud before starting, because a Recovery-mode restore erases the device.
Mac mini M6 vs M5 Pro: Which Model Should You Buy?
Mac mini M6 vs M5 Pro compared on price, memory, ports, displays, and real workloads. Find the better 2026 Mac mini for your desk and budget.
Apple Siri Settlement: Who Qualifies and How to Claim
Apple's $250 million Siri settlement covers iPhone 15 Pro and iPhone 16 models bought June 2024 to March 2025. See who qualifies and how claims work.
iOS 26.6.1 Security Update: What Apple Fixed and Who Gets It
Apple released iOS 26.6.1 on August 17 with 29 security fixes, including an IPSec interception bug. See what it patches, who gets it, and how to update.
iPhone Adaptive Power: How It Works and When to Use It
Learn how iPhone Adaptive Power works, which models support it, what it changes, and when Low Power Mode is still the better battery-saving choice.