Vysor for iPhone: Setup, Limits, and Alternatives 2026
Vysor mirrors your iPhone screen to a Windows, Mac, or Linux computer over USB. Learn setup, free versus paid limits, and Apple alternatives.
Quick AnswerVysor for iPhone mirrors your iOS screen to a Windows, Mac, or Linux computer over a USB cable. Unlike on Android, Vysor cannot remotely tap or type on an iPhone because iOS sandboxes input from outside apps.
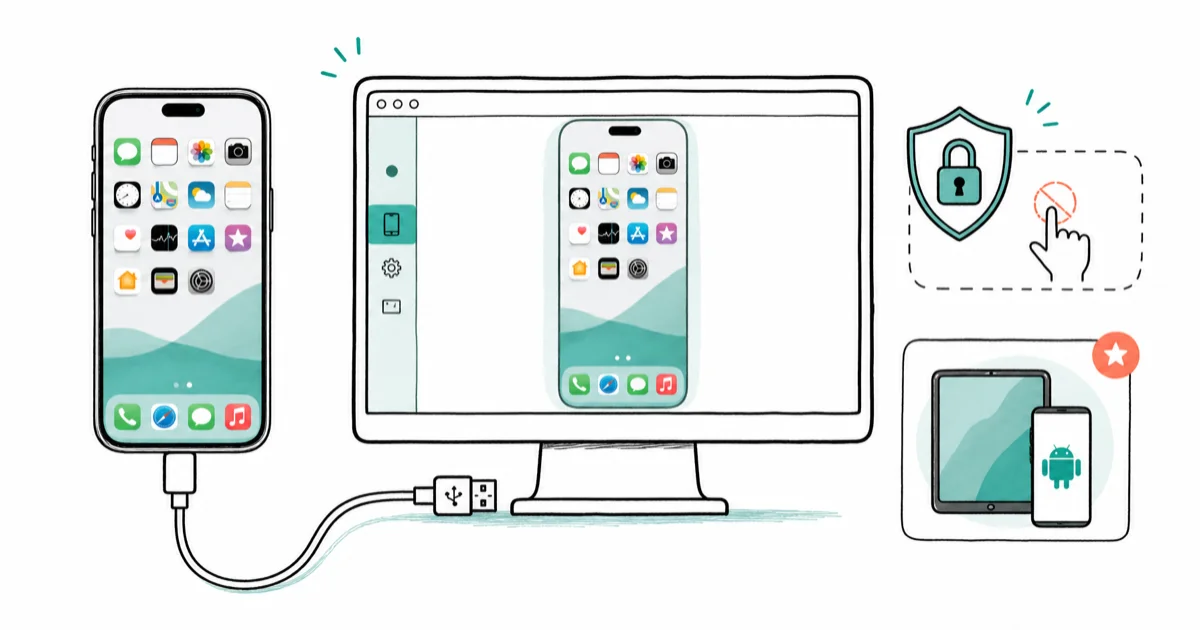
Vysor built its name on Android, where it can both mirror and remote-control a phone from a desktop, but on iPhone the story is different. Vysor for iPhone mirrors the screen to a desktop, but every tap still has to happen on the phone itself. If you came here expecting Android-style control, that distinction matters before you install anything.
- Vysor for iPhone needs iOS 14.0 or later and runs on Windows, macOS, and Linux desktops.
- A wired USB connection is mandatory for stable mirroring; wireless mirroring sits behind the paid Vysor Pro tier.
- The free tier limits resolution and shows ads; Vysor Pro unlocks HD output, ad-free use, and wireless streaming.
- iOS sandboxing prevents Vysor from remotely controlling your iPhone, which is the biggest behavioral gap versus the Android version.
- macOS Sequoia 15 ships with iPhone Mirroring, a free native option that does support remote control, provided you have an Apple-silicon Mac and an iPhone running iOS 18.
#How Does Vysor Mirror an iPhone?
Vysor uses the same screen-capture pipeline Apple exposes to QuickTime Player. The iPhone publishes a live video stream over Lightning or USB-C, and the Vysor desktop app subscribes to that stream, decodes it, and renders it inside a resizable window.
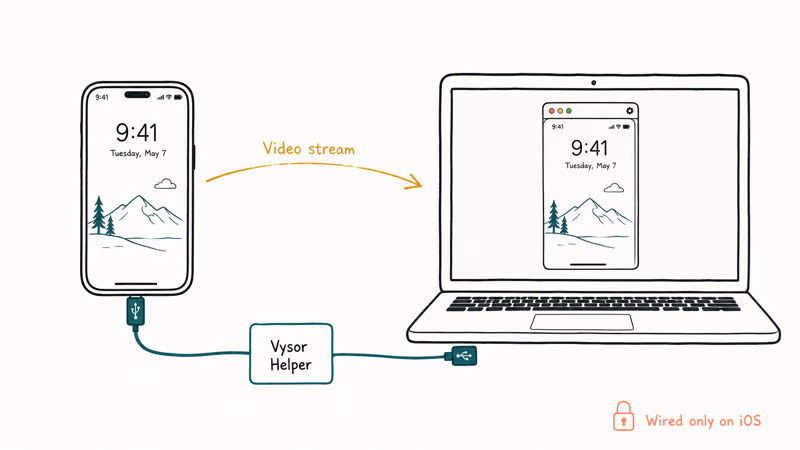
What it can’t do is push events back. iOS doesn’t expose a public API for third-party apps to inject taps, swipes, or keystrokes the way Android’s ADB does.
Vysor’s developer states that the iOS build is mirror-only, and that limitation is enforced by Apple, not by Vysor’s design choices.
Over a cable, Vysor still has some visible mirroring latency because the desktop app is decoding a live iPhone screen stream. That’s normal for mirrored video and separate from true remote-control support.
#How to Install Vysor on iPhone and Computer
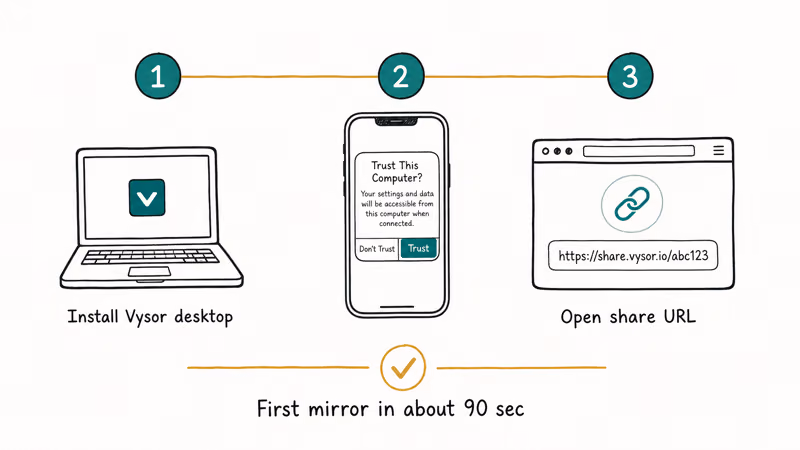
Vysor splits its install between the phone and the desktop, and both halves need to match before mirroring will start.
- Confirm your iPhone is running iOS 14.0 or later (
Settings>General>About> iOS Version). - Download the Vysor app from the App Store listing.
- Install the Vysor desktop client from vysor.io, then pick the Windows, Mac, or Linux build that matches your computer.
- Connect your iPhone to the computer with a working USB cable. A Lightning-to-USB-A cable or a USB-C-to-USB-C cable both work; Apple’s first-party cable is the safest starting point.
- Unlock the iPhone, tap Trust This Computer when the prompt appears, and enter your passcode.
- Open Vysor on the desktop, select your iPhone from the device list, and click Start mirroring.
If the iPhone does not appear, install or update iTunes on Windows (or Apple Devices on Windows 11) so the underlying USB drivers are in place. On a Mac, no extra driver is needed because the system already speaks to iOS devices natively.
#Free Vysor vs Vysor Pro Compared
Vysor offers a free tier and a paid tier called Vysor Pro. Vysor’s pricing page recommends Pro for any user who needs HD output or wireless mirroring on more than one device.
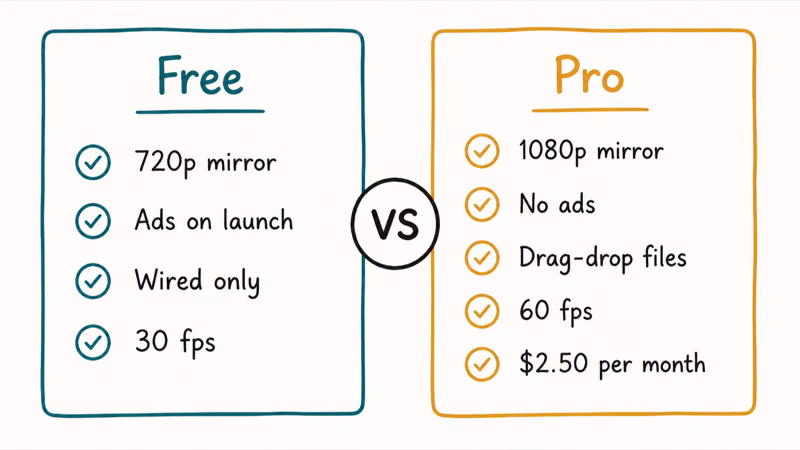
| Capability | Free | Vysor Pro |
|---|---|---|
| Wired USB mirroring | Yes | Yes |
| Wireless mirroring | No | Yes |
| Max resolution | Standard (lower bitrate) | HD |
| In-app ads | Yes | No |
| Multiple-device support | Limited | Yes |
The free version is enough for a quick demo on a single iPhone, but the ad placement and bitrate cap make longer sessions wear thin. Vysor lists Pro at roughly $2.50 per month when billed annually (priced in USD), which lands in the same neighborhood as Reflector and Mirroring360.
#Native Apple Alternatives: QuickTime and iPhone Mirroring
Before paying for Vysor Pro, check whether Apple’s built-in tools already cover what you need.
QuickTime Player is the long-standing free option on macOS. Plug an iPhone into a Mac, open QuickTime Player, choose File > New Movie Recording, and pick your iPhone from the camera dropdown. Apple’s support documentation confirms that QuickTime Player can preview and record any iPhone running iOS 8 or later. You won’t get remote control, but the mirroring is HD and zero-cost.
iPhone Mirroring on macOS Sequoia is the bigger deal. According to Apple’s iPhone Mirroring support article, the feature requires macOS Sequoia 15, iOS 18, an Apple-silicon Mac or T2-equipped Intel Mac, and the same Apple ID signed in on both devices. Once those four conditions are met, the Mac can mirror and control the iPhone using keyboard, trackpad, and drag-and-drop. This is the closest thing Apple offers to the Android-plus-Vysor experience, and it’s free.
For Windows users, our roundup of AirPlay tools for Windows 10 covers third-party software that works without Apple’s hardware constraints. If you need any-direction mirroring without Wi-Fi, we wrote a separate walkthrough on screen mirroring without WiFi.
#Third-Party Vysor Alternatives
Apple’s native tools cover most use cases. Vysor’s spot in the lineup is wired mirroring with cross-platform desktop apps. If you need something different, four alternatives are worth a look:
- Wondershare MirrorGo offers HD mirroring with keyboard input for iOS games via local Wi-Fi. Wondershare states that MirrorGo supports iPhone notification mirroring to PC in real time.
- Reflector 4 is an AirPlay receiver that mirrors multiple iPhones simultaneously and records each feed separately.
- AirServer is a long-running AirPlay receiver for Windows and Mac. It includes Miracast support, but lacks audio capture on some Linux builds.
- Mirroring360 works on Windows, Mac, and Chromebook, and lets you broadcast to up to 40 viewers.
Each one trades something. Reflector 4 records but is AirPlay-only. MirrorGo offers control for limited apps but is Wi-Fi-bound. For a broader comparison across operating systems, our best screen mirroring app shortlist breaks down which app fits which scenario, and our mirror app for phone overview covers cross-device picks.
If you’re trying to reverse the direction (sending PC input to the phone instead), our control iPhone from PC guide covers the workflows that actually work within Apple’s restrictions. Looking to use a Mac’s Sequoia feature instead? Our walkthrough on how to use iPhone Mirroring on Mac has the step-by-step.
#Why Is Vysor Lagging or Failing to Connect?
Three issues cause most Vysor iPhone connection failures.

Cable quality. A frayed or charge-only USB cable will charge the iPhone but won’t pass data. Apple recommends MFi-certified cables for any data transfer over Lightning, and the same advice applies to USB-C cables on iPhone 15 and later. Swap cables before changing settings.
Trust prompt missed. If you unlocked the iPhone after the desktop client opened, the Trust This Computer dialog might have been dismissed. Unplug, replug, and watch the iPhone screen for the prompt.
Background apps. Heavy apps like Zoom, screen recorders, or virtual cameras can fight Vysor for the iOS capture session. Quit other capture-heavy apps before starting Vysor. If audio is the issue, our notes on iPhone screen recording without sound cover the same capture-conflict pattern.
If you’ve already swapped cables, replugged, and quit background apps and Vysor still won’t find the iPhone, reset network settings on the phone (Settings > General > Transfer or Reset iPhone > Reset > Reset Network Settings). That clears stale USB tethering profiles that occasionally block the trust handshake.
#Bottom Line
Vysor for iPhone is a competent wired mirror, but not a controller.
It’s the right pick if you need to demo an iPhone screen on Windows or Linux. For Mac users with an Apple-silicon machine, iPhone Mirroring in macOS Sequoia is the better default: it’s free, native, and adds real remote control. If your iPhone or Mac doesn’t meet Sequoia’s hardware bar, QuickTime Player covers basic mirroring without any third-party install. Pick Vysor only when you need Windows or Linux support.
#Frequently Asked Questions
Can Vysor control my iPhone like it controls Android phones?
No. Apple’s iOS sandbox blocks third-party apps from injecting taps or keystrokes into other apps. Vysor on iOS is mirror-only, and every input still has to happen on the phone.
Does Vysor work over Wi-Fi instead of USB?
Wireless mirroring is locked behind the Vysor Pro subscription. The free tier is wired-only over Lightning or USB-C, and even with Pro a wired connection delivers lower latency.
Is Vysor safe to install on iPhone?
The Vysor iOS app is distributed through the App Store, which means it passes Apple’s standard review. It requests local network and screen-recording permissions; both are needed for the mirror to work and can be revoked any time in Settings > Privacy. Only mirror your own iPhone or a phone where the owner has given consent: capturing someone else’s device screen without permission can run afoul of US federal privacy law (CFAA) and similar regulations in other jurisdictions.
Why does my Mac already have iPhone Mirroring built in?
Apple added iPhone Mirroring as a native feature in macOS Sequoia 15. It mirrors your iPhone to the Mac and supports real remote control, but only if your Mac has Apple silicon (or a T2 Intel chip) and your iPhone is on iOS 18.
Does Vysor record audio from the iPhone?
Not reliably. The iOS screen-capture stream omits in-app audio.
What’s the maximum resolution Vysor supports?
The free tier caps output at a standard, lower-bitrate stream that’s roughly equivalent to 720p. Vysor Pro removes the cap and delivers HD output. Vysor’s marketing page states the Pro feed matches the iPhone’s native screen resolution within the bandwidth limits of the USB connection.
Can Vysor mirror multiple iPhones at the same time?
Multi-device support is a Vysor Pro feature only.
Do I need iTunes installed on Windows for Vysor to detect my iPhone?
Yes, on Windows you need either iTunes or the newer Apple Devices app from the Microsoft Store. Both install the USB driver layer that lets Windows recognize an iPhone as a media and screen-capture source. On macOS the system handles this automatically.

iPhone 17 Cellular Data Not Working on iOS 26? 9 Fixes
iPhone 17 cellular data still dropping on iOS 26? Apple fixed the launch bug in iOS 26.0.1, but recovery failures persist. Here's the fix ladder.

iPhone Cellular Data Not Working Abroad? eSIM Fixes
Travel eSIM showing no data abroad? Fix iPhone roaming with the data-line check, Data Roaming toggle, APN settings, and network selection steps.

iPhone Cellular Data Not Working for Some Apps? 8 Fixes
Some iPhone apps refuse to load on cellular while others work fine. Check the per-app cellular toggle, Low Data Mode, VPN profiles, and Screen Time.

iPhone Stuck on EDGE? How to Get 5G or LTE Back (2026)
iPhone stuck on EDGE with crawling data? Here's why the E icon appears, which settings force 5G or LTE back, and when the problem is your carrier.