VMware P2V: Convert a Physical Server to a VMware VM
Convert a live Windows Server to a VMware VM with vCenter Converter, including prerequisites, VSS fixes, cutover steps, and post-migration checks.

Quick AnswerVMware P2V converts a powered-on physical Windows Server into a VMware virtual machine using the free vCenter Converter Standalone tool. The hot-clone process replicates the OS, applications, and data while the source stays online, then syncs final changes before cutover.
VMware P2V (physical-to-virtual) migration moves a running Windows Server straight into a VMware virtual machine. The hot-clone method keeps the source box online while VMware vCenter Converter Standalone copies the disks, system state, and applications into ESXi.
You’ll hit a short cutover window, two VSS errors that commonly trip people up, and a network-card swap at the end. The fixes below focus on the usual Converter and Windows Server failure points.
- VMware P2V hot-cloning copies a live Windows Server into a VM with a short cutover window, not a full rebuild
- The free vCenter Converter Standalone tool is the only VMware-supported P2V path for ESXi 6.x and earlier
- The “Error 1219: Multiple connections” message means a remote drive is still mapped; disconnect every mapping before retry
- VSS error 0x80042316 fires when two snapshot providers are registered; you have to unregister the non-Microsoft one
- After cutover, disable “Connect at power on” for the VM’s network card so the source and the clone can’t fight for the same IP
#What Does VMware P2V Actually Do?
P2V stands for physical-to-virtual conversion. It clones every layer of a working server into a VM that boots on ESXi.
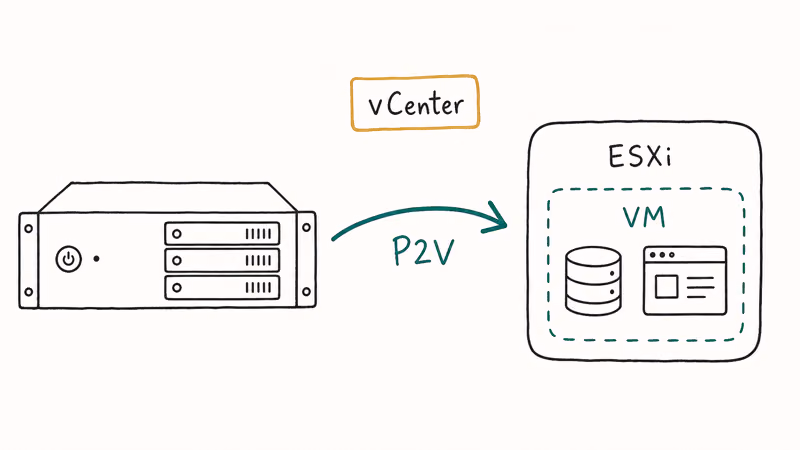
The goal isn’t a fresh install. It’s a forklift. After the migration, the new VM behaves like the old box: same drive letters, same services, same Windows licence key, same data.
That’s why P2V is the standard playbook here.
Hot cloning (the path this guide covers) keeps the source machine running during the bulk copy. A small VSS-based sync at the end captures changes made during the copy window. Cold cloning needs the source booted from rescue media; it’s safer for transactional databases but adds hours of downtime.
According to Wikipedia’s VMware ESXi article, VMware released the first version of ESX in 2001, and that bare-metal architecture is what makes P2V cutovers reliable. The benefits of virtualization (easier backups, hardware-agnostic recovery, lower power draw) add up to why most teams take the P2V hit rather than rebuilding 12 services on a fresh VM.
#What Do You Need Before a P2V Conversion?
P2V is a sysadmin task on your own computer or server, or one you manage with the owner’s explicit permission.
You’ll need three things plus free time on your ESXi datastore.
- Source machine. Any bare-metal Windows Server you want to virtualize. Common sources include Server 2008 R2, 2012 R2, 2016, and 2019, but compatibility depends on your Converter release.
- ESXi host. A working VMware vSphere Hypervisor installation with at least the same disk capacity as the source. ESXi 6.0 is the free baseline; newer versions work with VMware Converter if you grab the matching release.
- vCenter Converter Standalone. The free conversion tool that does the actual work. Install it on a workstation that can reach both the source server and the ESXi host.
A Windows admin account on the source, local or domain, is non-negotiable. Without it the agent installer can’t open the C$ share. Microsoft’s Local Accounts documentation confirms that the built-in Administrator account is the safest fallback when domain authentication fails mid-migration.
Plan the cutover window like a maintenance change. Notify users, freeze the source’s most write-heavy services (SQL Server, Exchange, IIS app pools), and schedule the final sync for off-hours. The bulk copy can run during business hours because hot-clone reads don’t lock files.
#How to Run a P2V Conversion With vCenter Converter
The conversion flow has three phases: install the agent, run the job, then sync at the end. Don’t skip the synchronization step; it’s what makes hot-clone safe for production.
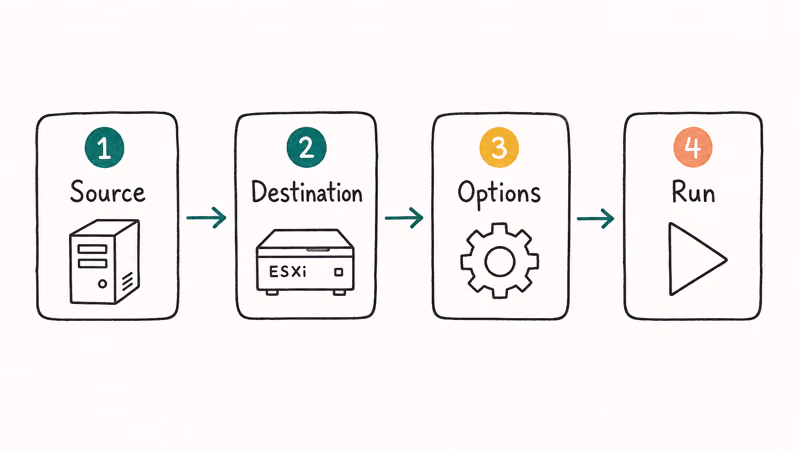
- Install vCenter Converter Standalone on your workstation (not the source server). Launch it after install completes.
- Click “Convert machine” in the home interface and pick Powered-on machine > A remote machine.
- Enter the source server’s IP or hostname, then the admin credentials in
DOMAIN\usernameorusername@domain.localform. Select Windows as the OS family. - Approve the temporary agent install. Tick “Automatically uninstall the files when import succeeds” so cleanup happens on its own.
- Point at the ESXi destination. Pick VMware Infrastructure virtual machine, enter the ESXi host IP, and use the root credentials. Leave proxy mode off unless your network requires it.
- Name the VM and pick a datastore. Match the VM hardware version to your ESXi release; don’t pick the newest version if you’ll need to vMotion later.
- Configure CPU, RAM, and disk. Default values usually work. Don’t resize disks; disk resizing disables the final synchronization step, which you’ll want.
- Set source services to stop before sync. Open the Services tab and check “Stop” beside SQL Server, Exchange, or any write-heavy service. They restart on the destination after cutover.
- Enable post-conversion options. Tick “Install VMware Tools on the destination virtual machine” and skip “Customize guest preferences for the virtual machine” unless you’re renaming the VM.
- Review the summary and click Finish. The job lands in the Tasks pane and shows Running for the next 30 minutes to several hours, depending on disk size and network speed.
When the bulk copy hits 100%, you’ll see the Synchronize changes prompt. Right-click the task and choose Synchronize. This pass copies anything that changed on the source during the bulk phase, including dirty SQL pages and IIS log writes.
#How to Fix Common VSS and Connection Errors
Two errors trip up nearly every first-time P2V run. Both have clean fixes once you know the pattern.
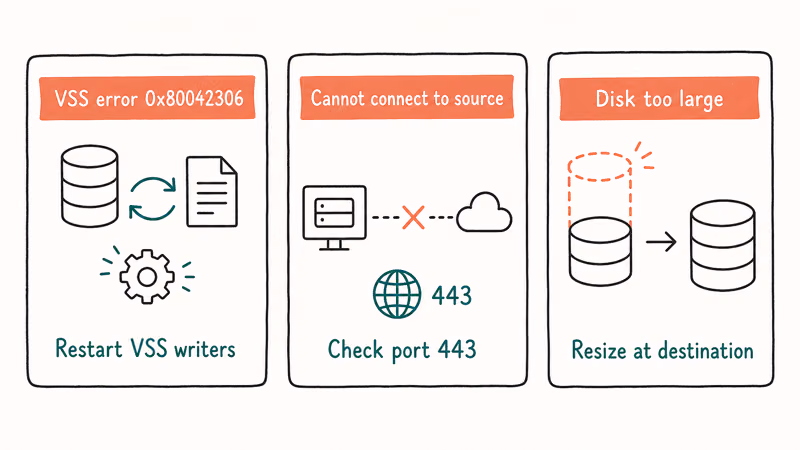
Error 1219: Multiple connections. This fires when the workstation running Converter still has a mapped drive to the source server. Open This PC, right-click every mapped network drive, and choose Disconnect.
Then on the source, open a command prompt and run net use * /delete to flush stale sessions. Reboot the workstation if the error persists.
Microsoft’s net use reference states that the /delete switch with * cancels every active network connection at once.
VSS error 0x80042316: Failed to create a snapshot. This means two Volume Shadow Copy providers are fighting for the same volume, usually because backup software (Veeam, Acronis, Symantec) registered its own provider alongside Microsoft’s default. Fix it on the source:
- Open
cmd.exeas administrator and runvssadmin list providers. Each registered provider shows in the output. - Identify any provider that is not Microsoft’s default Software Shadow Copy provider. If a backup product registered its own provider, export that provider key before deleting it so you can restore it after cutover.
- Open
regedit, drill toHKEY_LOCAL_MACHINE\SYSTEM\CurrentControlSet\Services\VSS\Providers, right-click the non-Microsoft provider key, and export it to a.regfile before deleting. Save the export; you’ll re-import it after cutover. - Reboot the source server, then re-run Synchronize in Converter.
A third issue you might hit on Windows Server 2003 or 2008 sources is a stale registry error that blocks the VSS service from starting at all. Restart the Volume Shadow Copy and Microsoft Software Shadow Copy Provider services in services.msc to clear it.
#Post-Conversion Steps Before You Cut Over
The new VM is on the datastore, but don’t power it on yet. Connect to the ESXi host with vSphere Client, find the VM, and right-click Edit Settings.
Under the Hardware tab, click Network Adapter and uncheck Connect at power on. This stops the clone from grabbing the source server’s IP the moment it boots, which would cause a network conflict and partition both machines.
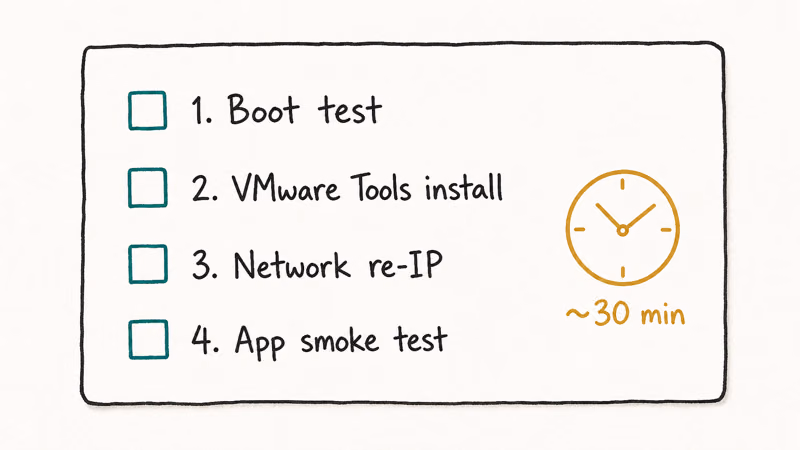
Now boot the VM. Sign in with the same credentials you’d use on the source, open Device Manager, and look for missing drivers. VMware Tools (which you installed in step 9) should handle the storage and network drivers, but third-party hardware like RAID controllers sometimes needs manual cleanup.
Re-import the non-Microsoft VSS provider .reg file you saved earlier if your backup software needs it.
Power the physical source server off cleanly. Don’t leave both machines running on the same network. Even with the VM’s NIC disabled, a shared name and SID will eventually collide on DNS.
Once the source is off, edit the VM settings again, re-enable Connect at power on, and reboot the VM. It’ll come up holding the source’s IP and hostname. Verify DNS resolution, mapped file shares, and any service dependencies before declaring the migration complete; one missed registry entry can take down a downstream app a day later.
#Best Practices to Avoid P2V Pitfalls
A few habits separate clean cutovers from late-night rollbacks.
- Snapshot the destination VM right after first boot. Before you let users back on, take a vSphere snapshot. If something corrupts the next day, revert is faster than a re-conversion.
- Disable the source’s Active Directory computer account, don’t delete it. If you have to fail back to the physical box for any reason, you’ll want the trust intact.
- Run
chkdsk /fon the source before kicking off P2V. A clean filesystem reduces VSS errors and avoids restarting a conversion because of source-disk inconsistencies. - Match the destination’s VM hardware version to your ESXi release. A hardware-19 VM won’t boot on ESXi 6.5, so compatibility matters before you start the clone.
- Test backup restore on the new VM before retiring the physical box. VMware Converter gets the data across, but only your backup tool tells you it’s recoverable.
For shops planning to virtualize a fleet rather than a single box, a laptop or workstation built for virtualization saves time when you’re running Converter, vSphere Client, and an RDP session to the source at the same time. Disk prep also matters if you’re loading ISO templates: converting ISO to IMG is a common pre-step for non-VMware tooling.
#Bottom Line
Run vCenter Converter Standalone hot-clone with VSS sync on and disk resize off.
That combination handles most P2V jobs in one pass on ESXi 6.x or 7.x, and the two errors above are the only ones worth memorizing. If you have a transactional database like SQL Server with high write rates or Exchange with active mailbox traffic, schedule the final sync for off-hours, stop the services before the sync, and plan for a short user-visible downtime window.
#Frequently Asked Questions
Can I perform P2V on any operating system?
vCenter Converter Standalone supports Windows from Server 2003 SP2 onward, including Windows 10 client, plus Red Hat Enterprise Linux, SUSE, Ubuntu, and CentOS. Check the version matrix for your specific source; older Converter releases drop support for newer Windows builds, and vice versa.
What are the prerequisites for a successful P2V conversion?
You need a working ESXi host with enough free datastore capacity, a workstation that can reach both source and destination on the network, admin credentials on the source, and a short cutover window. The source should pass chkdsk /f before you start.
Is VMware Converter a free tool?
Yes. vCenter Converter Standalone is free, though VMware retired the public download in 2022 and now requires a Customer Connect login.
How long does a typical P2V conversion take?
Conversion time varies with used data, disk health, and network throughput. A lightly used server can finish in hours; large file servers can run overnight. Schedule the work so the final synchronization and application smoke test don’t collide with user traffic.
Can I reverse a P2V conversion if needed?
Technically yes, with V2P tools, but it’s painful enough that nobody does it casually. The cleaner pattern is to keep the source server’s drives intact for 30 days post-cutover and don’t delete the AD computer account. If the new VM blows up, fail back to the physical hardware and rerun P2V from a known-good state. VMware stopped shipping V2P tooling years ago, so treat the original physical box as a 30-day insurance policy rather than a permanent rollback target.
What if the conversion fails halfway through?
Look at the Converter log for the failed step. The two common failures, Error 1219 (mapped drives) and VSS 0x80042316 (provider conflict), have the fixes above. Disk I/O errors mid-copy almost always mean a flaky source drive; clone the disk to a healthy spare with a tool like Clonezilla, then run P2V against the clone.
Do I need to install VMware Tools on the destination VM manually?
Not if you ticked “Install VMware Tools” during the Converter wizard. If you skipped that, mount the Tools ISO from the ESXi console and install it after the VM boots.
Will P2V trigger Windows reactivation on the VM?
Probably yes, because the BIOS UUID changes when the OS moves to virtual hardware. Have your product key ready, or use the same KMS server the source pointed at. According to Microsoft’s guide on reactivating Windows after a hardware change, a significant hardware change such as a new motherboard can leave Windows unactivated, so a reactivation request typically appears shortly after first boot.

Apps Crashing After iOS 27 Update? Fix Order (2026)
Apps crashing after the iOS 27 update? Update the app in the App Store first, then offload and reinstall to clear stale cache, then restart. The fix order.

Do AI Translation Earbuds Work Offline? What to Know
Do AI translation earbuds work offline? A few do with downloaded language packs, but most need the cloud. Here's what works offline and what you give up.

How to Set Up Translation Earbuds (Pairing and Modes)
How to set up translation earbuds: charge, install the app, pair over Bluetooth, pick two languages, and choose a mode. A step-by-step first-use guide.

Translation Earbuds Not Translating? How to Fix Them
Translation earbuds not translating? Usually it's the app, the internet, or the language settings. Here's how to fix pairing, sound, and lag fast.