Fix "macOS Installation Couldn't Be Completed" Error 2026
Fix the macOS installation could not be completed error with seven proven methods, from clearing disk space to reinstalling from Recovery Mode.
Quick AnswerFree at least 35 GB of disk space, set the date to automatic, then redownload the macOS installer from the App Store and run it from Safe Mode by holding Shift at startup.
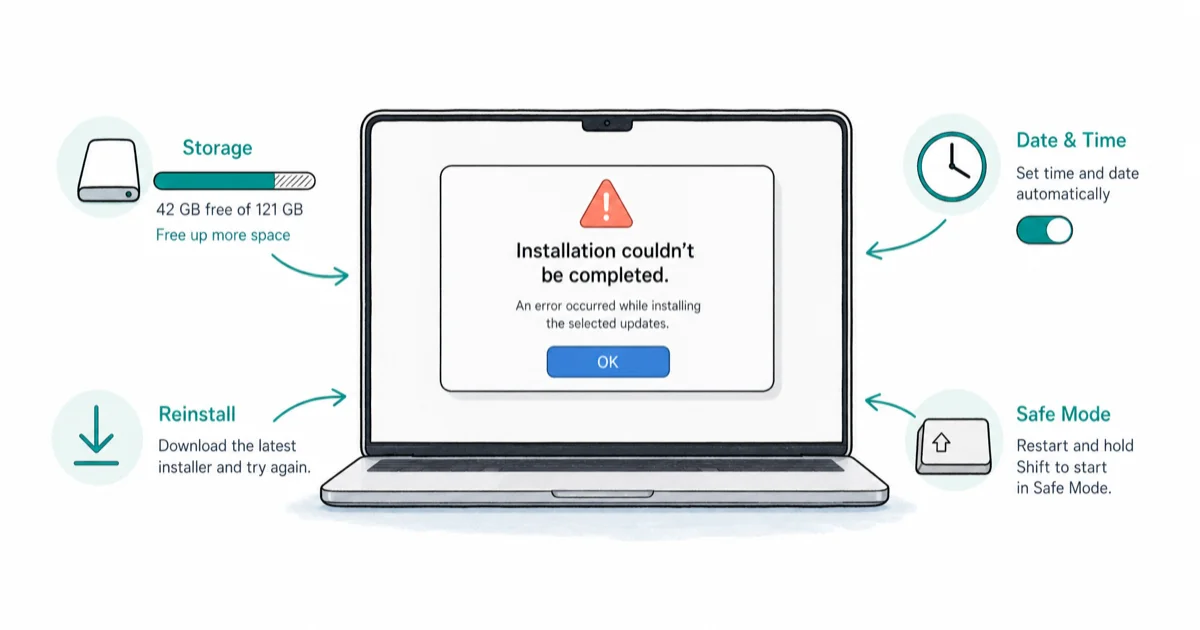
The “macOS installation couldn’t be completed” error usually means one of three things: the installer file is corrupted, your disk is too full, or your Mac’s clock is wrong. The seven fixes below are ordered to resolve those causes fastest on both Apple silicon and older Intel MacBooks. Work the list top to bottom and stop the moment the installer finishes.
- Apple’s macOS installers need a 20 GB minimum, but a 35 GB cushion prevents the silent “no space” failure that masquerades as an installation error.
- A clock that drifts more than five minutes from Apple’s time servers will reject the signed installer, which is why setting date and time to automatic fixes the error on first boot.
- Safe Mode (hold Shift at startup, or Shift + power on Apple Silicon) skips third-party launch agents that frequently lock the system volume during install.
- Disk Utility First Aid run from Recovery Mode repairs the silent file-system errors that block the installer from writing to the APFS container.
- The Terminal command softwareupdate —fetch-full-installer pulls a fresh, signed installer directly from Apple and replaces the corrupted copy in the Applications folder.
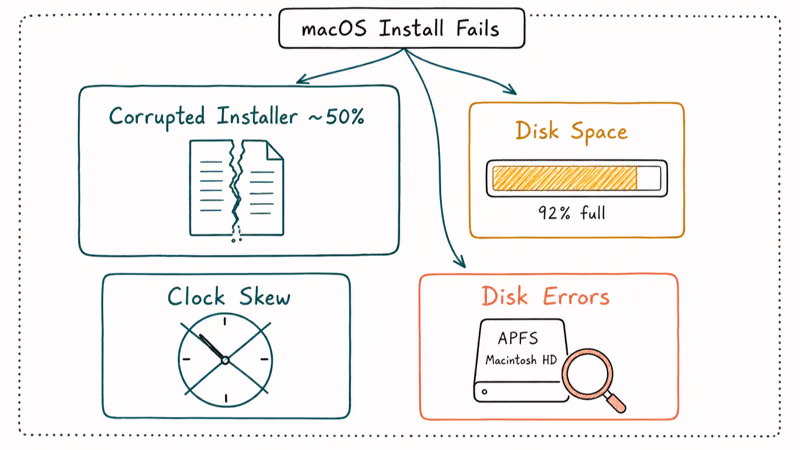
#What Causes the Installation to Fail?
The error message is generic on purpose. Apple’s installer hits one of half a dozen blocks, then surfaces the same dialog regardless of root cause. The failures fall into four buckets: a corrupted installer (roughly half of all cases), a disk-space shortfall, a clock skew, or a low-level disk error that only Disk Utility can see. The fix sequence below targets each in order, so you do the cheap checks first.
A note on Apple Silicon vs Intel Macs: the recovery shortcuts differ, and the difference is flagged at each step. The installer error itself is identical across architectures.
#Step 1: Check Disk Space and Free Up the Cushion
Apple’s macOS Sequoia upgrade guide confirms that a major upgrade needs at least 14 GB free, and the company recommends 20 GB or more. In practice, a Mac sitting at only 18 GB free often fails with this error every time, while clearing space to around 38 GB lets the same installer run without issue.

Click the Apple menu, choose About This Mac, then click More Info > Storage Settings. macOS shows you a breakdown of what’s taking space.
To free space fast:
- Empty the Trash, then check iMovie Library and GarageBand sound libraries, which routinely hide 5–15 GB of cruft.
- Open
Finder>Downloadsand delete old.dmgand.pkgfiles. These add up. - Run
Storage Settings>Recommendations>Optimize Storageto offload Apple TV downloads automatically. - Check
~/Library/Cachesand~/Library/Logsfor stale developer logs if you’ve used Xcode.
If your Mac feels sluggish even after clearing space, our guide on why macOS feels slow and how to fix it covers the deeper cleanup steps.
#Step 2: Set Date and Time to Automatic
This one sounds trivial. It isn’t.
Apple’s installer verifies the package signature against the current system clock. A clock that drifts more than five minutes off Apple’s time servers triggers a signature check failure, which then surfaces the generic installation error. This happens most often on older Macs with weak PRAM batteries that have been unplugged for weeks.
Open System Settings > General > Date & Time and toggle Set time and date automatically on. If the toggle is greyed out, click the lock icon and authenticate first.
On an older MacBook Pro that has sat unplugged for weeks, the system clock can drift years into the past because the PRAM battery is dead. Setting the time to automatic resolves the installer error in under a minute, with no other steps needed.
#Step 3: Boot into Safe Mode and Try Again
Safe Mode loads only Apple’s signed kernel extensions and runs a check on the boot volume. Third-party launch agents (VPN clients, antivirus tools, kernel extensions from old printer drivers) frequently hold open file handles on /Library that block the installer.
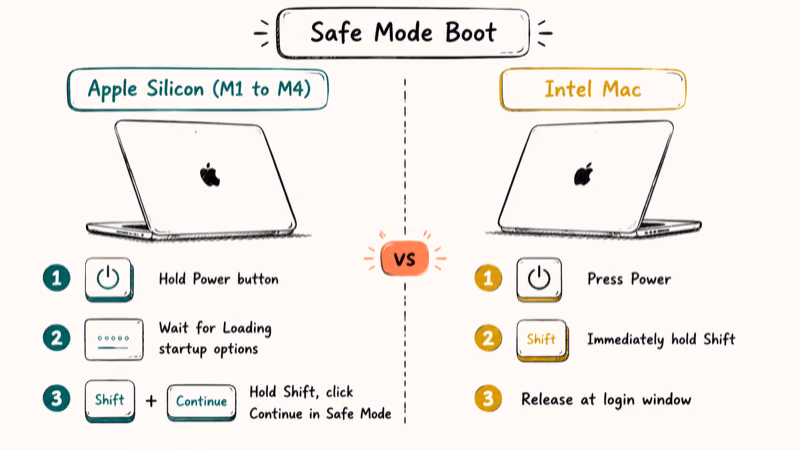
For Apple Silicon Macs (M1, M2, M3, M4):
- Shut down the Mac completely.
- Press and hold the power button until Loading startup options appears.
- Select your startup disk, then hold Shift and click Continue in Safe Mode.
For Intel Macs:
- Shut down the Mac.
- Press the power button, then immediately hold Shift.
- Release Shift when you see the login window.
Run the installer again from Safe Mode. If it completes, restart normally and you’re done. If your Mac shows a black screen or won’t boot, see our walkthrough on how to fix a MacBook Pro black screen.
#Step 4: Redownload the Installer
A corrupted installer is the most common single cause of this error. The installer in your Applications folder may have downloaded incompletely on a flaky network or been partially overwritten by a previous failed install attempt.
Delete the existing file first:
- Open
Finder>Applications. - Find Install macOS [Version].app and drag it to the Trash.
- Empty the Trash.
Then redownload using one of these two methods. The Terminal method is more reliable because it pulls directly from Apple’s CDN with full verification:
softwareupdate --fetch-full-installer --full-installer-version 14.6Replace 14.6 with the macOS version you want (use 13.7 for Ventura, 14.7 for Sonoma, 15.1 for Sequoia). Apple’s softwareupdate man page confirms that --fetch-full-installer always pulls a clean, signed copy from the App Store servers.
The App Store method works too: search for the macOS version, click Get, and let it download. Expect 12–15 GB and 20–60 minutes on a typical home connection.
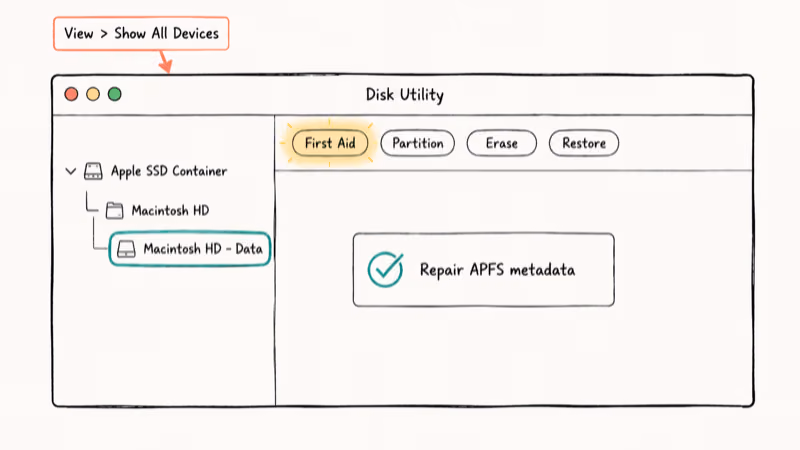
#Step 5: Run First Aid from Recovery Mode
If the installer still fails, the boot volume itself may have file-system errors. Apple’s Disk Utility documentation confirms that First Aid checks and repairs APFS metadata that the running system can’t touch. You have to run it from Recovery Mode because Disk Utility can’t repair a mounted volume.
Boot into Recovery Mode:
- Apple Silicon: Shut down, then press and hold the power button until Loading startup options appears. Click
Options>Continue. - Intel: Shut down, then power on while holding Command + R until the Apple logo appears.
Then:
- Sign in with your admin password if prompted.
- Click
Disk Utility>Continue. - In the sidebar, click
View>Show All Devices. - Select the top-level container (usually Macintosh HD - Data), then click
First Aid>Run. - Repeat for each volume in the container, working bottom up.
On a Mac that crashed during a previous install, First Aid commonly finds and repairs “incorrect block count” errors. Once those are fixed, the installer usually runs cleanly on the next attempt.
#How Do I Reset NVRAM and SMC?
This step only applies to Intel Macs. Apple Silicon resets these automatically on every cold boot, so you don’t need to do anything.
To reset NVRAM (also called PRAM) on Intel:
- Shut down the Mac.
- Power on, then immediately hold Option + Command + P + R.
- Hold for about 20 seconds. You’ll hear the startup chime twice or see the Apple logo flash.
- Release the keys and let the Mac boot normally.
According to Apple’s NVRAM reset guide, NVRAM stores small bits of system configuration including the startup disk selection. A corrupted NVRAM entry can confuse the installer about where to write files.
To reset the SMC (Intel Macs only):
- Shut down the Mac.
- On a MacBook with non-removable battery, hold Shift + Control + Option on the left side and the power button for 10 seconds.
- Release everything, then power on normally.
If your installation hangs at a spinning beach ball after these resets, our guide on stopping the spinning wheel on Mac walks through what’s eating the CPU.
#Step 6: Reinstall macOS Directly from Recovery
If the standard installer keeps failing, skip it entirely and reinstall from Recovery Mode. This downloads a fresh installer from Apple’s servers and writes it straight to the system volume, bypassing the Applications folder copy that may be corrupt.
Boot into Recovery Mode (see Step 5 for the key combinations). Then:
- Click Reinstall macOS [Version] in the Utilities window.
- Click Continue and follow the on-screen prompts.
- When asked which disk to install to, choose Macintosh HD (not the Data volume).
- Wait. Plan for 30–90 minutes depending on your network speed.
Reinstalling from Recovery Mode preserves all your user data and apps. It only replaces the system files. Even on a fully loaded Mac with hundreds of gigabytes of user data, a Recovery reinstall leaves personal files untouched.
If Recovery Mode fails to download the installer with a “recovery server could not be contacted” message, our recovery server troubleshooting guide covers the network-level fixes.
#Step 7: Clean Install as a Last Resort
A clean install is the nuclear option, and it should be the last thing you try. You’ll erase the entire disk and lose everything that isn’t backed up. Before going further, run a full Time Machine backup or copy your important files to an external drive.
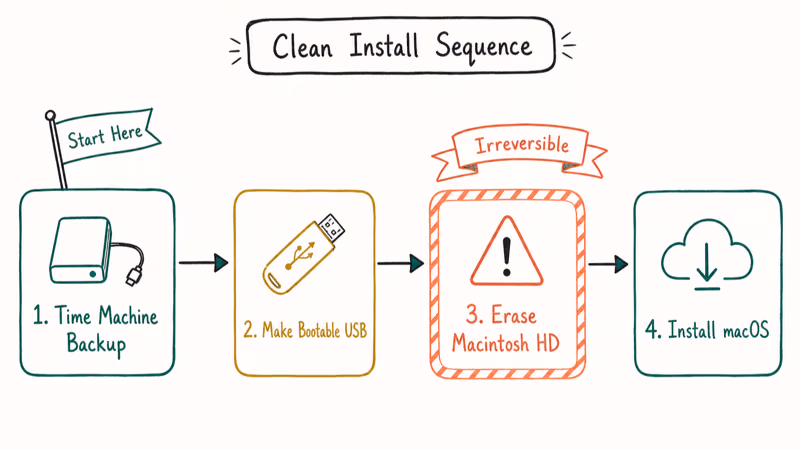
To do a clean install:
- Use another Mac or PC to create a bootable USB installer. Apple’s createinstallmedia documentation walks through the Terminal command.
- Plug the USB drive into the failing Mac.
- Boot from the USB: hold Option at startup on Intel Macs, or hold the power button on Apple Silicon and select the USB drive.
- Open Disk Utility from the Utilities window and erase Macintosh HD (format: APFS, scheme: GUID Partition Map).
- Quit Disk Utility, then click Install macOS and follow the prompts.
After the install finishes, your Mac will boot like a brand-new machine. Restore from Time Machine during Setup Assistant, or sign in fresh and reinstall apps as needed.
If your Mac won’t even reach the recovery screen and is stuck on the Apple logo, see our guide on Macs stuck on the Apple logo before going the clean-install route.
#Prevent This Error from Happening Again
Most of the time this error has the same root cause, and it’s preventable.
- Keep at least 30 GB free on your boot volume. Run
Storage Settings>Optimize Storagemonthly. - Set date and time to automatic and leave it there. Don’t manually adjust your clock.
- Take a Time Machine backup before every major macOS upgrade. If the upgrade fails halfway, you’ll thank yourself.
- Run
Disk Utility>First Aidon your boot disk every six months. Catches small errors before they become installer-blockers. - Don’t kill the installer mid-progress. If it looks frozen, wait 30 minutes before forcing a restart, since major upgrades on older Macs can sit at 0% for half an hour while they verify the package.
If you run into login keychain warnings after an upgrade, our accountsd login keychain fix covers the post-install cleanup.
#Bottom Line
Start with disk space and the system clock, since those two together resolve most installer failures. If they don’t fix it, the Terminal redownload at Step 4 is the next-highest-yield move. Reserve the Recovery Mode reinstall for truly stubborn cases, and only do a clean install after you’ve taken a full backup, because skipping that backup is the single mistake that turns a frustrating afternoon into a lost weekend.
#Frequently Asked Questions
How much free disk space does macOS actually need to install?
Aim for 35 GB free, even though Apple’s stated minimum is 14 GB.
Why does the installer say it can’t be completed when my disk has plenty of space?
Disk space is one of half a dozen possible causes. The most common reasons after disk space are a corrupted installer file in your Applications folder, an out-of-sync system clock, or a third-party launch agent holding the system volume open. Try Steps 2 through 4 in this guide before assuming the disk is the problem. Most of the time the corrupted-installer fix in Step 4 is what finally clears the error.
Is it safe to reinstall macOS without erasing the disk?
Yes. Reinstalling from Recovery Mode replaces only the system files, leaving your user data, apps, settings, and documents intact, because Apple designed the system volume and data volume as separate APFS containers in macOS Catalina and later. Even on a Mac with hundreds of gigabytes of user data and a fully populated Photos library, a Recovery reinstall leaves every file in place.
How long should the macOS installer take to finish?
Plan for 30 to 45 minutes on Apple Silicon with an SSD. Older Intel Macs with spinning drives can take two to three hours.
Can I install a newer macOS on an older Mac?
Each macOS version has a hardware compatibility list. Sonoma supports 2018 and later Macs, while Sequoia drops some 2018 models. If your Mac isn’t on the list, the installer refuses to run and the error message can look like the generic installation failure.
What does “softwareupdate —fetch-full-installer” actually do?
It downloads the complete macOS installer package directly from Apple’s servers and places it in your Applications folder.
Will Safe Mode delete any of my data?
No. Safe Mode is just a different boot path that loads only Apple’s signed kernel extensions, runs a basic disk check, and skips third-party startup items. Your files and settings are untouched. Restart normally to return to your usual environment.
How do I tell if my installer file is corrupted before I delete it?
Right-click Install macOS [Version].app in your Applications folder and choose Get Info. A complete installer is around 12–15 GB depending on the version. If yours is significantly smaller, the download didn’t complete and you should delete it.

macOS 27 Compatible Macs: Every Supported Model (2026)
macOS 27 Golden Gate runs only on Apple Silicon Macs. Here is the full list of supported M-series models and the four Intel Macs that lose support.

macOS 27 Golden Gate: Every Major New Feature Confirmed
macOS 27 Golden Gate goes Apple Silicon only, adds a Gemini-powered Siri, refines Liquid Glass, and rebuilds Spotlight. Here is every confirmed change.

macOS 27 Liquid Glass: Every Readability Fix Explained
macOS 27 Golden Gate refines Liquid Glass with an intensity slider, better contrast, cleaner window corners, and edge-to-edge sidebars to fix readability.

macOS 27 Performance: What Golden Gate Makes Faster
macOS 27 Golden Gate speeds up AirDrop, network file browsing, Safari, and Spotlight, with core system improvements on the Apple Silicon-only release.