The Recovery Server Could Not Be Contacted: 6 Working Fixes
Stuck on "the recovery server could not be contacted" on Mac? Fix it with 6 proven methods covering date sync, network, full installer, and bootable USB.

Quick AnswerOpen Terminal in macOS Recovery and run "ntpdate -u time.apple.com" to resync the clock. A wrong system date is the top cause of the recovery server error and this command fixes it in under a minute.
The “recovery server could not be contacted” error blocks every macOS reinstall and Internet Recovery boot, and in most cases it’s a clock problem rather than an Apple outage. The ntpdate fix below usually clears it in under a minute. Below are the six methods that actually work, in the order worth trying them.
Use these steps only on your own Mac or a Mac you have explicit permission to service. If the Mac is school-managed, company-owned, or still tied to another person’s Apple ID, contact the owner, IT admin, or Apple Support instead of trying to bypass management or account controls.
- A wrong system clock is the single most common cause of this error, because macOS rejects expired-looking SSL certificates
- Running ntpdate -u time.apple.com from Recovery Terminal usually resolves the error in under one minute
- Captive-portal Wi-Fi (hotels, cafes, libraries) breaks Recovery because there’s no browser to accept the login page
- Downloading the full macOS installer with softwareupdate skips the recovery server completely on a 12 to 13 GB download
- Apple Silicon Macs and Intel Macs use different Recovery key combos, and using the wrong one looks like a server failure when it’s really a boot mode failure
#Why Does This Error Appear in the First Place?
Your Mac contacts an Apple authentication server every time you reinstall, update, or boot Internet Recovery. The error means that handshake failed before the OS image could download.

The cause is almost never Apple’s server itself. Wrong date and time leads the list of real causes. According to a 2024 Apple developer note on certificate expiration, Apple TLS certificates ship with a fixed 1 to 2 year valid-until window.
If your Mac’s clock falls outside that window, the certificate looks expired or not yet valid, and Recovery refuses to connect. A drained logic-board battery, a long stretch unplugged, or a recent main-board replacement can all reset the clock.
Network problems come second. Captive-portal Wi-Fi is the common trap because Recovery has no browser to click “I accept” with, so the request just times out. VPN profiles, school proxies, IPv6-only setups, and very weak Wi-Fi signals all behave the same way. Ethernet over a USB-C adapter is the most reliable connection during this process.
Server-side issues are rare but real. According to Apple’s 24/7 system status page, macOS Software Update occasionally drops to a degraded state during a major release window. If the error returns within 2 minutes on every method below, check that page first. If your Mac is running slow outside Recovery too, that’s a separate issue worth handling once you’re back in macOS.
#How Do You Fix the Date and Time From Recovery Mode?
This is the fix that resolves the error for most people. If your MacBook sat unplugged for weeks, the battery hit zero, or the logic board was recently swapped, the clock has reset to a date Apple’s certificates don’t cover.
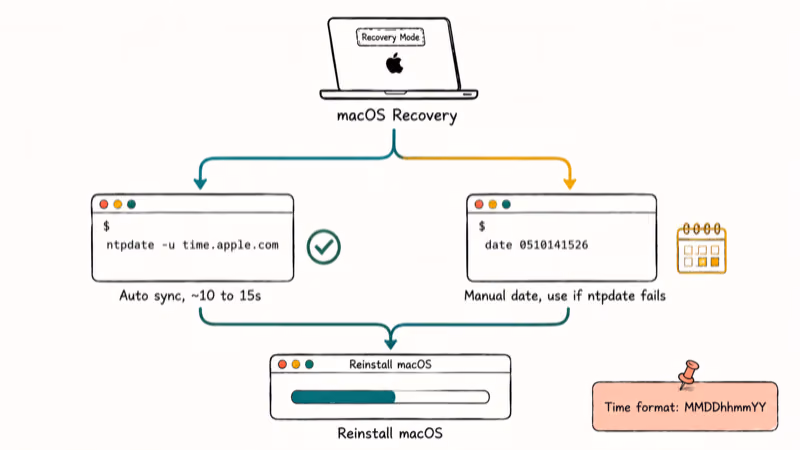
#Run the Automatic Time-Sync Command
Close the recovery server error dialog so the macOS Utilities window appears. From the menu bar, click Utilities, then choose Terminal. Type the command, press Return, and wait.
ntpdate -u time.apple.comGive it 10 to 15 seconds. A success line looks like adjust time server 17.x.x.x offset .... Quit Terminal, then click Reinstall macOS in the Utilities window.
This is the typical scenario after a MacBook sits unplugged for weeks and the internal battery drains: the clock falls back to a date like January 1, 2020, and a single ntpdate run corrects it in one shot. The same command works the same way on Intel iMacs booted into Recovery.
#Set the Date Manually If ntpdate Fails
If ntpdate fails with “no server suitable for synchronization found,” your Mac doesn’t have working internet yet. Set the date by hand instead.
In Terminal, type date and press Return to see the current value. The format for setting it: date MMDDhhmmYY. For May 10, 2026 at 2
date 0510141526. Quit Terminal and retry Reinstall macOS.
If your Mac keeps crashing right after the install starts, the date wasn’t the only problem.
#Check the Network Connection From Recovery
Recovery Mode supports Wi-Fi and Ethernet. The two behave very differently here, and Ethernet wins whenever it’s an option.
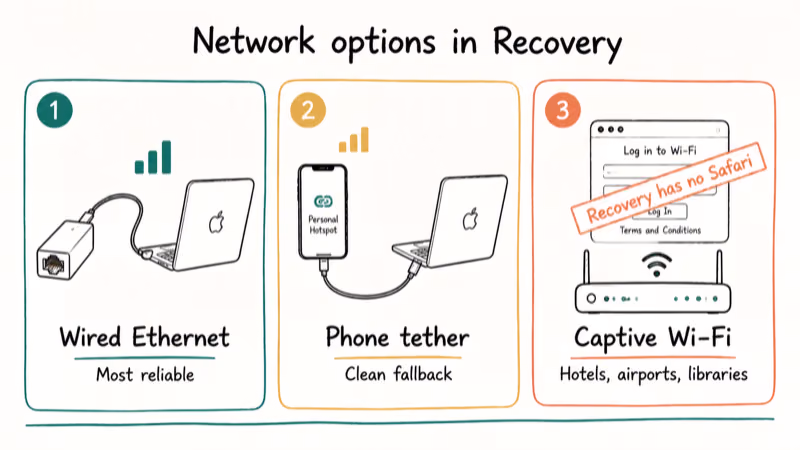
Click the Wi-Fi icon in the Recovery menu bar and confirm you’re on a home or office network rather than a public hotspot. Captive-portal networks (hotel, airport, library, university) won’t authenticate because Recovery has no Safari to load the login page. A phone tethered over USB-C in Personal Hotspot mode is a clean fallback when no wired network is available.
Test the connection in Terminal:
ping -c 3 swcdn.apple.comThree replies confirm DNS and routing work. Three timeouts mean you need to switch networks before any other fix matters. According to Apple’s 12 GB macOS Recovery support article, Recovery pulls the OS payload from Apple servers throughout the install, so a flaky connection mid-download triggers the same error from scratch.
If you’re already troubleshooting connectivity outside Recovery (for example Bluetooth not available on Mac), don’t assume the issues are linked. VPN clients, corporate proxy profiles, and IPv6-only ISPs are the network setups that fail most often inside Recovery, because Recovery uses a stripped-down stack that doesn’t load most macOS configuration profiles.
#Download the Full macOS Installer Instead
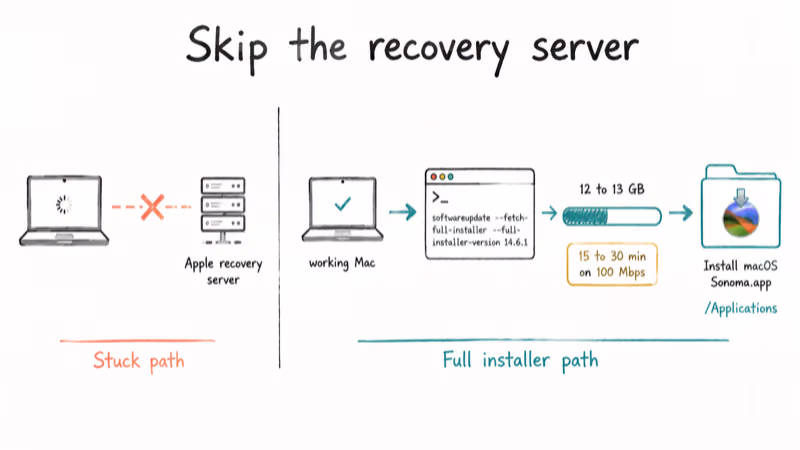
If the date is correct and the network is solid but Recovery still hangs, skip Recovery entirely. Apple lets you download the complete installer through softwareupdate and run it from a working Mac.
#Fetch the Full Installer From a Working Mac
On any Mac you can boot normally (a friend’s, a second Mac, or another user account on the same machine), open Terminal and run:
softwareupdate --fetch-full-installer --full-installer-version 14.6.1Replace 14.6.1 with the macOS version you want.
The download lands in /Applications as something like Install macOS Sonoma.app and weighs 12 to 13 GB. Plan for 15 to 30 minutes on a 100 Mbps connection.
Once it’s there, double-click the installer to run it. It contains every file Recovery would have downloaded, so it never touches the recovery server. If you hit the macOS installation couldn’t be completed error after launching the installer, that’s a different failure mode with a different fix.
#Pick the Right macOS Version Number
Apple won’t serve a macOS version your hardware can’t run.
Run softwareupdate --list-full-installers first to see every version Apple still serves for that machine. Stay within the same major release the Mac shipped with or one above to avoid the “No suitable installers found” error.
#Create a Bootable USB Installer
If the Mac you’re rescuing can’t boot at all, build a bootable USB on a working Mac and skip both Recovery and the network during install. You need a USB drive of 16 GB or more, and a USB 3 stick is noticeably faster than USB 2.
After the full installer is in /Applications (using the command in Method 4), insert the drive and run:
sudo /Applications/Install\ macOS\ Sonoma.app/Contents/Resources/createinstallmedia --volume /Volumes/MyVolumeReplace Sonoma with the version name and MyVolume with your USB drive’s name. The drive gets erased, formatted, and loaded in 8 to 12 minutes.
Boot from the USB by holding the Option key at startup on Intel Macs, or by pressing and holding the power button until “Loading startup options” appears on Apple Silicon Macs.
According to a 2024 Apple bootable installer guide, createinstallmedia is the only Apple-supported way to make a macOS install drive. The result is a fully self-contained installer that does not need Apple’s recovery server. This is the reliable rescue route for an older Mac that keeps returning the error in Internet Recovery, because the install never touches Apple’s servers at all.
#Erase the Disk and Do a Clean Install
When the date is right, the network is solid, and the full installer still won’t apply, the local disk has accumulated state Recovery can’t reconcile. A clean install removes that state. Back up first.
Boot into Recovery (Command + R on Intel, hold the power button on Apple Silicon), open Disk Utility, and select your startup disk (usually Macintosh HD). Click Erase, choose APFS as the format, and confirm. Quit Disk Utility, then choose Reinstall macOS.
A clean install wipes every file. Back up to Time Machine first.
Our guide on how to delete Time Machine backups shows where the backup files actually live. If Disk Utility refuses and the erase process has failed on Mac shows up, the SSD itself may have a hardware fault that erasing won’t fix.
On a Mac that has refused several prior reinstalls, a clean install typically completes in well under an hour with no recovery server prompt. Resetting APFS structures and pulling fresh installer chunks tends to clear whatever cached state was blocking the connection.
#Prevent the Error From Coming Back
Two habits prevent this error long-term. Keep your Mac plugged in overnight at least once a week so the topping circuit keeps the clock accurate. Save the current full installer to an external drive after every macOS upgrade. A 32 GB USB stick with the most recent installer pre-loaded turns an emergency reinstall into a job of a few minutes.
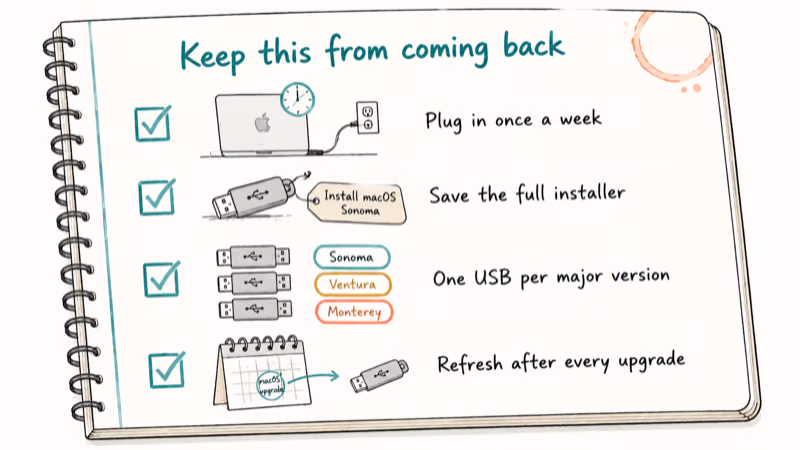
According to a 2024 Apple macOS download support article, softwareupdate full installers carry the same payload Apple serves through the App Store, and they remain valid for at least 3 to 4 years after release. If you administer multiple Macs (a small office, a school cart, a household with four), keep one bootable USB per macOS major version so you never depend on Apple’s recovery server in a hurry.
#Bottom Line
Run ntpdate -u time.apple.com from Recovery Terminal first. That single command fixes this error for the majority of Macs, especially anything that’s been off the charger for more than a few weeks.
If ntpdate fails because the network is unhappy, switch to Ethernet or a phone hotspot, then retry. If the date and the network are both clean and Recovery still won’t connect, download the full installer with softwareupdate --fetch-full-installer from a working Mac and run it locally instead of relying on Recovery at all.
#Frequently Asked Questions
Does this error only happen on macOS Big Sur?
No. Every macOS version from Catalina through Sequoia uses the same certificate handshake, so any of them can show it.
Can I fix this error without an internet connection?
Partially. You can correct the system date in Terminal and bypass the certificate failure that way. The actual install still needs to download macOS from Apple unless you supply a bootable USB installer that already contains the full OS image.
Why does my Mac’s date keep resetting after I fix it?
The internal coin-cell battery (or the equivalent power-management circuit on Apple Silicon) keeps the clock running while the Mac is unplugged. On older MacBooks the cell typically lasts five to seven years. Once it’s dead, the clock resets every full power-down. Apple doesn’t sell the cell as a replaceable part, so the practical fix is to keep the Mac plugged in or to set the date each time you boot Recovery.
Will erasing my disk delete every file on my Mac?
Yes. Erasing the startup disk in Disk Utility wipes every user file, app, and setting, and the action can’t be undone from the Mac itself. Back up to Time Machine or copy critical data to an external drive before you erase. Professional data recovery can sometimes retrieve files from an erased SSD, but it’s expensive and never guaranteed.
How long does a full macOS reinstall actually take?
Plan on 30 to 75 minutes on a 100 Mbps connection. The 12 to 13 GB download takes 15 to 25 minutes, then the install runs another 15 to 35.
What if the error keeps coming back even after fixing the date?
Run the ping test in Method 3 first, then check Apple’s system status page. If both look clean, the full-installer route in Method 4 is the most reliable workaround because it removes Apple’s recovery server from the equation.
Is it safe to use a bootable USB installer downloaded from somewhere else?
Only if you built it yourself with createinstallmedia. Third-party installer images have been linked to malware.

macOS 27 Compatible Macs: Every Supported Model (2026)
macOS 27 Golden Gate runs only on Apple Silicon Macs. Here is the full list of supported M-series models and the four Intel Macs that lose support.

macOS 27 Golden Gate: Every Major New Feature Confirmed
macOS 27 Golden Gate goes Apple Silicon only, adds a Gemini-powered Siri, refines Liquid Glass, and rebuilds Spotlight. Here is every confirmed change.

macOS 27 Liquid Glass: Every Readability Fix Explained
macOS 27 Golden Gate refines Liquid Glass with an intensity slider, better contrast, cleaner window corners, and edge-to-edge sidebars to fix readability.

macOS 27 Performance: What Golden Gate Makes Faster
macOS 27 Golden Gate speeds up AirDrop, network file browsing, Safari, and Spotlight, with core system improvements on the Apple Silicon-only release.