The Audio Service Is Not Running: 7 Fixes for Windows
Fix The Audio Service Is Not Running on Windows 10 and 11 with 7 proven methods. Restart Windows Audio, update drivers, and run the troubleshooter.

Quick AnswerOpen services.msc, right-click Windows Audio, and pick Restart. Then set the Startup Type to Automatic so the service starts at every boot.
You hover over the speaker icon and see a red X with the message “The Audio Service Is Not Running.” That means the Windows Audio service has stopped, and your speakers stay silent until you start it again. Start with services.msc because none of the fixes below need a third-party tool.
- A stopped Windows Audio service is the most common root cause for this error on both Windows 10 and Windows 11.
- The audio service has 2 dependencies that must also run: Windows Audio Endpoint Builder and Multimedia Class Scheduler.
- Setting Startup Type to Automatic stops the error from coming back after every reboot.
- An outdated Realtek or Intel SST driver can trigger the same red X even when services.msc shows the audio service as Running.
- If services.msc can’t fix the error, the built-in Windows Audio Troubleshooter or an SFC scan usually catches the underlying corruption.
#What Causes the Audio Service to Stop?
The Windows Audio service (audiosrv) handles every sound on your PC. When it stops, the speaker icon shows a red X.
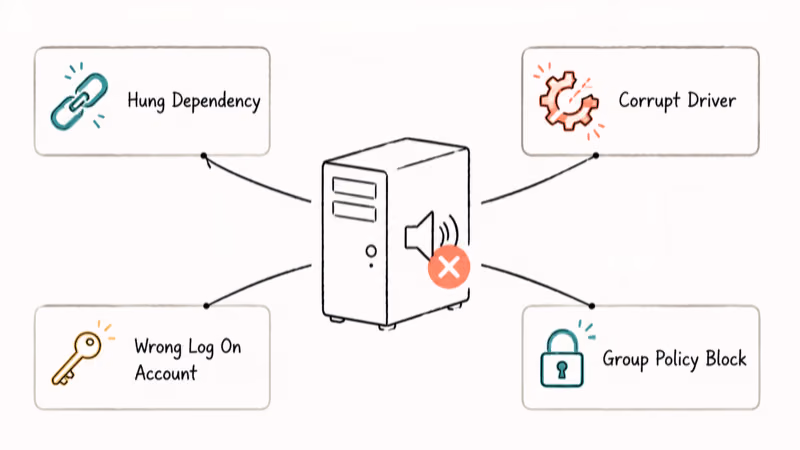
Common triggers include a hung dependency service, a corrupt audio driver after a Windows feature update, a wrong Log On account on the audio service, and a Group Policy that blocks audiosrv from starting. According to Microsoft, ordered steps fix this error in the sound troubleshooting guide, and the methods below follow that same service-first, driver-second order.
Open services.msc and check the Windows Audio status. If the column reads anything other than “Running,” it’s a service-level issue. If it says “Running” but you still see the red X, the driver or default device is the real problem. Our guide on no sound on laptop covers the related side cases.
#Method 1: Restart the Windows Audio Service
Restarting the service is the first thing to try, especially when the error appears suddenly after a Windows Update or wake-from-sleep.
- Press Windows + R to open Run.
- Type
services.mscand press Enter. - Scroll down to Windows Audio in the alphabetical list.
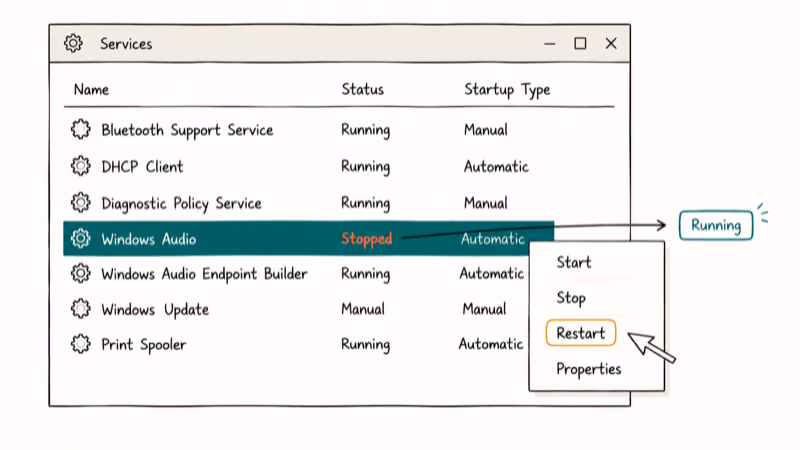
- Right-click it and pick Restart. If Restart is greyed out, pick Start instead.
- Hover over the speaker icon in the system tray. The red X should be gone.
A successful restart clears the red X once the audio service is running again. If the status column already shows “Running” but the error stays, a dependency is the real problem and you should skip ahead to Method 2.
That’s the fast path.
The same services.msc trick is one of the steps in our failed to play test tone fix, but the 2 errors hit different services. The audio service error needs audiosrv. The test tone error needs audioendpointbuilder. They share dependencies but never both fail at once.
#Method 2: Restart Audio Service Dependencies
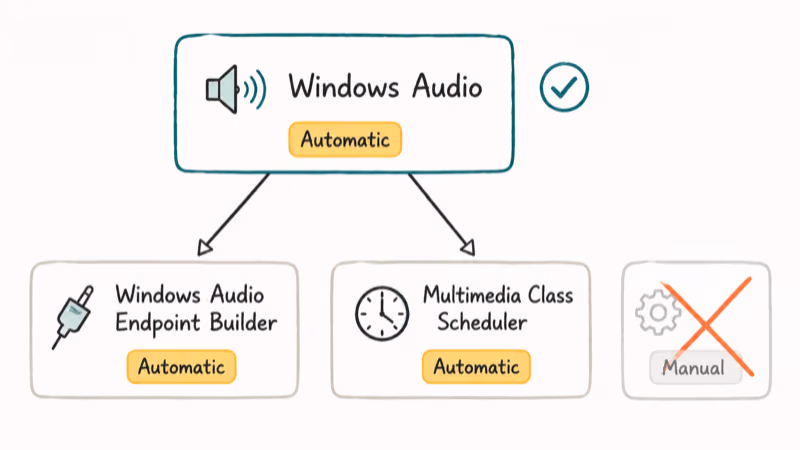
The Windows Audio service depends on two other services. If either dependency stops, audiosrv stops with it. You need to restart all three together and set them to Automatic so they survive a reboot.
- Open services.msc as in Method 1.
- Find each of these three services in turn:
- Windows Audio
- Windows Audio Endpoint Builder
- Multimedia Class Scheduler
- For each one, double-click to open Properties.
- Set Startup type to Automatic.
- Click Apply, then Start if the status is Stopped, then OK.
- Back in the services list, right-click each of the three and pick Restart.
If your system doesn’t have Multimedia Class Scheduler at all, that’s fine on some Windows 11 trims. The 2 remaining services are enough.
If Audio Endpoint Builder is set to Manual, switch it to Automatic and restart the services so the error doesn’t come back at every boot. If the speaker icon also shows the wrong default output device after this, the Chrome not playing sound walkthrough covers default-device fixes that work the same way for system-wide playback.
#Method 3: Check the Log On Settings
Some fresh installs and migrated systems leave the audio service set to log on under “This Account” instead of the local system. According to Microsoft’s Local System account documentation, the LocalSystem account has the SE_TCB_NAME privilege that core OS services like audiosrv need to start, so any other setting will block the service from running.
- In services.msc, right-click Windows Audio and pick Properties.
- Switch to the Log On tab.
- Make sure Local System account is selected. Don’t pick “This account.”
- Click Apply, then OK.
- Restart the service from the main services list.
If you flipped this and the service still refuses to start, your account isn’t in the Administrators group. Sign in with an admin account or use Run as administrator on the Services console.
#Method 4: Update or Reinstall the Sound Driver
A stale or corrupt audio driver can throw the same red X even when services.msc shows everything as Running. It shows up most often after a feature update bundles a newer Realtek or Intel SST driver that doesn’t match your hardware. The mismatch is silent and the only symptom is the red X coming back at every reboot, even with all 3 audio services set to Automatic.
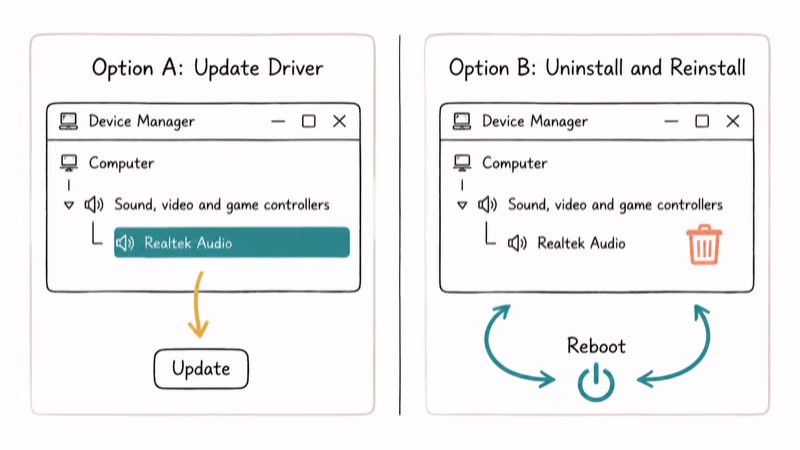
Two options here.
Update the driver through Device Manager, or remove it entirely and let Windows reinstall a clean copy on reboot.
#Option A: Update Through Device Manager
- Right-click Start and pick Device Manager.
- Expand Sound, video and game controllers.
- Right-click your audio device (Realtek, Intel, Conexant, etc.).
- Pick Update driver, then Search automatically for drivers.
- Reboot when prompted.
#Option B: Reinstall by Removing the Driver
- In Device Manager, right-click the audio device.
- Pick Uninstall device and check Delete the driver software for this device if it appears.
- Reboot. Windows reinstalls the driver from its driver store on the next boot.
If Windows installs a generic driver instead of the OEM one, our generic audio driver guide walks through swapping it.
A driver-level error sometimes comes with a blue screen on wake. If you have seen that combo, the DPC Watchdog Violation fix covers the power-state bug that takes down both the audio stack and the SATA driver at once.
#Method 5: Run the Windows Audio Troubleshooter
Microsoft recommends running the built-in audio troubleshooter before any deeper repair. It catches misconfigured default devices, muted endpoints, and disabled audio enhancements that you might not notice in the GUI. The tool’s bundled with Windows, so you don’t need to download anything.
It’s the lowest-effort fix on this list.
On Windows 11, go to Settings > System > Troubleshoot > Other troubleshooters and run Playing Audio. On Windows 10, go to Settings > Update & Security > Troubleshoot > Additional troubleshooters > Playing Audio.
The troubleshooter walks through default-device selection, then auto-restarts the audio services if it finds them stopped. It can also catch a wrong default device and offer a one-click fix before you touch services.msc.
If the troubleshooter reports “Audio service not responding” and can’t proceed, you’re back in Method 1 territory. Restart the service first, then run the troubleshooter again.
#Method 6: Run SFC and DISM Scans
If none of the above help, the audio service binary itself may be corrupt. The System File Checker (sfc /scannow) replaces damaged Windows files with verified copies from the local component store. DISM is the heavier tool that repairs the local image first, so SFC has a clean source to copy from.
- Right-click Start and pick Terminal (Admin) on Windows 11, or Command Prompt (Admin) on Windows 10.
- Run
DISM.exe /Online /Cleanup-image /Restorehealthand wait. It can take 15 minutes on a slow disk. - Once DISM finishes, run
sfc /scannow. - Reboot when SFC reports any repairs.
According to Microsoft’s System File Checker documentation, running DISM before SFC fixes the underlying repair source, which prevents the common “could not fix some files” message from blocking the repair.
Expect this repair to take a while, especially on a slow disk. Reboot when Windows reports repairs, then check whether the audio service starts cleanly.
#Why Does the Error Come Back After a Restart?
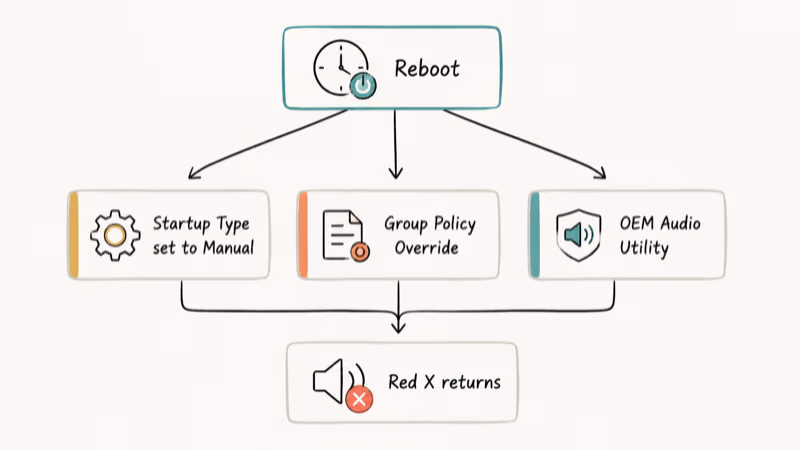
If you fix the audio service and the red X reappears the next time you boot, one of 3 things is happening. The Startup Type is set to Manual instead of Automatic. A Group Policy is overriding the service setting on a domain-joined PC. Or another piece of software, often an OEM audio utility, is stopping the service on shutdown.
Start with Startup Type. It covers the majority of cases. Open services.msc, double-click each of the 3 audio services, and confirm the Startup type column reads Automatic, not Manual or Disabled.
If the Startup Type keeps reverting after each boot, you’re dealing with Group Policy or a registry override. Open gpedit.msc (Pro and Enterprise only) and check Computer Configuration > Windows Settings > Security Settings > System Services for any policy on Windows Audio. If a policy is set, change it to “Not Defined” so the local service settings apply.
OEM audio utilities like B&O Audio Control, Realtek Audio Console, and MaxxAudio sometimes stop the audio service when their license check fails or when their installer leaves orphan tasks behind. Open Task Manager and disable anything tagged as audio enhancement under Startup apps.
The cleanup pays off twice.
If the speaker also buzzes or pops on top of the red X, our writeup on why Windows 10 runs slow and unresponsive covers the broader cleanup that often resolves audio-stack lockups along with the slowdown.
#Bottom Line
Start with Method 1 in services.msc; it’s the fastest fix when the service is simply stopped. If the red X comes back after every boot, run Method 2 and set all 3 audio services to Automatic. If it survives that, uninstall the audio driver from Device Manager and let Windows reinstall on reboot. Save SFC and DISM for last; they’re the longest step and most people never need them.
#Frequently Asked Questions
Why does the audio service keep stopping on Windows 10?
A stopped audio service is usually the result of a hung dependency or an OEM utility that kills audiosrv on shutdown. The fix is to set Windows Audio, Windows Audio Endpoint Builder, and Multimedia Class Scheduler all to Automatic in services.msc.
Can I restart the audio service from a single command?
Yes. Open Command Prompt as administrator and run net stop audiosrv followed by net start audiosrv. The same works in PowerShell with Restart-Service audiosrv. This is the fastest way to recover the service when you’ve already opened a terminal for something else, and it’s the same path the Windows Audio Troubleshooter uses internally.
Will reinstalling Windows fix the audio service error?
Yes, but only as a last resort. A reinstall takes hours and wipes your apps. Try every method above first.
Why does the speaker icon show a red X but services.msc says the service is running?
In that case the audio service is fine, but the audio device or driver isn’t. Open Device Manager and check whether the audio entry has a yellow warning triangle, which means the driver failed to load. Update or reinstall the driver using Method 4. The red X clears as soon as the driver loads cleanly.
Does this error affect Windows 11 the same way?
Yes. Both Windows 10 and Windows 11 use the same audiosrv service and the same 2 dependencies. The only difference is the path to the troubleshooter. On Windows 11 it lives under Settings > System > Troubleshoot, while on Windows 10 it’s under Update & Security > Troubleshoot.
Can malware cause the Windows Audio service to stop?
It can, but it’s rare in 2026 because most modern malware doesn’t target audio services. If you suspect infection, run a full scan with Microsoft Defender or Malwarebytes before going further. A clean scan plus a working SFC pass is enough to rule out malware as the cause. If the scan finds something, remove it first and then redo Method 1, because the audio service settings may have been altered.
How do I know if my audio driver is the real problem?
Open Device Manager and expand “Sound, video and game controllers.” If your audio device has a yellow warning triangle, an exclamation mark, or shows up as “Generic Audio Driver” instead of the real chip name, the driver is the problem. Method 4 fixes both cases.

Bluetooth Not Working on Snapdragon X? Fixes for 2026
Bluetooth not working on your Snapdragon X Copilot+ PC? Generic audio, mice, and keyboards work, but vendor apps often lack an ARM build. Fixes inside.

Docker Desktop and WSL2 Not Working on Snapdragon X? Fix It
WSL2 runs fine on Snapdragon X, but Docker Desktop ARM is Early Access and throws WSL errors. Use WSL2 plus native ARM64 Ubuntu and Docker Engine.

Does iTunes Work on Snapdragon X? ARM Windows 11 Guide
Yes, iTunes runs on Snapdragon X laptops through Prism emulation, but the Apple Devices app is the smoother route. Here is what to install on ARM.

Does OBS Studio Work on Snapdragon X? ARM64 Build Guide
Yes, OBS Studio has an experimental ARM64 build since version 31.1, but x64 plugins won't load and hardware encoding is missing. Here is what works.