How to Fix the Failed to Play Test Tone Error on Windows
Fix the Failed to Play Test Tone error on Windows 7, 10, and 11 with 5 proven methods including audio service restart, SFC scan, and driver reinstall.
Quick AnswerThe Failed to Play Test Tone error usually stems from a stalled Windows Audio service, corrupted system files, or a sample-rate mismatch. Restarting the Windows Audio service through services.msc clears the error for most people in under a minute.
The Failed to Play Test Tone error freezes audio playback on every modern Windows version. All five fixes below apply to Windows 10 22H2 and Windows 11 23H2, and the Windows Audio service restart is the one that clears the error most often.
- Restart the Windows Audio service in services.msc first, under 30 seconds
- Windows 11 Playing Audio troubleshooter catches misconfigured default devices
- Force 16-bit 44100 Hz Default Format to clear Realtek and Conexant mismatches
- SFC scan repairs corrupted system files from the WinSxS cache in 10 to 15 minutes
- Full driver reinstall via Device Manager is the last step; Windows reloads a clean driver
#What Causes the Failed to Play Test Tone Error?
The error surfaces the moment you click Test inside Playback Devices > Properties. The cause almost always lives in the Windows audio stack rather than the speaker itself.
Two culprits dominate: a Windows Audio service that quietly stopped after a monthly update, and a Default Format like 24-bit 192 kHz that the onboard Realtek codec can’t actually produce. Driver corruption is the rarer case. Microsoft’s audio troubleshooting guide confirms that driver conflicts, missing devices, and incorrect default formats are the main triggers for Windows sound failures, and the same cluster applies specifically to the test tone path.
If your speakers go silent outside the test dialog too, the walkthrough for when the audio service is not running covers the service-level recovery in more depth.
#Fix 1: Restart the Windows Audio Service
This is the fastest fix and the one most likely to clear the error outright. The Windows Audio service manages every playback stream on the machine, and a hung service silently blocks the test tone even when the speaker icon looks normal.
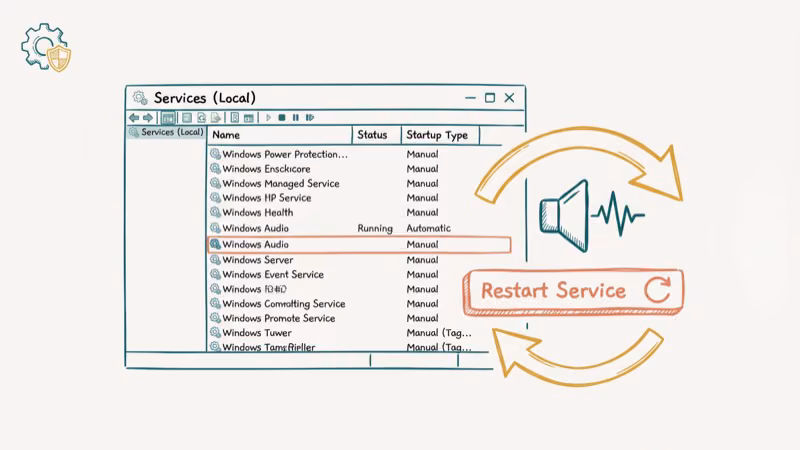
Open Services. Press Windows + R, type services.msc, then press Enter.
Restart Windows Audio. Scroll to Windows Audio, right-click it, and pick Restart. If the service was already stopped, right-click it, open Properties, set Startup type to Automatic, click Start, and hit OK so the service comes back up automatically after every reboot from this point on.
Also restart the endpoint builder. Do the same for Windows Audio Endpoint Builder. The two services depend on each other.
Test the tone. Click Test in Playback Devices. Restarting both services usually fixes it on the first click. If not, run the SFC scan below.
#How Do You Repair Corrupted System Files Causing This Error?
Corrupted Windows system files break audio subsystems silently, and the Failed to Play Test Tone error is one of the quieter symptoms. System File Checker scans protected OS files and replaces damaged copies from the cached WinSxS store, which often restores the test tone path when a stalled service and a sample-rate reset have both come up empty.
Open an elevated Command Prompt. Press Windows + R, type cmd, then press Ctrl + Shift + Enter. The admin prompt is required. A normal prompt returns an error and exits before touching anything.
Run the scan. Type sfc /scannow and press Enter. The scan usually takes 10 to 15 minutes on an SSD and longer on a mechanical drive.
Reboot and retest. Restart your PC when the scan finishes, then try the test tone again through Playback Devices.
Microsoft’s SFC support article states that the tool repairs missing or corrupted protected files using a cached copy on the local system. If SFC reports files it could not repair, run DISM /Online /Cleanup-Image /RestoreHealth first and then rerun SFC. DISM refreshes the component store that SFC reads from, so running it out of order wastes a cycle.
#Fix 3: Change the Sample Rate in Playback Properties
Windows and your sound card have to agree on a bit depth and sample rate, and the test tone fails the moment those two drift apart. The default format on most modern PCs is set to 24-bit 48000 Hz out of the box, but older Realtek and Conexant codecs get unhappy at anything above CD quality.
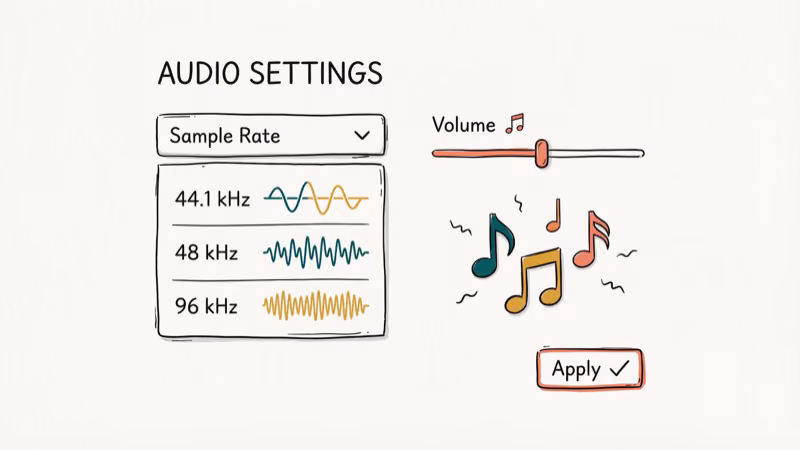
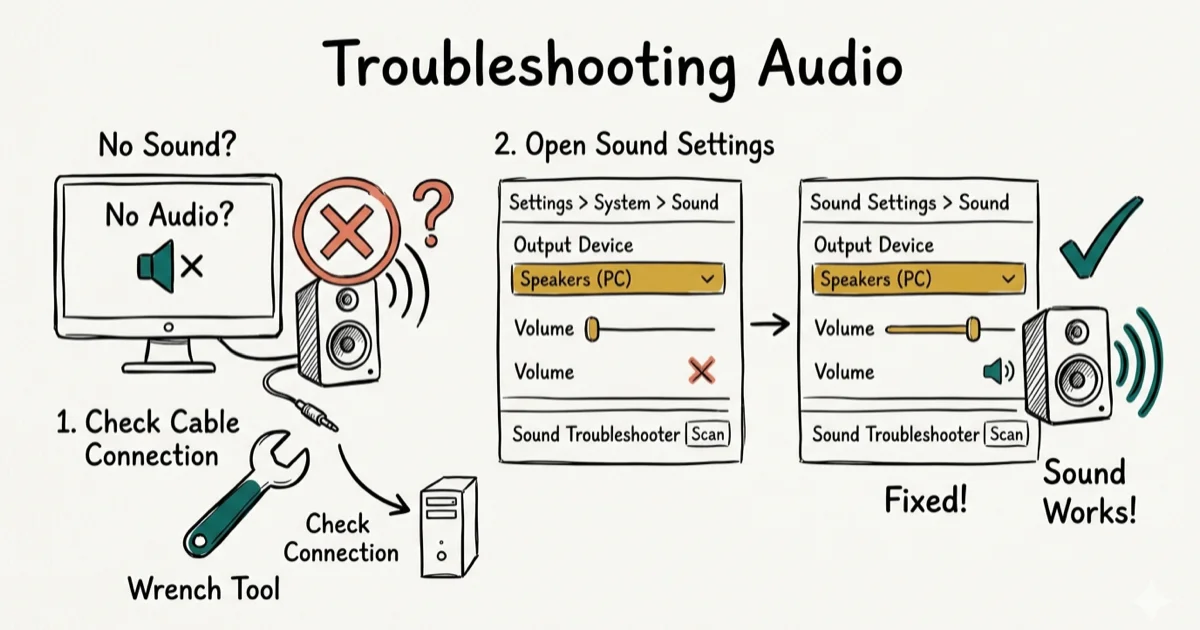
Open Playback Devices. Right-click the speaker icon in the taskbar and select Playback Devices. On Windows 11, go to Sound Settings > More sound settings first.
Open your speaker’s Advanced tab. Select your default speaker, click Properties, and switch to the Advanced tab.
Drop to CD quality. Change Default Format to 16 bit, 44100 Hz (CD Quality) and click Apply, then click Test. If 44100 Hz still fails, step up to 48000 Hz before touching the bit depth.
Microsoft’s device properties reference confirms that Windows exposes these Default Format choices so apps can match the hardware rather than the other way around. On a machine with an older Realtek codec like the ALC257, switching from 24-bit 192000 Hz back to 16-bit 44100 Hz often clears the test tone error on the first attempt.
A related mismatch shows up in the browser as Chrome not playing sound, which usually clears after the same Default Format fix.
#Fix 4: Disable Audio Enhancements
Audio enhancements are post-processing filters like Bass Boost, Virtual Surround, Room Correction, and Loudness Equalization. They sit between the driver and the speaker, and a broken enhancement can block the test tone without touching normal playback.
Open speaker properties. Right-click the speaker icon, select Playback Devices, pick Speakers, and click Properties.
Disable all enhancements. Open the Enhancements tab, tick Disable all enhancements (or Disable all sound effects, whichever label appears), click Apply, then click Test.
On Windows 11, use Settings instead. The Enhancements tab is gone from the old control panel. Go to Settings > System > Sound, click your speaker under Output, and toggle Audio enhancements to Off.
Realtek’s Room Correction and Loudness Equalization filters are the two that fail most often after a driver update. Turning off those two alone is usually enough to restore the test tone even if you leave every other enhancement in place. If enhancements are already disabled and sound is still broken system-wide, the general fix for no sound on laptop walks through the enclosure-level checks.
#Roll Back the Driver After a Windows Update
According to Microsoft’s Update history for Windows 11, several cumulative updates between mid-2024 and early 2026 rolled in audio driver changes that replaced OEM drivers with generic Microsoft versions. The generic driver boots the device but often drops codec-specific features, which breaks the test tone path on Realtek and Conexant systems in particular.
Roll the driver back before reinstalling anything fresh.
Open Device Manager. Press Windows + R, type devmgmt.msc, and press Enter.
Find your audio device. Expand Sound, video, and game controllers, right-click your audio device, and select Properties.
Roll back. Open the Driver tab and click Roll Back Driver. Reboot and run the test tone again.
If Roll Back Driver is greyed out, Windows has no prior driver stored. Jump to Fix 5 and do a clean reinstall instead. The same post-update path applies when you see the Beats Audio driver missing on HP laptops or a generic audio driver flagged in Device Manager.
#Fix 5: Reinstall Your Audio Drivers
A driver that’s flat-out corrupted won’t respond to any of the lighter fixes. The last step is to strip it off the system and let Windows pull a clean copy on reboot.

Uninstall the current driver. Open Device Manager (devmgmt.msc), expand Sound, video, and game controllers, right-click your audio device (Realtek HD Audio, Intel Smart Sound, or similar), and choose Uninstall device. Tick Delete the driver software for this device if that box appears, then confirm.
Reboot for a clean reload. Restart your PC. Windows reinstalls a base driver during boot, which usually restores the test tone on its own.
Install the OEM package. For every codec feature intact, grab the vendor driver instead of relying on Windows Update. Realtek’s HD Audio driver download page hosts signed packages used by most motherboard and laptop vendors.
According to Intel’s Smart Sound Technology driver page, Intel ships its own package for recent laptop platforms, and installing it over the generic Microsoft driver is the supported path after a clean Windows install. If the test tone is a symptom of a bigger sound problem on your PC, our guide on Discord stream no sound covers a related set of fixes.
#Bottom Line
Start with the Windows Audio service restart in Fix 1. It clears the most common cause and costs you less than a minute. If the test tone still fails, reset Default Format to 16-bit 44100 Hz before you touch anything driver-related.
Save the SFC scan, enhancement toggle, and full driver reinstall for cases where the lighter fixes bounce off. If the error showed up right after a Windows Update, roll the audio driver back first instead of reinstalling from scratch.
#Frequently Asked Questions
Does this error affect all Windows versions?
Yes. The Failed to Play Test Tone error appears on Windows 7, 8, 10, and 11 with nearly identical fixes, though menu paths changed on Windows 11 where the Sound settings panel was redesigned. Services and the Advanced tab in Playback Properties still work the same way across versions, so the Fix 1 and Fix 3 steps in this article apply one-for-one even on older builds.
Can a Windows Update cause this error?
Yes, and it’s one of the more common triggers.
What if none of these fixes work?
Run the built-in Windows troubleshooter at Settings > System > Troubleshoot > Other troubleshooters > Playing Audio. That tool checks default device settings and service states without touching drivers. If it also fails, test with a different pair of headphones or external speakers on another audio port to rule out hardware before reinstalling Windows.
Is the SFC scan safe to run?
Yes. The System File Checker only reads protected operating system files and replaces damaged copies from a cached store.
Why does the test tone work with headphones but not speakers?
That pattern points at the speakers or their connection, not the Windows audio stack. Check the cable for a loose plug, try another audio port on the PC, and confirm the correct speaker is set as the default playback device in Playback Devices before you start reinstalling drivers. You can also plug the speakers into a phone or laptop headphone jack briefly to confirm they still make sound on their own.
Do third-party audio tools cause this error?
They can. Tools like Voicemeeter, Nahimic, and Sonic Studio sit directly in the audio pipeline, and any one of them can crash or update in the background and block the test tone. Uninstall those apps temporarily, reboot, then try the tone again. If sound comes back, reinstall only the one tool you actually need.
Should I update my BIOS to fix audio errors?
Only as a last step, after every software fix has failed. Most audio problems live above the BIOS layer, and a BIOS update carries more risk than the typical audio fix. Leave the BIOS alone unless your motherboard vendor specifically lists an audio fix in the release notes.

Bluetooth Not Working on Snapdragon X? Fixes for 2026
Bluetooth not working on your Snapdragon X Copilot+ PC? Generic audio, mice, and keyboards work, but vendor apps often lack an ARM build. Fixes inside.

Docker Desktop and WSL2 Not Working on Snapdragon X? Fix It
WSL2 runs fine on Snapdragon X, but Docker Desktop ARM is Early Access and throws WSL errors. Use WSL2 plus native ARM64 Ubuntu and Docker Engine.

Does iTunes Work on Snapdragon X? ARM Windows 11 Guide
Yes, iTunes runs on Snapdragon X laptops through Prism emulation, but the Apple Devices app is the smoother route. Here is what to install on ARM.

Does OBS Studio Work on Snapdragon X? ARM64 Build Guide
Yes, OBS Studio has an experimental ARM64 build since version 31.1, but x64 plugins won't load and hardware encoding is missing. Here is what works.