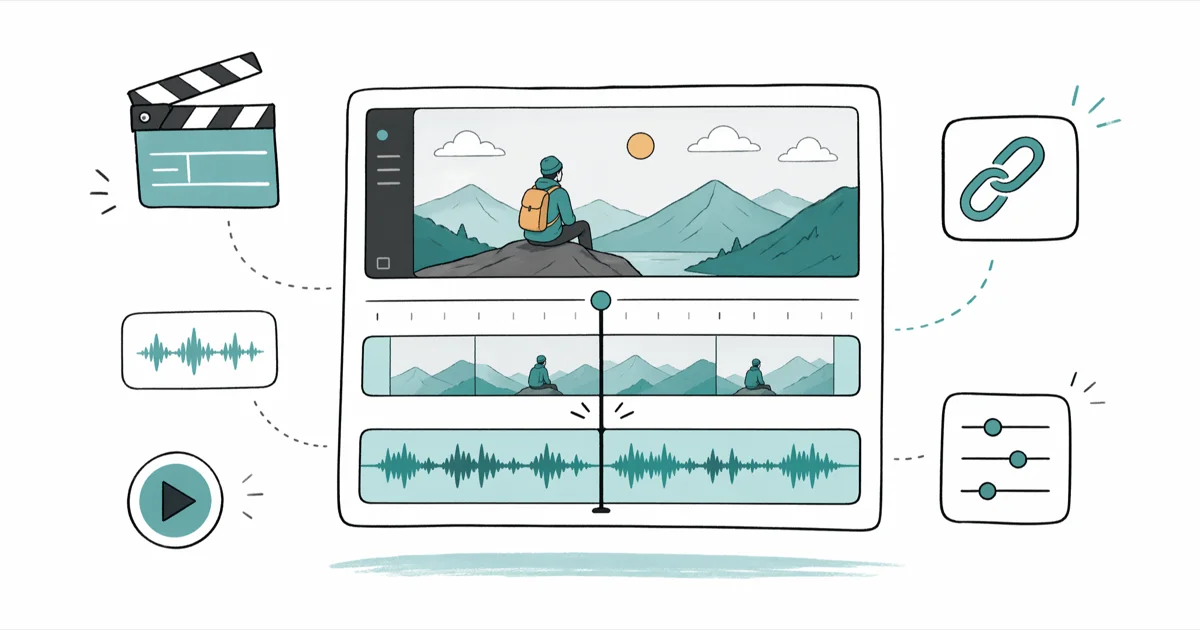
How to Sync Audio and Video in Premiere Pro: 4 Methods
Sync audio and video in Adobe Premiere Pro using Merge Clips, Synchronize, manual offset, or PluralEyes. Step-by-step fixes and alternatives.
Quick AnswerTo sync audio and video in Adobe Premiere Pro, select your video and external audio in the Project panel, right-click, and choose Merge Clips with the Audio option. For multi-camera shoots, drop clips into a sequence and use Clip > Synchronize to align by waveform or timecode.
Sync audio and video in Adobe Premiere Pro the wrong way and even a tiny offset will make a tutorial unwatchable. The good news: Premiere has two purpose-built tools for this job, plus a manual fallback that takes about a minute per clip.
This guide walks through four practical methods, the recording habits that prevent drift, and which free editors handle sync if Premiere isn’t an option.
- Adobe Premiere Pro has two built-in sync tools: Merge Clips for paired video and external audio, and Synchronize for multi-camera timelines.
- Audio offset above roughly 40 milliseconds is visible on lip movement, so use waveform alignment instead of judging by eye.
- Match camera and recorder sample rates before recording, since mixing 23.976 fps footage with 48 kHz audio causes gradual drift across long takes.
- A loud clap or slate at the head of every shot gives Premiere a sharp waveform peak the Synchronize command can lock onto.
- DaVinci Resolve, iMovie, Filmora, Blender, and VLC each handle basic audio and video sync if Premiere Pro is unavailable.
#Why Do Audio and Video Drift Out of Sync?
Sync problems almost never come from Premiere itself. They come from how the footage was captured.
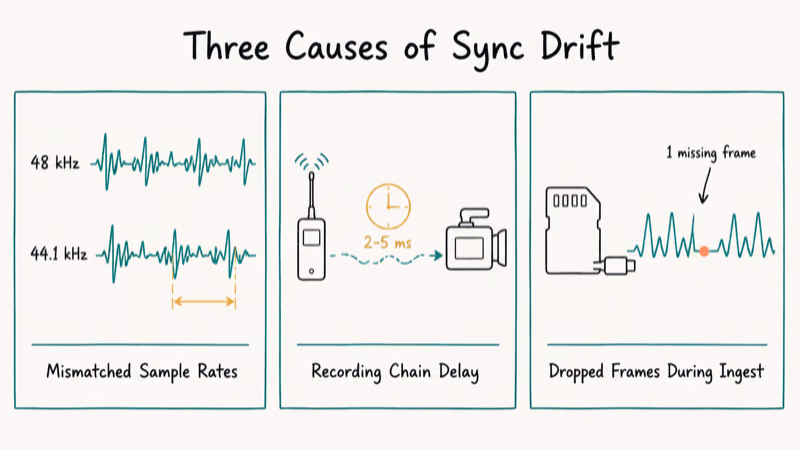
Three causes dominate.
Mismatched sample rates. If your camera records audio at 48 kHz but your external recorder runs at 44.1 kHz, the two tracks will drift by several frames over a ten-minute take. Variable frame rate footage from phones produces the same effect, since the timeline assumes a constant rate when stretching audio to match. This is one of the most common long-take drift causes.
Recording chain delay. Wireless lavalier transmitters add 2 to 5 ms of latency, HDMI audio embedded by an external monitor adds more, and any in-camera processing pushes audio behind the picture. None of these matter on a five-second shot. On a 20-minute interview the gap is obvious.
Dropped frames during ingest. A bad transfer can leave the picture and external audio out of step by the end of a shot. Re-ingesting from the original card is safer than trying to repair a damaged transfer on the timeline.
Always check ingest by spot-comparing waveform peaks at minute zero, minute five, and minute ten. If peaks drift between checkpoints, reformat the card and re-ingest before fixing anything in post.
According to Adobe’s synchronizing clips help page, the Synchronize command can align by clip start, clip end, timecode, clip markers, or audio. A clean clap at the head of every shot saves you when ingest goes sideways.
PS: if you’re still choosing between editors, here is the full DaVinci Resolve vs. Premiere Pro comparison for further reading.
#Four Ways to Sync Audio and Video in Premiere Pro
Each method below targets a different shoot pattern. Pick the one that matches how your media was captured rather than running them all.
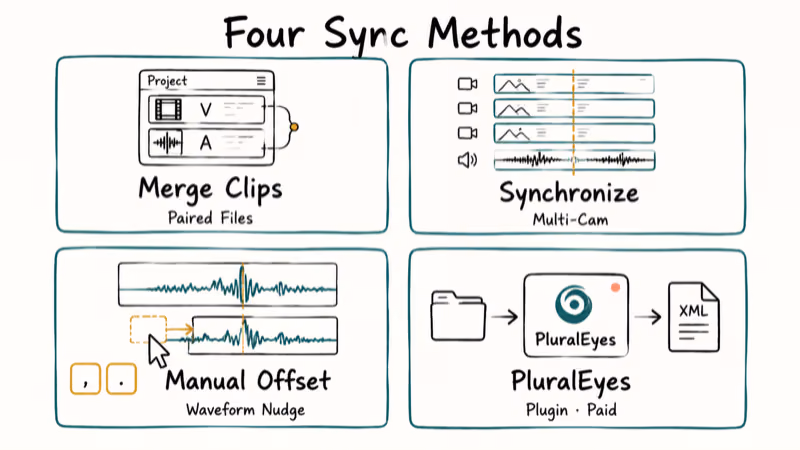
#Method 1: Merge Clips for Paired Files
Merge Clips is the right tool when you have one video file plus one external audio file from a single take. It’s common in podcast video when an external recorder captures the voice and the camera records reference audio.
- In the Project panel, hold Shift and click both the video clip and the matching audio file.
- Right-click the selection and choose Merge Clips.
- In the dialog, set Synchronize Point to Audio and tick Remove Audio From AV Clip.
- Click OK. Premiere creates a merged clip with the external audio replacing the camera scratch track.
When waveform analysis succeeds, Merge Clips creates a merged clip that behaves like a single source clip on the timeline, so trims and cuts move both tracks together.
#Method 2: Synchronize a Multi-Camera Timeline
Synchronize is the multi-cam workflow. Drop every angle plus a master audio track into one sequence, line them up loosely, then let Premiere snap them tight.
- Place all clips on separate video and audio tracks in a sequence. Stack them so the rough start times overlap.
- Highlight every clip you want aligned.
- Go to
Clip>Synchronize. - Choose Audio if you have a clean reference clap, or Timecode if your cameras and recorder are jam-synced.
- Click OK and wait for the analysis to finish.
Synchronize works best when at least one clip carries a clear clap at the head. Without a clap, Premiere may align some angles but leave others drifting.
#Method 3: Manual Offset Using Audio Waveforms
Use this when both other methods fail or when a clip is too short for Premiere’s audio analysis to find a match.
- Drop the video and audio onto adjacent timeline tracks.
- Press the backslash key to fit the sequence to the program window, then scroll horizontally until you can see the waveform peak from a clap, door slam, or other transient.
- Hold Shift and drag one track until the peaks line up.
- Press the equals key to zoom in until each waveform peak is roughly an inch wide on screen.
- Nudge with the comma and period keys (one frame at a time) until the peaks overlap exactly.
Manual offset takes about 60 seconds per clip once the keyboard shortcuts are in muscle memory. For a tutorial on cleaning up tail-end audio after sync, see our guide to fade audio in Premiere.
Tip: zoom to single-frame width before nudging.
#Method 4: PluralEyes and Other Sync Plugins
Red Giant’s PluralEyes is the third-party answer for shoots with dozens of clips that would take an hour to merge by hand. The plugin reads waveforms across every clip in a folder, builds a synchronized timeline, and exports it back to Premiere as an XML.
PluralEyes is paid software and overkill for short shoots, but it pays for itself on event coverage where you might have eight cameras running for three hours. If you need to reverse a misaligned clip after sync, our walkthrough on how to reverse a clip in Premiere Pro covers the steps.
#Best Alternatives to Adobe Premiere Pro
Premiere Pro requires a Creative Cloud subscription, so a free or one-time-purchase alternative makes sense for hobbyists and one-off projects.
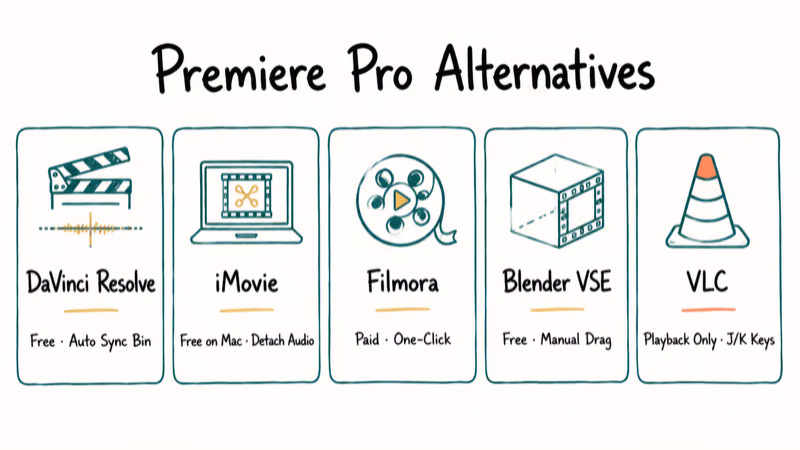
#DaVinci Resolve
Resolve has the strongest free audio toolset of the alternatives. Its Cut page Sync Bin matches clips automatically when you import a folder of paired files, and the Fairlight tab handles per-frame sync correction. Resolve’s auto-sync handles paired-file workflows without a plugin. For deeper coverage, see DaVinci Resolve audio editing and DaVinci Resolve speed up clip.
#iMovie
iMovie ships free on every Mac and iPad. It can’t match Premiere’s multi-cam sync, but its Detach Audio command lets you separate a video clip’s audio track and slide it manually until the waveform peaks line up. According to Apple’s iMovie User Guide for Mac, detached audio behaves as an independent clip on the timeline. Practically, this means you can offset by as little as 1 frame (about 33 ms at 30 fps) without affecting the underlying video file.
If you hit playback errors during export, our guide on iMovie video rendering errors walks through the common fixes.
#Filmora
Wondershare Filmora is a paid editor that targets beginners. It has a one-click Audio Sync on the timeline.
Filmora is fine for short YouTube clips. Longer projects with multiple sources are better suited to Resolve or Premiere.
#Blender Video Sequencer
Blender’s free Video Sequence Editor handles basic audio sync if you’re already using Blender for 3D work.
The Sequencer renders waveforms in the timeline so you can drag-align by eye. According to Blender’s Video Editing manual, the Sequencer supports stacking audio strips on independent channels, which is what makes manual offset workable.
#VLC for Playback Sync
VLC isn’t an editor; it’s the right tool when the video file itself is permanently out of sync and you only need to watch it. Press J or K during playback to nudge audio delay by 50 milliseconds at a time. The change is non-destructive, so you can dial in the offset until lips and dialogue match.
#How Do You Prevent Sync Issues During Recording?
Fixing sync in post is always slower than not breaking it during the shoot.
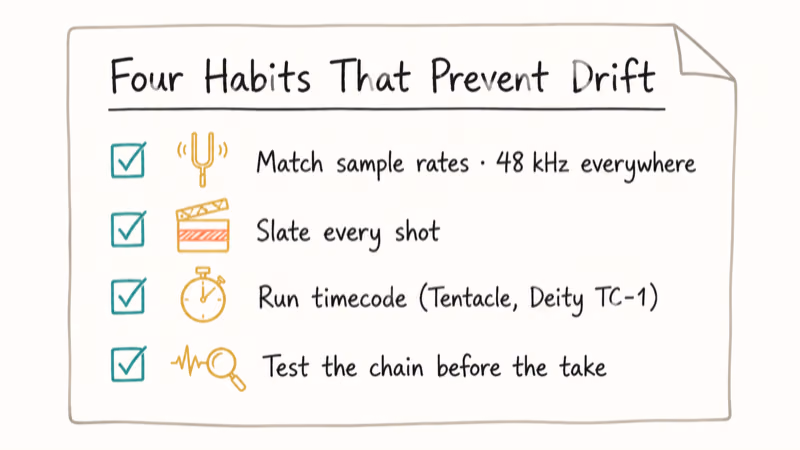
The four habits below prevent most avoidable drift.
Match sample rates and frame rates. Set every audio device to 48 kHz and every camera to a constant frame rate (23.976, 25, or 29.97). Mixed rates are the single biggest cause of long-take drift.
Slate every shot. A clapper or a loud hand clap in front of the lens gives every sync method a sharp waveform peak. The clap only takes a moment and gives you a clear reference if automatic sync fails.
Run timecode if you can. Sound devices, Tentacle Sync, and the cheaper Deity TC-1 all jam-sync cameras and recorders to the same master clock. Once cameras are jam-synced, Premiere’s Timecode option in Synchronize handles the rest in seconds.
Test the chain before the take that matters. Record 30 seconds, drop it onto a timeline, and confirm the waveforms align. This check can reveal recording-chain delay before the real take, when it’s still easy to fix.
For background noise cleanup after the shoot is locked, see how to remove background noise in iMovie for an iMovie-specific approach. The same waveform-and-fade workflow applies to Premiere’s Essential Sound panel.
#Premiere Pro Sync Keyboard Shortcuts to Memorize
Mouse-dragging clips into alignment is the slow way to work. The five shortcuts below cut manual sync time roughly in half once they’re in muscle memory.
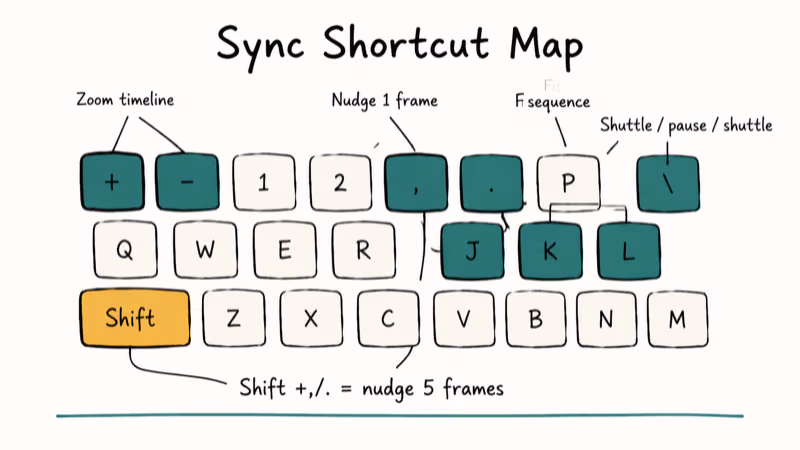
- Plus and minus: zoom timeline in or out around the playhead.
- Comma and period: nudge the selected clip back or forward by one frame.
- Shift plus comma or period: nudge by five frames at a time.
- Backslash: fit the entire sequence to the program window.
- L, K, J: shuttle forward, pause, shuttle back at variable speeds.
A dedicated shortcut pad can help on long edits, but memorizing the built-in shortcuts is enough for most projects.
#When to Re-Record Instead of Fixing in Post
Some sync problems aren’t worth the post-production time. If a clip has more than 10 frames of drift, the audio source isn’t usable as a reference, or the camera dropped multiple frames mid-take, you’ll spend more time chasing the fix than re-recording.
Three concrete tells that re-recording is cheaper than fixing:
- Variable frame rate footage from a phone: Premiere’s interpretation drifts unpredictably. Re-shoot on constant frame rate.
- Audio with no transient peaks: a 20-minute monotone narration with no claps gives Synchronize nothing to lock onto. Re-record with a slate.
- Drift that grows non-linearly: if the offset is 4 frames at minute one, 11 frames at minute five, and 24 frames at minute ten, sample-rate mismatch is the cause. No amount of timeline nudging fixes it cleanly.
#Bottom Line
For most paired video-and-audio shoots, Merge Clips in Premiere Pro is the fastest path. Select the two files, right-click, choose Audio as the sync point, and Premiere does the work in under five seconds per clip. Reach for Synchronize on the timeline only when you have three or more angles to align together, and always include a clean clap at the head of every shot so Premiere’s audio analysis has a sharp peak to lock onto.
If you need a free option, DaVinci Resolve is a strong choice for paired-file audio sync.
iMovie is the right pick on a Mac when the project is short and the audio is already close, and PluralEyes earns its license fee only on event coverage where you have eight or more cameras to align.
#Frequently Asked Questions
Can I sync audio and video automatically in Premiere Pro?
Yes. Premiere has two automatic sync tools built in: Merge Clips for paired files in the Project panel and Synchronize on the timeline. Both align by audio waveform when you tick the Audio option. They won’t work on clips with no shared audio reference, which is why a clap at the head of each shot matters so much.
Skip it and expect Synchronize to fail more often on multi-cam takes.
What should I do if my audio and video are still out of sync after Merge Clips?
Confirm the camera and external recorder used the same sample rate before anything else. Mixed rates cause drift that Merge Clips can’t correct, and the symptom looks identical to a recording chain delay or a dropped frame.
Next, check whether the external recorder dropped frames during recording. If both are clean, fall back to manual waveform alignment using the comma and period keys.
Can I adjust sync manually after using automated methods?
Yes. Even after Merge Clips runs successfully, scrub to a moment with a clear transient and confirm the waveform lines up with the visual cue at the same frame. If it drifts, nudge one track using the comma and period keys until the peaks overlap.
Does syncing audio and video reduce the quality of my footage?
No. Sync operations in Premiere Pro reposition the audio track on the timeline; they don’t re-encode either file. Quality only changes when you export, and that depends on your export settings, not the sync method.
Are there keyboard shortcuts in Premiere Pro that speed up syncing?
Yes. Plus and minus zoom the timeline, comma and period nudge the selected clip one frame, and Shift plus comma or period nudge by five frames. Holding the equals key zooms to the playhead, which is useful when matching waveform peaks. Memorising these four pairs cuts manual sync time roughly in half compared to dragging with the mouse.
What is the smallest sync offset a viewer will notice?
Around 40 milliseconds, which is roughly one frame at 24 fps. Below that, the eye and ear merge the two streams. Above 40 ms, lip movement starts to look detached from speech, and viewers report the video feels off without always knowing why. Always check sync at the frame level on dialogue-heavy footage.
Can I sync audio and video on a phone or tablet?
iMovie on iPad supports detached audio editing, which is enough for short clips with a clear waveform. For longer shoots, edit on a desktop. Mobile editors are not built for multi-camera sync, and screen size makes frame-level waveform alignment unreliable.

Apps Crashing After iOS 27 Update? Fix Order (2026)
Apps crashing after the iOS 27 update? Update the app in the App Store first, then offload and reinstall to clear stale cache, then restart. The fix order.

Do AI Translation Earbuds Work Offline? What to Know
Do AI translation earbuds work offline? A few do with downloaded language packs, but most need the cloud. Here's what works offline and what you give up.

How to Set Up Translation Earbuds (Pairing and Modes)
How to set up translation earbuds: charge, install the app, pair over Bluetooth, pick two languages, and choose a mode. A step-by-step first-use guide.

Translation Earbuds Not Translating? How to Fix Them
Translation earbuds not translating? Usually it's the app, the internet, or the language settings. Here's how to fix pairing, sound, and lag fast.