How to Access and Configure Surface Book 3 BIOS/UEFI
Access Surface Book 3 BIOS/UEFI settings to change boot order, set passwords, and manage security. Step-by-step instructions for all Surface models.
Quick AnswerShut down your Surface Book 3, hold the Volume Up button, then press Power. Release Volume Up when the Surface logo appears to enter UEFI/BIOS settings.
Your Surface Book 3 uses UEFI firmware instead of legacy BIOS, but Microsoft still calls the setup screen “Surface UEFI.” The standard entry path is the Volume Up plus Power button sequence while the device is fully shut down.
Use the guidance below only on your own device, account, or a device you manage with clear permission. Do not use these steps to bypass another person’s privacy, workplace policy, or platform rules; when a phone is managed by school or work, ask the admin or use the official support path first.
- Hold Volume Up plus press Power while the device is off to reach UEFI settings
- The Surface Book 3 UEFI lets you change boot order, disable hardware, and set admin passwords
- TPM 2.0 stores BitLocker keys in dedicated hardware that Windows and apps can’t read
- Secure Boot blocks unsigned bootloaders and is required by Windows 11 minimum specs
- UEFI passwords accept 4 to 20 characters using only letters and numbers
#How Do You Enter BIOS on a Surface Book 3?
Microsoft’s Surface devices ditched the old BIOS years ago. They use UEFI (Unified Extensible Firmware Interface), which handles the same job with a graphical menu, mouse support, and faster boot times. The entry method works the same across every Surface Book model.
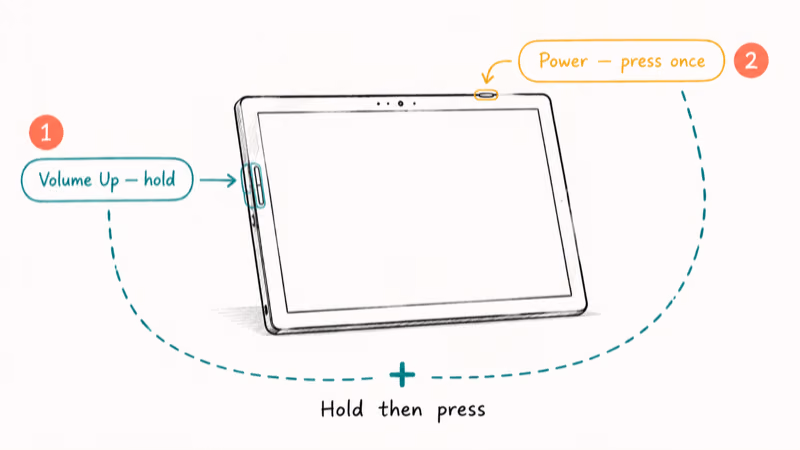
Here is the exact sequence:
- Shut down your Surface Book 3 completely. If it’s frozen, hold the Power button for a full 10 seconds until it powers off.
- Press and hold Volume Up on the tablet section.
- While still holding Volume Up, press the Power button once and let go of Power only.
- Keep holding Volume Up until the Surface logo appears, then release.
The UEFI screen loads within a few seconds. According to Microsoft’s Surface UEFI guide, the button positions differ by model: Surface Book and Surface Pro use Volume Up plus Power, while Surface Laptop models use F6 instead. The same Microsoft page confirms the menu layout split: Surface Pro 4 and later (including Surface Book 3) use the newer left-side tabbed interface, while Surface Pro 3 still uses the older single-screen design.
Surface UEFI supports keyboard and trackpad input when the keyboard base is attached. If your Surface keyboard isn’t working, you can still reach UEFI using only the tablet’s physical buttons. Detach the keyboard and use the volume rocker plus power button directly.
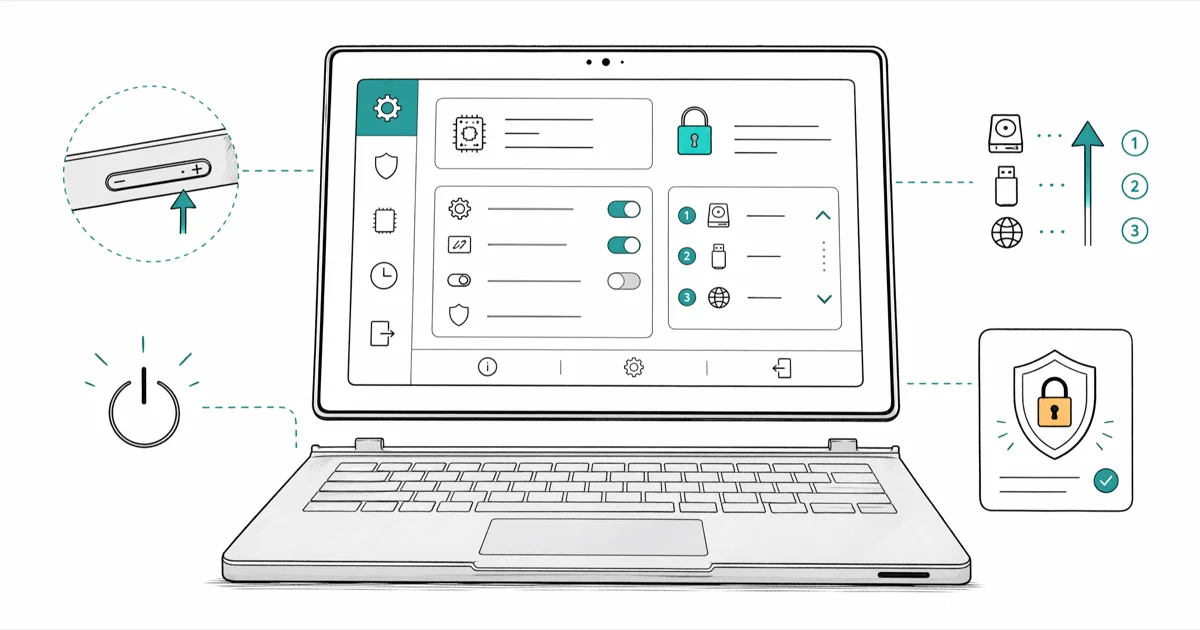
#Surface UEFI Configuration Options
The UEFI menu on the Surface Book 3 has several configuration tabs. Each one controls a specific layer of firmware behavior.
#Device Information
This tab shows your Serial Number, System UUID, and Asset Tag. It’s read-only and useful for warranty claims and asset inventory.
#Boot Configuration
The boot order tells your Surface Book 3 which device to start from first. The default is SSD only, which boots straight from the internal drive. You can switch the order to Network > USB > SSD if you need to boot from a USB recovery drive or PXE network source for troubleshooting or a clean OS install.
Changing boot order is the standard prep step for installing a fresh copy of Windows from a USB recovery drive. Microsoft’s Surface UEFI management documentation states that the supported boot sources on Surface Book 3 are limited to internal SSD, attached USB storage, and IPv4/IPv6 PXE network. Thunderbolt boot is not exposed in UEFI for security reasons. Most users should leave the default SSD-only setting unless they have a specific reason to change it.
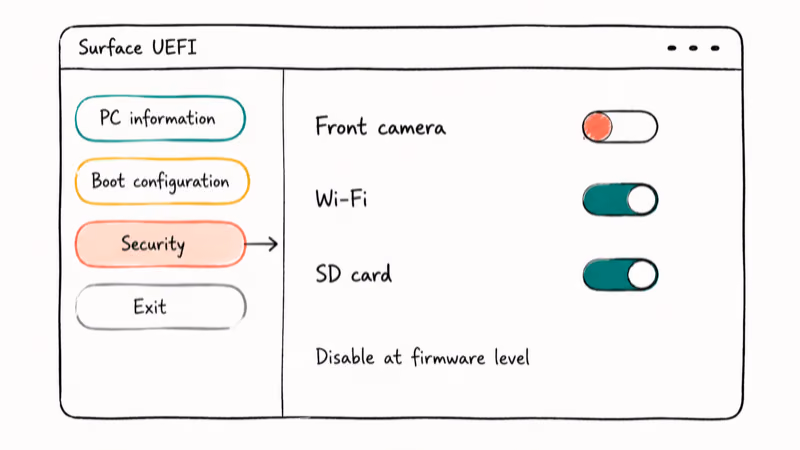
#Security Settings
The Advanced Device Security tab lets you disable hardware components: Side USB, Front Camera, Rear Camera, Wi-Fi, Bluetooth, and the SD card reader. IT administrators rely on these toggles to lock down corporate devices.
Disabling hardware at the UEFI level is more secure than turning it off in Windows because the component does not appear in Device Manager at all, and no regular user can re-enable it without the UEFI admin password. When a camera, wireless radio, or port is disabled in UEFI, Windows treats that component as unavailable after reboot.
#TPM: Hardware-Level Security on Surface Book 3
TPM (Trusted Platform Module) is a security chip soldered onto your Surface Book 3’s motherboard. It stores encryption keys, passwords, and digital certificates in dedicated hardware that is isolated from Windows and your apps.
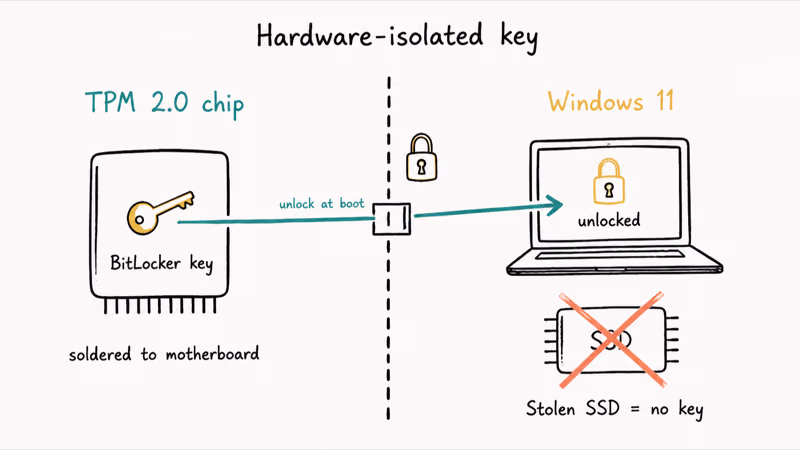
Here is how it works in practice. When you power on, the TPM provides a cryptographic key to unlock your encrypted drive. Stolen SSD pulled from the laptop? Won’t boot, because the TPM key stays with the original motherboard.
According to Microsoft’s Windows 11 specifications, the OS requires TPM 2.0 as a minimum hardware requirement, and the Surface Book 3 ships with TPM 2.0 already enabled. If you use BitLocker, the TPM handles key management automatically, so you don’t need a separate boot password.
The TPM also monitors firmware integrity. If it detects unauthorized changes to your device’s startup code, the Surface Book 3 boots into recovery mode instead of loading a potentially compromised system. According to Microsoft’s TPM overview, TPM 2.0 includes a Platform Configuration Register (PCR) that records cryptographic measurements of every boot-time component, and BitLocker uses these PCR values to detect tampering before unsealing the drive key.
If you’re dealing with Windows errors like the Bad Pool Caller blue screen, those are software-level problems unrelated to TPM and won’t be fixed by toggling firmware settings.
#How Does Secure Boot Protect Your Device?
Secure Boot verifies that every piece of software loaded during startup is digitally signed by a trusted authority. Before Secure Boot existed, the legacy BIOS would hand control to whatever bootloader it found on the hard drive — including malware that hid in the boot sector.
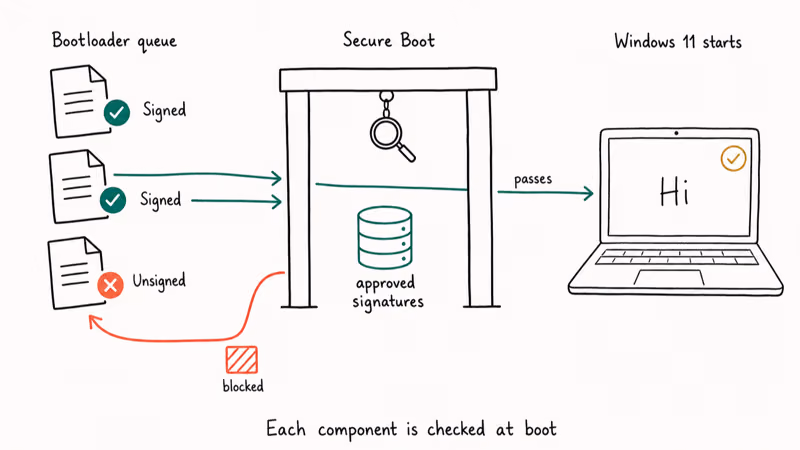
With Secure Boot enabled, the UEFI firmware checks each startup component against a database of approved signatures. No valid signature, no execution.
Keep Secure Boot turned on unless you need to run a Linux distribution that lacks signed shim support, or you depend on specialized software with unsigned drivers. According to Microsoft’s Secure Boot OEM guidance, all Surface devices ship with Secure Boot enabled by default, and the UEFI signature database is populated with Microsoft, Microsoft Corporation UEFI CA, and OEM keys at the factory. For the average user, disabling Secure Boot creates more problems than it solves.
If you have been troubleshooting Windows issues like error 0x8007042c or other system service problems, Secure Boot is not usually the cause. Those errors come from Windows services, not firmware settings.
#Setting a UEFI Password on Surface Book 3
An Administrator Password in UEFI prevents anyone from changing firmware settings without authorization. It’s useful for shared devices, kiosks, and company-owned hardware where you don’t want users tampering with boot order or security toggles.
To set the password:
- Enter UEFI mode using the Volume Up plus Power method.
- Select Administrator Password from the settings menu.
- Enter a password between 4 and 20 characters, using only letters and numbers (no symbols or spaces).
- Confirm the password and save your changes before exiting.
Once set, you’ll need this password every time you open UEFI settings. Forget it? You’ll have to contact Microsoft Support directly because there’s no self-service reset path. The same Microsoft Surface UEFI guide we cited earlier confirms that, on Surface devices, a forgotten UEFI admin password requires a service replacement of the motherboard rather than a CMOS reset like older PCs.
This password is separate from your Windows login, and it only guards the firmware menu, not the Windows desktop. If your keyboard has issues on Windows 10, plug in an external USB keyboard or use the on-screen keyboard before rebooting into UEFI; the on-screen keyboard does not work inside the UEFI menu itself.
#Troubleshooting UEFI Entry Problems
If the Volume Up plus Power method doesn’t work, the most common cause is an incomplete shutdown. Sleep and hibernation won’t let you in. Hold the Power button for 15 seconds to force a hard shutdown, then try again.
Battery level matters too. Below 10 percent, your Surface Book 3 may refuse to enter UEFI as a safeguard against mid-config power loss. Plug in the charger first.
Still stuck? Use the Windows-based path: Settings > System > Recovery > Advanced startup > Restart now, then on reboot pick Troubleshoot > Advanced options > UEFI Firmware Settings. This bypasses the physical buttons entirely and works even if your volume rocker is damaged.
System corruption can also block UEFI entry. If you’ve been wrestling with deleted Windows update files or stale firmware payloads, fixing those inside Windows first often resolves the symptom.
#Bottom Line
For most Surface Book 3 owners, the only reason to enter UEFI is to change boot order before installing Windows from USB. Use the Volume Up plus Power combo while the device is fully shut down. Leave Secure Boot and TPM enabled — they’re required by Windows 11 and protect BitLocker keys.
Skip the Administrator Password unless your device is shared or company-owned, because there’s no self-service reset path if you forget it. If you’re reinstalling Windows, switch to Network > USB > SSD boot order temporarily, then revert to SSD only after install completes.
#Frequently Asked Questions
What is the difference between BIOS and UEFI?
BIOS is the older firmware standard PCs used before roughly 2012. UEFI replaced it with a graphical menu, mouse and trackpad input, faster boot times, support for drives larger than 2 TB through GPT partitioning, and per-component security features like Secure Boot. The Surface Book 3 uses UEFI exclusively, but people still call it “BIOS” out of habit because the entry-point and purpose are the same.
Can you access UEFI settings while Windows is running?
Yes. Go to Settings > System > Recovery, then click “Restart now” under Advanced startup. After the reboot, select Troubleshoot > Advanced options > UEFI Firmware Settings.
Will changing UEFI settings void my warranty?
No. Microsoft designed Surface UEFI to be fully user-configurable.
How do you reset UEFI settings to default on Surface Book 3?
Open the UEFI menu and look for “Exit” or “Restore defaults.” Select it, confirm the prompt, and your device reverts every setting to factory values, including boot order and security toggles. Your files and Windows installation stay untouched.
Does the Surface Book 3 support booting from USB?
Yes, but you have to change the boot order first. Set it to “Network > USB > SSD” in UEFI, insert your bootable USB drive, and restart. The USB drive needs FAT32 or NTFS formatting and a valid UEFI bootloader. Older legacy MBR-only USB drives won’t be recognized because the Surface Book 3 firmware does not include a Compatibility Support Module for legacy BIOS booting.
What happens if you disable Secure Boot?
Your Surface Book 3 will load unsigned operating systems and drivers, which some Linux distributions still require. The tradeoff is real: your device becomes vulnerable to bootkit malware that loads before Windows starts, meaning antivirus software can’t catch it. Re-enable Secure Boot anytime if you change your mind.
Can you update Surface UEFI firmware?
Yes. Updates ship through Windows Update.
Is it safe to disable TPM on Surface Book 3?
Disabling TPM removes hardware-level encryption support. If you use BitLocker, this locks you out of your encrypted drive permanently unless you have the recovery key saved elsewhere. Back up your BitLocker recovery key to your Microsoft account before making any TPM changes. Most users should never touch this setting.

Bluetooth Not Working on Snapdragon X? Fixes for 2026
Bluetooth not working on your Snapdragon X Copilot+ PC? Generic audio, mice, and keyboards work, but vendor apps often lack an ARM build. Fixes inside.

Docker Desktop and WSL2 Not Working on Snapdragon X? Fix It
WSL2 runs fine on Snapdragon X, but Docker Desktop ARM is Early Access and throws WSL errors. Use WSL2 plus native ARM64 Ubuntu and Docker Engine.

Does iTunes Work on Snapdragon X? ARM Windows 11 Guide
Yes, iTunes runs on Snapdragon X laptops through Prism emulation, but the Apple Devices app is the smoother route. Here is what to install on ARM.

Does OBS Studio Work on Snapdragon X? ARM64 Build Guide
Yes, OBS Studio has an experimental ARM64 build since version 31.1, but x64 plugins won't load and hardware encoding is missing. Here is what works.