How to Save Images from Google Docs: 6 Methods That Work
Save images from Google Docs in 6 proven ways: right-click to Keep, Publish to Web, HTML download, add-ons, and screenshots. A clear step-by-step guide.
Quick AnswerRight-click an image and pick "Save to Keep," then right-click the image in the Keep sidebar and choose "Save Image As." For every image at once, use File > Download > Web Page (.html, zipped) and open the "images" folder inside the unzipped archive.
Google Docs hides a frustrating gap: there’s no “Save Image” button. There are six reliable ways to pull images out of a Google Doc, from a 5-second right-click to a full HTML export, and each one fits a different situation. Pick the method that matches what you’re trying to do, not the first one that comes to mind.
Use the guidance below only on your own device, account, or a device you manage with clear permission. Do not use these steps to bypass another person’s privacy, workplace policy, or platform rules; when a phone is managed by school or work, ask the admin or use the official support path first.
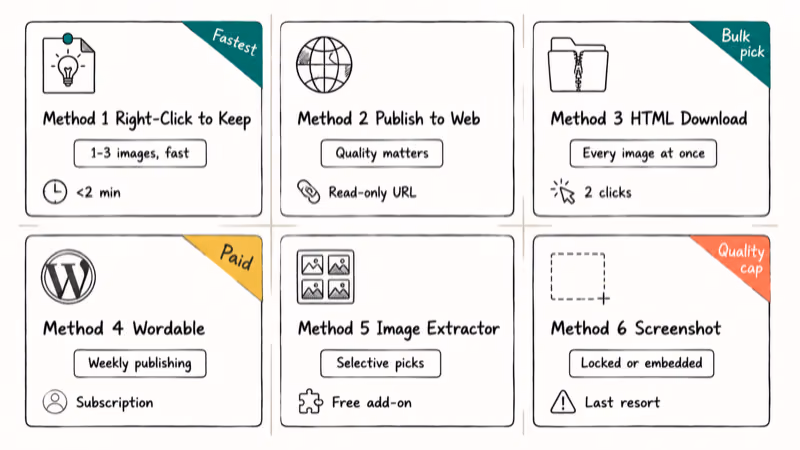
- Right-click and “Save to Keep” is the fastest way to grab a single image and finishes in well under a minute.
File>Download>Web Page(.html, zipped) extracts every image at once into an “images” subfolder you open after unzipping.- Publish to the Web is the cleanest option when you want to copy images out without touching the original document.
- Screenshots are last-resort only; they downsample to your screen’s pixel density and lose any resolution above that.
- Rename files with 3-5 lowercase keywords joined by hyphens before uploading; CMS search and image search both reward descriptive filenames.
Important: These methods apply to your own Google Docs, files you’ve been given edit access to, or images you have explicit permission to reuse. Saving copyrighted or private images without permission can violate copyright law or privacy rules.
#When Should You Save Images from a Google Doc?
You’d want a local copy any time you need the image outside of Docs. Common cases include republishing on a blog, sending finals to a designer, archiving for a client folder, or pasting into a slide deck or print layout.
The right method depends on three things: image count, output resolution, and whether the original doc has to stay untouched.
#Method 1: Right-Click and Save to Google Keep
This is the fastest single-image method, and it’s the one to reach for when you only need a picture or two and don’t want to touch the document’s sharing settings. The first save can take a moment while the Keep sidebar loads, and each image after that goes faster.
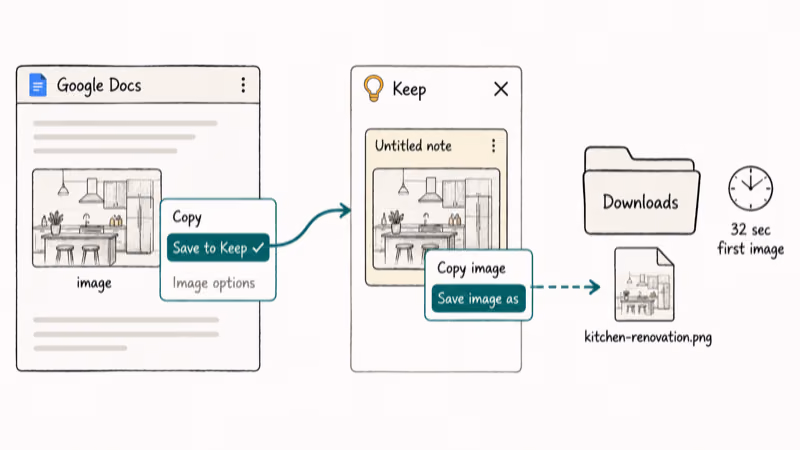
Right-click any image inside the doc and pick Save to Keep. A Keep sidebar slides in from the right with the image attached to a fresh note.
Right-click the image inside that Keep note and choose Save Image As, then pick a folder and rename the file before saving, since a descriptive name like team-photo.png is far easier to find later than the random string Keep assigns by default and it also helps if you plan to reuse the file on a website.
According to Google’s Keep help center, saved attachments stay tied to their originating note and sync to every signed-in device until you delete them, so we recommend cleaning up temporary Keep notes once the local files are downloaded.
The big advantage: nothing about the doc gets modified or shared. Use this when you need 1 to 3 images and want to be done in under 2 minutes.
#Method 2: Publish to the Web for High-Quality Exports
Publishing to the web exposes your doc as a read-only public URL. From that public page you can right-click any image and use the browser’s native Save Image As option, which preserves the embedded resolution rather than the smaller display size. The original document stays exactly as it was.
Open the document, then go to File > Share > Publish to web and click Publish. Copy the link, paste it into a new browser tab, then right-click any image and pick Save image as to download. When you’re done, return to the Docs menu and click Stop publishing to revoke the public URL.
Google’s Publish to Web documentation confirms that publishing creates a separate read-only link without changing your editing rights or the document’s sharing permissions, and revoking it makes the URL stop resolving immediately on Google’s side.
Pick this method when image quality matters more than speed, or when collaborators shouldn’t see the file modified.
#Method 3: Download the Doc as HTML to Get All Images at Once
For bulk extraction, an HTML export is the cleanest path. Even a long document with dozens of inline images downloads almost instantly, and the unzipped folder holds every image as a clean PNG.
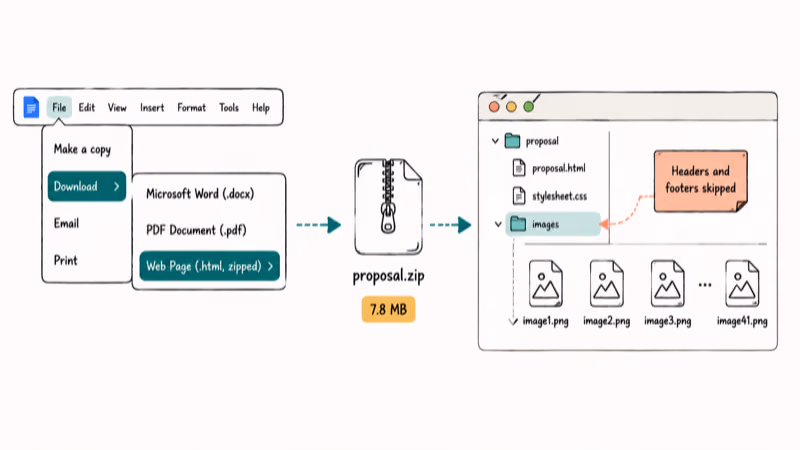
Go to File > Download > Web Page (.html, zipped) and save the archive. Double-click to unzip on macOS, or right-click and pick Extract All on Windows. Inside the unzipped folder you’ll see an images subfolder containing every body image numbered sequentially: image1.png, image2.png, and so on.
Rename them. Filenames like image3.png are useless for SEO and useless for finding the right file in a month.
Google’s SEO image best practices guide recommends descriptive lowercase filenames with hyphens between words because the file path itself is one of the signals Google Images uses to understand the picture, alongside alt text and surrounding context.
One catch: only inline body content lands in the images folder. Headers, footers, and decorative backgrounds get skipped. If you only need a handful out of 50, jump to Method 5 instead, which lets you preview and pick before downloading any file at all.
#Method 4: Use Wordable to Send Images Straight to WordPress
Wordable connects Google Docs to WordPress, Medium, and HubSpot, uploading every image with original filenames intact.
Install it from Extensions > Add-ons > Get add-ons.
Click Extensions > Wordable > Open Wordable, sign in, then pick the destination site and click Export. Your first export verifies the WordPress credentials; later runs are one click. Images upload in parallel, so a doc with 40 images publishes in roughly the same wall-clock time as a doc with 5, which is the entire point of paying for the tool.
Trade-offs to weigh: Wordable charges a monthly subscription, and it locks you into its supported destinations. If you publish a long-form post a week, the time savings stack up quickly. If you only need to grab images twice a year, stick with Method 3.
#Method 5: Image Extractor Add-On for Selective Picks
Incentro’s Image Extractor add-on is a free Google Workspace add-on that lists every image in your doc as a thumbnail and lets you download them individually or in batches.
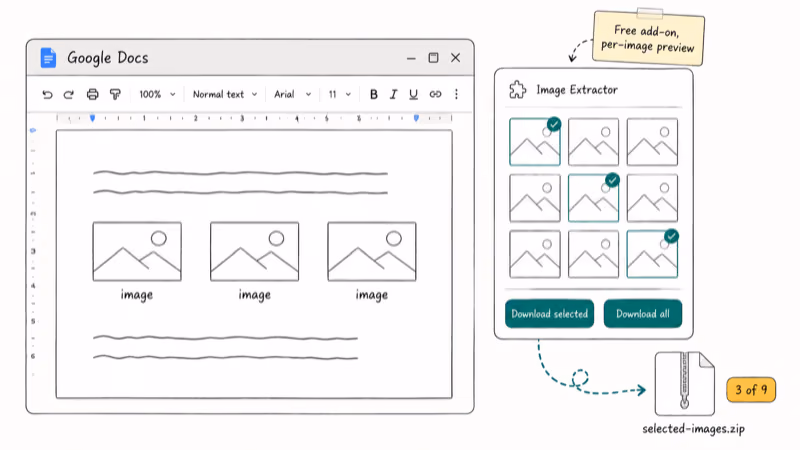
Install it from Extensions > Add-ons > Get add-ons and search for Image Extractor. Open it from Extensions > Image Extractor > Start. The sidebar populates with thumbnails. Click any thumbnail to download just that image, or shift-click multiple thumbnails and pick Download selected to get a zip.
This is the right fit when you have a 50-image catalog and need 8 specific ones. It’s slower than Method 3 for everything, but faster than Method 1 for selective work.
#Method 6: Screenshot as a Last Resort
If an image is locked, embedded as a watermark, set as a page background, or stuck inside a table that blocks the right-click menu, the other methods all break. A screenshot captures whatever is visible on screen and turns it into a local PNG.
Press Shift + Command + 4 on Mac and drag a selection. On Windows 11, press Windows + Shift + S to open the Snipping Tool overlay.
According to Microsoft, Windows 10 version 1809 introduced the Windows + Shift + S shortcut. Windows 11 keeps it as the default capture path. See the full Snipping Tool support article for the keyboard map, save formats, and timer options.
The catch: a screenshot is limited to your monitor’s pixel density. If the original image is 4000 pixels wide and your monitor displays it at 800, you save 800 and the rest is gone. For more on resolution preservation, see this resize and optimize images guide.
If your work account blocks screen capture entirely, that’s an MDM policy issue. We’ve covered the security-policy screenshot block separately.
#Which Method Should You Use?
Match the method to the job. For one image you’ll be done with in two minutes, use Method 1: the right-click flow is the fastest way to get a clean PNG out of Docs without modifying the file. For every image in a doc, use Method 3, since the HTML download takes one menu pick and gives you a folder full of PNGs ready for renaming.
Method 2 is the right call when you want a clean read-only copy and care about resolution. Publishing to the web preserves the embedded resolution and lets you walk away without changing the doc.
For repeat WordPress publishing more than once a week, Wordable (Method 4) pays for itself in saved upload time. Method 5 is the surgical option: when you need 8 specific images out of a 50-image catalog, only the Image Extractor sidebar gives you per-image previews before download.
Method 6 is for locked or embedded images, full stop. Screenshots are last resort, but they’re sometimes the only resort.
#Common Save Failures and Fixes
Several patterns explain why a given image refuses to download.
The right-click menu is missing the Save to Keep option. This happens when the doc is opened from a non-Google account, when an admin policy disables Keep integration, or when the image was inserted as a Drawing rather than an image. Switch to Method 2 and grab it from the published version instead.
The HTML export skipped your image. Header, footer, and certain table-cell images don’t always appear in the images folder, because the HTML export prioritizes body content. Move the image inline, re-download, and put it back afterward. Sheets users running into related export issues can check our Google Sheets row freeze guide for similar workarounds.
The image looks blurry after saving. Almost always Method 6. Switch to Method 1 or Method 3.
Right-click works but Save to Keep doesn’t. When right-click is blocked but the HTML export still includes the image, run Method 3 once and pull the file you need out of the images folder. If you also work with Google Drive video files, the same export-then-extract pattern applies for embedded media.
Headers and footers won’t export at all. This is a documented limitation. The HTML export only includes inline body content, so any header image, footer image, or watermark embedded into the page furniture will be missing from the images folder no matter how many times you re-run. Workaround: edit the header to temporarily move the image into the body, run the export, then put it back. To clean up afterward, see our Google Docs header deletion guide.
#Bottom Line
For a single image, use Method 1 (right-click to Keep). It’s the fastest path and leaves the doc untouched. For every image at once, use Method 3 (HTML download) because nothing else gets you a clean folder of PNGs in two clicks.
If you publish from Google Docs to WordPress more than weekly, Wordable’s monthly tier is the only method that scales without manual uploads. For everyone else, Methods 1, 2, and 3 cover 95% of real cases.
Always rename saved files before uploading. kitchen-renovation-before.png ranks. image1.png doesn’t and never will.
#Frequently Asked Questions
What’s the fastest way to save a single image?
Right-click the image, pick “Save to Keep,” then right-click the image in the Keep sidebar and choose “Save Image As.” The whole sequence takes under a minute on a typical broadband connection.
Can I save Google Docs images on my phone?
Yes. Long-press an image in the Google Docs mobile app and tap the Keep button; Keep then saves the image to your camera roll. HTML downloads and add-ons are desktop-only.
Why are my saved images low-quality?
You’re almost certainly using Method 6 (screenshot), which caps quality at your screen’s pixel density. Method 1 (right-click to Keep), Method 2 (Publish to Web), and Method 3 (HTML download) all preserve the embedded resolution. Switch to one of those for high-quality output. If your monitor is 1080p but the embedded image is 4K, only the export-based methods give you the full resolution.
Can I save every image without unzipping?
Not with the built-in tools. The HTML export ships as a zipped archive because Google Docs bundles the HTML, CSS, and image files together; the unzip step is required to access the images subfolder. Wordable (Method 4) is the only option that delivers files without unzipping, but it sends them to WordPress rather than your local disk.
Why did some images skip the HTML export?
Header images, footer images, watermarks, and certain table-cell images don’t always make it into the images folder. The HTML export prioritizes body content. Move the image inline before exporting and you’ll get it in the archive.
Do any of these methods cost money?
Methods 1, 2, 3, and 6 are completely free and built into Google Docs and your operating system. Method 5 (Image Extractor add-on) is also free. Method 4 (Wordable) starts at a paid monthly subscription after the free trial. Pick the paid option only if you publish image-heavy content from Docs to WordPress regularly.
Is it legal to save images from any Google Doc?
Only when you own the doc, have explicit permission from the owner, or the doc is licensed for reuse. Saving images from a private or copyrighted doc you don’t own can violate copyright or privacy rules. When in doubt, ask the doc owner before exporting.

Best Apple Watch Band for Working Out: Proven Picks
The best Apple Watch band for working out handles sweat and stays put on your wrist. Compare silicone, nylon, and titanium picks for runs and lifts.

Best Apple Watch Bands: Proven Picks by Size and Style
The best Apple Watch bands depend on your case size group first, then your use. Compare silicone, nylon, stretchy, and steel picks for the right fit.
Best Charger for Google Pixel 10 Pro: PPS Picks 2026
The best charger for Google Pixel 10 Pro needs PPS. A 30W brick covers the 10 and 10 Pro; the Pro XL wants 45W. Four PPS picks compared here.
Best Charger for Samsung Galaxy S25 Ultra: 45W PPS Picks
The best charger for Samsung Galaxy S25 Ultra needs PPS to hit a full 45W. Compare four PPS picks and learn why most 45W chargers fall short here.