How to Remove Glare from a Photo: 7 Methods That Work
Remove glare from any photo with 7 fixes that work: Lightroom Dehaze, Photoshop healing, Snapseed, Google Photos, GIMP, AI tools, plus prevention tips.
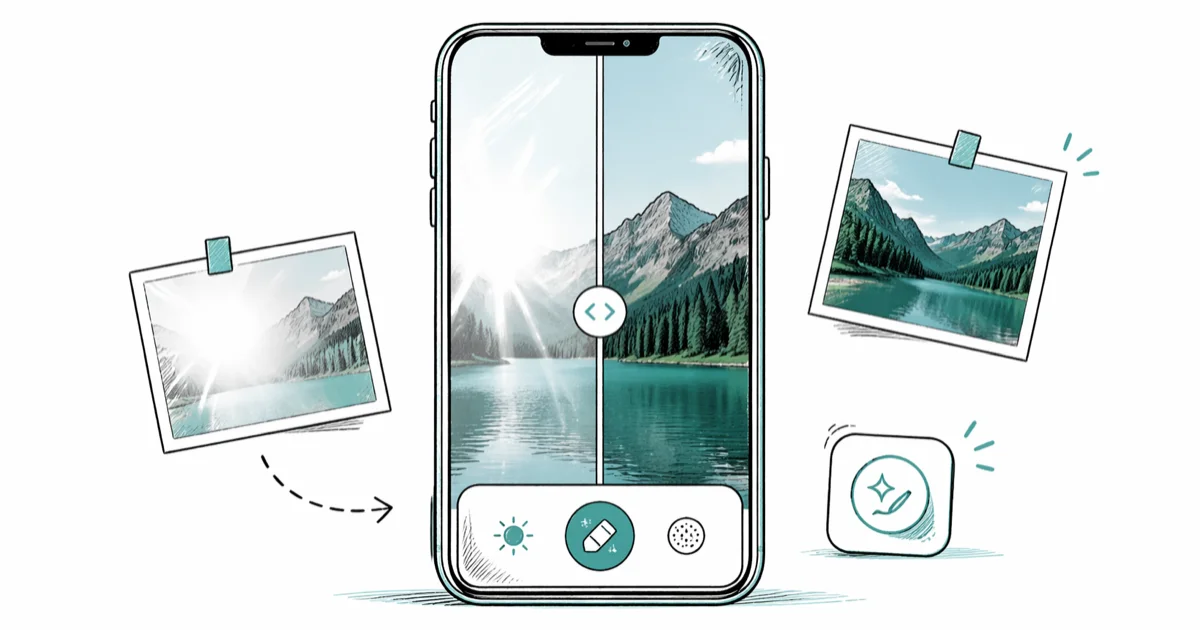
Quick AnswerFor mild glare, drop Highlights to -100 and Whites to about -50 in Lightroom or the iPhone Photos editor. For hard reflections on glass or glasses, use Photoshop Spot Healing Brush or Snapseed Selective. A circular polarizing filter prevents most glare at the lens.
A bright reflection on glasses, a window, or a polished car can wreck an otherwise good shot. Seven editing paths on iPhone, Android, and desktop tackle glare, and they vary widely in which ones recover real detail and which only trade glare for a smudgy mess.
Lightroom and Photoshop still win on hard cases. Free tools like Snapseed and Google Photos handle most everyday photos without a subscription. Prevention beats every editor: a $40 polarizer kills the problem at the lens.
- Mild glare on highlights usually clears with Highlights -100 and Whites about -50 in any editor with raw-style sliders.
- Hard-edge glare on glass or glasses needs healing or clone tools. Photoshop Spot Healing Brush, Snapseed Selective, or Lightroom mask plus brush all work.
- A circular polarizing (CPL) filter prevents most glass and water reflection before the shutter clicks. Angle the lens roughly 35-45° to the surface for the strongest cut.
- Google Photos Magic Eraser (Pixel and Google One subscribers) removes small bright spots in a tap, but smears textures bigger than a thumbnail.
- For glasses-glare in portraits, the cleanest fix is the photographer trick: shoot a second frame without glasses and composite the eye area in Photoshop or Affinity Photo.
#What Actually Causes Glare in a Photo?
Glare is the camera sensor receiving too much specular reflection: light that bounces off a smooth surface at the same angle it arrived. Glasses lenses, shop windows, water, screens, polished metal, and wet pavement all act like partial mirrors. When that reflection lands inside the lens at the right angle, you get blown-out highlights, color veiling, or a hard bright shape sitting on top of the subject.
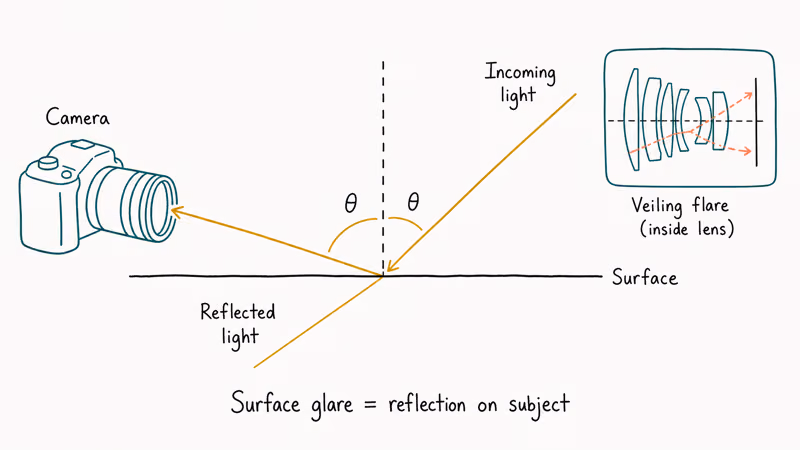
Across the common glare types (window glare, sun flare, glasses reflection, water reflection, and screen reflection), each one needs a different tool, so it pays to identify the type first. In-lens reflections between glass elements cause veiling flare that lifts shadows and washes out contrast across the whole frame. Surface glare is different: it lives on a specific spot in the scene.
Knowing which one you have changes the fix. Lens flare lives in the photo’s contrast curve. Surface glare lives in a localized hot spot that you can usually circle with a brush.
#Prevention: Stop Glare Before You Press the Shutter
Prevention is faster than every editor on this list. Three preventative moves cover most shoots.
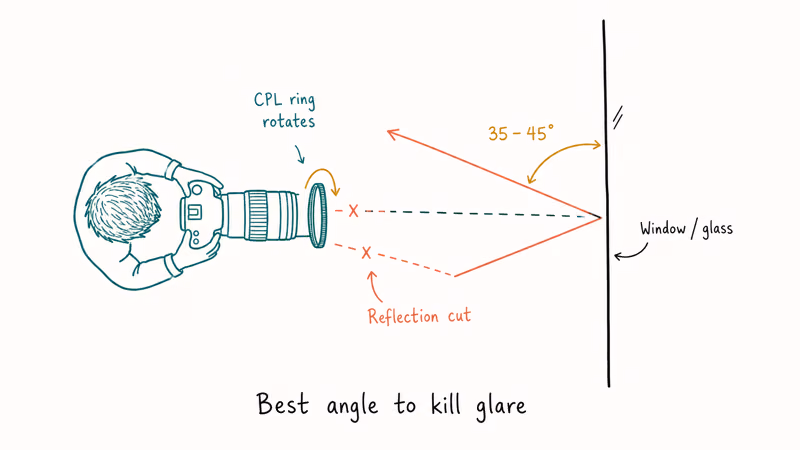
A circular polarizing filter screws onto the front of a DSLR or mirrorless lens and physically blocks reflected light at certain angles. Rotate the ring while looking through the viewfinder until the reflection drops out.
B&H Photo’s polarizing filter buying guide covers the optics in detail. Rotating the CPL ring cuts the visible reflection most at roughly a 35° angle to the glass. On phones, clip-on CPL filters from Moment or Sandmarc do the same job for around $50.
Changing your angle to the reflective surface costs nothing. Stand so the surface sits roughly 35-45° from your line of sight rather than head-on. Light bouncing off a window directly into your lens will move out of frame the moment you step left or right. For glasses portraits, asking the subject to tilt their chin down a few degrees usually pushes the reflection above the eye line.
When the glare comes from your own flash, kill the on-camera flash and bounce a light off a wall or ceiling. Direct flash on a glossy face or shiny package is the most preventable kind of glare in this list.
#Removing Glare on iPhone with the Photos App
The built-in iPhone Photos app handles softer glare without a third-party download, and it works the same way on every iPhone going back to the iPhone 8 running iOS 13. Open the photo, tap Edit, then drag Highlights to -100 and Whites down until the bright patch stops looking blown out, usually around -40 to -60. The slider response on newer A15 and A17 chips is faster, but the math is identical.
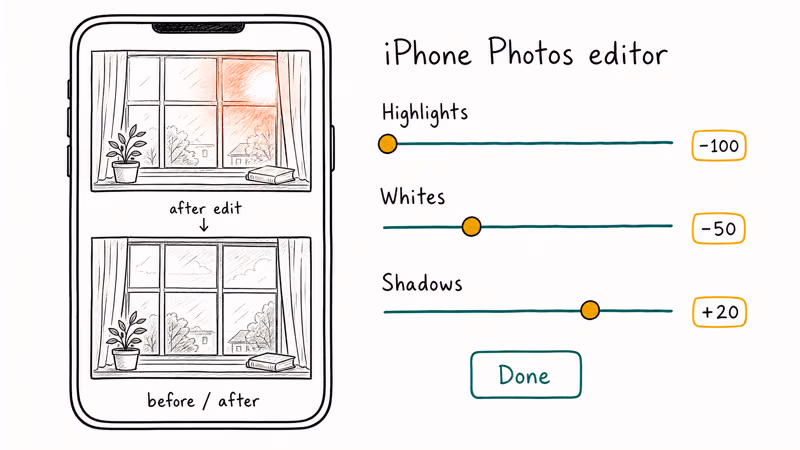
If the underlying detail is still there, this single move recovers most of it. Drop Brightness slightly and bump Shadows to keep the rest of the image from going dark.
Apple’s Photos editing guide walks through the full slider list, including Black Point, Contrast, and the Selective Color tool that lets you desaturate a specific reflected color. Highlight recovery works best on a photo captured in HEIF. According to Apple, the format keeps about 2 stops more highlight headroom than equivalent JPEG.
If your iPhone is set to “Most Compatible” instead of “High Efficiency,” your edits will have less room to recover.
When you finish, tap Done. iPhone edits are non-destructive. Revert restores the original at any time. If you also need to fix dark patches in the same shot, our iPhone shadow-removal walkthrough covers the inverse problem.
#Glare Removal on Android Phones
Google Photos is the default on most Android handsets and the easiest editor to start with. Open the image, tap Edit, then look at three places.
The Tools tab has a sliders panel where Highlights and Whites work the same way as on iPhone. Drop both until the bright patch stops looking pure white. The HDR effect under Suggestions sometimes recovers detail in a single tap by intelligently re-tone-mapping the image. Try it before manual sliders.
If you have a Pixel phone or pay for Google One, Magic Eraser appears under Tools. The Google Photos Magic Eraser support page walks through how to brush over distractions you want gone.
Magic Eraser clears a small sun glint, like one on a car door, in a single tap. Anything larger than a thumbnail gets smeared because the AI is filling in texture from the surrounding pixels. Treat it as a spot tool, not a global glare fix.
For glare that needs more control, install Snapseed (free, Google-owned). The Selective tool lets you tap directly on the bright area and pull Brightness down only on that spot.
On a glasses-reflection portrait, Snapseed recovers the eye behind the lens cleanly enough to publish, where Magic Eraser tends to smear the iris into a flat patch.
#Lightroom Dehaze for Atmospheric and Soft Glare
Adobe Lightroom (mobile or desktop) has the strongest globally adjustable controls for soft glare and haze. The Dehaze slider, introduced in Lightroom CC and Camera Raw 9.1, increases local contrast in low-contrast regions. That is exactly what veiling flare destroys.
A reliable recipe for a hazy or sun-flared landscape:
- Highlights: -100
- Whites: -30 to -50
- Dehaze: +20 to +40
- Texture: +10 (restore micro-detail Dehaze flattens)
- Shadows: +20 (offset the global darkening)
According to Adobe’s local corrections help page, Dehaze can also be applied as a local adjustment via the Brush or Linear Gradient. That is useful when only one corner of the photo is glare-hit. Apply +30 Dehaze with a soft-edged brush over the affected area and leave the rest of the image alone.
Lightroom’s masking is where you graduate from “good enough” to clean. Use the Subject mask to invert and adjust only the background, or paint a Brush mask on the glare patch and lower its Exposure by -1.5 stops. The same masking approach drives our Lightroom background-blur tutorial. The workflow is identical; only the slider you push changes.
#Photoshop Healing, Patch, and Content-Aware Fill
For hard-edge glare on glasses, screens, or polished surfaces, Photoshop is still the strongest tool. Three approaches in order of effort.
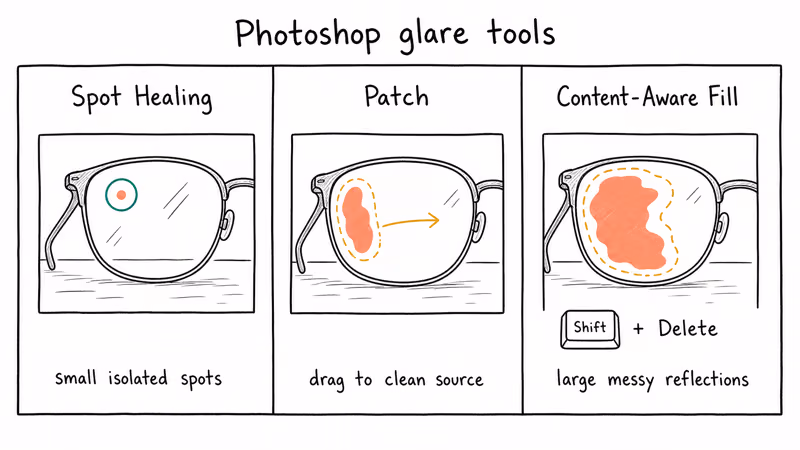
Spot Healing Brush in content-aware mode handles isolated hot spots. Set the brush slightly larger than the glare, click and drag once, and Photoshop samples surrounding pixels.
Adobe’s Spot Healing Brush documentation explains that the content-aware option synthesizes new pixels rather than copying a sample, which is why it handles textures like skin and fabric better than the older Proximity Match algorithm did. Verify your brush is in the correct mode before clicking, or you’ll get a duplicated patch instead of a smooth blend.
Patch tool works for larger reflections that have a clean source area nearby. Lasso the glare, drag the selection onto a clean part of the image with similar texture, and release. Photoshop blends the edges automatically.
Content-Aware Fill is the heaviest hammer. Make a rough selection around the glare, press Shift+Delete, choose Content-Aware, and let Photoshop figure it out.
For complicated backgrounds (foliage, water), Generative Fill in Photoshop Beta produces cleaner results than classic Content-Aware. Cost: a Creative Cloud subscription with generative credits.
If the glare is on a face and not on the eyes, the Camera Raw filter inside Photoshop gives you Lightroom’s slider toolkit on a single layer. Layer mask the result so the correction only applies to the affected area. The same logic drives our photo-compositing walkthrough on inserting a person into another picture. The compositing principle (mask, blend, iterate) is the same.
#How Do You Remove Glasses Glare in a Portrait?
Glasses glare is the hardest case because the glare often covers the eye, the focal point of the portrait. Three options.
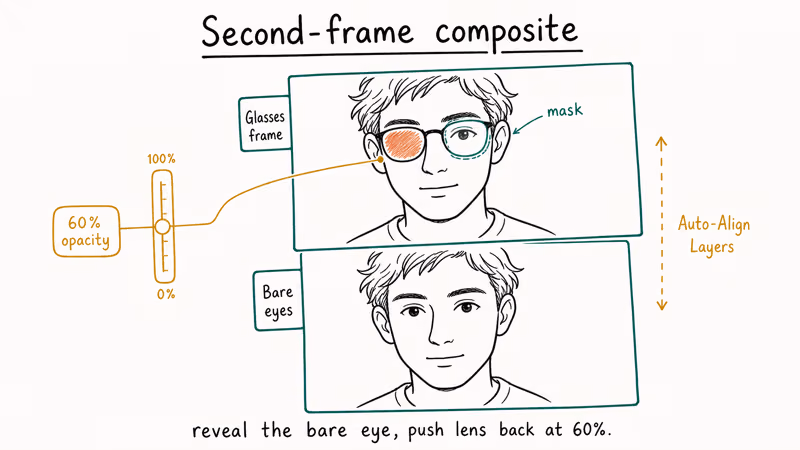
The cleanest fix is the photographer trick: take a second frame in the same pose with the subject’s glasses removed, then composite the bare eyes over the glare.
Open both images as layers in Photoshop, align them with Edit > Auto-Align Layers, mask the glasses-frame layer to reveal the bare eyes, then push the lens reflection back in by lowering layer opacity to about 60% over the lens area only. Pro headshot photographers do this because it preserves the original eye sharpness from the bare-eye exposure rather than recovering pixels that the reflection already crushed.
Stuck with one frame? Lightroom’s Brush tool at Exposure -2.0, Highlights -100, Whites -100, painted along the lens reflection, recovers the iris in most cases. Trade-off: a touch of softness, but the eye stays sharp enough to be the focal point.
For Android-only or no-subscription workflows, Snapseed Selective + Healing tools handle moderate glasses glare. Tap the glare with Selective, lower Brightness to -100 on that spot, then use Healing to clean residual edges. Snapseed’s manual approach keeps more iris detail than an automatic anti-glare button like AirBrush’s, which tends to flatten the eye into a generic shape.
A bonus tip: a highly upvoted r/photography polarizer thread recommends asking the subject’s optician about anti-reflective coatings on prescription lenses. AR coatings cut visible glare on lenses by a noticeable amount. Worth it if portraits with glasses come up often.
#Free Desktop Tools: GIMP, Photopea, and darktable
Not everyone has a Creative Cloud subscription. Three free desktop options that handle glare.
GIMP is the open-source Photoshop alternative. The Heal tool (H) works like Photoshop’s Spot Healing Brush. Ctrl-click a clean source, then paint over the glare. Curves (Colors > Curves) lets you pull down highlights non-destructively.
Detail and edge handling lag Photoshop on hard cases, but for everyday glare on web-resolution photos it gets the job done. Our GIMP vs Paint.NET comparison covers when each free editor is the right pick for a given workload, including portraits, product shots, and longer batch jobs where Photoshop’s licensing cost would not pay back fast.
Photopea is a browser-based Photoshop clone. The interface is nearly identical, so any Photoshop tutorial maps directly. The browser app handles files up to roughly 100 MP smoothly on a modern laptop.
darktable and RawTherapee handle raw files with Lightroom-style controls. darktable adds a dedicated Haze Removal module that targets veiling flare directly. Both are free, cross-platform, and read raw files from every major camera brand. The learning curve is steeper than Lightroom, but neither asks for a monthly subscription, and both run well on older laptops where Lightroom Classic chokes on the import preview.
#Online and AI-Powered Glare Removers
For one-off fixes without installing anything, AI-powered web tools are the fastest path. Cleanup.pictures, Pixlr, and Adobe Express all have free tiers that handle small reflections in a single click. Upload, brush over the glare, download.
Across the common glare types, Cleanup.pictures handles water and screen reflection cleanest, since its inpainting model is tuned for removing objects from busy backgrounds. Pixlr’s Heal tool, based on the same content-aware idea as Photoshop, does best on window glare where the surrounding area is fairly uniform. Adobe Express’s free tier cleans sun flare reasonably well but watermarks the result unless you pay for a plan.
Skip web tools for sensitive photos. Anything you upload sits on someone else’s server, and the privacy policies vary widely. For client work or personal portraits, stay on-device with Snapseed, Lightroom Mobile, or desktop GIMP.
#Bottom Line: Which Glare Fix Should You Use?
For an iPhone snapshot with mild window glare, the Photos editor plus 30 seconds of slider work covers most cases. On Android, do the same in Google Photos, then drop into Snapseed for the harder ones.
Shooting the same glare daily? Buy a $40 CPL filter and stop fixing it in post.
For paid work where the glare lands on the focal point (eyes behind glasses, a face under hard flash, a product shot with a hot reflection), use Lightroom for global tone, Photoshop for surgical local work, and the second-frame composite trick for glasses portraits. AI tools are catching up but smear textures the moment you ask them to fill anything bigger than a coin.
If the same shot also has branded overlays you need to clean up, pair this workflow with our watermark guides. Only edit photos you own or have rights to edit.
#Frequently Asked Questions
Does removing glare lower photo quality?
Done with sliders only (Highlights, Whites, Shadows), no. Sliders adjust how the existing pixels are mapped, so the detail that was captured stays.
Done with healing or clone tools, you are replacing real pixels with synthesized ones, so quality drops in that specific patch. A smooth wall, sky, or plain background hides the swap because the surrounding texture is uniform. Skin, hair, fabric weave, or printed text shows it immediately, since healing brushes smear directional detail. Zoom to 200% before saving to confirm the patch holds up.
Can I remove glare from a JPEG, or do I need raw?
Both work, but raw gives more headroom. A raw file from a DSLR or recent iPhone (in ProRAW mode) carries roughly 2-3 stops more highlight detail than the same shot saved as JPEG. If you know you’ll be editing heavily, capture in raw or HEIF. If the file is already JPEG, you can still recover mild glare; just expect harder limits.
What is the difference between glare and lens flare?
Glare is reflected light from a surface in the scene, like a window or pair of glasses. Lens flare is light bouncing inside the lens itself, producing colored ghost shapes or a hazy wash across the frame.
Glare is local and lives on a surface. Flare is global and spreads across the image. Lightroom’s Dehaze slider was built specifically for flare, while Photoshop’s healing tools are better for glare.
Will a polarizing filter eliminate all glare?
A CPL filter cuts most reflection from non-metallic surfaces such as glass, water, painted surfaces, and leaves.
It does almost nothing for reflections off bare metal or chrome, because metal reflections are not polarized. It also has zero effect on subjects facing the camera straight on. Best results come at roughly a 35-45° angle to the reflective surface.
Can AI tools like Magic Eraser remove glare reliably?
For small isolated glare patches such as a sun glint on a car or a tiny window highlight, yes. These often come out clean in a single tap. For glare covering more than about 5-10% of the frame, AI tools start filling in texture that does not belong, and the result reads as fake. Use AI for spot fixes; reach for Lightroom or Photoshop for anything bigger.
Is glasses glare easier to fix in landscape or portrait orientation?
Orientation does not matter. What matters is whether the reflection sits on the eye itself. Glare on the upper lens (above the iris) is easy with brush masking, while glare directly on the iris is the hardest case in this whole article. The second-frame composite trick is the most reliable fix.
Does free software handle glare as well as paid software?
For everyday photos, yes. Snapseed, Google Photos, GIMP, Photopea, and darktable can all clean mild-to-moderate glare.
Where free tools fall behind is on detailed local healing of complicated textures (hair, foliage, water surfaces). Photoshop’s Generative Fill and Lightroom’s Subject masking still pull ahead on those edge cases.

Apps Crashing After iOS 27 Update? Fix Order (2026)
Apps crashing after the iOS 27 update? Update the app in the App Store first, then offload and reinstall to clear stale cache, then restart. The fix order.

Do AI Translation Earbuds Work Offline? What to Know
Do AI translation earbuds work offline? A few do with downloaded language packs, but most need the cloud. Here's what works offline and what you give up.

How to Set Up Translation Earbuds (Pairing and Modes)
How to set up translation earbuds: charge, install the app, pair over Bluetooth, pick two languages, and choose a mode. A step-by-step first-use guide.

Translation Earbuds Not Translating? How to Fix Them
Translation earbuds not translating? Usually it's the app, the internet, or the language settings. Here's how to fix pairing, sound, and lag fast.