How to Photoshop Someone Into a Picture: A 6-Step Guide
Photoshop someone into a picture in six steps: match lighting, select the subject, scale, mask edges, color match, and disclose edits. Consent-first guide.
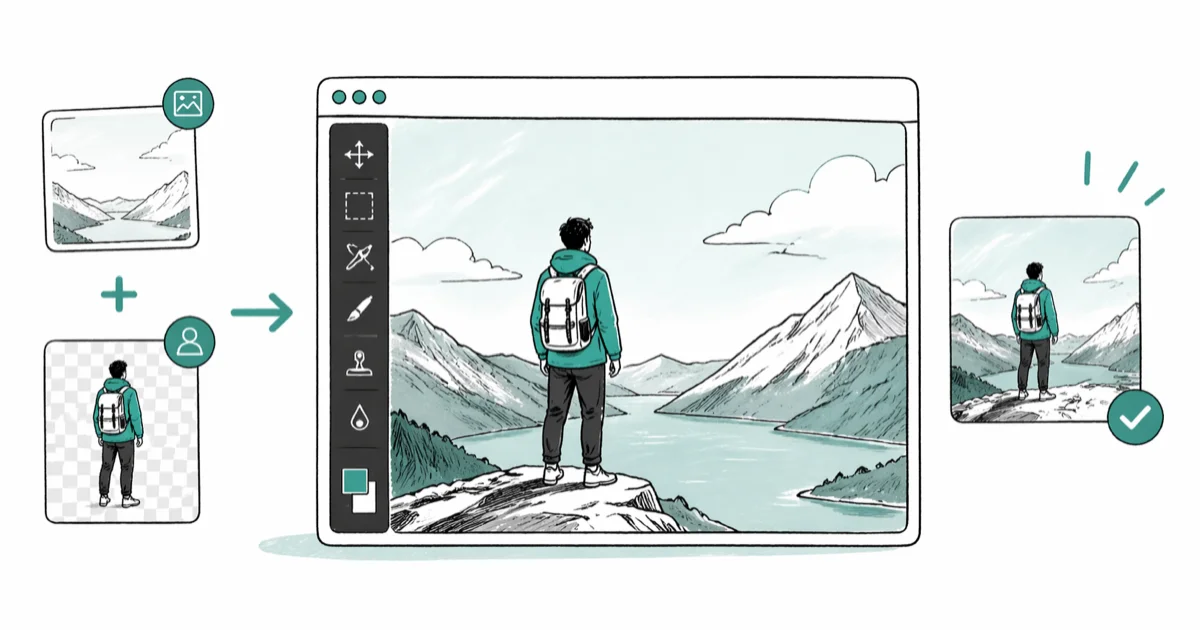
Quick AnswerTo photoshop someone into a picture, match the lighting and perspective of both photos, isolate the subject with the Quick Selection or Object Selection tool, paste onto a new layer in the destination image, scale to size with Free Transform, then refine edges with a layer mask and a soft brush. Always work with images you own or have permission to use.
Learning how to photoshop someone into a picture is a useful skill for family group photos when one person couldn’t attend, holiday cards, real estate listings, e-commerce product shots, and design mockups. The technique itself is straightforward once you understand layers, selections, and color matching. What separates a clean composite from an obvious paste-job is matching lighting and perspective at the source, not patching it later with filters.
- Source photos must share light direction, time of day, and camera angle for the composite to read as one scene
- Object Selection or Quick Selection isolates the subject in seconds for most portraits with simple backgrounds
- Free Transform with the Shift key locked keeps the inserted subject in proportion at every scaling step
- A layer mask plus a 30-50% flow soft brush is the standard tool for cleaning hair, fur, and translucent edges
- Always work with photos you own or have written permission to use, and disclose composited images in advertising
#When Is It OK to Photoshop Someone Into a Picture?
The technique itself is neutral. The ethics depend on who’s in the photo, what the photo is used for, and whether viewers know it has been edited.
Legitimate use cases include family memorials, group portraits when someone was absent on the day of the shoot, holiday cards, art portfolios, catalog photography, and real estate marketing. The shared trait: everyone shown has agreed, and the resulting image isn’t passed off as evidence of something that didn’t happen.
Three boundaries don’t bend:
- Don’t insert someone into a photo to harass, embarrass, or deceive viewers about where they were.
- Don’t composite a person into sexual, violent, or politically charged imagery without explicit consent.
- Don’t pass off composited photos as journalism, news evidence, or court evidence.
According to Wikipedia, Photoshop has been around since 1990.
The US Copyright Office’s fair use guidance confirms that fair use is fact-specific, not blanket permission, and doesn’t override defamation or right-of-publicity claims. The FTC’s AI and deception guidance recommends disclosing manipulated or AI-generated imagery in advertising so consumers aren’t misled.
Adobe addressed disclosure at the file level. Adobe’s Content Credentials documentation states that Photoshop can embed cryptographically signed provenance metadata into every exported file, recording which tools touched the pixels and when. Anyone downstream, including viewers, editors, and fact-checkers, can verify the chain with one click in a supported viewer such as Verify or Truepic. Adobe rolled this out under the Coalition for Content Provenance and Authenticity (C2PA) standard.
#Match Lighting and Camera Angle Before You Open Photoshop
The single biggest cause of obvious composites is mismatched light. If the destination scene was shot at golden hour with warm sidelight from camera-left, the subject photo needs warm sidelight from camera-left too.
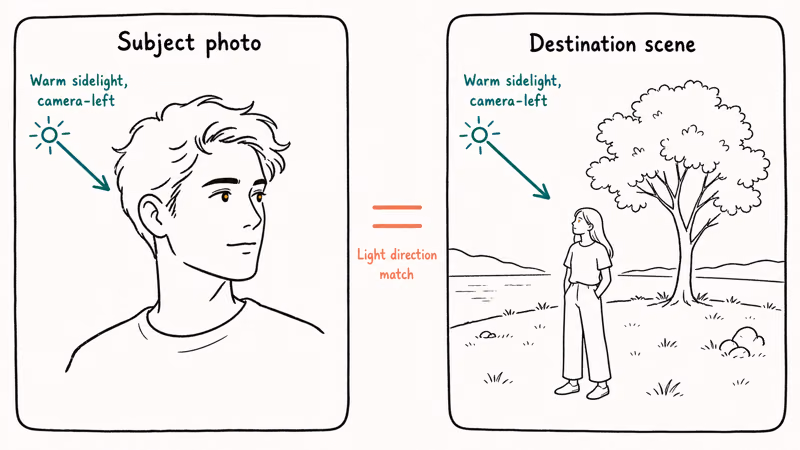
Check the catchlights in the eyes. They show exactly where the original light source was.
If you can reshoot the subject, place them next to a window or outdoor light source that matches the destination scene’s primary light source. Camera height also matters: a subject shot from below can’t be pasted into a scene shot from above without distortion.
When you can’t reshoot, choose a destination scene that fits the subject, not the other way around. Stock libraries make this easier, since most platforms let you filter by light direction and time of day. Wikipedia’s article on photo manipulation confirms that consistent light direction across composite elements has been the defining technical challenge since the practice began in the 1860s.
#How Do You Photoshop Someone Into a Picture in Six Steps?
The six-step workflow below uses Photoshop’s selection, transform, layer mask, color matching, and export tools. Free editors such as GIMP can follow the same concept, but Photoshop’s selection tools make the portrait workflow more direct.
For portraits against simple backgrounds, Photoshop’s Object Selection or Select Subject usually gives the fastest starting mask. Complex hair still needs manual cleanup in Select and Mask.
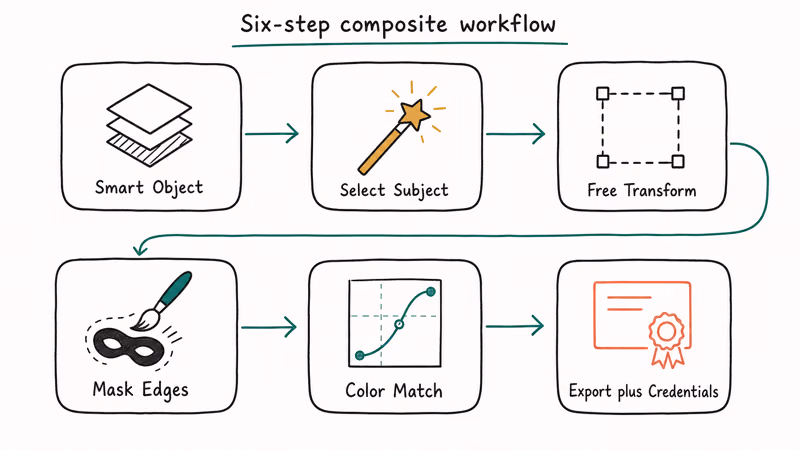
#Step 1: Open Both Photos and Convert to Smart Objects
Open Photoshop. Drag both photos in as separate layers.
Right-click each layer and choose Convert to Smart Object. Adobe’s layer basics documentation explains that Smart Objects preserve the original pixel data, so you can scale, rotate, and warp without permanent quality loss. This matters because you’ll resize the subject several times before the composite looks right.
#Step 2: Isolate the Subject With Object Selection or Select Subject
Click the subject layer. Choose Select > Subject from the menu.
Photoshop creates an automated mask that catches many edges, including hair. For tighter control, switch to the Object Selection tool (W) and draw a rectangle around the subject.
For complex hair against a busy background, open Select > Select and Mask. Use the Refine Edge brush along the hairline. Set Output To: New Layer With Layer Mask. The mask is non-destructive, so you can paint white to bring pixels back and black to hide them.
#Step 3: Scale and Position With Free Transform
Press Cmd-T (Mac) or Ctrl-T (Windows). A bounding box appears around the subject.
Hold Shift and drag a corner to scale proportionally. Reference an object of known size in the destination scene to set height correctly. A standing adult is roughly the height of a typical doorway, a parked car door, or four standard kitchen counter heights. Drag the subject into position, then press Enter to commit.
#Step 4: Clean Edges With a Layer Mask and Soft Brush
Click the layer mask thumbnail next to the subject layer. Select the Brush tool (B). Set foreground to black, hardness to 0%, flow to 30-50%, and size to 8-20 pixels for face and edge cleanup.
Paint over leftover background pixels that survived Step 2. Switch foreground to white if you erase too much; the layer mask is fully reversible.
Zoom to 200% along the hairline. This is where most composites fall apart. Use a 4-6 pixel brush at 40% flow and short strokes. Hairline cleanup often takes the most patience, but it makes the biggest difference to a believable result.
#Step 5: Color-Match the Subject to the Scene
Add a Curves adjustment layer above the subject layer, then right-click and choose Create Clipping Mask. The curve now affects only the subject.
Sample a midtone from the destination scene with the eyedropper. Pull the subject’s RGB curves toward that midtone. Add a Color Lookup adjustment layer if the scenes have very different color casts; built-in 3DLUT files match common cinematic looks.
#Step 6: Export With Content Credentials
Add a one-to-two pixel Gaussian Blur to the layer mask edge to soften the boundary slightly.
In File > Export > Export As, check the Content Credentials checkbox if you’re publishing the image. When you post the composite to social, in advertising, or on a real estate listing, label it as an edited or composite image.
#Photoshop vs. Free Alternatives for Compositing
Photoshop is the industry standard, but it isn’t the only option. The right tool depends on how often you do this work and whether you need AI-powered selection.
| Software | Price (2026) | Subject selection | Layer masks | Best for |
|---|---|---|---|---|
| Adobe Photoshop | $22.99/mo (Photography plan with Lightroom) | AI Select Subject, Object Selection | Full support, non-destructive | Professionals, frequent compositing |
| GIMP 2.10 | Free, open source | Foreground Select tool (slower) | Full support | Hobbyists, occasional projects |
| Affinity Photo 2 | $69.99 one-time | Selection Brush, Smart Selection | Full support, non-destructive | Buyers avoiding subscriptions |
| Pixelmator Pro | $49.99 one-time (Mac only) | ML Select Subject | Full support | Mac users wanting native software |
| Fotophire | Subscription, 30-day free trial | Auto background removal | Limited (single-layer composite) | First-timers, simple cuts |
For one-off composites you can finish in an afternoon, Fotophire handles the cut-and-paste part automatically and skips the selection learning curve.
Some links on this page are affiliate links, which means fone.tips may earn a commission at no extra cost to you.
For ongoing work, the Photoshop Photography plan pays for itself within a year if you use it twice a month, and the AI selection tools save real time. If you’d rather not subscribe, Affinity Photo 2 has reached feature parity with Photoshop for compositing.
If you want to test Adobe before committing, check how to cancel an Adobe free trial before the renewal date so you aren’t charged.
#Common Compositing Mistakes That Make Edits Obvious
Three technical mistakes show up in nearly every weak composite:
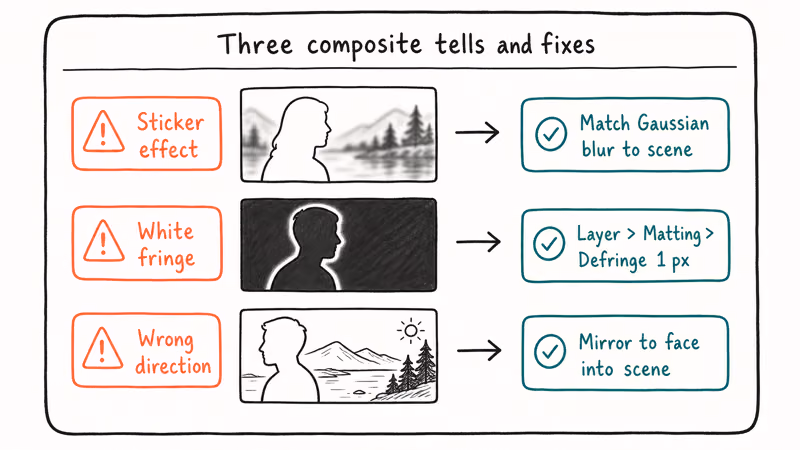
- Sharp-focus subject on a defocused background. Add matching Gaussian blur to the subject’s layer or it looks like a sticker.
- Harsh white pixel fringe on dark hair.
Use Layer>Matting>Defringeat one pixel to clean it up. - Subject facing the wrong direction. Mirror them so they face into the scene, not out of it.
A fourth mistake hits beginners: forgetting to match grain. If the destination has visible film grain or sensor noise, add matching grain to the subject via Filter > Camera Raw Filter > Effects > Grain.
Grain is the giveaway most people skip.
For related editing techniques, see our guides on:
- Removing the background in Canva
- Enlarging photos without quality loss
- Blurring the background in Lightroom
- Choosing a mouse that’s comfortable for long editing sessions
#Consent, Releases, and Disclosure for Composited Images
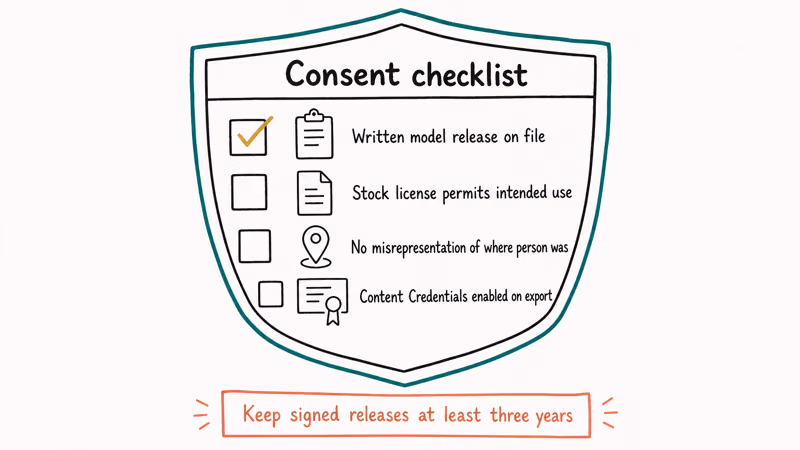
Three ethical mistakes ruin compositing work: editing a recognizable person into a photo without asking, using a stranger’s stock-model headshot in a way the license doesn’t permit, and pasting children into adult contexts.
None of those are gray areas.
The first is a right-of-publicity issue in most US states and the EU. The second is a license violation. The third sits in policy violation territory on every major platform.
For marketing campaigns, packaged products, or published ads, get written model release forms from everyone shown. Free template releases are available from the American Society of Media Photographers. Keep signed copies for at least three years after publication. Adobe announced its first round of commercial-use indemnification for Generative Fill output during the 2023 Creative Cloud release.
#Bottom Line
Treat the compositing workflow as two parallel jobs: technical execution and ethical disclosure.
The technical job ends with a clean six-step pass through selection, scaling, masking, and color matching. Choose the Adobe Photography plan if you composite often and need Photoshop’s selection tools, or Affinity Photo 2 if you’d rather pay once.
Skip neither side.
The ethical job ends with a signed model release for every recognizable person in the frame, Content Credentials embedded in the exported file, and a plain-language disclosure on the post itself. Anything less turns a useful skill into a liability.
#Frequently Asked Questions
Is it legal to photoshop someone into a picture without their consent?
In most US states it isn’t strictly illegal to edit, but using the resulting image in advertising, commercial work, or any context that misrepresents the person can trigger right-of-publicity, defamation, or false-light claims. Personal art kept private is the safest zone. Commercial use requires a written model release.
Can I use Photoshop’s Generative Fill to add a person to a scene?
You can. Adobe’s Generative Fill documentation confirms Firefly was trained on Adobe Stock and public-domain content. The catch: Firefly synthesizes a generic person, not a specific individual you’ve selected.
What’s the fastest way to select someone with messy hair?
Open Select > Select and Mask. Run the Refine Edge brush along the hair. Set View to “On Black” so the missed pixels show clearly, then paint along stray hairs in short strokes.
Do I need to disclose that a photo is composited on social media?
For personal posts, no. For sponsored content, advertising, paid endorsements, real estate listings, and product packaging in the US, the FTC recommends clear disclosure. The Coalition for Content Provenance and Authenticity has industry support for embedding signed provenance metadata, which Photoshop’s Content Credentials toggle does automatically on export.
Why does my composited subject look fake even after careful masking?
Almost always it’s mismatched light direction or color temperature, not the mask itself. Check where the highlights and shadows fall on the subject versus the destination, and look at the eye catchlights to confirm where the original light sat. If the destination has warm sidelight from the right but the subject was lit by cool overhead light, no amount of edge refinement will fix the disconnect. Reshoot the subject under matching light or pick a different destination scene.
Can I use stock photo models in a composite for my business?
Read the license. Most standard royalty-free licenses on Adobe Stock, Shutterstock, and Getty allow commercial use of stock-model headshots, but extended licenses are needed for sensitive uses such as health, politics, finance, or anything that implies the model endorses your specific product.
What file format should I export the composite as?
For social media and web display, JPEG at 80-90% quality is the standard. For print, PNG or TIFF preserve the layer-mask edge sharpness better. Keep the layered PSD file for any image you might need to revise; flattening it later is one click, but un-flattening is impossible.

Apps Crashing After iOS 27 Update? Fix Order (2026)
Apps crashing after the iOS 27 update? Update the app in the App Store first, then offload and reinstall to clear stale cache, then restart. The fix order.

Do AI Translation Earbuds Work Offline? What to Know
Do AI translation earbuds work offline? A few do with downloaded language packs, but most need the cloud. Here's what works offline and what you give up.

How to Set Up Translation Earbuds (Pairing and Modes)
How to set up translation earbuds: charge, install the app, pair over Bluetooth, pick two languages, and choose a mode. A step-by-step first-use guide.

Translation Earbuds Not Translating? How to Fix Them
Translation earbuds not translating? Usually it's the app, the internet, or the language settings. Here's how to fix pairing, sound, and lag fast.