How to Blur Backgrounds in Lightroom: A Comprehensive Guide
Learn how to blur backgrounds in Lightroom using the Adjustment Brush, Radial Filter, and Graduated Filter. Step-by-step guide for desktop and mobile.

Quick AnswerUse the Adjustment Brush in Lightroom, paint over the background area, then reduce the Sharpness slider and increase the Clarity slider to negative values to create a natural-looking blur effect.
Lightroom can’t create real optical bokeh, but it can simulate a convincing background blur using three built-in tools. The Adjustment Brush gives you the most control for complex backgrounds because you can paint the blur exactly where it belongs.
- Lightroom offers 3 main tools for background blurring: Adjustment Brush, Radial Filter, and Graduated Filter
- Set Sharpness and Clarity sliders to negative values (typically -50 to -100) to create the blur effect
- The Adjustment Brush gives the most precise control for complex backgrounds with irregular shapes
- Use the Radial Filter for circular blurs around portrait subjects and the Graduated Filter for landscapes
- Avoid over-blurring by using low Density settings and building up the effect gradually
#Which Lightroom Tool Should You Use for Background Blur?
Background blurring, often referred to as bokeh, is a fundamental technique in photography designed to separate the subject from its surroundings. This effect not only emphasizes the main subject but also adds a polished, professional look to photographs. According to Adobe’s Lens Blur documentation, Lightroom can add optical Blur and Bokeh effects and lets you define blur amount, focus range, and refinement settings.
Lightroom provides three main tools for background blurring:
- Adjustment Brush
- Radial Filter
- Graduated Filter
Each tool has its strengths and is suited for different types of images. By mastering these tools, you can transform ordinary photos into stunning works of art.
If you’re looking to blur backgrounds on mobile devices or other platforms, there are also dedicated background blur apps available for iOS, Android, and PC.
#Using the Adjustment Brush for Precise Blurring
The Adjustment Brush is ideal for images with complex backgrounds or irregular shapes that require precise control.
#How to Use the Adjustment Brush:
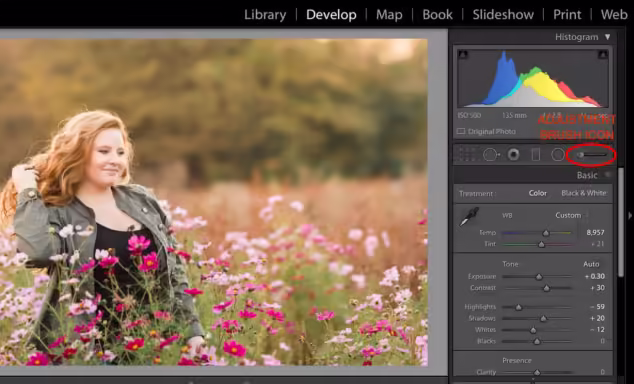
Select the Adjustment Brush from the toolbar and set your brush size. Lower Clarity and Sharpness to negative values (typically -50 to -100). Paint over the background areas. Enable Show Selected Mask Overlay to see exactly where the blur is applied.
Negative Clarity and Sharpness settings create the softening effect, and stronger negative values produce a heavier simulated blur. According to Adobe’s Lightroom masking guide, the Adjustment Brush supports up to 15 independent mask overlays per image, letting you fine-tune blur intensity across different background regions separately.
#Creating Circular Blurs with the Radial Filter
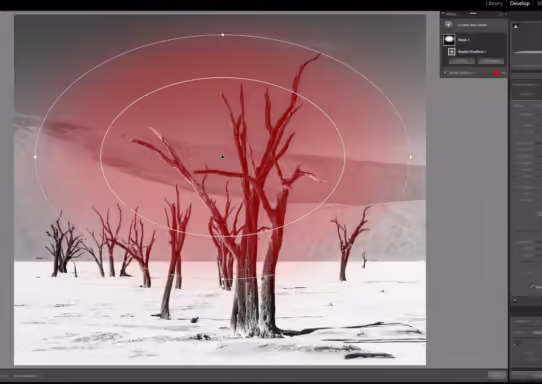
The Radial Filter is perfect for creating circular or oval blurs, making it ideal for portraits or subjects centered in the frame.
#Steps to Use the Radial Filter:
Select the Radial Filter and draw an oval around your subject. Check Invert so the blur applies outside the circle. Lower Clarity and Sharpness to negative values, then adjust feathering for a smooth transition.
A high feather setting usually creates a smoother transition between sharp and blurred areas. According to Digital Photography School’s Lightroom blur tutorial, the Radial Filter works best when the subject is roughly centered in the frame.
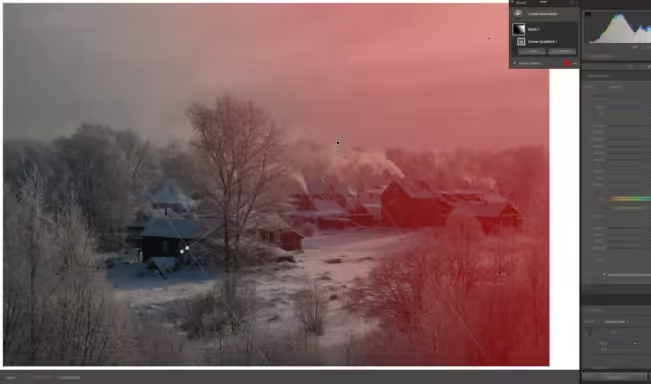
#Applying Linear Blurs with the Graduated Filter
The Graduated Filter is best for creating linear blurs, making it perfect for landscape photos or images with consistent horizontal backgrounds.
#How to Use the Graduated Filter:
Select the Graduated Filter and drag across the area you want to blur. Adjust the transition lines to control how gradual the effect is, then reduce Clarity and Sharpness.
According to PetaPixel’s Lightroom editing tips, stacking 2-3 Graduated Filters at different angles creates more convincing depth blur than a single filter pass.
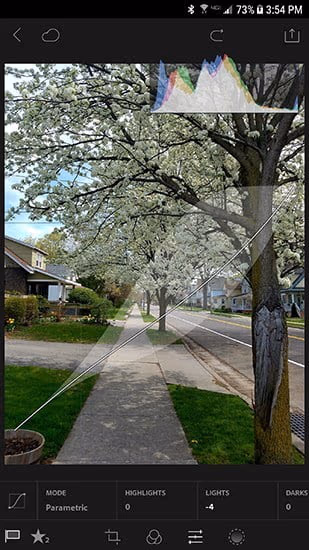
#Blurring Backgrounds in Lightroom Mobile
Lightroom Mobile has the same core blurring tools as the desktop version, allowing for on-the-go editing.
#Mobile Blurring Process:
Import your image, select the Brush, Radial, or Graduated Filter, and reduce Clarity and Sharpness. Use Selective mode to constrain the blur to specific areas.
Mobile Tip: Take advantage of your device’s touch screen for precise adjustments and masking.
#Advanced Tips for Effective Background Blurring
Match the tool to the shot. Use the Adjustment Brush for irregular backgrounds, the Radial Filter for centered subjects, and the Graduated Filter for horizons. Fine-tune feathering to avoid hard edges between sharp and blurred zones.
Enable Auto Mask when painting near your subject’s edges. It prevents blur from bleeding into the subject. Save your preferred settings as a preset so you can apply the same blur configuration to future photos in one click.
For those interested in creating a cinematic look, you might want to explore techniques on how to make video look like film. Some of these techniques can be adapted to still photography to enhance your blurring effects.
#What Are the Most Common Background Blur Mistakes?
Over-blurring is the biggest mistake. If the background looks like vaseline was smeared on the lens, dial back the Clarity. Stay above -90 for natural results on most images.
Inconsistent blur happens when you paint unevenly with the Adjustment Brush. Enable the mask overlay (press O) to check coverage. Any gaps in the mask will leave sharp patches in the background that look strange.
Low-resolution originals can’t be saved with blur. Lightroom can’t invent detail that wasn’t in the original shot. Always start with the highest quality source file available. If you need to unblur a video, that requires different tools entirely.
#Bottom Line
Use the Adjustment Brush for portraits and complex backgrounds, the Radial Filter for centered subjects, and the Graduated Filter for landscapes. Start with Clarity at -80 and Sharpness at -100, then adjust from there. The blur won’t match a real f/1.4 lens, but it’s convincing enough for social media and web use.
For video work, check our guides on merging audio and video in VLC and changing aspect ratio in iMovie.
#Frequently Asked Questions
Can Lightroom create real bokeh like a fast lens?
No. Lightroom simulates blur by reducing sharpness and clarity, which softens detail rather than creating true optical bokeh circles. The result looks convincing at web resolution but won’t match the quality of a photo shot with an f/1.4 or f/1.8 lens at full size.
Does Lightroom Mobile have the same blur tools as desktop?
Yes. Lightroom Mobile includes the Selective Brush, Radial Filter, and Graduated Filter. The touch interface makes masking slightly easier for simple shapes but less precise for complex edges compared to a mouse.
What Clarity and Sharpness values work best?
Start with Clarity at -80 and Sharpness at -100 for a strong blur. For subtle background softening, try -40 Clarity and -60 Sharpness. The exact values depend on the image and how much separation you want.
Will blurring the background reduce image quality?
The blur effect is non-destructive in Lightroom. Your original file stays intact, and you can remove or adjust the blur at any time. The blur doesn’t add noise or reduce resolution in other parts of the image.
How do I blur everything except my subject?
Paint over the background with the Adjustment Brush, or use the Radial Filter with the Invert option checked to apply effects outside the circle. Enable Auto Mask to help the brush avoid bleeding into your subject’s edges.
Can I save blur settings as a preset?
Yes. After applying your blur adjustments, click the + icon in the Presets panel and save the current settings. You can then apply the same blur configuration to other photos with one click.
Is Photoshop better than Lightroom for background blur?
Photoshop offers more precise control through layer masks and the Gaussian Blur filter. But Lightroom’s tools are faster for most use cases and don’t require switching between applications. Use Photoshop when edges are very complex, like hair or foliage.
Does background blur help with social media engagement?
Yes. Photos with a clear subject and blurred background consistently perform better on Instagram and Facebook. The blur directs attention to the subject, which increases the likelihood of viewers pausing and engaging with the image.

Apps Crashing After iOS 27 Update? Fix Order (2026)
Apps crashing after the iOS 27 update? Update the app in the App Store first, then offload and reinstall to clear stale cache, then restart. The fix order.

Do AI Translation Earbuds Work Offline? What to Know
Do AI translation earbuds work offline? A few do with downloaded language packs, but most need the cloud. Here's what works offline and what you give up.

How to Set Up Translation Earbuds (Pairing and Modes)
How to set up translation earbuds: charge, install the app, pair over Bluetooth, pick two languages, and choose a mode. A step-by-step first-use guide.

Translation Earbuds Not Translating? How to Fix Them
Translation earbuds not translating? Usually it's the app, the internet, or the language settings. Here's how to fix pairing, sound, and lag fast.