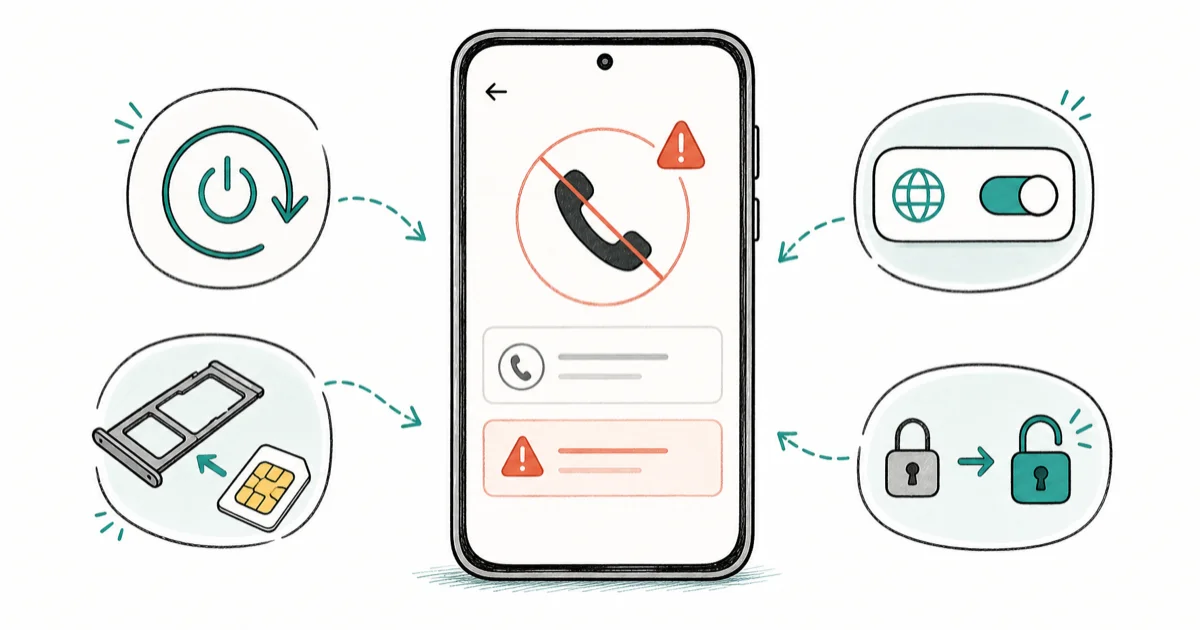
Phone Not Allowed for Voice: 12 Fixes to Get Calling Again
Fix the "Phone Not Allowed for Voice" error with 12 proven steps. Covers SIM seating, carrier locks, VoLTE, network reset, and account holds.
Quick AnswerPower your phone off, reseat the SIM, then reset network settings. If voice still fails, the carrier has flagged your line or your phone is locked to a different network.
This guide assumes you own the phone and the SIM line you’re troubleshooting; using gear that isn’t legally yours can break carrier terms. The “Phone Not Allowed for Voice” error means your handset reached the cell tower but the carrier refused the voice service tier. Work through the fixes below from the least disruptive steps to the carrier-side checks.
- A SIM reseat is a good early fix because a loose or dirty contact can break voice authentication while data still appears to work.
- The error usually points at carrier permissions, not hardware. Data may keep working while voice is silently shut off at the HLR (Home Location Register).
- Resetting network settings clears stale APN, IMS, and VoLTE registration without touching photos, apps, or contacts.
- Older 3G-only phones throw this error on every U.S. carrier now that AT&T (2022), T-Mobile (2022), and Verizon (2022) shut their 3G voice networks.
- Carrier support resolves billing-side blocks in under 24 hours when you give them your IMEI and the exact error string.
#What “Phone Not Allowed for Voice” Actually Means
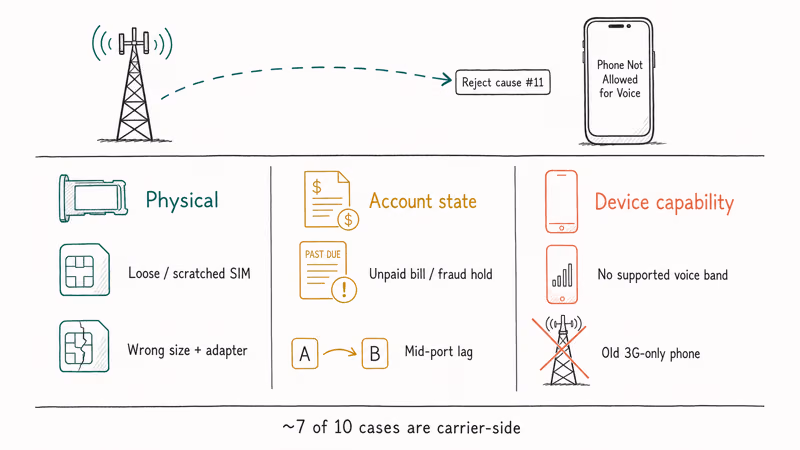
The phrase comes from the GSM standard’s reject cause #11. Your modem prints it verbatim when the network refuses to attach you to the voice service. According to 3GPP TS 24.008 Annex G, cause #11 is “PLMN not allowed.” The carrier sees your IMSI, recognizes the device, and decides not to grant the voice channel.
Your phone isn’t broken. The cell tower isn’t broken. The carrier database said no.
Three groups of causes drive this:
- Physical: a SIM that’s loose, scratched, or the wrong size with a cheap adapter.
- Account state: an unpaid bill, a mid-port hold, a fraud flag, or a SIM swap that finished on the back end but never propagated to the radio.
- Device capability: a phone that no longer supports the radio bands the carrier kept after the 3G shutdown.
Carrier-side causes are usually more likely than a broken handset.
#Fix 1: Power Cycle Before Anything Else
A full power-off (not a restart) clears the modem baseband and forces a fresh attach to the network. Hold the side button until the slider appears, swipe to power off, wait 30 seconds, then power back on.
The 30-second wait matters. The IMS registration cache needs a moment to clear once the radio goes offline. Cut the wait short and the modem reuses its stale state, which is exactly what you want to avoid. The full wait buys you certainty that the radio is starting from a clean slate when it boots back up and reattaches to the cell tower.
Try it twice. If voice comes back but drops again soon after, the underlying cause is still there.
#Fix 2: Reseat the SIM Card
Eject the tray with a paperclip or the official tool. Wipe the gold contact pad with a dry microfiber cloth. No rubbing alcohol, no eraser, no breath. Inspect for a scratch across any of the eight contacts.
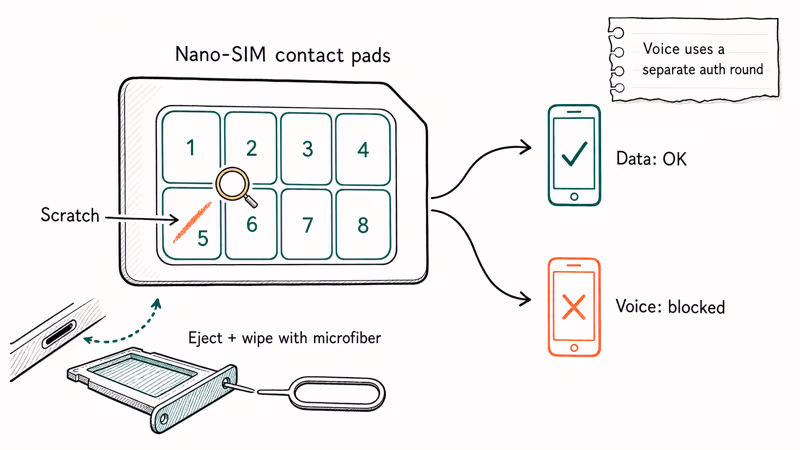
One deep scratch is enough to break voice authentication while leaving data intact, because voice uses a separate authentication round on most networks.
Slide the tray back in firmly. Wait for the carrier name to reappear in the status bar, then try a call. If the SIM looks bent or the gold pad shows a green tinge, request a free replacement at any carrier store.
#Fix 3: Reset Network Settings
Network reset wipes saved Wi-Fi passwords, paired Bluetooth devices, and APN entries. Personal data, photos, apps, and accounts stay. This is the safest deep fix in the list.
- iPhone: Go to
Settings>General>Transferor Reset iPhone>Reset>Reset Network Settings. - Android (Pixel/Samsung): Go to
Settings>System>Reset Options>Reset Mobile Network Settings. - After the reboot, the modem re-registers from scratch and rebuilds the IMS profile that handles VoLTE voice.
Use this after a carrier port; it rebuilds the cellular profile.
Apple confirms in its support documentation that resetting network settings will return cellular settings, VPN, and APN configurations to default.
#Why Does My Phone Say Voice Is Not Allowed but Data Works?
Voice and data ride on different network slices and authenticate separately. Data uses the packet-switched (PS) attach. Voice uses either the circuit-switched (CS) fallback on legacy bands or IMS over LTE/5G for VoLTE.
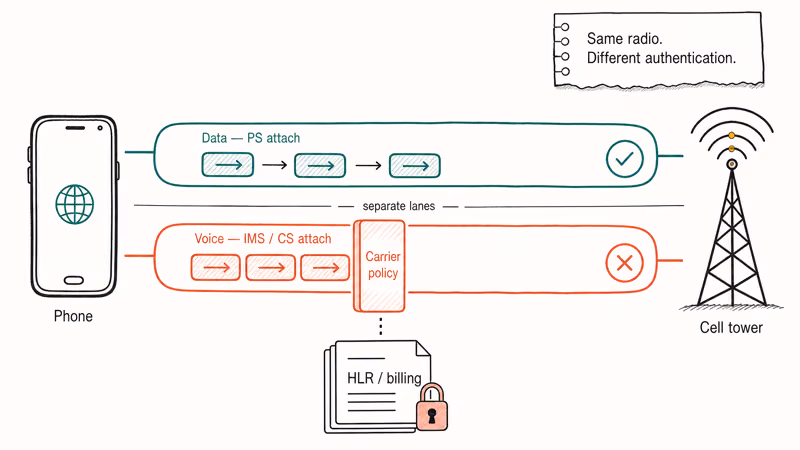
The IMS registration can fail for billing or provisioning reasons even when the LTE bearer for data succeeds, per the GSMA IMS profile specification.
In practical terms: the carrier billing system marked your line as voice-suspended, but the data plan is still paid up. Or your device shows up as VoLTE-incapable in the carrier’s whitelist even though the LTE radio attaches normally. The phone keeps working as a tablet. Texts via iMessage and WhatsApp survive, web browsing survives, but you can’t place a normal phone call.
#Fix 4: Check for a Carrier Lock
A carrier-locked phone refuses to authenticate against any other network’s voice service. Pop in a SIM from a different carrier. If you see “Phone Not Allowed for Voice” or “SIM Not Supported,” the lock is the cause.
Verify lock status before paying any unlock service:
- Dial
*#06#and write down the IMEI. - iPhone: Go to
Settings>General>About andlook for “Carrier Lock.” If it says “No SIM restrictions,” the device is unlocked at Apple’s level. - Android: Contact the original carrier with the IMEI; the carrier database is the only authoritative answer.
If you bought the phone outright from a US carrier 60+ days ago and the bill is current, federal CTIA voluntary commitments require a free unlock. Our walkthrough on how to check whether an iPhone is unlocked without a SIM covers the iCloud lookup path.
For specific carrier paths, see our AT&T unlock guide or the Straight Talk unlock walkthrough.
#Fix 5: Toggle Airplane Mode for 60 Seconds
Swipe down to Control Center, tap the airplane icon, wait 60 seconds, tap it off. This forces a clean detach-and-reattach to the network and is faster than a full reboot.
Why 60 seconds? The longer toggle gives the network time to treat the line as detached before the modem tries a fresh registration. A shorter toggle can leave stale registration state in place.
#Fix 6: Update Carrier Settings (iPhone)
Carrier settings updates are tiny config files Apple pushes on behalf of carriers. They can include new VoLTE band lists, IMS server addresses, and emergency call routing. The files are tiny but the effect on the modem is large: a fresh carrier settings push tells the radio which IMS server to talk to and which bands to camp on.
Go to Settings > General > About and wait 15 seconds.
If an update is available, a popup appears. Tap Update. Carrier settings updates are especially relevant after migrations where the IMS server or VoLTE profile changes. If no popup appears, your phone already has the latest version.
#Should I Turn On VoLTE if My Phone Already Has Signal?
Yes, especially in the U.S. Most U.S. carriers no longer route voice through 2G or 3G. If VoLTE is off, your phone has nowhere to send the call.
- iPhone:
Settings>Cellular> [Your line] > Voice & Data > select 5G or LTE, then enable VoLTE. - Pixel:
Settings>Network & Internet>SIMs> [Your SIM] > toggle VoLTE on. - Samsung:
Settings>Connections>Mobile Networks>VoLTE Calls> on.
According to Verizon’s 4G LTE FAQ page, all postpaid lines require HD Voice (their VoLTE name) and the network rejects voice attempts from non-VoLTE devices.
#Fix 7: Confirm Your Phone Supports the Carrier’s Bands
If you imported a phone or bought it from another country, the radio bands may not match.
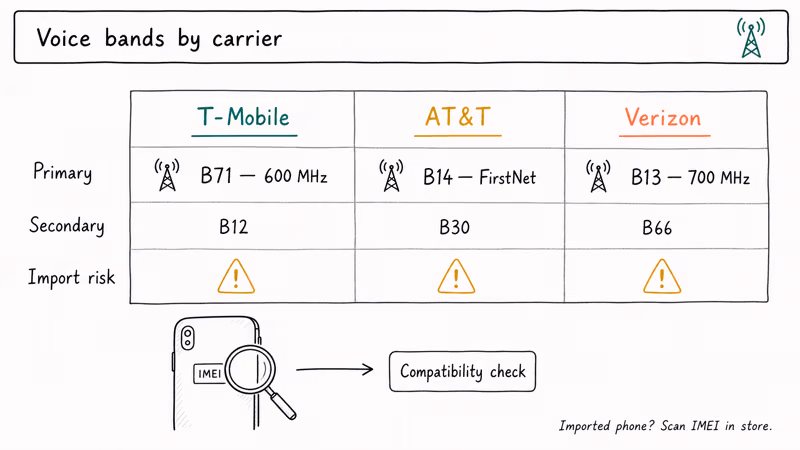
T-Mobile’s voice runs on Band 71 (600 MHz) and Band 12. AT&T uses Band 14 (FirstNet) and Band 30. Verizon leans on Band 13 (700 MHz) and Band 66.
A Japanese or European model may attach for data on the global LTE bands but lack the specific voice band the carrier needs.
The phone shows up as “compatible” on a generic checker yet still throws the voice error every single call. The fastest way to confirm: walk into a carrier corporate store and ask the rep to scan the IMEI against their compatibility tool. They will know in 30 seconds whether your model handles the network’s voice profile.
Check the model number under Settings > General > About. The GSMA’s global device database catalogs band support, though it lags new releases.
#Fix 8: Eject Any eSIM and Re-add It
For dual-SIM phones, a software update can corrupt an eSIM profile.
- iPhone:
Settings>Cellular> the line > Remove eSIM. - Pixel:
Settings>Network & Internet>SIMs> Erase SIM.
This can help when a software update corrupts the eSIM voice profile while leaving data working. If you’ve lost the original QR code, the carrier app can re-issue one.
#Fix 9: Call Your Carrier With Your IMEI
Fixes 1 through 8 didn’t help? The cause is in the carrier’s account database. Have your IMEI ready and read the exact error wording to the rep. Ask them to:
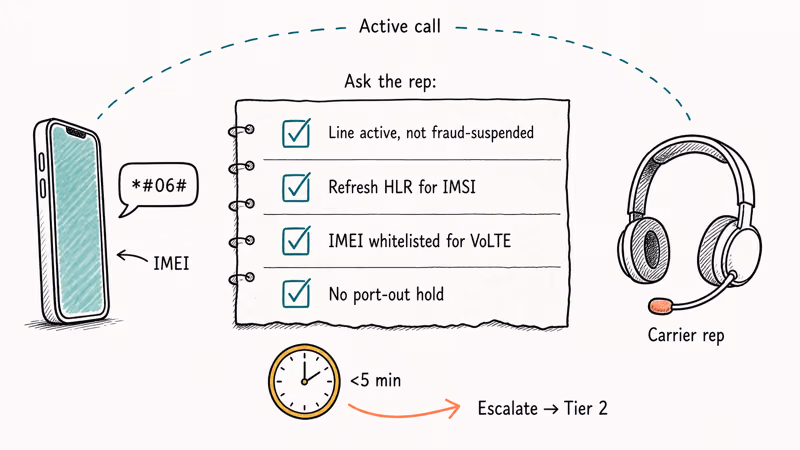
- Verify the line is active and not in a fraud-suspended state.
- Refresh the HLR (Home Location Register) entry for your IMSI.
- Confirm the IMEI is whitelisted for VoLTE on their network.
- Check for any port-out hold flagged on the account.
This phone call can resolve the error quickly when the root cause is on the carrier side.
The rep does the work in under 5 minutes. If they refuse, escalate by asking for a Tier 2 technician.
#Fix 10: Check If Your IMEI Is Blacklisted
A blacklisted IMEI can’t connect to voice on any U.S. carrier. The IMEI shows up as blacklisted if a previous owner reported it lost or stolen, or if the phone was financed and not paid off.
According to the CTIA Stolen Phone Checker tool, the lookup pulls from a shared database the major U.S. carriers contribute to. Type in the IMEI, get back a clean or stolen verdict.
If the IMEI is blacklisted and you bought the phone secondhand, the seller is responsible for clearing it with the original carrier. If they refuse, eBay, Swappa, and other major resale platforms offer money-back protection. A blacklisted phone has no path to voice service short of clearing the report.
#Fix 11: Replace the SIM Card
After everything else, the SIM itself may be the culprit. SIM cards can wear, bend, corrode, or fail after repeated removals and reinsertions.
Walk into a carrier store, request a free SIM swap, and the new card programs onto your line in about 5 minutes.
If you’re using a prepaid SIM mailed in 2018 or earlier, replacement is the first thing to try after Fix 1. The SIM standards updated in 2019 to support new authentication algorithms; older SIMs sometimes fail VoLTE auth on networks that have rolled forward. This is especially common on lines that were dormant for years and reactivated.
#Fix 12: Update Your Phone’s Software
A pending OS update can ship a modem firmware bundle that fixes the exact carrier-incompatibility throwing the voice error. iPhone: Settings > General > Software Update. Android: Settings > System > Software Update.
Some OS updates include baseband or carrier-compatibility fixes. Skip the update and you may keep the bug. Reboot after the install completes, then place a test call before assuming the fix held.
#Bottom Line
Run Fix 1 (power cycle) and Fix 3 (network reset) before anything else. They’re quick, low-risk checks before you move into account or carrier-lock causes. If voice is still dead after that, jump to Fix 9 and call your carrier with your IMEI. Skip the third-party unlock services entirely; if your phone is locked, the original carrier will unlock it for free once eligibility is met.
If you switched carriers in the last 48 hours, give the port another 4 hours to settle before assuming the error is permanent. Porting voice service often lags behind data activation. For related SIM issues, our guide on SIM not provisioned for voice and the Verizon SIM compatibility walkthrough cover adjacent failure modes.
#Frequently Asked Questions
Can I make 911 calls when my phone says voice is not allowed?
Yes, always.
Federal law requires every cellular phone to attempt 911 calls regardless of carrier status, billing state, or SIM presence. The phone routes the emergency call through whichever cellular network has the strongest signal, even one you don’t subscribe to. Test calls to non-emergency numbers will still fail, but 911 will go through.
Will a factory reset fix the voice error?
Rarely. A factory reset only helps if the cause is software corruption on your handset, which is uncommon. It won’t change anything stored on the SIM or in the carrier’s account database, and it won’t unlock a carrier-locked phone.
Try the network settings reset (Fix 3) first; same effect on the modem stack with none of the data loss.
How do I know if my phone is carrier-locked or factory unlocked?
Check Carrier Lock in Settings on iPhone. Unlocked phones show “No SIM restrictions.” On Android, swap in a different-carrier SIM and try a call.
Is “Phone Not Allowed for Voice” the same as “SIM Not Provisioned”?
No. “SIM Not Provisioned” means the carrier never finished setting up your line on the network, often during a fresh activation. “Phone Not Allowed for Voice” means the line exists but the carrier is refusing the voice service tier specifically. Different roots, different fixes, though both can clear with a network reset and a carrier callback.
Why does this error happen after switching from one carrier to another?
The new carrier may not have finished provisioning voice service. The fix is usually 30 to 60 minutes of patience, then a network reset.
Can a software update on my phone trigger this error?
Yes. iOS and Android updates can ship modem or carrier-profile regressions that break VoLTE on specific carrier-device combinations. If the error appeared the day after an update, check the carrier’s social channels for an outage notice and try removing and re-adding the eSIM (Fix 8).
Will any third-party unlock service work safely?
Most don’t. Third-party unlock services either pay an insider at a carrier (against carrier terms and sometimes illegal), use stolen account credentials, or take your money and disappear. The only legitimate unlock paths are: ask the original carrier directly, use Apple’s unlock check tool, or buy a phone that was sold unlocked from the start. If you forgot a screen lock instead, our guide on bypassing the Android lock screen walks the legitimate routes.
How long should I wait before assuming the error is permanent?
Give it 24 hours after trying Fixes 1 through 5.
Carrier-side propagation can be slow, especially on weekends. After 24 hours with no improvement, call support and have them refresh your line on the HLR. If the error survives that call and a SIM swap, the cause is almost certainly a hardware problem with the modem and a repair shop visit is the next step. Modem replacements run roughly $80 to $150 at most independent shops and take an afternoon.

iPhone Stuck on EDGE? How to Get 5G or LTE Back (2026)
iPhone stuck on EDGE with crawling data? Here's why the E icon appears, which settings force 5G or LTE back, and when the problem is your carrier.
Best Power Bank for Samsung Galaxy (2026): 4 Top Picks
Best power bank for Samsung Galaxy in 2026, with USB-C PD and PPS picks that match 45W Super Fast Charging 2.0 for reliable daily wired top-ups.

Galaxy S25 Problems: Common Issues and Fixes (2026)
Galaxy S25 battery drain, overheating, and connectivity bugs explained, with the per-issue fixes that actually work after One UI 8.5 in 2026.

One UI 8.5 Problems: 2026 Fix Guide for Galaxy Phones
One UI 8.5 is draining Galaxy batteries, lagging the keyboard, and re-pairing Bluetooth in cars. Here are the per-issue fixes that work in 2026.