Outlook Not Receiving Emails: 11 Fixes That Work in 2026
Outlook not receiving emails? 11 proven fixes for Junk filters, Work Offline, full mailboxes, server settings, and broken profiles on Windows and Mac.
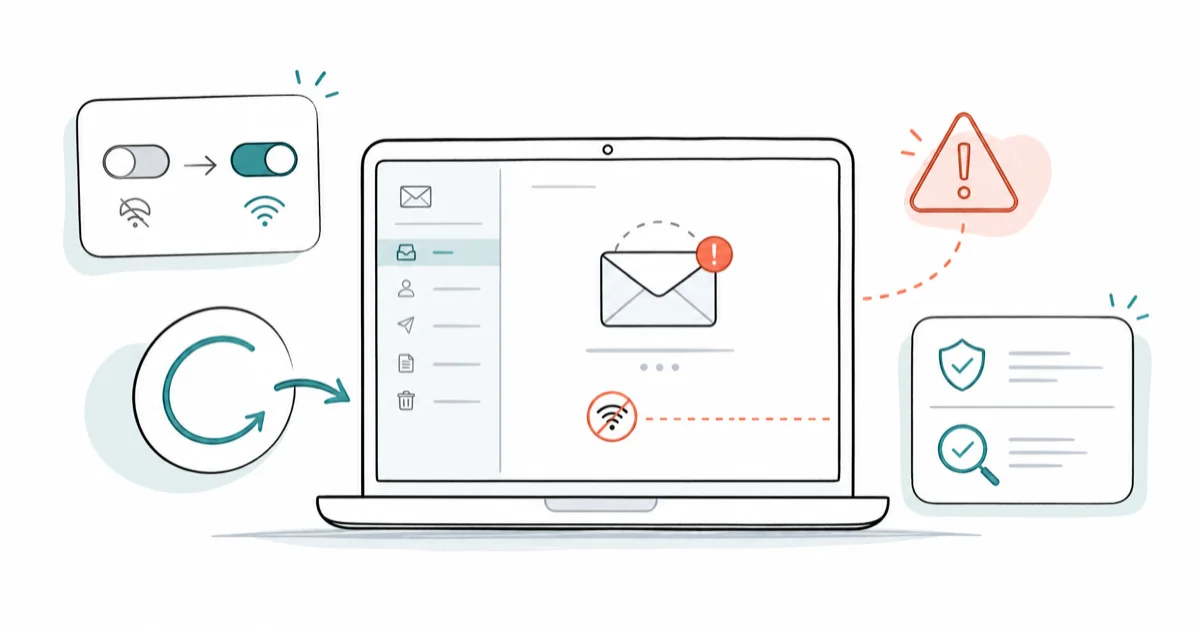
Quick AnswerFirst, look in the Junk Email folder for misfiltered messages. Then open the Send/Receive tab and toggle Work Offline off. If new mail still does not arrive, check mailbox storage and run Outlook in Safe Mode to rule out add-ins.
This guide assumes Outlook is signed in to a mailbox you own; the steps here change account settings, profiles, and cache files, so only run them on devices and accounts you control.
Outlook has stopped pulling in new mail, and you want it back today. The fixes below cover Outlook for Microsoft 365, the new Outlook for Windows, and Outlook for Mac, so they apply no matter which version you run, and most take only a minute or two to rule out.
- The Junk Email folder catches legitimate mail more often than any other cause, so check it first before changing any settings.
- Work Offline mode silently blocks incoming sync on desktop Outlook, and toggling it off in the Send/Receive tab restores delivery within one sync cycle.
- A mailbox at 100% of its storage limit stops accepting new mail until you free space, per Microsoft’s official mailbox quota documentation.
- Clearing the RoamCache folder repairs corrupted local cache, a common culprit when sync breaks after an interrupted Windows update.
- Rebuilding the Outlook profile through Mail in Control Panel resolves stuck profiles when no other fix works, and takes about 5 minutes end to end.
#Why Is Outlook Not Receiving New Emails?
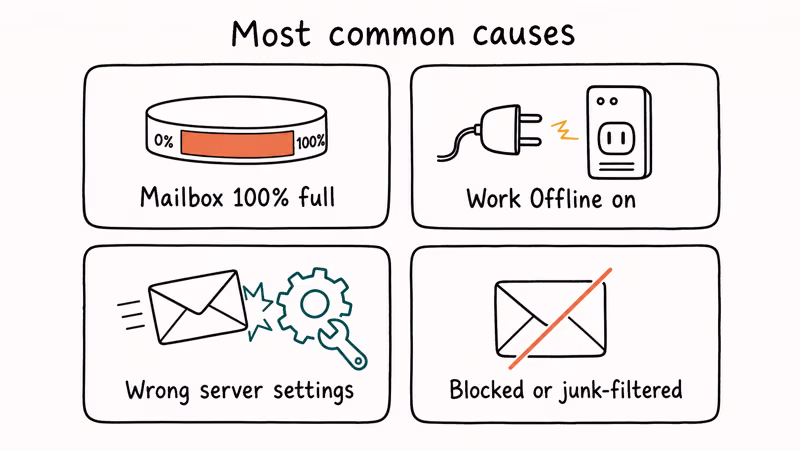
According to Microsoft, 4 culprits cause most receive failures: full mailbox storage, blocked senders, Work Offline mode, and incorrect server settings, per the send and receive troubleshooter.
On Windows, the Junk Email folder often catches newsletters and order confirmations even from senders already marked as safe. On macOS, Work Offline can get toggled by accident through a stray keyboard shortcut. Both are quick to rule out.
If Outlook keeps showing a connection warning instead of going fully silent, you may actually be looking at the Outlook disconnected error rather than a pure receive failure.
#1. Check the Junk Email and Other Folder
Spam filters are aggressive in modern Outlook, and the rules update on Microsoft’s side without telling you. Mail you used to receive can suddenly land in Junk Email after a server-side filter change.
The Junk filter can intercept routine sender emails even after those senders are added to Safe Senders, and order confirmations from large e-commerce sites are common casualties. The fix takes seconds, but you have to know to look.
- Open Outlook and click the Junk Email folder in the left navigation.
- Right-click any legitimate message and choose
Junk>Not Junk. - In the dialog, tick Always trust email from this address and click OK.
- If you use Focused Inbox, also check the Other tab; demoted senders land there silently.
Repeat for the Deleted Items folder if rules might have moved messages there.
#2. Turn Off Work Offline Mode
Work Offline cuts the sync connection while leaving Outlook open and visible. New mail piles up on the server. Most users never notice the small status bar indicator.
With Work Offline enabled, new messages stay queued on the server and never reach the inbox, even though Outlook stays open and looks normal. Toggling it off lets the queued mail sync within a single send/receive cycle, usually in seconds.
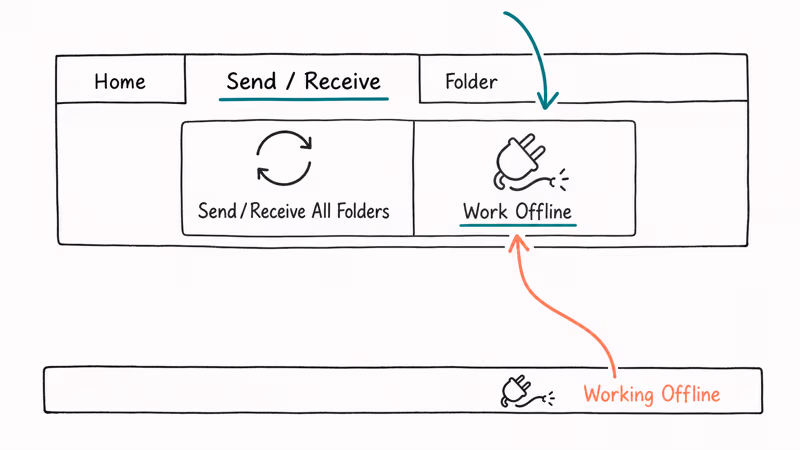
- Look at the bottom-right status bar for Working Offline.
- Open the Send/Receive tab on the ribbon.
- Click Work Offline to toggle it off; the icon stops being highlighted.
- Click Send/Receive All Folders to force an immediate sync.
If the toggle does nothing, your network connection itself may be blocked at the firewall.
#3. Verify Account and Server Settings
Wrong incoming server, port, or encryption settings stop mail at the door. Email providers update server addresses every few years, and old IMAP or POP3 setups can quietly break after a provider migration. The auto-discover step in Outlook does not always catch the new values.
On older third-party accounts like Yahoo, auto-discover can pull the wrong port and silently fail all incoming sync until the settings are corrected by hand.
- Go to
File>Account Settings>Account Settings. - Select your email account and click Change.
- Confirm the Incoming mail server, Outgoing mail server, Port numbers, and Encryption method.
- Click
More Settings>Advancedand verify the Incoming server (IMAP) is 993 with SSL/TLS, or POP3 is 995 with SSL/TLS for most providers. - Click
OK>Nextand let Outlook test the connection.
Microsoft’s Outlook account settings reference lists the official server addresses and ports for Outlook.com, Hotmail, and Microsoft 365. Use it as the source of truth whenever a provider migration breaks sync, because the values can shift quietly without an end-user notification. If you see a specific error code instead of silent failure, see the 0x80042109 fix guide for that exact error.
#4. Free Up Mailbox Storage
A full mailbox stops accepting new messages without warning. Outlook does not show a popup. It just silently rejects new mail at the server, and the sender gets a bounce reply you never see.
Microsoft’s mailbox storage documentation confirms that free Outlook.com accounts get 15 GB of mailbox storage shared with OneDrive, while Microsoft 365 Personal subscribers get 50 GB dedicated to mail.
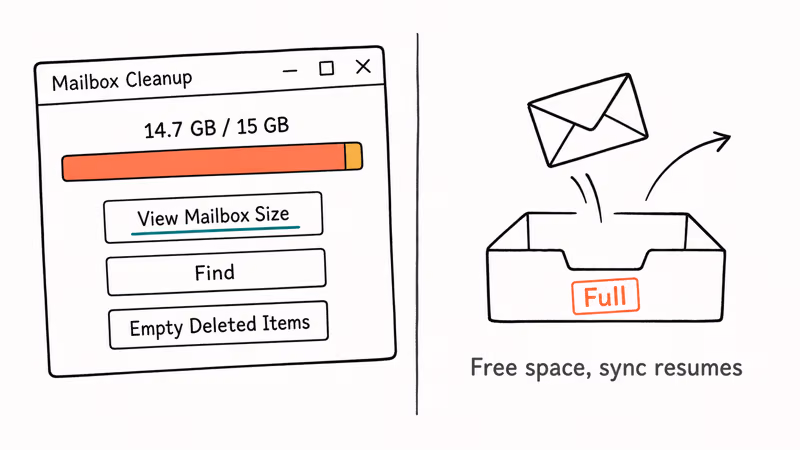
- In Outlook for Windows, go to
File>Tools>Mailbox Cleanup. - Click View Mailbox Size to see your current usage.
- Click Find to locate emails larger than 5 MB and delete or archive them.
- Empty the Deleted Items folder; trashed messages still count toward your quota.
- On the web, open
Settings>General>Storageat outlook.com to view a visual breakdown.
Once a full Outlook.com mailbox drops back below its quota, deleting a few gigabytes of large attachments usually restores mail flow on the next sync.
#5. Clear the Outlook Cache and RoamCache
Corrupted local cache files block sync even when your account, network, and storage are all healthy. The RoamCache folder stores autocomplete data and preview cache that can become inconsistent after a crash or a forced shutdown.
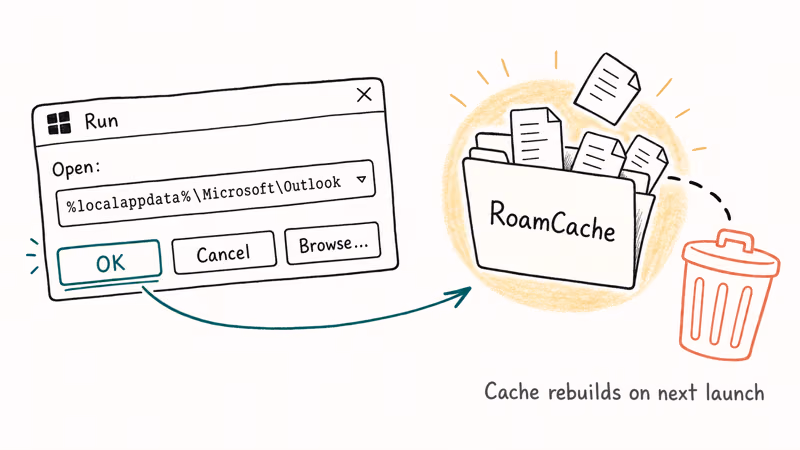
Cache reset is the fix that nothing else replaces. A Windows Update that interrupts Outlook mid-sync is a classic trigger, and clearing the cache lets the next launch rebuild it and resume normal delivery.
- Close Outlook completely. Use Task Manager to end any outlook.exe process if needed.
- Press Windows key + R, type
%localappdata%\Microsoft\Outlook, and press Enter. - Open the RoamCache folder.
- Select all files (Ctrl+A) and delete them.
- Reopen Outlook and let it rebuild the cache; the first sync may take 1-2 minutes.
If Outlook hangs at the splash screen the next time you open it, work through the Outlook stuck loading profile fixes before you go any further.
#6. Run Outlook in Safe Mode and Disable Add-Ins
A misbehaving add-in can freeze sync silently. Safe Mode isolates the culprit by booting Outlook without third-party add-ins.
Outdated add-ins such as an old Adobe PDF integration are a frequent cause of mysterious sync failures. The Outlook crash log often points at a generic COM error rather than the add-in itself, so disabling add-ins one by one is the only reliable way to find the culprit.
- Close Outlook.
- Press Windows key + R, type
outlook.exe /safe, and press Enter. - Click OK in the profile prompt.
- Send a test email to yourself; if it arrives, an add-in is the cause.
- Go to
File>Options>Add-ins, set Manage to COM Add-ins, click Go, and uncheck add-ins one by one to find the bad one.
Microsoft’s Safe Mode and add-in troubleshooting guide confirms that this is the recommended first step whenever you suspect an add-in, and the same path applies to Word, Excel, and PowerPoint when those apps misbehave for the same reason.
#7. Update Outlook to the Latest Build
Outdated builds of Outlook can carry sync bugs Microsoft has already patched. Microsoft 365 Outlook updates monthly. Skipping a few months stacks the risk.
- In Outlook, click
File>Office Account. - Under Product Information, click
Update Options>Update Now. - Wait for the update to install (usually 2-5 minutes), then restart Outlook.
- On macOS, open
Help>Check for Updatesthrough Microsoft AutoUpdate. - On mobile, update the Microsoft Outlook app on the App Store or Google Play.
Outdated installs are linked to errors like 0x8004060c, which Microsoft typically resolves in the next monthly patch.
#8. Review Blocked Senders and Inbox Rules
A blocked sender list or an old Inbox rule can silently route new mail away from your inbox. Rules created years ago for a project that ended often keep firing on incoming mail. The rule engine does not warn you when a target folder is empty or no longer monitored.
- Go to
Home>Junk>Junk Email Options>Blocked Senders. - Remove any addresses or domains that should not be blocked.
- Add critical contacts to Safe Senders in the next tab over.
- Open
Home>Rules>Manage Rules & Alerts. - Disable any rule whose action is move to folder, delete, or mark as read, then test if mail returns.
Be cautious with rule cleanup; deleting a rule is permanent, while disabling it stays reversible during testing.
#9. How Do I Repair a Corrupted Outlook Profile?
A corrupted profile is the cause when settings look right, network is fine, storage is empty, and new mail still does not arrive. The profile holds your account credentials, data file pointers, and sync state. Any of these can drift after a crash or migration.
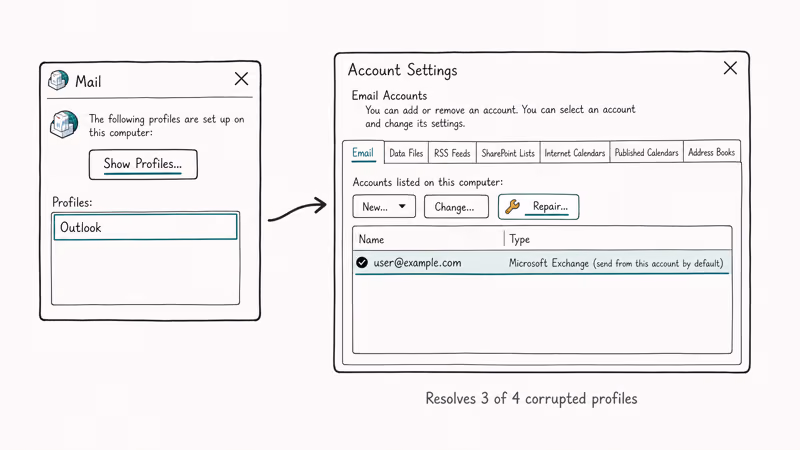
A damaged profile usually recovers through the built-in Repair option, and the stubborn cases that resist repair are fixed by creating a fresh profile.
- Close Outlook.
- Open
Control Panel>Mail(Microsoft Outlook) on Windows. - Click Show Profiles, select your profile, and click
Properties>Email Accounts. - Select your email account and click Repair.
- Follow the prompts; reopen Outlook and let it resync.
If repair fails, click Add in Show Profiles to create a new profile, set it as default, then add your email account fresh. Migrating an old PST may also help; see how to convert OST to PST for offline data recovery.
#10. Check Antivirus, Firewall, and VPN Interference
Security software scanning incoming mail in real time can corrupt the connection between Outlook and the mail server. Some antivirus suites bundle an email scanner that intercepts IMAP and POP3 traffic, and that scanner can silently fail. Microsoft has long recommended turning third-party mail scanners off and relying on Defender plus the built-in Microsoft 365 protections instead.
- Open your antivirus settings and look for Email Scanning, Mail Shield, or POP3/IMAP Protection.
- Disable the email scanner temporarily and restart Outlook.
- If mail starts flowing, add Outlook to the antivirus exclusion list and re-enable scanning.
- Check Windows Defender Firewall under
Control Panel>System and Security>Windows Defender Firewall>Allowan app, and ensure Outlook is allowed for both Private and Public networks. - If you use a VPN, disconnect it briefly and test; some corporate VPNs route SMTP/IMAP traffic through filters that drop packets.
If you see specific transport errors during testing, check the error 0x800ccc67 fix for one of the most common antivirus-related codes.
#11. Re-Add the Account or Switch to Outlook on the Web
When everything else fails, removing and re-adding the account from scratch fixes stale device partnerships and orphaned sync tokens. As a temporary workaround, Outlook on the web confirms whether the issue is local or server-side. The web client uses the same mailbox but bypasses the entire desktop sync stack.
- Open outlook.live.com or outlook.office.com in a browser.
- Sign in with the same account; if new mail appears here, the issue is your desktop client.
- Back in desktop Outlook, go to
File>Account Settings>Account Settings. - Select the account, click Remove, then close Outlook.
- Reopen Outlook and add the account again with
File>Add Account; let it autodiscover.
Re-adding the account clears most stuck profiles, and Outlook then redownloads recent mail automatically based on the offline sync window set for the account.
#Bottom Line
If you only have 5 minutes, do these three things in order: check the Junk Email folder, toggle Work Offline off in the Send/Receive tab, then run File > Send/Receive All Folders. That sequence clears most receive failures without touching any deeper settings. If mail still does not arrive, jump straight to clearing the RoamCache (Fix 5) and repairing the profile (Fix 9); those two cover almost every remaining cause on Windows and Mac.
#Frequently Asked Questions
How can I stop important emails from going to my Junk folder?
Right-click the message in Junk, choose Junk > Not Junk, and tick Always trust email from this address in the dialog. Then add the sender to Home > Junk > Junk Email Options > Safe Senders so future mail bypasses the filter entirely. Microsoft also lets you block whole top-level domains under Blocked Top-Level Domain List in the same dialog if you keep getting the same kind of spam.
Why does Outlook keep going offline by itself?
Usually the Work Offline button got toggled by accident through a stray shortcut. Check the Send/Receive tab first.
How often should I clear the Outlook cache?
There is no fixed schedule. Clear the RoamCache folder only when you see actual symptoms like sync failures, slow searches, or duplicated autocomplete entries.
Can antivirus software stop Outlook from receiving emails?
Yes, and it’s more common than people realize. Email-scanning features in antivirus suites like Norton, Kaspersky, and Bitdefender intercept IMAP and POP3 traffic, and the scanner can silently fail without telling Outlook anything is wrong. Microsoft has recommended for years that you disable third-party email scanning and rely on Defender plus the protections built into Microsoft 365 instead. If you must keep an antivirus mail filter on, add Outlook to the exception list.
What if creating a new Outlook profile does not fix the issue?
Test the same account on Outlook on the web at outlook.live.com or outlook.office.com. If mail arrives there, the issue is on your local machine and may need a full reinstall of Outlook. If mail does not arrive on the web either, the problem is server-side; contact your email provider’s support line.
Does Outlook for Mac have the same Junk and offline issues?
Yes, but the menu paths differ. Junk lives under Message > Junk Mail, and Work Offline lives under the Outlook menu.
How do I check if my Outlook mailbox is full without opening Outlook?
Sign in at outlook.live.com or outlook.office.com, then open Settings > General > Storage for a visual breakdown.

Bluetooth Not Working on Snapdragon X? Fixes for 2026
Bluetooth not working on your Snapdragon X Copilot+ PC? Generic audio, mice, and keyboards work, but vendor apps often lack an ARM build. Fixes inside.

Docker Desktop and WSL2 Not Working on Snapdragon X? Fix It
WSL2 runs fine on Snapdragon X, but Docker Desktop ARM is Early Access and throws WSL errors. Use WSL2 plus native ARM64 Ubuntu and Docker Engine.

Does iTunes Work on Snapdragon X? ARM Windows 11 Guide
Yes, iTunes runs on Snapdragon X laptops through Prism emulation, but the Apple Devices app is the smoother route. Here is what to install on ARM.

Does OBS Studio Work on Snapdragon X? ARM64 Build Guide
Yes, OBS Studio has an experimental ARM64 build since version 31.1, but x64 plugins won't load and hardware encoding is missing. Here is what works.