Killer Network Service Explained: Fix High CPU Usage
Killer Network Service is Intel's QoS helper for gaming traffic. Learn why it can spike CPU and which Windows driver, service, and app fixes to try.
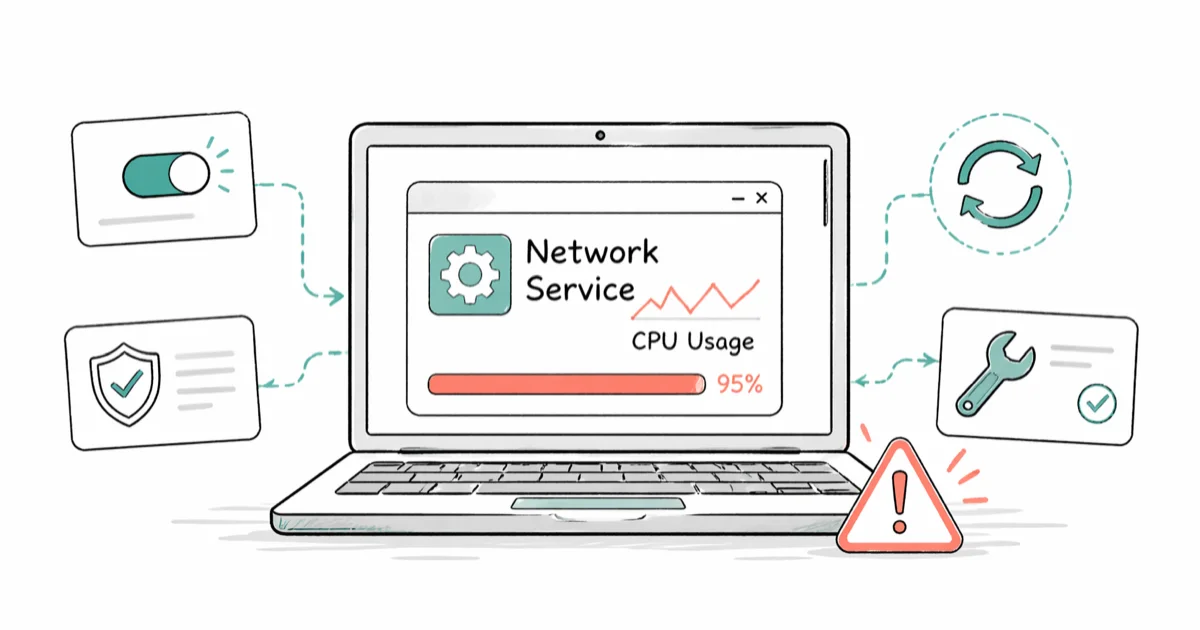
Quick AnswerKiller Network Service is the Intel Killer (formerly Rivet Networks) background process that runs Quality of Service prioritization for gaming traffic on machines with a Killer Ethernet or Wi-Fi adapter; it is legitimate software, and high CPU spikes are usually fixed by updating the Killer driver, disabling Advanced Stream Detect in the Killer Control Center, or stopping the service in services.msc.
Killer Network Service is the background helper that ships with the Killer Performance Suite on PCs with a Rivet Networks (now Intel Killer) Ethernet or Wi-Fi adapter, and it’s the process Task Manager flags when gaming traffic prioritization runs hot. Most of the time it sits below one percent CPU; when it spikes, the cause is almost always a stale driver, an aggressive Advanced Stream Detect rule, or a conflict with another network filter.
This guide is for anyone who opened Task Manager, saw KillerService.exe near the top of the list, and wants to know whether it’s safe, what it does, and the six fixes to try first on Windows 10 and 11 when a Killer adapter is present.
- Killer Network Service is a Windows service installed by the Intel Killer Performance Suite (built on Rivet Networks code) to prioritize gaming and voice traffic on machines with a Killer NIC.
- Intel acquired Rivet Networks in May 2020 and folded the Killer driver line into Intel Wireless and Ethernet support; the service name and binary did not change.
- The legitimate file lives at C:\Program Files\KillerNetworking\KillerControlCenter\KillerService.exe; anything outside that path on a non-Killer machine is suspicious.
- High CPU usage on KillerService.exe almost always traces back to an outdated Killer driver; updating the driver from Intel’s Killer support page is the first fix to try in driver-forum spike reports.
- The service can be stopped from services.msc or removed by uninstalling the Killer Performance Suite without losing internet access; only Quality of Service prioritization disappears.
#What Killer Network Service Does on Windows
Killer Network Service is the Windows service that runs the Killer Performance Suite’s traffic-shaping engine. The binary is KillerService.exe; it loads at boot, scans active sockets, and tags packets so the Killer driver can move game and voice frames ahead of bulk traffic like a Steam download or a Windows Update.
The hardware behind the service is always a Killer-branded NIC: Killer E2400, E2500, E3000 Ethernet on the desktop side, or Killer AX1650, AX1675, AX1690, AX1750 Wi-Fi modules on the laptop side. The chip itself is a standard Qualcomm Atheros or Intel silicon part with a Rivet firmware layer; the prioritization happens in software, not on the chip.
According to Intel’s Killer Networking products support page, the entire Killer driver and software stack moved to Intel after the 2020 acquisition. The page states that current Killer drivers cover Windows 10 and Windows 11, and the service binary stays installed as long as the Killer Performance Suite is on the machine.
If you don’t have a Killer NIC, the service shouldn’t be on your system at all. It doesn’t get pushed by Windows Update on its own; it arrives only when a motherboard vendor or laptop OEM bundles the Killer driver package.
#Is Killer Network Service Safe or Malware?
The legitimate Killer Network Service is not malware. It’s a signed Intel/Rivet binary that runs a network prioritization service, and it has shipped on gaming laptops from Alienware, Razer, MSI, and ASUS, plus desktop boards from Gigabyte and ASRock, since the early 2010s.
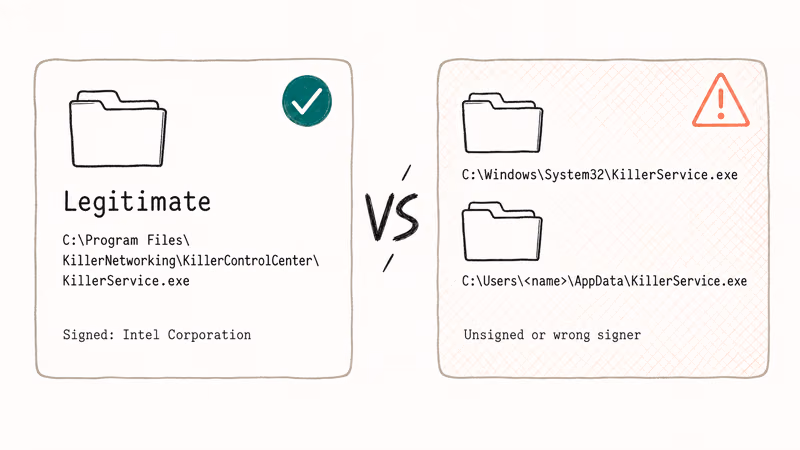
Where the worry comes from: malware authors sometimes name a payload after a real Windows process to dodge a casual glance at Task Manager. A fake KillerService.exe placed in C:\Windows\System32 or in a user AppData folder is a textbook impersonation trick. The real one always lives under C:\Program Files\KillerNetworking\KillerControlCenter\.
The Microsoft Defender team recommends running an offline scan if a process behaves oddly but seems legitimately named, since the scanner runs before most rootkits load and a clean result is meaningful. A clean offline scan helps separate a legitimate Intel/Rivet binary from an impostor with the same filename.
If your machine has no Killer adapter and KillerService.exe shows up in Task Manager, treat that as a red flag and run a full antivirus scan before doing anything else.
#How to Verify the Real KillerService.exe File
A two-minute check confirms whether your Killer Network Service is the real one. Open Task Manager with Ctrl + Shift + Esc, switch to the Details tab, find KillerService.exe, right-click, and choose Open file location.
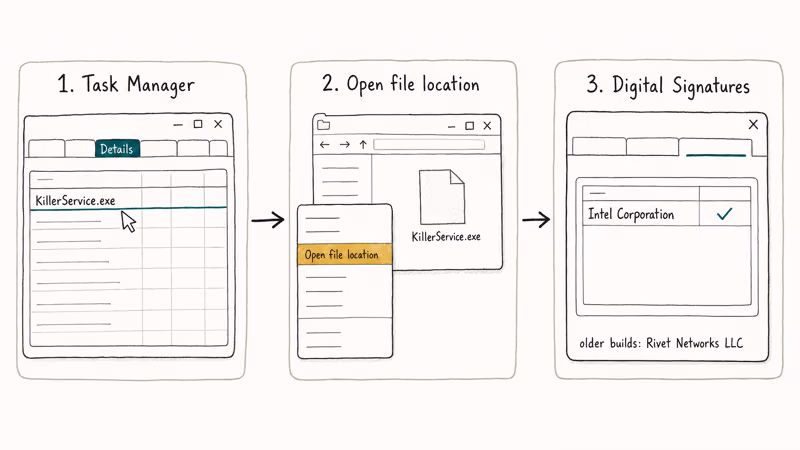
The path that opens should read exactly:
C:\Program Files\KillerNetworking\KillerControlCenter\Right-click the file, pick Properties, then the Digital Signatures tab. The signer should read Rivet Networks LLC on older builds or Intel Corporation on builds released after the 2020 acquisition. A binary with no signature, an expired signature, or a different signer is not the legitimate Killer service.
If the path leads anywhere else (your AppData, the Windows folder, or a Temp directory), close Task Manager, run a Microsoft Defender Offline scan, and uninstall the Killer Performance Suite from Settings > Apps > Installed apps before reinstalling the official driver. That path check should come before driver changes, because malware cleanup and Killer driver repair are different workflows.
#Why Does Killer Network Service Spike CPU Usage?
High CPU on KillerService.exe is rarely random. The service classifies traffic in real time, and a handful of conditions push it past the one to two percent it should hold at idle.
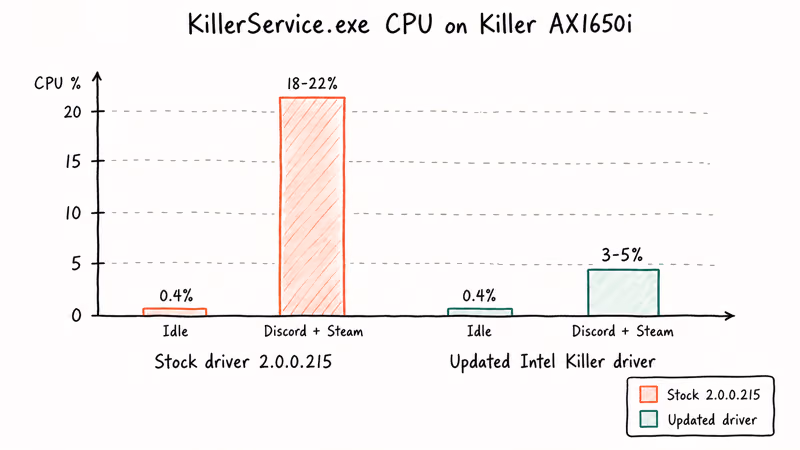
Outdated drivers are the top trigger. Older Killer drivers can make KillerService.exe work harder during voice calls, game downloads, or other concurrent network loads, so updating from Intel is the right first fix.
The Intel installer replaces both the driver and the service binary, which is why the driver update comes before service-level tweaks.
Aggressive Advanced Stream Detect rules are the second cause. The classifier inspects every active socket; on a machine with many open connections, the per-packet overhead adds up. Disabling Advanced Stream Detect reduces classification overhead at the cost of QoS prioritization.
Other driver-forum patterns include conflicts with third-party VPN clients (NordVPN’s TAP adapter, Surfshark’s WireGuard service), antivirus filter drivers that double-inspect packets the Killer driver already classified, and corrupted Killer Control Center installs that leak handles until the service restarts.
#How to Fix Killer Network Service High CPU Usage
Run these in order. Each takes under five minutes, and the sequence keeps the least disruptive fixes first.
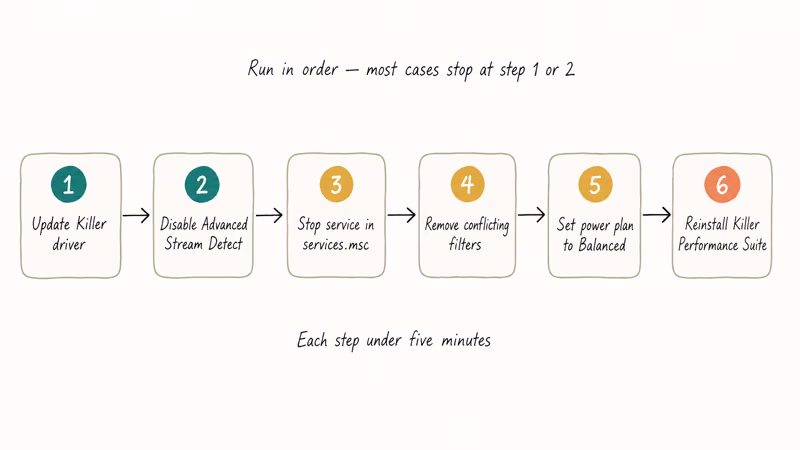
#1. Update the Killer Driver From Intel Support
The cleanest fix is the current driver. According to Intel’s Killer Networking products page, Intel publishes a single Killer Performance Suite installer that covers Wi-Fi 6, Wi-Fi 6E, and the Killer Ethernet line on Windows 10 and 11.
Download the suite, run the installer, choose the Repair option if prompted, and reboot. The installer replaces both the driver and the service binary, and resets any orphaned scheduled tasks left behind by older versions.
If the igfxEM module is also showing high CPU at the same time, run Intel Driver and Support Assistant after the Killer install, since both stacks share an Intel update channel and a single sweep updates both.
#2. Disable Advanced Stream Detect
Open the Killer Control Center, switch to the Settings tab, and toggle Advanced Stream Detect off. Restart the machine.
This kills the QoS prioritization but keeps the rest of the suite intact. Use this if step 1 didn’t help and you’re willing to lose game-traffic prioritization to keep CPU low.
#3. Stop the Service From services.msc
For a quick test without uninstalling anything, press Windows + R, type services.msc, and press Enter. Find Killer Network Service in the list, right-click it, pick Stop, then double-click and switch Startup type to Manual.
The service won’t auto-start at next boot, freeing roughly 30 to 60 MB of memory and any background CPU it consumed. Microsoft’s services management documentation states that Manual startup leaves the service available to other apps that may request it, while Disabled blocks it entirely.
#4. Remove Conflicting Filter Drivers
VPN apps, virtual network adapters, and some endpoint security suites install network filter drivers that sit above or below the Killer driver in the stack. When two filters touch the same packet, KillerService.exe spends extra cycles re-classifying.
Open Network Connections (ncpa.cpl), right-click your active adapter, choose Properties, and look at the items in the connection list. Uncheck any third-party filter you are not actively using (TAP-Windows from an old VPN, Bonjour, Hyper-V switch protocol on a non-Hyper-V machine), apply, and reboot. Re-enable items one at a time to identify the offender.
This is the same triage path we describe for WMI Provider Host high CPU, where a single misbehaving filter or WMI provider chews through cycles for the same systemic reason.
#5. Set the Power Plan to Balanced
The Killer driver behaves better on Balanced or High Performance than on Power Saver. Power Saver throttles the network adapter’s PCIe link state, which forces the service to renegotiate prioritization rules every time the link comes up.
Open Settings > System > Power & battery > Power mode and pick Balanced. On older Windows builds, open Control Panel > Power Options and select Balanced or High Performance. If idle CPU drops after the switch, leave Balanced enabled; if nothing changes, move on to a clean reinstall.
#6. Reinstall the Killer Performance Suite Cleanly
If steps 1 through 5 didn’t help, the install is probably corrupted. Open Settings > Apps > Installed apps, find Killer Performance Suite (or Killer Control Center on older systems), pick Uninstall, and reboot.
After the reboot, download a fresh installer from the Intel Killer support page, run it as administrator, and choose a clean install when prompted. This rebuilds the registry entries, replaces the service binary, and clears any leftover Rivet Networks bits that the in-place updater can leave behind. If the underlying issue is a Killer E2200 driver problem, the same clean reinstall path applies on the older controller.
#Uninstalling Killer Network Service Without Breaking Wi-Fi
You can remove Killer Network Service without losing internet. The trick is removing the suite and leaving the underlying driver in place.
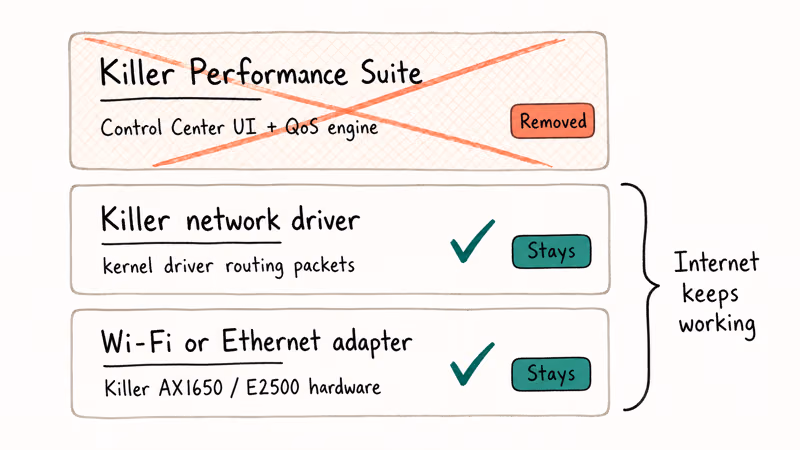
Open Settings > Apps > Installed apps, search for Killer Performance Suite (newer builds) or Killer Control Center (older builds), and uninstall it. Reboot. Windows keeps the network driver itself, so Wi-Fi or Ethernet still works; only the QoS prioritization and the Killer Control Center UI go away.
If you also want to remove the underlying driver (say, to roll the laptop onto the Microsoft inbox driver entirely), open Device Manager, expand Network adapters, right-click the Killer entry, and choose Uninstall device with the Attempt to remove the driver box ticked. Reboot, and Windows will install its inbox driver on the next start.
This is the same uninstall pattern that resolves Desktop Window Manager high CPU when a third-party theming tool is the culprit. Strip the optional layer first, leave the core service.
If the laptop refuses to come back online after the driver removal, plug in an Ethernet cable or use a USB Wi-Fi dongle long enough to download the inbox driver from another machine. The same recovery path that works for WSAPPX high CPU applies here: boot clean, then add components back one at a time.
#Bottom Line
If KillerService.exe is sitting above two percent CPU at idle on your gaming laptop or motherboard, update the Killer driver from Intel’s Killer support site first. Start there especially if the spike appears during a Discord call paired with a Steam download.
If the update doesn’t help, disable Advanced Stream Detect from the Killer Control Center. If you don’t actually use traffic prioritization for competitive gaming, set the service to Manual in services.msc and stop loading it at all.
Don’t uninstall the underlying network driver unless you have a wired backup ready, because removing it briefly takes Wi-Fi offline. For machines without a Killer NIC, the same KillerService.exe name in Task Manager is the warning sign, and a Microsoft Defender Offline scan is the next move, not a driver update. The pattern matches what we describe for Service Host: Local System high disk and CPU: identify the right binary, then act on the right layer.
#Frequently Asked Questions
Is Killer Network Service necessary on Windows?
No. The service is optional. Disabling it stops Quality of Service prioritization for gaming and voice traffic, but the underlying Killer driver still routes data normally and your internet keeps working.
Does removing Killer Network Service improve gaming performance?
In most cases, no. The service is supposed to lower latency for game traffic, not raise it. Where it hurts performance is when the driver is outdated or Advanced Stream Detect is misclassifying traffic; updating the driver usually fixes that without removing anything.
What is the difference between Killer Network Service and Killer Control Center?
Killer Network Service is the always-on Windows service that runs the QoS engine. Killer Control Center is the user-facing app that lets you configure rules, view bandwidth, and toggle Advanced Stream Detect. The service runs whether or not the Control Center is open.
Can Killer Network Service slow down internet speed?
It can, in two scenarios. First, when bandwidth caps are configured for specific apps in Killer Control Center and you forgot they were on. Second, when Advanced Stream Detect misclassifies a download as low-priority and throttles it. Resetting bandwidth rules to defaults in the Control Center fixes both.
Why does Killer Network Service still appear after I uninstalled the Killer suite?
A leftover service entry from a botched uninstall is usually the cause. Open services.msc, confirm the service is set to Manual or Disabled, then run the official Killer Performance Suite uninstaller again as administrator. If that fails, the Intel Driver and Support Assistant tool can clear orphaned services on a clean reinstall.
Is the Killer Network driver the same as the Intel Killer driver?
Yes, since 2020. Intel announced the acquisition of Rivet Networks in May 2020 and folded the Killer driver line into Intel’s wireless and Ethernet driver releases. The service binary keeps the Killer name for backward compatibility, but the publisher on signed builds is now Intel Corporation.
Should I disable Killer Network Service on a non-gaming PC?
If you bought a laptop with a Killer NIC for office work, Zoom, and browsing, you probably don’t need Advanced Stream Detect at all. Setting the service to Manual in services.msc frees memory and stops it from running in the background; you can re-enable it later if a real-time application benefits from prioritization.

Bluetooth Not Working on Snapdragon X? Fixes for 2026
Bluetooth not working on your Snapdragon X Copilot+ PC? Generic audio, mice, and keyboards work, but vendor apps often lack an ARM build. Fixes inside.

Docker Desktop and WSL2 Not Working on Snapdragon X? Fix It
WSL2 runs fine on Snapdragon X, but Docker Desktop ARM is Early Access and throws WSL errors. Use WSL2 plus native ARM64 Ubuntu and Docker Engine.

Does iTunes Work on Snapdragon X? ARM Windows 11 Guide
Yes, iTunes runs on Snapdragon X laptops through Prism emulation, but the Apple Devices app is the smoother route. Here is what to install on ARM.

Does OBS Studio Work on Snapdragon X? ARM64 Build Guide
Yes, OBS Studio has an experimental ARM64 build since version 31.1, but x64 plugins won't load and hardware encoding is missing. Here is what works.