How to Restore Your iPhone Without Updating iOS (2026)
Restore your iPhone without triggering an iOS update using 4 methods: Settings reset, Finder restore, Recovery Mode, or iCloud backup. Step-by-step guide.
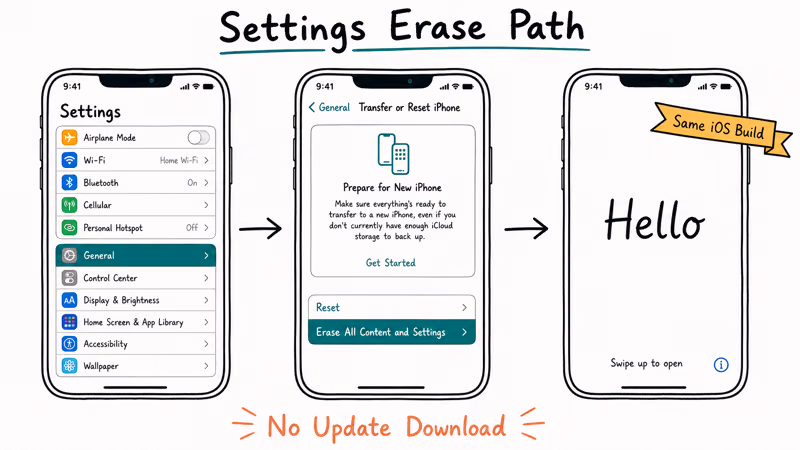
Quick AnswerTo restore your iPhone without updating, go to Settings > General > Transfer or Reset iPhone > Erase All Content and Settings. This wipes your device to factory defaults on your current iOS version with no forced iOS upgrade.
You can restore your iPhone without updating iOS, and for most people the Settings erase route does the job in under five minutes. This guide covers all four methods on your own iPhone, with the timings, prompts, and limits you’ll actually see on screen.
Settings>General>Transferor Reset iPhone>Erase All Content and Settingsresets your device on the same iOS version you already have- Finder on Mac (or iTunes on Windows) lets you restore a local backup without an iOS upgrade as long as you click “Restore Backup” instead of “Restore iPhone”
- Recovery Mode in Finder shows a “Restore” button that skips the “Update” choice but still installs whichever iOS firmware Apple is currently signing for your model
- Disabling automatic updates before restoring stops the setup wizard from pushing a version upgrade during the activation phase
- iCloud backup keeps your apps and data intact after an erase and works without a computer, though restore time scales with backup size and Wi-Fi speed
#Method 1: Erase via Settings (No Computer Required)
This is the fastest route and the best choice for most situations. It resets your iPhone to factory defaults on whatever iOS version is currently installed.
- Go to
Settings>General>Transferor Reset iPhone - Tap Erase All Content and Settings
- Enter your passcode or Apple ID password when prompted
- Tap Continue to confirm
The erase itself runs in five to ten minutes on every modern iPhone. When the device restarts into the setup wizard, you’ll hit a software update prompt; tap Later or Set Up Without Updating to activate without installing a newer iOS. Back the iPhone up first. If you skip that, your photos, messages, and app data are gone permanently.
One caveat: if your iPhone is enrolled in an MDM profile (common on work or school devices), you’ll need admin credentials to erase. For personal iPhones you own outright, this step is straightforward.
See also: what restoring an iPhone actually does if you want a deeper explanation of how the erase process works under the hood.
#Does Finder or iTunes Force an Update When You Restore a Backup?
No. Restoring a backup through Finder (or iTunes on Windows) preserves your current iOS version, as long as you pick the right button.
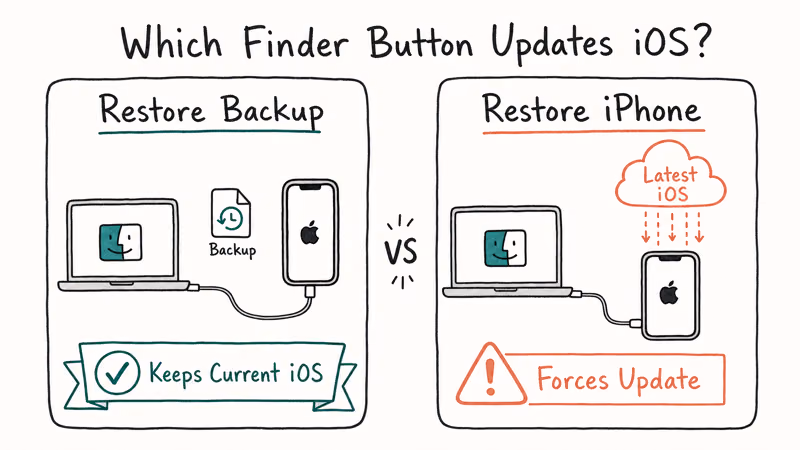
Open Finder, select your iPhone, and click Restore Backup (not “Restore iPhone”). Finder lists every available backup with date and size so you can pick the right one. Click Restore, keep the cable connected, and wait for the progress bar to finish. The bar typically clears in five to fifteen minutes depending on backup size.
Picking Finder’s “Restore Backup” option leaves the device on the same iOS build the whole time, with no update prompt during the restore. According to Apple’s iPhone backup and restore documentation, Finder restores the selected backup to the connected iPhone rather than treating that action as a software-update command, which is exactly why the iOS version stays put.
Disable automatic update checks before you start. In Finder, go to Finder > Preferences > Devices and uncheck “Automatically sync when this iPhone is connected.” In iTunes on Windows, go to Edit > Preferences > Devices and do the same.
If the backup you want doesn’t appear in the list, the backup itself may have failed silently. Read our guide on fixing iPhone backup failed errors before you press on.
#Can Recovery Mode Restore Your iPhone Without Updating?
Recovery Mode is the right tool when your iPhone won’t boot normally, but it comes with one important caveat: it almost always installs the latest iOS firmware.
Here’s what actually happens. When you put your iPhone into Recovery Mode and click “Restore,” Finder pulls the current signed firmware for your model from Apple’s servers. Apple typically signs only the most recent major release at any given moment, so Recovery Mode is not a version-locking tool. Use it to unbrick a device that won’t boot, not to stay on an older iOS version.
How to enter Recovery Mode by model:
- iPhone 8 or later (including all USB-C models): Press and quickly release Volume Up, press and quickly release Volume Down, then hold the Side button until the recovery screen appears
- iPhone 7 and 7 Plus: Hold Volume Down and the Side button together until the recovery screen appears
- iPhone 6s or earlier: Hold Home and the Top (or Side) button together
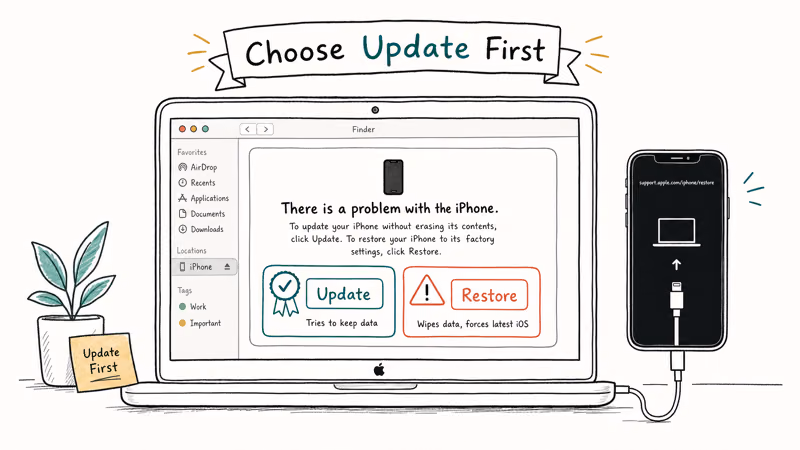
Once you see the recovery screen, Finder or iTunes will detect the device and offer a Restore or Update choice. Choose Restore. The Update option installs only the newest iOS without erasing data; Restore erases the device and installs whatever firmware Apple is currently signing.
If the device gets stuck in Recovery Mode after the process starts, our guide on fixing an iPhone stuck in Recovery Mode walks through the next steps.
#Restoring from iCloud Backup
iCloud backup restores your apps and data without a USB cable. It doesn’t force an iOS update on its own. The iOS version you end up on is whatever Apple is signing during setup.
Step 1: Erase your iPhone using Settings > General > Transfer or Reset iPhone > Erase All Content and Settings.
Step 2: Work through the setup wizard until you reach the Apps and Data screen. Tap Restore from iCloud Backup.
Step 3: Sign in with your Apple ID, then choose the backup you want from the list. Keep the iPhone on Wi-Fi and plugged into power until the restore finishes.
Apple’s iCloud documentation confirms that iCloud backup includes app data, settings, and photos but not the iOS version itself, so restoring an older iCloud backup onto an iPhone already running a newer iOS keeps you on that newer build. Apple also states that each Apple Account includes 5 GB of free iCloud storage, so larger restores often need either a paid storage tier or the temporary full-device backup offer Apple shows during setup.
iCloud backup is the right pick if you don’t have a Mac or Windows PC nearby. The main downside is speed. Restoring a large backup over home Wi-Fi can take an hour or longer.
#Third-Party iOS System Repair Tools
Several reputable apps offer a Standard Repair mode that re-flashes iOS firmware while attempting to keep your data intact:
Some links on this page are affiliate links, which means fone.tips may earn a commission at no extra cost to you.
These tools are useful when:
- Your iPhone loops on the Apple logo and Recovery Mode won’t connect
- iTunes throws error 4013 or error 14 repeatedly
- The device is stuck on the activation screen after a failed restore
On an iPhone with a persistent boot loop, Tenorshare ReiBoot’s standard repair mode is designed to bring the device back to a working state without wiping data. Final iOS version still depends on which firmware Apple is signing that day, so version control stays limited. See our guide on iPhone boot loop fixes for related troubleshooting steps.
These tools cost money (typically $30 to $60 for a single license) and require a computer. They don’t give you a reliable way to lock a specific older iOS version once Apple has stopped signing it.
#Preventing Automatic iOS Updates During and After Restoration
After an erase, the setup wizard pushes iOS updates by default. Here’s how to handle the prompt at each stage.
During the setup wizard: On the Software Update screen, tap Later or Remind Me Tomorrow when the option appears. Some iOS versions show Set Up Without Updating as a dedicated button.
After activation, prevent background installs:
- Go to
Settings>General>Software Update - Tap Automatic Updates
- Turn off Download iOS Updates and Install iOS Updates
Apple’s software update support page recommends turning automatic updates on for security reasons, and that’s a real tradeoff: most iOS point releases ship with security fixes, so any version you skip has to be patched by hand later. If you stay on an older version for app compatibility, revisit this setting every few weeks and install patches by hand when they appear.
If you want to step back to a specific older iOS version after an accidental update, read our guide on how to downgrade iOS without iTunes.
#Bottom Line
If your iPhone is functional, start with Method 1 (Settings erase). It finishes in under ten minutes and keeps you on your current iOS version.
Pair the erase with an iCloud or Finder backup restore to get your data back on that same iOS build. Use Recovery Mode only when the iPhone won’t boot, since it installs whichever iOS Apple is currently signing. Reach for third-party tools like Tenorshare ReiBoot or iToolab FixGo when error 4013 or a persistent boot loop blocks you and Recovery Mode won’t connect.
iPhone tips & tricks
#Frequently Asked Questions
Does the Settings erase method update iOS?
No. Erasing via Settings > General > Transfer or Reset iPhone wipes your data but leaves the iOS version unchanged. The only update prompt you’ll see is in the setup wizard afterward, and you can skip it by tapping Later or Set Up Without Updating.
Can you restore your iPhone without a computer?
Yes. Settings erase and iCloud restore both work over Wi-Fi.
What’s the difference between “Restore iPhone” and “Restore Backup” in Finder?
“Restore iPhone” erases the device and reinstalls the latest iOS firmware. “Restore Backup” puts your data back without touching the iOS version. Pick the second option if you want to avoid a firmware update.
Will Recovery Mode always install the latest iOS?
Almost always, yes. Recovery Mode pulls firmware from Apple’s servers, and Apple only signs the current release for most devices. The one exception is loading a valid IPSW file manually by holding Option (Mac) or Shift (Windows) while clicking Restore in Finder, but the signing window for older firmware closes quickly after a new release.
How do you keep your iPhone on an older iOS version?
Disable automatic updates at Settings > General > Software Update > Automatic Updates and turn off both Download iOS Updates and Install iOS Updates. You can stay on your current iOS indefinitely, but security patches won’t arrive unless you check manually. Apple ships security-focused updates frequently, so check in every few weeks if you’re sitting on an older version. Downgrading past what’s currently installed only works if Apple is still signing that firmware.
What should you do if your iPhone gets stuck during restoration?
Force-restart first: press Volume Up, press Volume Down, then hold the Side button until the Apple logo appears. If the iPhone stays stuck on the restore screen, connect it to a Mac or PC and retry Restore from Recovery Mode.
Is it safe to use third-party tools to restore an iPhone?
Reputable tools like Tenorshare ReiBoot and iToolab FixGo are safe to use on your own iPhone. They pull firmware from Apple’s servers and don’t install unofficial software on the device. Avoid any tool that asks for your Apple ID password or claims to remove activation locks on phones you don’t own; those fall outside legitimate iOS restoration.

Best Wireless Earbuds for iPhone in 2026: USB-C Era Picks
Best wireless earbuds for iPhone in 2026, comparing AirPods Pro 3, Sony WF-1000XM6, Bose QC Ultra, and Anker Liberty 4 NC on the USB-C iPhone lineup.

iPhone Keyboard Lag? 7 Proven Fixes for iOS 26 (2026)
Fix iPhone keyboard lag with 7 proven fixes for iOS 26. Covers restart, storage, predictive text, third-party keyboards, and dictionary reset.
How to Block Porn on an iPhone: A Guide for Parents
Learn how to block porn on iPhone using Screen Time, DNS filtering, and safe browsers. Step-by-step guide for parents to protect kids' devices.
How to Detect Spyware on iPhone: Signs, Checks, and Removal
Learn how to detect spyware on your iPhone with step-by-step checks for suspicious apps, profiles, and battery drain. Remove threats safely.