iMovie Time-Lapse: Mac and iPhone Step-by-Step (2026)
Make a time-lapse in iMovie on Mac, iPhone, or iPad. Speed presets, photo-to-video method, shooting tips, and audio fixes that actually work in 2026.
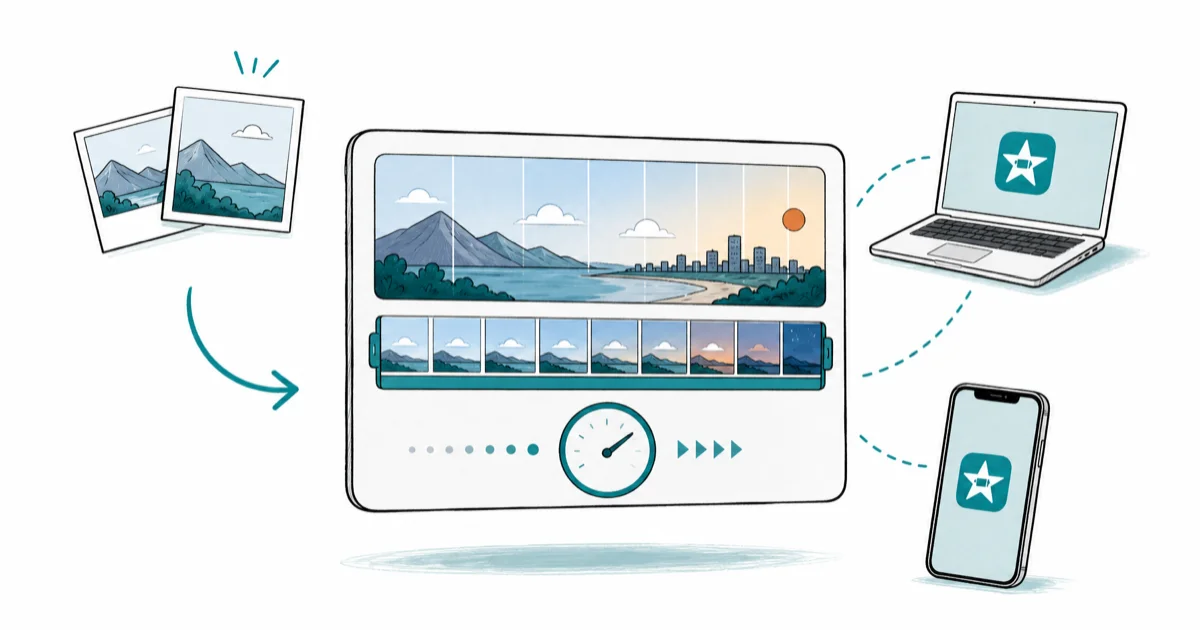
Quick AnswerDrop your clip on the iMovie timeline, click the speed icon (clock on iOS, speedometer on Mac), choose Fast and pick 8x or 20x. For photo sequences, set Photo Duration to 0.1s in Preferences before importing.
A time-lapse in iMovie takes about three clicks once you find the speed button. There are two routes on Mac and iPhone. The Mac flow handles photo sequences faster, while the iPhone flow wins when you already shot footage in the native Camera app’s Time-Lapse mode.
This guide covers both. Start with the path that matches what you already have on your device.
- Set Photo Duration to 0.1 seconds in iMovie Preferences before importing photos so each image fills one timeline slot instead of the default 4 seconds.
- Speed multipliers of 8x to 20x cover most subjects: 8x for traffic and crowds, 20x for clouds and plant growth, 40x to 60x for sunsets shot over an hour.
- A tripod or weighted phone mount is non-negotiable because tiny shifts between frames stack into visible jitter at high speeds.
- Export your first pass as a file, re-import it, and apply 250% to 300% to get smoother 25 or 30 fps output than a single-pass speedup.
- Lock exposure and focus before recording to stop the flicker that automatic adjustments cause between frames.
#Which iMovie Time-Lapse Method Should You Use?
The answer depends on your source material. Two paths produce a time-lapse, and they handle source video very differently.
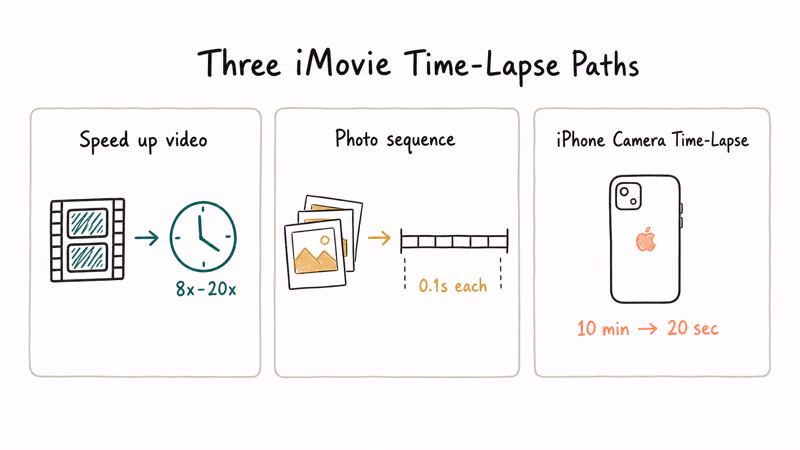
Path one takes a regular video clip and speeds it up. iMovie compresses 10 seconds of footage into a 1-second blur at 10x. Apple’s change clip speed walkthrough for iMovie on Mac states that the Fast presets reach up to 20x, with a Custom field for any value in between. Anything past 20x requires the double-pass trick described later in this guide.
Path two stitches a photo sequence into a video. You take 200 still images at fixed intervals (5 seconds, say), drop them on the timeline, and iMovie plays them back at 0.1 seconds each. Serious shooters take this route.
A third option skips iMovie entirely on iPhone. The native Camera app has a built-in Time-Lapse mode that picks intervals based on recording length. According to Apple’s Camera support page, the camera adjusts the capture rate automatically as you record. A 10-minute recording produces about 20 seconds of finished video, no editing required.
#Setting Up iMovie Before You Start
Two settings make the difference between a usable time-lapse and a jittery mess. Both live in Preferences and only need to be set once.
Open iMovie on Mac, then go to iMovie > Settings (or Preferences on older macOS).
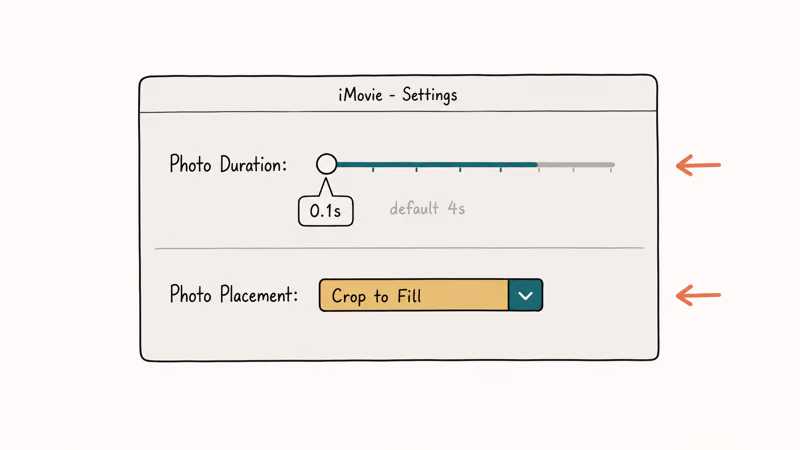
Set Photo Duration to 0.1 seconds. The default of 4 seconds turns a 200-photo sequence into a 13-minute slideshow rather than the 20-second time-lapse you actually want.
Next, set Photo Placement to Crop to Fill. Mixed photo dimensions (some portrait, some landscape) otherwise leave black bars that flicker every frame. The Photo Duration tweak applies to all future imports, not retroactively to clips already on the timeline.
On iPhone and iPad, iMovie doesn’t expose Photo Duration as a setting. The mobile app uses a fixed 3-second photo duration, which is why most iOS users speed up existing video instead of building photo sequences. If you need photo-sequence control on mobile, OSnap on the App Store handles interval shooting and stitches the result before you ever open iMovie.
#How Do You Speed Up Video in iMovie on Mac?
This is the fastest way to turn an existing video into a time-lapse. The whole process takes under two minutes once your clip is in the timeline.
First, import your footage. Click File > Import Media, select your clips, and click Import Selected. Drag them into the timeline in the order you want them to play.
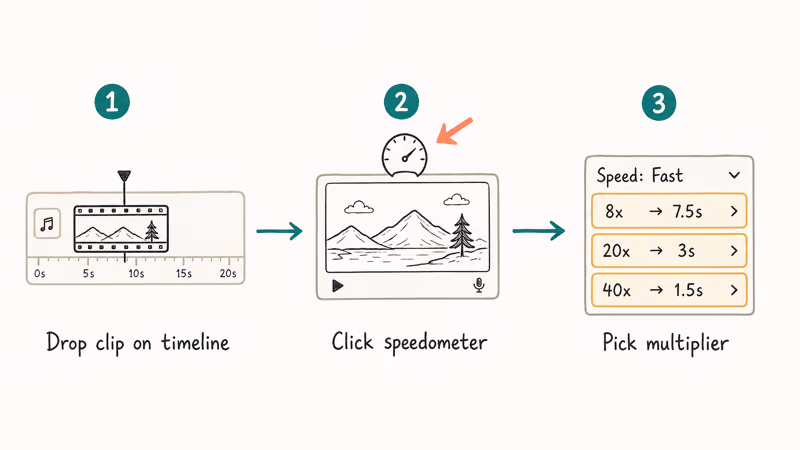
Click the clip on the timeline so it shows yellow selection borders, then click the speed icon above the preview window — the small speedometer. A panel slides down with Speed, Forward/Reverse, and Preserve Pitch options on iMovie 10.4 and 10.3.
Set Speed to Fast and pick a multiplier from the dropdown.
On a 60-second cloud clip the presets work out to simple math: 8x cuts it to 7.5 seconds (good for animated clouds), 20x to 3 seconds (dramatic), and 40x to 1.5 seconds (almost too fast for sky). For most subjects, 8x is your starting point.
Preview the result by pressing the spacebar. Choppy motion means your source frame rate was too low. Try a slower multiplier like 4x or 6x and re-record the source at 60 fps next time.
When export hangs or errors out, our iMovie video rendering errors guide covers the corrupted-clip and mixed-format fixes.
#Building a Time-Lapse from Photos on Mac
This route gives you the cleanest output but takes more setup. You need 100 to 600 photos shot at fixed intervals, usually with an interval-shooting app or a camera with built-in intervalometer.
After importing photos with Photo Duration set to 0.1s, drag them all onto the timeline at once. iMovie places each one as a 0.1-second clip, which means 600 photos play back in 60 seconds at 10 fps. That frame rate looks slightly stuttery, which leads to the trick most YouTube tutorials skip.
Export your sequence (File > Share > File, choose ProRes or H.264 1080p). Then create a new iMovie project, import the exported video, and apply 250% or 300% speed using the speed icon. The double-pass produces smoother 25 or 30 fps output because iMovie interpolates between the original 10 fps frames during the second speedup.
A small note on color. Shoot in your camera’s flat or log profile if it has one, then apply iMovie’s color adjustments to all clips at once after you finish the speed pass. Color grading after speedup keeps the look consistent across every frame.
#Making a Time-Lapse on iPhone or iPad
The mobile flow has fewer options but works without a Mac. Open iMovie on your iPhone, tap Start New Project, and pick Movie. Tap the Plus icon, choose your source video from Photos, and tap Create Movie.
Your clip drops into the timeline.
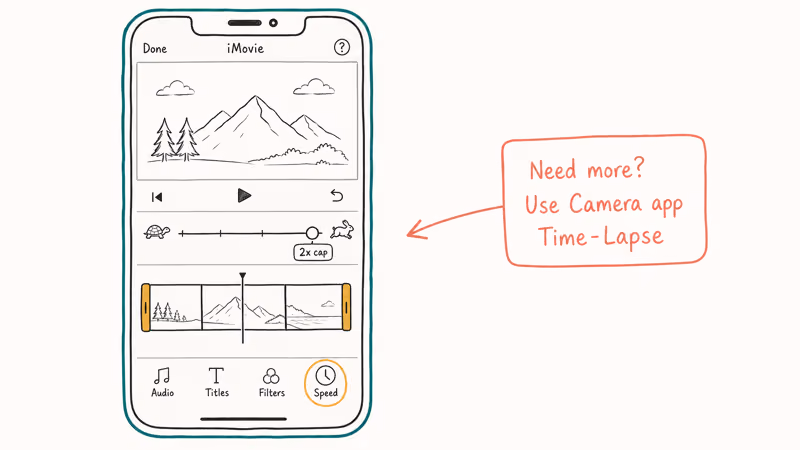
Tap it once so the yellow trim handles appear, then tap the speed icon (a clock symbol on iOS) at the bottom of the screen. A turtle-to-rabbit slider appears above the timeline. Drag toward the rabbit to hit 2x — that’s the mobile cap.
Need more than 2x? Use the iPhone Camera app’s Time-Lapse mode before opening iMovie, or duplicate the sped-up clip and trim each copy down. The native Camera app is the cleaner route, since its captured footage already lands around 30x to 100x depending on recording length.
Tap Done, then the share icon and Save Video. To stack clips side-by-side, our putting multiple videos on one screen in iMovie guide covers picture-in-picture.
#Advanced Techniques for Smoother Output
The double-pass speedup is the single biggest quality improvement. Here are three more that compound on top of it.
Lock exposure and focus before recording. On iPhone, long-press the spot you want sharp until the AE/AF Lock banner appears. Without this, the camera adjusts every frame, producing the flickering exposure shifts that mark amateur time-lapses. The 9to5Mac team recommends this same lock technique for iPhone time-lapses.
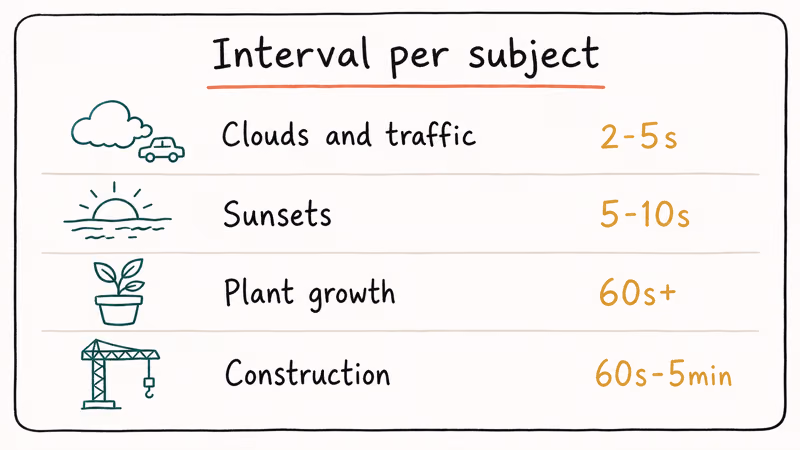
Pick your interval to match your subject. Clouds work at 2 to 5 seconds between frames; plant growth wants 60 seconds or more; sunsets land in the 5 to 10 second range for a 90-minute window.
Too short wastes storage and too long produces visible stutter.
Use a wired power source for sessions over 20 minutes. iPhone batteries drain fast in Camera mode, and a dead phone mid-shoot kills hours of waiting. A long unplugged sunset shoot can easily die well before the light does once the battery runs flat.
You can also change the aspect ratio in iMovie to match Instagram, TikTok, or YouTube before exporting.
#Cleaning Up Audio and Color
Sped-up video either sounds chipmunky or scraped raw. Neither works for a polished time-lapse. The fix is to mute the original audio and add music or ambient sound separately.
In iMovie on Mac, click your clip, then click the volume icon (a small speaker) in the inspector. Drag the volume slider to zero.
On iPhone, tap the clip, tap the volume icon at the bottom, and drag the slider all the way left. Then drag a music track from iMovie’s built-in soundtracks (or your Music library) onto the timeline above your video.
When the time-lapse carries voiceover or natural sound worth keeping, our iMovie background noise removal walkthrough covers the equalizer and noise-gate trick that strips wind, HVAC hum, and crowd murmur without killing the source. On an outdoor clip with steady wind, the noise floor drops noticeably after the gate is applied.
For color, iMovie’s auto color tool handles most cases. Click your clip, click the color wand in the inspector, then right-click and choose Paste Adjustments > All to copy that look to every clip.
#Bottom Line
Quick time-lapse from existing video? Drop the clip on a Mac timeline, click the speedometer, and pick 8x.
For maximum quality, shoot a photo sequence with a tripod and interval shooter, set Photo Duration to 0.1s in iMovie Preferences, and run the export through iMovie a second time at 250% to get smooth 30 fps output. When you only have a phone, the iPhone Camera app’s built-in Time-Lapse mode beats trying to push iMovie mobile past its 2x ceiling.
For matching different platforms after editing, our vertical video editor comparison covers tools that re-frame to TikTok or Reels formats.
#Frequently Asked Questions
Can I create a time-lapse from existing video footage in iMovie?
Yes. Drop the clip on the timeline, click the speed icon, choose Fast, and pick a multiplier between 4x and 20x. Source video shot at 60 fps gives smoother results than 30 fps when you push past 8x.
What’s the right interval between photos for a time-lapse?
Match the interval to your subject. Clouds and traffic look right at 2 to 5 seconds between frames; sunsets and shadows want 5 to 10 seconds across a 60- to 90-minute window; plant growth or construction needs 60 seconds to 5 minutes per frame. Faster movement equals shorter intervals.
How long should my final time-lapse video be?
Aim for 15 to 30 seconds. Most viewers lose interest past 30 seconds unless the subject changes dramatically (sunrise to sunset, season transitions). For social media, 10 to 15 seconds matches platform defaults.
Why does my iMovie time-lapse look jittery?
Three causes account for almost every jitter complaint. Your camera moved between frames (use a tripod), your source frame rate was below 30 fps (re-shoot at 60 fps), or your speed multiplier was too aggressive for the source (try 4x instead of 20x and see if motion smooths out).
Can I edit a time-lapse after posting it on social media?
You usually can’t edit the file itself once it’s uploaded, but TikTok lets you trim and add effects after posting. Our guide on editing TikTok videos after posting covers what’s possible per platform.
What’s the iPhone Camera app’s Time-Lapse mode actually doing?
It records at a low frame rate that scales with how long you record. According to Apple’s iPhone Camera support documentation, the camera samples about 2 frames per second for short clips and drops to roughly 1 frame every few seconds for long sessions. Final output always plays back at 30 fps, so a 30-minute recording produces smoother results than a 5-minute one.
Does iMovie limit how long my time-lapse can be?
iMovie doesn’t cap project length, but mobile devices run out of memory on projects past 15 minutes of timeline content. On Mac you can build hour-long sequences without issue if you have 16 GB of RAM or more. For more general video tools, see our best video players roundup if you want playback testing options.

Apps Crashing After iOS 27 Update? Fix Order (2026)
Apps crashing after the iOS 27 update? Update the app in the App Store first, then offload and reinstall to clear stale cache, then restart. The fix order.

Do AI Translation Earbuds Work Offline? What to Know
Do AI translation earbuds work offline? A few do with downloaded language packs, but most need the cloud. Here's what works offline and what you give up.

How to Set Up Translation Earbuds (Pairing and Modes)
How to set up translation earbuds: charge, install the app, pair over Bluetooth, pick two languages, and choose a mode. A step-by-step first-use guide.

Translation Earbuds Not Translating? How to Fix Them
Translation earbuds not translating? Usually it's the app, the internet, or the language settings. Here's how to fix pairing, sound, and lag fast.