How to Screen Record on Windows 11 (Built-In Tools)
Record your Windows 11 screen with the built-in Snipping Tool recorder and Xbox Game Bar, capture audio, choose a region, and find where files save.
Quick AnswerOpen the Snipping Tool, click the record button, select an area, and press Start. For full-screen capture with audio, press Windows + G to open Xbox Game Bar.
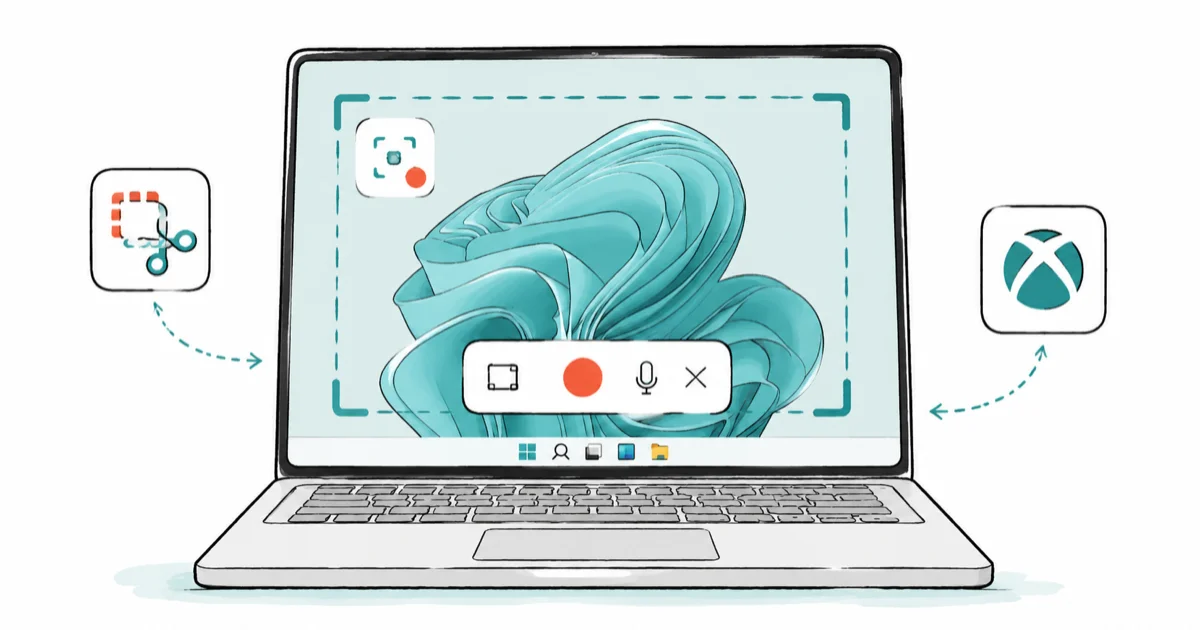
You can screen record on Windows 11 without installing anything. Two built-in tools cover it: the Snipping Tool for quick region clips and Xbox Game Bar for full-app capture with audio. Knowing which one fits saves a needless download.
- The Snipping Tool records a selected region; press Windows + Shift + R to jump straight to it.
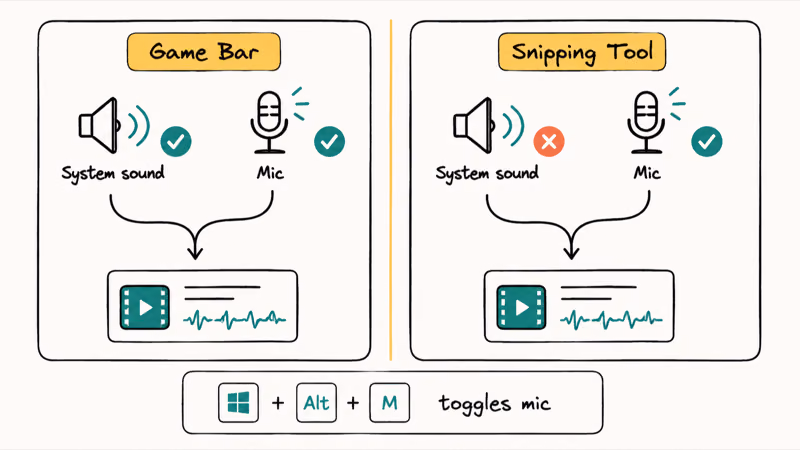
- Xbox Game Bar (Windows + G) records the active app or game with system and microphone audio.
- Game Bar can’t record the desktop or File Explorer, so use the Snipping Tool there.
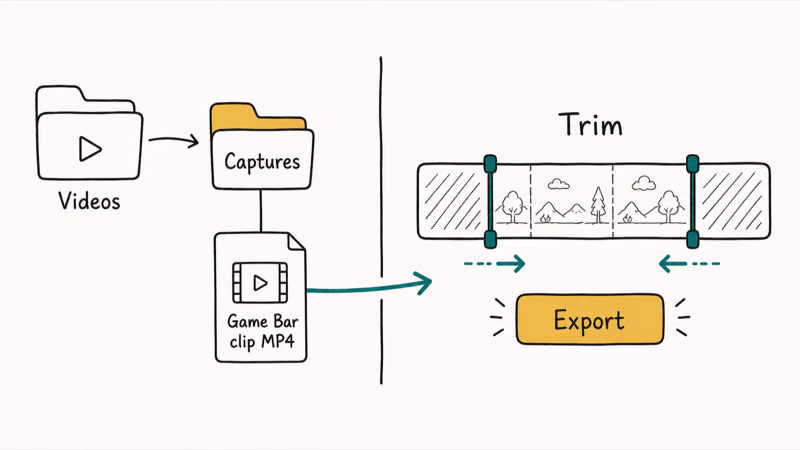
- Game Bar clips save to
Videos>Capturesas MP4 files, named with the app and time. - Reach for a third-party app only when you need advanced editing or restricted desktop areas.
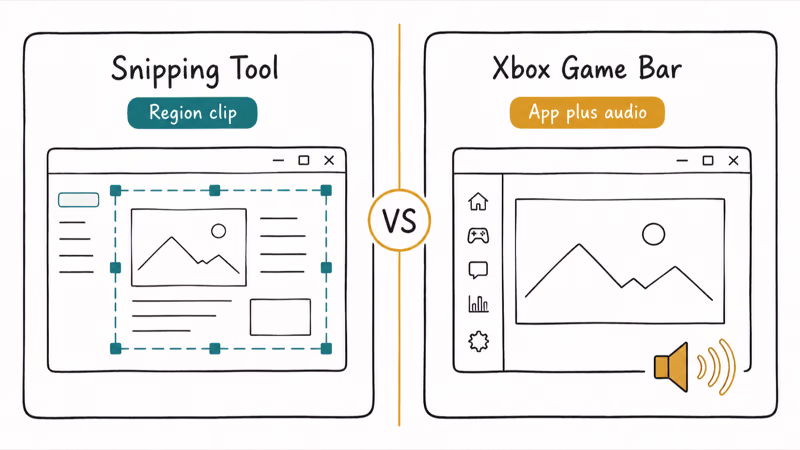
#Which Built-In Tool Should You Use?
It comes down to what you’re recording. The Snipping Tool is best for a slice of the screen, like a settings window or a short how-to. Game Bar is built for a whole app or game, and it’s the one that grabs system sound.
Here’s the quick rule.
Pick the Snipping Tool for a tidy region clip you’ll share fast, and pick Game Bar when you need the audio playing through your speakers captured too. Most people only need to learn one of them well, and the Snipping Tool covers the everyday cases. If you also want still images, the guide to screenshot on Windows walks through those shortcuts.
#Recording With the Snipping Tool
The Snipping Tool gained a recorder, so it’s no longer just for screenshots. Microsoft’s Snipping Tool guide confirms that you can now capture video of your screen, not only still screenshots.
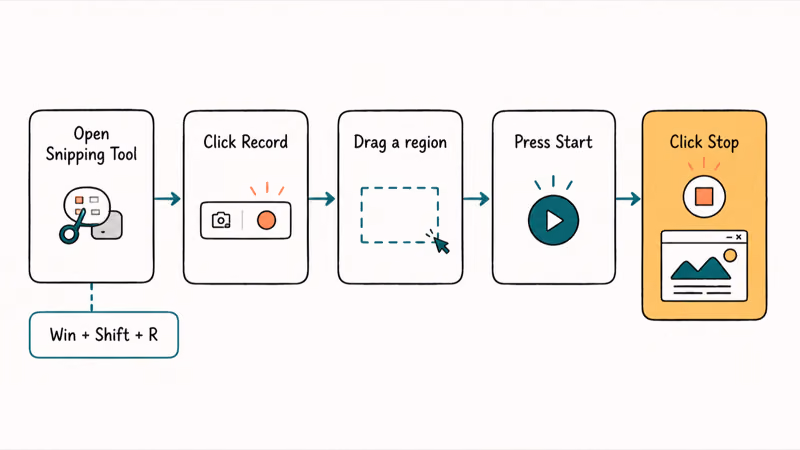
Open it and click the Record button, or just press Windows + Shift + R.
Drag a rectangle around the area you want, then click Start. A short countdown runs, the clip records, and you click Stop when you’re done.
After you stop, the region clip opens in a preview screen with an option to send it to Clipchamp for trimming. That makes the Snipping Tool ideal for a fast region capture you want to share without any editing detour.
#Recording With Xbox Game Bar
Game Bar is the heavier tool, and it’s the only built-in option that records system audio. Microsoft’s Xbox Game Bar guide states that pressing Windows + Alt + R starts and stops a recording, with no overlay clicks needed.
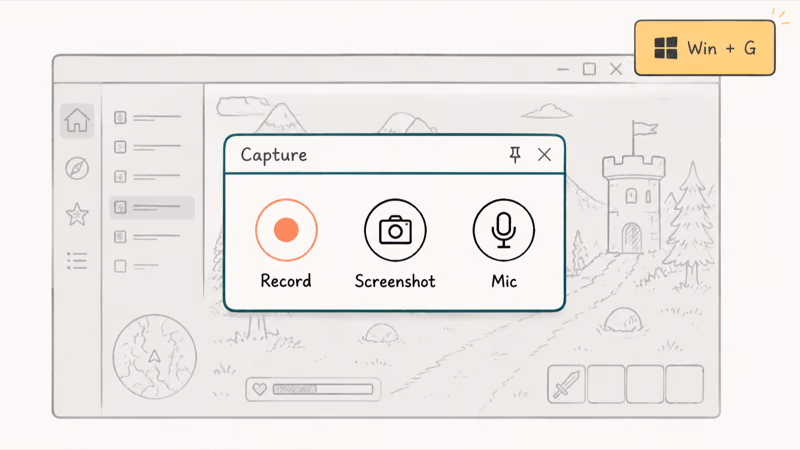
Press Windows + G first to open the overlay. A Capture widget appears with a record circle, a screenshot camera, and a microphone toggle.
If nothing happens, the feature may be off. Go to Settings, then Gaming, and turn on the recording option, then try again. Game Bar records the active app or game, not your whole desktop, which is by design.
Game Bar is the better built-in choice when you need system audio captured with an app or browser video, which is something the Snipping Tool alone simply won’t do for you. For longer sessions, keep an eye on free storage, because high-resolution clips grow surprisingly fast and can quietly drag down a machine that’s already running slow before you start. Close a few heavy tabs first.
#How Do You Capture Audio While Recording?
This is where the tools split. Game Bar records both system sound and your microphone, so a narrated demo with the app’s own audio just works. Toggle the mic with Windows + Alt + M during a recording.
The Snipping Tool is different.
Its recorder focuses on video and microphone narration rather than full system audio, so if you need the sound coming out of your speakers, Game Bar is the safer choice. Pick the tool by the audio you need, not just the area, and you’ll avoid re-recording a silent clip.
#Where Recordings Save and How to Trim Them
Game Bar files have a fixed home. According to Microsoft’s Windows keyboard shortcuts list, Windows + G opens the overlay, and the clips it makes land in Videos, inside a folder called Captures, as MP4 files.
Snipping Tool recordings aren’t auto-saved. After you stop, you preview the clip and choose where to save it, or send it to Clipchamp first.
Trimming is easy in either path. Open the clip in Clipchamp, drag the ends of the timeline to cut the start and finish, then export. If File Explorer acts up while you hunt for the file, the fix for File Explorer not responding can help.
#When a Third-Party App Makes Sense
The built-in tools cover most needs, but they have edges. Game Bar won’t touch the desktop or File Explorer, and the Snipping Tool leans toward short region clips rather than long, edited productions.
Reach for an external app in two cases.
The first is advanced editing, like layered tracks, zoom effects, or webcam overlays that go beyond Clipchamp. The second is recording restricted areas Game Bar refuses, such as the desktop itself. Before you install anything, it’s worth confirming your PC is healthy and up to date, which ties into knowing what TPM 2.0 is and whether your machine meets the Windows 11 baseline. For pure window arranging during a recording, snap layouts in Windows 11 keep your demo tidy.
#Bottom Line
You don’t need third-party software for everyday screen recording on Windows 11. The Snipping Tool handles quick region clips, and Xbox Game Bar covers full-app recording with system audio. Pick the Snipping Tool for a fast share and Game Bar when you need the speaker sound captured, and only install an external app if you require advanced editing or capture of the desktop and File Explorer.
#Frequently Asked Questions
Does Windows 11 have a built-in screen recorder?
Yes, two of them. The Snipping Tool records a selected region, and Xbox Game Bar records a full app or game with audio.
How do I record my screen with sound on Windows 11?
Use Xbox Game Bar for sound. Press Windows + G to open it, click the record circle in the Capture widget, and it grabs both system audio and your microphone. The Snipping Tool recorder is geared toward video and narration rather than full system sound, so when you specifically need the audio coming through your speakers, Game Bar is the reliable pick.
Why can’t Game Bar record File Explorer or the desktop?
Game Bar is built to capture apps and games, not the Windows shell itself. Recording the desktop or File Explorer is outside what it supports, which is intentional. For those areas, use the Snipping Tool’s region recorder instead, since it isn’t limited to a single app window.
Where do my screen recordings save?
Game Bar clips save automatically to Videos, in a folder named Captures, as MP4 files. Snipping Tool recordings aren’t saved automatically, so you choose the location after you stop and preview the clip.
Which tool is better, Snipping Tool or Game Bar?
Neither wins outright. The Snipping Tool is faster for a region clip you want to share, while Game Bar is the one that records full-app audio. Match the tool to the job.
How do I trim a recording after I capture it?
Open the clip in Clipchamp, which Windows 11 includes. Drag the handles at the start and end of the timeline to cut the parts you don’t want, then export the trimmed version. Game Bar clips and saved Snipping Tool recordings both open in Clipchamp the same way.

Bluetooth Not Working on Snapdragon X? Fixes for 2026
Bluetooth not working on your Snapdragon X Copilot+ PC? Generic audio, mice, and keyboards work, but vendor apps often lack an ARM build. Fixes inside.

Docker Desktop and WSL2 Not Working on Snapdragon X? Fix It
WSL2 runs fine on Snapdragon X, but Docker Desktop ARM is Early Access and throws WSL errors. Use WSL2 plus native ARM64 Ubuntu and Docker Engine.

Does iTunes Work on Snapdragon X? ARM Windows 11 Guide
Yes, iTunes runs on Snapdragon X laptops through Prism emulation, but the Apple Devices app is the smoother route. Here is what to install on ARM.

Does OBS Studio Work on Snapdragon X? ARM64 Build Guide
Yes, OBS Studio has an experimental ARM64 build since version 31.1, but x64 plugins won't load and hardware encoding is missing. Here is what works.