How to Disable Windows Ink: A Guide for Windows Users
Learn how to disable Windows Ink Workspace in Windows 10 and 11 using Group Policy, Registry Editor, or taskbar settings. Quick step-by-step guide.

Quick AnswerRight-click the taskbar, select Taskbar settings, and turn off Windows Ink Workspace. Alternatively, disable it via Group Policy Editor or Registry Editor.
Do you wonder how to disable Windows Ink? This knowledge is handy for any Windows user who wants to remove the pen-shaped icon from their taskbar.
Have you updated your Windows OS to the 10th Anniversary Update? You’ll notice a feature called Windows Ink Workspace that appears as a pen icon in your taskbar.
What is it?
There are several reliable methods to disable this feature across Windows 10 and 11 systems. Windows Ink was designed to enhance digital pen functionality, but it can be disabled if not needed.
- Windows Ink Workspace was introduced in the Windows 10 Anniversary Update and appears as a pen-shaped icon in the taskbar.
- The Group Policy method works on Windows 10 Pro and Enterprise but does not work on the Windows 10 Home edition.
- Windows 10 Home users must use the Registry Editor method, navigating to HKEY_LOCAL_MACHINE\SOFTWARE\Policies\Microsoft\WindowsInkWorkspace to disable the feature.
- Disabling Windows Ink removes the pen icon from the taskbar and stops the workspace from launching, but does not affect basic stylus input functionality.
- You can also hide the Windows Ink Workspace icon by right-clicking the taskbar and toggling it off without fully disabling the feature.
#What Is Windows Ink Workspace?
Before we explain removal methods, let’s understand Windows Ink Workspace. It’s a comprehensive feature introduced in the 10th Anniversary Update that fundamentally changed how users interact with digital content using stylus and touch input devices across the Windows ecosystem.

A pen icon that represents exactly what it does — providing a gateway to enhanced digital writing and drawing functionality. With Windows Ink, you can use digital pens with more flexibility and versatility across Windows applications, making touchscreen interactions more intuitive and productive for creative workflows, note-taking, and document annotation.
For instance, you can create sticky notes, draw on a digital whiteboard, or take screenshots through Sketchpad. These features work well for users with touchscreen devices and stylus pens.
#How Can You Enable Windows Ink Workspace?
Simply click on the pen icon in your taskbar to access Windows Ink Workspace.
#Why Would You Want to Disable Windows Ink?
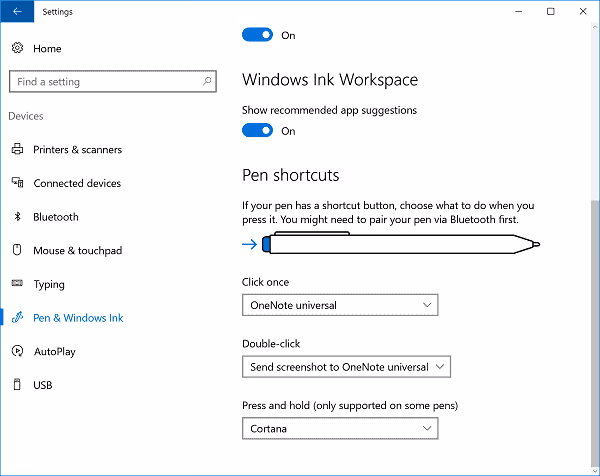
You can customize pen settings in Windows through Settings → Devices → Pen. Here you’ll configure single-click, double-click, and long-press actions.
Windows Ink works exceptionally well for users with touchscreen laptops and digital pens, especially on Surface Pro models and similar 2-in-1 devices.
Many users want to disable Windows Ink for several reasons:
- Clean taskbar appearance without the pen icon
- Performance optimization on non-touch devices
- Preventing accidental activation of the workspace
Disabling Windows Ink makes perfect sense for non-touch users who find the pen icon clutters their taskbar unnecessarily and want to optimize their system for traditional mouse and keyboard workflows without touchscreen functionality.
For related hardware issues, check our guides on fixing Huion pen problems and Windows 10 keyboard not working.
If you run into system-level issues while editing the registry, our walkthrough on fixing registry errors covers the safest recovery steps.
#How Do You Disable Windows Ink Using Group Policy?
This method works for Windows 10 Pro and Enterprise editions. According to Microsoft’s documentation, Group Policy Editor contains a large number of administrative templates and policy settings, but isn’t available on Windows 10 Home. Home edition users have to use the Registry method below instead.
Follow these steps to disable Windows Ink using Group Policy:
-
Press Windows + R to open the Run dialog.
-
Type
gpedit.mscand press Enter or click OK. -
In the Group Policy Editor, go to:
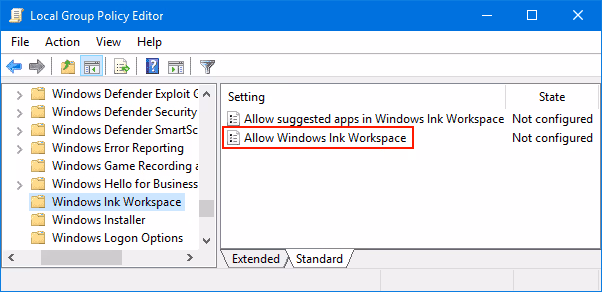
Computer Configuration → Administrative Templates → Windows Components → Windows Ink Workspace -
Look for two separate Ink Workspace entries. You’ll need the second option to disable the feature properly.
-
Double-click “Allow Windows Ink Workspace” in the right pane.
-
Select “Enabled” first, then choose “Disabled” from the dropdown under Options.
-
Click Apply and then OK.
-
Restart your computer to activate the changes.
After restart, the Windows Ink Workspace icon will disappear from your taskbar. On domain networks, Group Policy changes can take up to a couple of hours to propagate. On a single machine, the change applies as soon as you restart, with no impact on the rest of the system.
#Method 2: Disable Windows Ink Through Registry Editor
The Registry Editor method works on all Windows 10 versions, including Home edition. However, registry changes can lead to system errors if done incorrectly.
Important: Create a backup of your important data before proceeding. According to Microsoft’s guide to backing up and restoring the registry, you should export a backup before editing. The registry stores critical low-level settings, so incorrect modifications can lead to startup issues, which is why a backup is essential before you make any change.
Follow these Registry Editor steps:
-
Press Windows + R to open the Run dialog.
-
Type regedit and press Enter.
-
Go to this path:
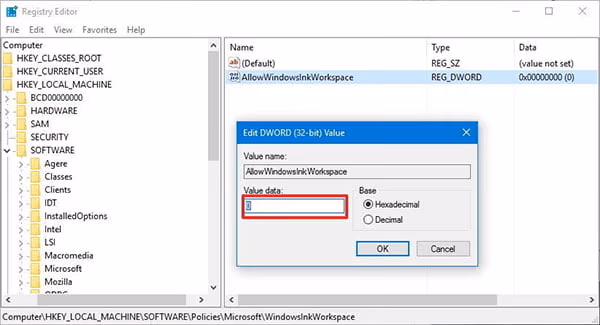
HKEY_LOCAL_MACHINE\SOFTWARE\Policies\Microsoft\WindowsInkWorkspace
Important: Can’t find the “WindowsInkWorkspace” folder? You’ll need to create it manually.
Right-click the Microsoft Key, choose New → Key, and name it WindowsInkWorkspace. Click OK to confirm.
-
Click the WindowsInkWorkspace key to expand it.
-
Right-click in the empty space on the right side.
-
Select DWORD (32-bit) Value.
-
Name the new key AllowWindowsInkWorkspace.
-
Set the value to 0 and click OK.
-
Restart your computer to apply the changes.
This method works for all Windows 10 versions, including Home edition. The registry method reliably disables Windows Ink Workspace across different Windows configurations.
#How to Just Hide the Windows Ink Icon Instead
Sometimes you just want the icon gone, not the whole feature.
If that’s all you need, you don’t have to touch Group Policy or the registry at all. Hiding the icon is the lightest option, it reverses in a single click, and it leaves every pen capability fully intact so nothing about your stylus workflow changes.
Right-click an empty part of the taskbar and open taskbar settings. Find the “taskbar corner icons” section and toggle Windows Ink Workspace off.
This is the right choice if you might use a stylus later. The workspace stays one toggle away, so you keep the feature and lose only the clutter, which makes it easy to flip back on the day you finally pick up a pen again.
#How to Disable Windows Ink on Windows 11
According to Microsoft’s Windows support, Windows 11 moved the pen and ink settings into the Settings app.
According to Microsoft’s Windows 11 support documentation, pen and ink behavior is managed inside the Settings app rather than scattered across legacy menus. Open Settings, go to Bluetooth & devices, then Pen & Windows Ink to change or disable the workspace shortcuts.
For a full reset of related input quirks, the same approach that fixes the icon also helps when a stylus misbehaves. Adjusting these settings does not remove driver-level stylus support, only the workspace shortcuts.
#Bottom Line
Disabling Windows Ink Workspace is straightforward whether you use Group Policy Editor (Pro/Enterprise) or Registry Editor (all versions). Both methods require a simple restart to take effect.
We recommend the Group Policy method for Pro and Enterprise users since it’s safer and more user-friendly. Home edition users should use the Registry Editor method but create a backup first to avoid any potential system complications that could arise from incorrect registry modifications.
Both approaches are equally effective at removing the pen icon from your taskbar and freeing up system resources. If you experience other Windows issues, our invalid value for registry and ethernet doesn’t have valid IP configuration guides can help with common Windows problems.
#Frequently Asked Questions (FAQs)
Can I re-enable Windows Ink after disabling it?
Yes, you can re-enable Windows Ink at any time by following the same steps outlined in this guide. Simply access the Windows Ink Settings and toggle on the “Use Windows Ink” option.
Will disabling Windows Ink affect other pen or touch features?
Disabling Windows Ink will only disable the Windows Ink Workspace and associated features. Other pen or touch features, such as basic stylus functionality, won’t be affected.
Can I use a different stylus after disabling Windows Ink?
Yes, disabling Windows Ink does not restrict you from using a different stylus. You can still use other styluses or input devices without any issues.
Will disabling Windows Ink improve my device’s performance?
Disabling Windows Ink itself may not significantly impact your device’s performance. However, if you don’t use the Windows Ink Workspace or any of its features, disabling it can help declutter your system and potentially improve performance.
Are there any alternative applications to Windows Ink?
Yes, there are alternative applications available that offer similar functionality to Windows Ink. Some popular options include Adobe Photoshop, Sketchbook, and Bamboo Paper.
Is it recommended to disable Windows Ink?
Disabling Windows Ink is a personal preference. If you find that you don’t use the Windows Ink Workspace or its features, disabling it can simplify your user experience. However, if you frequently use Windows Ink for note-taking, drawing, or other tasks, it’s best to keep it enabled.
#Final Words
Well, that’s all about how to disable Windows Ink. As you may notice, it requires only a little bit of effort to make those changes.
However, for any further questions related to this matter, we are always ready to help you. So, don’t hesitate to post a comment with your queries, and our experts will address them at their earliest.

Bluetooth Not Working on Snapdragon X? Fixes for 2026
Bluetooth not working on your Snapdragon X Copilot+ PC? Generic audio, mice, and keyboards work, but vendor apps often lack an ARM build. Fixes inside.

Docker Desktop and WSL2 Not Working on Snapdragon X? Fix It
WSL2 runs fine on Snapdragon X, but Docker Desktop ARM is Early Access and throws WSL errors. Use WSL2 plus native ARM64 Ubuntu and Docker Engine.

Does iTunes Work on Snapdragon X? ARM Windows 11 Guide
Yes, iTunes runs on Snapdragon X laptops through Prism emulation, but the Apple Devices app is the smoother route. Here is what to install on ARM.

Does OBS Studio Work on Snapdragon X? ARM64 Build Guide
Yes, OBS Studio has an experimental ARM64 build since version 31.1, but x64 plugins won't load and hardware encoding is missing. Here is what works.