How to Merge Audio and Video in VLC: A Comprehensive Guide
Learn how to merge audio and video in VLC using two methods: synchronized playback and permanent file export. Includes sync troubleshooting tips.
Quick AnswerTo merge audio and video in VLC, open Media > Convert/Save, add your video file, check "Show more options" and paste the audio file MRL into "Play another media synchronously," then convert and save the output.
VLC can merge audio and video files for free, without installing additional software. This guide covers synchronized playback, permanent export, and the limits to know before you start.
- VLC can merge audio and video in two ways: synchronized playback without creating a new file, or permanent export as a combined MP4.
- To save a merged file permanently, strip the original audio first, then add your new audio track and re-encode to MP4.
- Use VLC’s Track Synchronization tool under Tools to fix audio timing if the merged tracks drift out of sync.
- VLC replaces the original audio entirely when merging and can’t mix or layer two audio tracks in the same output file.
- For projects needing multiple audio layers or precise control, DaVinci Resolve offers free alternatives with more advanced features.
#What Can VLC Actually Do for Audio-Video Merging?
VLC isn’t a dedicated video editor, but it handles basic audio-video merging well for free. VLC supports a wide range of audio and video formats, which means your source files will almost always be compatible without pre-conversion. VLC’s codec library covers over 50 common formats, per VLC’s feature overview. VideoLAN states that over 3 billion downloads have been recorded, making it one of the most widely used free media tools.
The playback method (Method 1) is quick to set up. The export method (Method 2) takes longer depending on file size. Both methods work without installing any codec packs.
#How Do You Prepare Files for Merging in VLC?
Before merging, organize your files. Put both the video and audio files in the same folder and use clear names like main_video.mp4 and background_music.mp3. This prevents confusion when VLC asks you to select files during the process.
Supported formats for merging:
- Video: MP4, AVI, MOV, MKV, FLV
- Audio: MP3, WAV, AAC, FLAC
If your audio is longer than your video, VLC will either loop or cut it depending on the export settings you choose. Make sure the audio length matches the video before starting.
#Method 1: Merge Audio and Video for Playback
This method plays your video with a new audio track without creating a new file. Good for previewing sync.
- Open VLC and go to
Media>Open Multiple Files. - Click Add and select your video file.
- Check Show more options and Play another media synchronously.
- Click Browse next to the synchronous playback field.
- Select your audio file and click Select.
- Click Play.
- Go to
Audio>Audio Trackand select the new track (usually Track 2).
If the audio and video drift during playback, go to Tools > Track Synchronization and adjust the audio delay. Enter a positive value to delay the audio or a negative value to advance it.
#Method 2: Merge and Save as a New File
This method creates a permanent combined file.
 This method can produce an MP4 output from separate video and audio files.
Part A: Remove original audio from the video
- Open VLC and go to
Media>Convert/Save. - Add your video file and click Convert/Save.
- Click the wrench icon next to Profile.
- In the Audio codec tab, uncheck Audio to strip the original track.
- Click Save, choose a destination filename ending in
.mp4, and click Start.
This creates a silent video file, which gives VLC a clean source for adding the replacement audio track.
Part B: Add the new audio to the silent video
- Go to
Media>Open Multiple Filesagain. - Add the silent video file you just created.
- Check Show more options and Play another media synchronously.
- Click Browse and select your audio file.
- From the Play dropdown, choose Convert/Save.
- Enable audio in the Profile settings.
- Choose a destination, add
.mp4to the filename, and click Start.
Wait for VLC to finish encoding. The output file will contain your video with the new audio track permanently merged.
#Troubleshooting Sync and Quality Issues
Audio out of sync:
 Use
Use Tools > Track Synchronization to offset the audio. Start with a small adjustment, then preview and repeat until speech and motion line up. According to VLC’s documentation, the Track Synchronization values persist for that session only and reset when you close VLC.
Quality loss: VLC re-encodes the video during export, which reduces quality slightly. To minimize this, use a high-bitrate profile in the encoding settings. MP4 with H.264 and 4,000 kbps video bitrate preserves most of the original quality.
File compatibility errors: Convert both files to MP4 and MP3 before merging if VLC reports an MRL error. These are the most universally compatible formats across VLC versions.
For other VLC workflows, see our related guides:
- How to merge videos in VLC
- Trim videos in VLC on Mac
- Cast VLC to Chromecast
- Remove reverb from audio before merging if you have quality issues
#VLC Limitations and When to Use Something Else
VLC can’t mix or layer multiple audio tracks
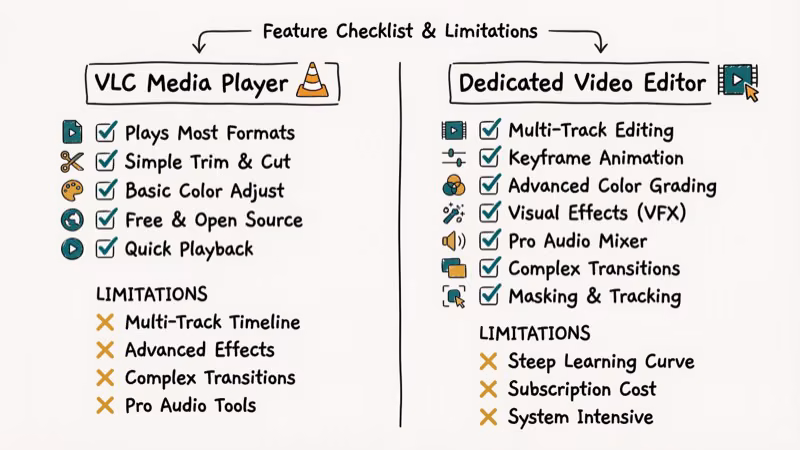 into a single output file. It replaces existing audio entirely. It also doesn’t support waveform editing, fade effects, or beat synchronization.
For projects that need those features, use these free alternatives:
DaVinci Resolve: Full video editor with a dedicated audio mixer. Supports multiple audio tracks, crossfades, and keyframe-based volume control. According to Blackmagic Design, the free version includes all core editing and audio features. Wikipedia’s VLC article notes VLC has been downloaded more than 6 billion times, confirming its status as the most widely-used open source media tool.
Audacity: Audio editor that lets you sync and adjust audio before merging. Useful when you need to trim, fade, or clean up audio before adding it to a video.
For more video editing options, check out VLC alternatives and the guide to marriage video editing software.
#Bottom Line
VLC works well for basic audio-video merging and handles most common formats without extra software. Method 1 (playback sync) suits quick previews; Method 2 (export) produces a permanent combined file. Expect minor quality loss from re-encoding, so use a high bitrate setting. For multi-track audio or fade effects, switch to DaVinci Resolve.
#Frequently Asked Questions
Can I merge multiple audio tracks with one video in VLC?
No. VLC replaces the existing audio with one new track. It can’t layer or mix multiple audio files into the same output. If you need multiple audio tracks, use DaVinci Resolve or Adobe Premiere Pro instead.
Will merging audio and video in VLC affect video quality?
Yes, but minimally with the right settings. VLC re-encodes the video during export, which reduces quality slightly. Using a high-bitrate H.264 profile keeps quality loss low compared to the original.
Can I use VLC to extract audio from a video?
Yes. Go to Media > Convert/Save, add your video, and choose an audio-only output profile. VLC saves just the audio track.
Is it possible to merge audio and video on the VLC mobile app?
No. VLC mobile (iOS and Android) is a player only. Use the desktop version.
What should I do if VLC crashes during the merging process?
Update to the latest VLC version first. According to VideoLAN’s changelog, each release fixes stability issues with specific codecs. If crashes persist, try working with a shorter video clip or converting your source files to MP4 before merging.
How long does it take to merge files in VLC?
Method 1 (playback) is instant. Method 2 (export) depends on file size, video resolution, and your CPU speed. Short clips finish faster than long 1080p or 4K files.
Can VLC sync audio and video with different lengths?
Yes. During playback, VLC loops or cuts audio to match the video. During export, the output file ends when the shorter of the two tracks ends. If you want the audio to fade out before the video ends, use an audio editor like Audacity to add the fade before importing.

Apps Crashing After iOS 27 Update? Fix Order (2026)
Apps crashing after the iOS 27 update? Update the app in the App Store first, then offload and reinstall to clear stale cache, then restart. The fix order.

Do AI Translation Earbuds Work Offline? What to Know
Do AI translation earbuds work offline? A few do with downloaded language packs, but most need the cloud. Here's what works offline and what you give up.

How to Set Up Translation Earbuds (Pairing and Modes)
How to set up translation earbuds: charge, install the app, pair over Bluetooth, pick two languages, and choose a mode. A step-by-step first-use guide.

Translation Earbuds Not Translating? How to Fix Them
Translation earbuds not translating? Usually it's the app, the internet, or the language settings. Here's how to fix pairing, sound, and lag fast.