How to Resolve the Widevine Content Decryption Module Issue
Fix the Widevine Content Decryption Module error in Chrome that prevents Netflix, Amazon Prime Video, and other DRM-protected videos from playing.
Quick AnswerThe Widevine Content Decryption Module is a built-in Chrome plugin for playing DRM-protected content like Netflix. If it causes errors, update Chrome, re-enable the component at chrome://components, or reinstall the browser.
Widevine Content Decryption Module refers to a decryption module, which is in-built into Chrome. This module enables Chrome to play HTML5 videos and audios protected by DRM, which you also find on Netflix.
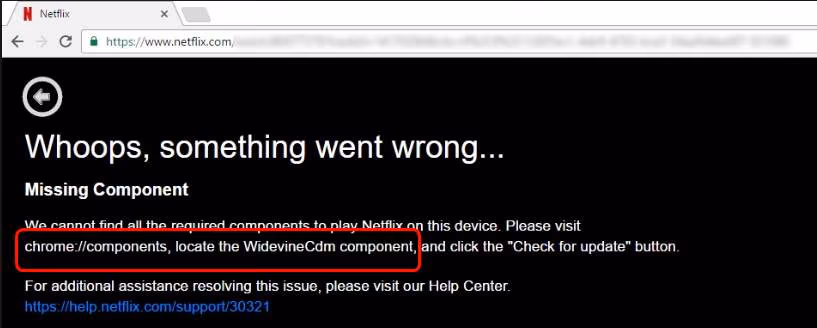
While using Netflix or Chrome, you may come across the ‘Widevine Content Decryption Module or WidevineCdm error.
The plugin is there on Google Chrome the very first time when you install the program. You don’t have to install this plugin manually.
Today, users watch TV shows and Netflix movies online to kill boredom. Common streaming setups include:
- Chromecast with Safari for iPhone and Mac users
- Casting VLC to Chromecast for local video files
However, when you attempt to play Netflix videos, you sometimes encounter an unusual error called Error M7702-1003. Other unrelated playback problems include YouTube buffering issues and YouTube error 503, which have different fixes from the Widevine error.
The major cause of this error is the ‘Widevine Content Decryption Module.’
This plugin lets Chrome play DRM-protected videos on services like Netflix.
In other words, if you remove or disable this WidevineCdm module, the browser won’t play Amazon Prime Video or Netflix without the extension.
If the browser can’t locate this plugin or finds it outdated, corrupted, or blocked by your security software, you can face this ‘Widevine Content Decryption Module’ issue, and Chrome will refuse to render the protected video stream until the module is restored or properly updated through the official components page.
- WidevineCdm is a DRM plugin built into Chrome for streaming Netflix and Amazon Prime Video
- Error M7702-1003 on Netflix is caused by a missing, outdated, or corrupted WidevineCdm plugin
- Go to chrome://components/ and click “Check for update” next to the Widevine entry to fix it
- Antivirus software can block Chrome from updating the WidevineCdm plugin
- Deleting the WidevineCdm folder under
Google>Chrome>User Data forces a clean reinstall
#How to Resolve the WidevineCdm Missing Problem?
If you can’t find WidevineCdm on your system, you need to ensure that you’re using Google Chrome from Google. Having confirmed that, you can try the following:
- Try uninstalling Google Chrome, then restart the computer.
- Install Chrome from the official website directly.
- Go to chrome://components/ in the installed Chrome and check the WidevineCdm update.
Here are the effective methods to resolve the ‘Widevine Content Decryption Module’ issue. Start with updating the plugin, and if you see an ‘Update Failed’ error, move on to the next solution.
#Solution 1: Upgrade the Widevine Content Decryption Module
The WidevineCdm problem often appears when the module hasn’t been updated in a long time. According to Google’s Widevine documentation, this DRM system protects content across a huge number of devices worldwide, so keeping it current is essential.
It’s important that you update this plugin from the components page of Chrome. Google’s Chrome support page confirms that the Widevine module is essential for playing protected content, and Chrome can update plugins automatically.
First, right-click Google Chrome and choose ‘Run as administrator.’
#Steps to Getting Rid of the Widevine Content Decryption Module Problem:
To resolve the issue, follow the steps given below:
#Step 1: Launch Google Chrome
Once you have launched Chrome, enter the address “chrome://components/” in the search column and tap Enter.
#Step 2: Select ‘Check for update’
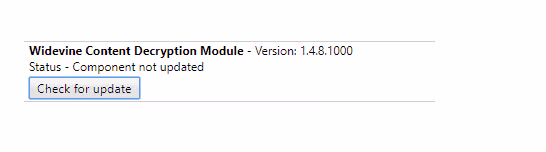
Go to the page’s end until you come across an entry called Widevine Content Decryption Module. Tap on the ‘check for update’ button present below it.
#Step 3: Refresh the Page
Next, you have to refresh the page. If you can see the ‘Up-to-date’ status below the plugin, this means that your plugin was successfully updated.
#Step 4: Examine the Issue
Start your system again, and see if the problem has been solved.
#Could Your Antivirus Be Blocking the WidevineCdm Update?
Many users trace the ‘Widevine Content Decryption Module’ issue to their security software. Antivirus tools such as Avast can block Chrome’s plugin update repeatedly until you add an exception rule.
The security software on computers, such as firewalls or antivirus software, enjoy full privileges and could stop the computer from updating plugins like ‘Widevine Content Decryption Module.’ According to Netflix’s help center, outdated DRM components are a common cause of the M7702-1003 error code.
Temporarily disable these services, retry the update from solution 1, and re-enable them once the plugin is current.
#Solution 3: Modify the Permission of ‘Widevine Content Decryption Module’
Users can even try changing the folder’s permission available on the system. If they don’t have enough privileges, the UAC of Windows won’t let you upgrade the WidevineCdm plugin.
To check this, you need to go to the WidevinceCdm plugin folder. So, ensure that the account features full control and update it again using the first method.
#Steps to Fix the ‘Widevine Content Decryption Module’ Problem:
To resolve this annoying issue, go through the following steps:
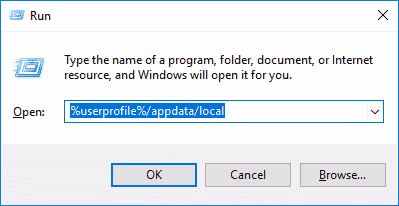
#Step 1: Press ‘Windows + R’
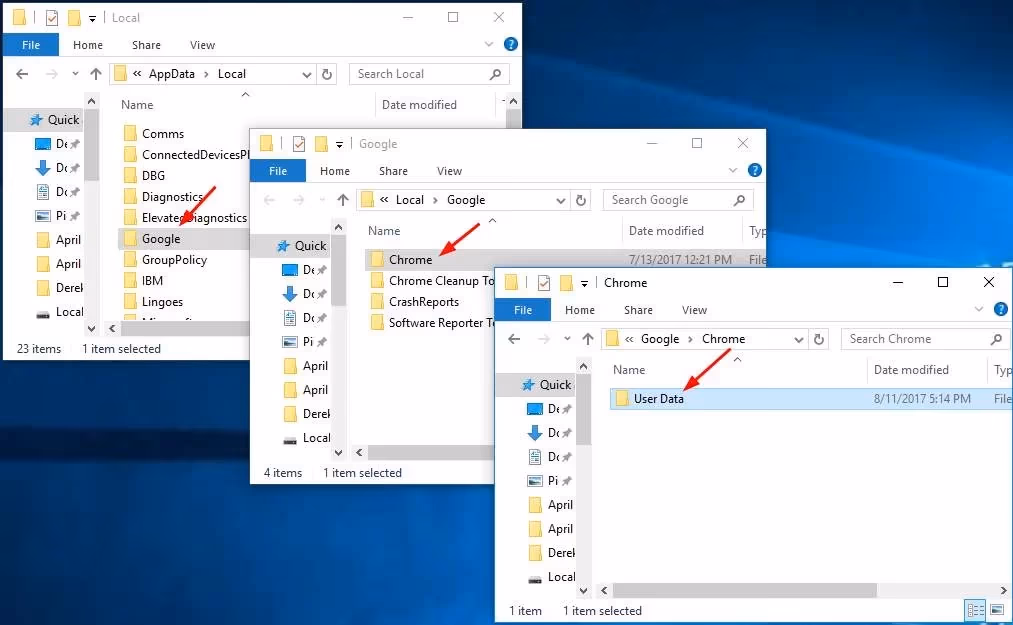
Firstly, press tabs ‘Windows’ + ‘R’ to launch the Run box. Now, enter “%userprofile%/appdata/local” in the Run box and tap Enter. Then, you would be redirected to the desired folder.
#Step 2: Open’ User Data’
Go to the file path as follows:
Google > Chrome > User Data
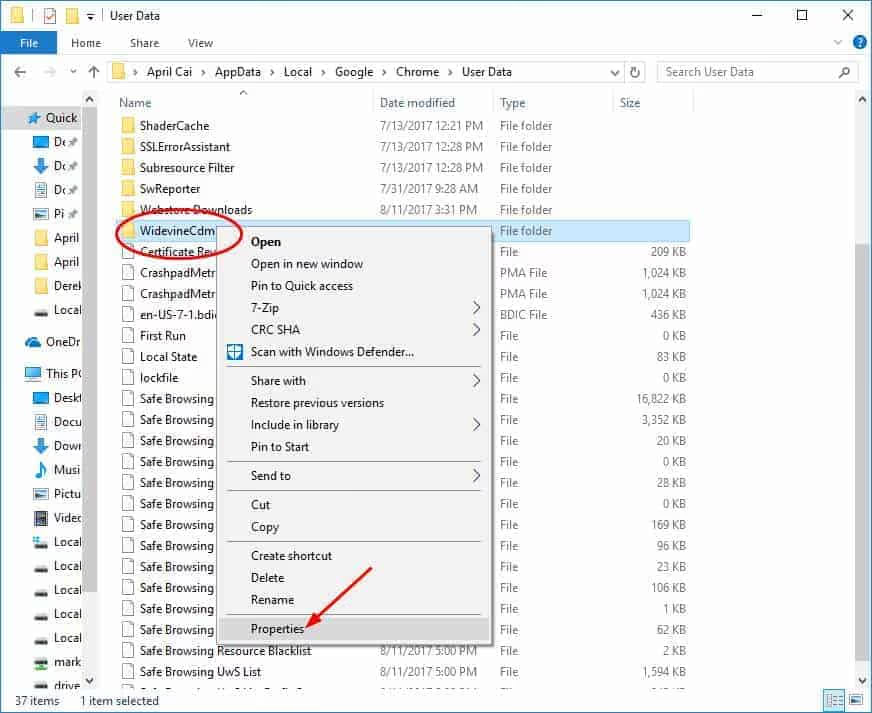
#Step 3: Tap on ‘Properties’
Discover the ‘WidevineCdm’ folder from the given list. Right-tap on it and choose ‘Properties.’
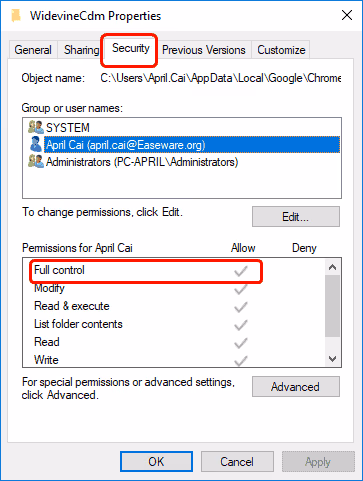
#Step 4: Choose ‘Security’
Go to the tab ‘Security’ and ensure that the login user enjoys complete access to this folder. This could be examined by checking if a checkmark exists against the ‘Full control’ feature within the Properties tab.
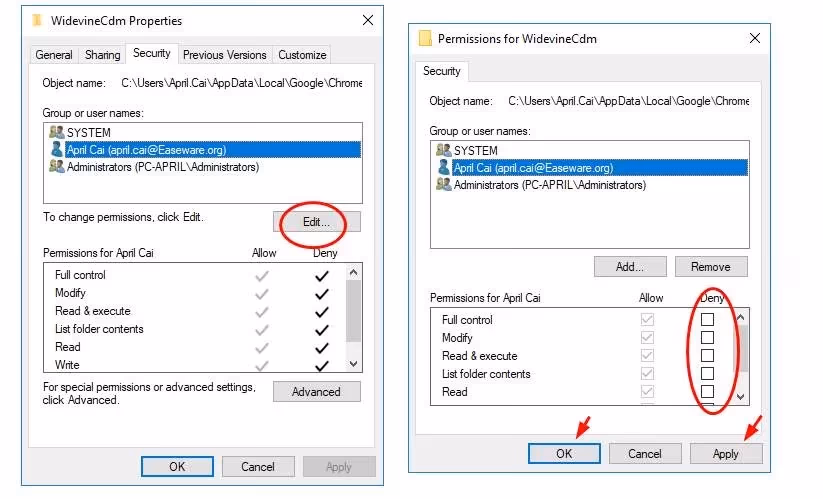
If the user does not enjoy complete control, go through the below steps.
1. Select your user profile and tap on ‘Edit.’
2. Next, uncheck the mark below the ‘Deny’ column and ensure that the account enjoys complete access. Tap on ‘Apply’ to save changes and then exit.
3. Now, restart the system and update the WidevineCdm plugin.
#Solution 4: Remove the Plugin Folder and Upgrade It Again
If the above methods don’t work, you can remove the ‘Widevine Content Decryption Module’ plugin folder.
Once done, reinstall it with the help of Google Chrome. Please remember that this method may need administrative privileges. Thus, you need to ensure that you log in as an admin.
#Steps to Resolve the Widevine Content Decryption Module Issue:
#Step 1: Press ‘Windows + R’
In the first place, press the tabs ‘Windows’ + ‘R’ to launch the Run box. Then, enter “%userprofile%/appdata/local“ in that box and tap Enter. Now, this command will redirect you to the desired folder.
#Step 2: Open’ User Data’
Now, you have to go to the file path, as shown below:
Google > Chrome > User Data
#Step 3: Tap on ‘Delete’
Look for ‘WidevineCdm‘ from the given folder list. Once found, right-tap on the ‘Widevine Content Decryption Module’ folder and choose ‘Delete.’
#Step 4: Press ‘Windows + S’
Next, you have to press the tabs ‘Windows’ + ‘S,’ and a dialog box will appear. Type “Task Manager” in that box and right-tap on the app. Once clicked, choose ‘Run as administrator.’
#Step 5: Click ‘End task’
End all the tasks related to Chrome by right-tapping on the Chrome entries. Then, choose ‘End task.’
#Step 6: Update the WidevineCdm Plugin
Next, go back to solution one and update the ‘Widevine Content Decryption Module’ plugin with the abovementioned instructions. The WidevineCdm module will update correctly, and Chrome may restart.
#Step 7: Restart the System
Now, start the computer again and play any video. Most probably, the ‘Widevine Content Decryption Module’ error would not show up now.
#Solution 5: Install Google Chrome Again
If you are still struggling with the ‘Widevine Content Decryption Module’ error, you need to install Google Chrome again. After you have uninstalled Chrome, all of its modules will get removed.
This could resolve the ‘WidevineCdm’ issue if it’s happening due to some corrupt components or not functioning the way they should work.
#Steps to Eliminate the ‘Widevine Content Decryption Module’ Issue:
To do this, read the following instructions:
#Step 1: Press ‘Windows + R’
Initially, press the tabs ‘Windows’ + ‘R’ to launch the Run box. In that dialog box, enter “appwiz.cpl“ and tap Enter. This will open a window where you can see a list of all the applications installed on the system.
#Step 2: Tap on ‘Uninstall’
Next, right-tap on ‘Google Chrome’ from that list and choose ‘Uninstall.’
#Step 3: Install Chrome
Once you have uninstalled the app, go to the official website of Google, and install Chrome in any accessible location.
#Step 4: Examine the Issue
After you have downloaded Chrome, run the executable to install it. Next, see if installing Chrome again resolves the ‘Widevine Content Decryption Module‘ problem.
#Bottom Line
The ‘Widevine Content Decryption Module’ error is almost always fixable without reinstalling your browser. Start with the simplest fix: go to chrome://components/ and click “Check for update” next to the Widevine entry. If you’re running into video errors elsewhere, our guide on the 0xc10100bf error code covers a similar media playback fix.
If the update fails, temporarily disable your antivirus, check folder permissions, or delete the WidevineCdm folder and let Chrome rebuild it. You can also reinstall Google Chrome as a final resort.
#Frequently Asked Questions
What is the Widevine Content Decryption Module?
The Widevine Content Decryption Module is a DRM component used by web browsers to decrypt and play protected media content. It’s built into Chrome by default and ensures only authorized users can access streaming services like Netflix and Amazon Prime Video.
Why does the WidevineCdm error appear on Netflix?
The error shows up as code M7702-1003 when the Widevine module is outdated, corrupted, or blocked by security software.
How do I manually update the Widevine plugin?
Open Chrome and type chrome://components/ in the address bar. Scroll down to find the Widevine Content Decryption Module entry and click “Check for update.” If the status changes to “Up-to-date,” the update succeeded.
Can browser extensions cause the WidevineCdm issue?
Yes, certain browser extensions or add-ons can interfere with the module’s functioning. It’s best to disable or remove conflicting extensions, especially ad blockers and privacy tools that modify how Chrome handles media requests.
Is it safe to delete the WidevineCdm folder?
Yes, it’s completely safe. Chrome will recreate the folder and download a fresh copy of the plugin the next time you trigger an update through the components page. The WidevineCdm folder only contains the DRM module files, not your bookmarks, passwords, or browsing history, so deleting it won’t affect your personal data at all.
What should I do if none of the troubleshooting methods work?
If the issue persists after trying all five solutions, contact Blizzard support or post on Google’s Chrome Help Community. You might also want to try a different browser like Firefox or Edge, both of which include their own Widevine implementations.

Bluetooth Not Working on Snapdragon X? Fixes for 2026
Bluetooth not working on your Snapdragon X Copilot+ PC? Generic audio, mice, and keyboards work, but vendor apps often lack an ARM build. Fixes inside.

Docker Desktop and WSL2 Not Working on Snapdragon X? Fix It
WSL2 runs fine on Snapdragon X, but Docker Desktop ARM is Early Access and throws WSL errors. Use WSL2 plus native ARM64 Ubuntu and Docker Engine.

Does iTunes Work on Snapdragon X? ARM Windows 11 Guide
Yes, iTunes runs on Snapdragon X laptops through Prism emulation, but the Apple Devices app is the smoother route. Here is what to install on ARM.

Does OBS Studio Work on Snapdragon X? ARM64 Build Guide
Yes, OBS Studio has an experimental ARM64 build since version 31.1, but x64 plugins won't load and hardware encoding is missing. Here is what works.