Where Are Steam Screenshots Saved? Find Folders Fast
Find where Steam screenshots are saved on Windows, Mac, and Linux, open the folder in two clicks, and change the default save path to free up your C drive.
Quick AnswerSteam saves screenshots inside the Steam install folder under userdata\[SteamID]\760\remote\[GameID]\screenshots. The fastest way to open this folder is View > Screenshots inside the Steam client, then click Show on Disk.
Where Steam screenshots are saved on your PC depends on three things: your operating system, your Steam install path, and the game you took the shot in. By default, every screenshot lands inside a deeply nested folder under your Steam directory, sorted by user ID and game ID. The good news is you don’t need to memorize that path, because the Steam client has a one-click button that opens the exact folder for you.
- Steam’s default Windows screenshot path is C:\Program Files (x86)\Steam\userdata[SteamID]\760\remote[GameID]\screenshots, with one subfolder per game
- The fastest open route is
View>Screenshotsinside the Steam client, then Show on Disk, which works on Windows, Mac, and Linux without typing a path - F12 is the default capture key; you can change it under
Settings>In-Gamealongside the save folder - Screenshots save as JPEG; tick Save an uncompressed copy under
Settings>In-Gameto keep PNG originals - Moving the screenshot folder to a non-system drive needs an admin Command Prompt and a mklink symbolic link, not a settings toggle
#Default Steam Screenshot Folder Path
Steam writes every screenshot to a folder buried inside your Steam install directory. The structure is the same on every platform, but the root path differs.
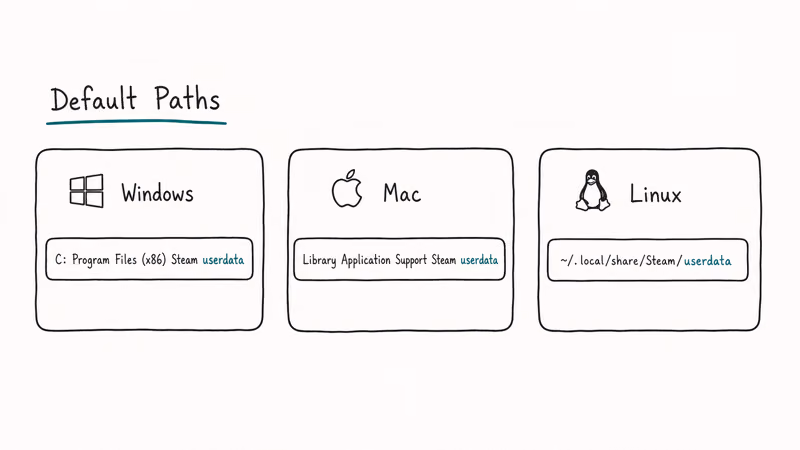
On Windows, the default path is:
C:\Program Files (x86)\Steam\userdata\[SteamID]\760\remote\[GameID]\screenshotsOn macOS:
~/Library/Application Support/Steam/userdata/[SteamID]/760/remote/[GameID]/screenshotsOn Linux, the screenshots live under your home directory:
~/.local/share/Steam/userdata/[SteamID]/760/remote/[GameID]/screenshotsThree numbers in that path tell you what’s what. [SteamID] is your unique Steam user ID. The 760 folder is the App ID for Steam Community, which is where screenshots are stored. [GameID] is the App ID for the specific game, so Counter-Strike 2 screenshots sit in a different folder than Dota 2 screenshots, and each App ID is a stable integer that never changes for the lifetime of the game.
Steam Support’s official screenshot FAQ confirms that each Cloud upload is capped at 16 MB per image, and screenshots stay on your local drive until you choose to share them. Deleting a local file does not remove it from your online library once it’s been uploaded.
Each Steam account gets its own [SteamID] subfolder under userdata, so household sharing won’t mix screenshots between accounts.
#Three Ways to Open the Steam Screenshot Folder
You have three routes. Pick the one that matches your patience level.
#Method 1: Use the Steam Screenshot Manager (fastest)
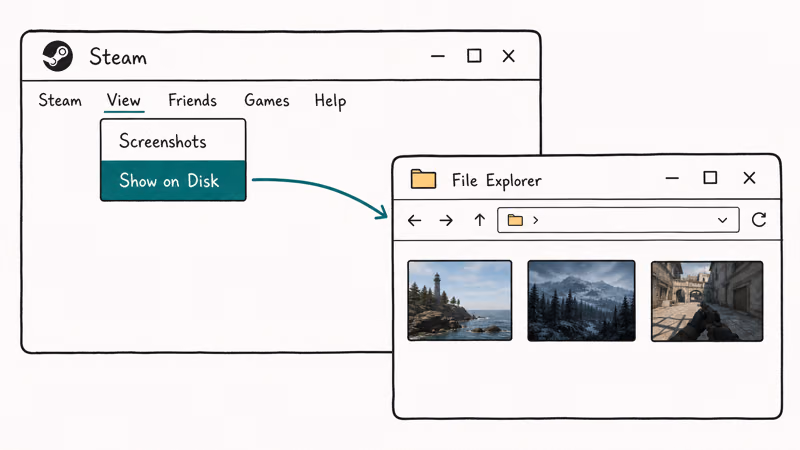
Open the Steam client. In the top menu, click View > Screenshots. The Screenshot Manager opens, showing every screenshot grouped by game. Pick any game from the dropdown, then click the Show on Disk button at the bottom.
Your file explorer opens directly to the correct [GameID]\screenshots folder. This works the same on Windows, Mac, and Linux.
#Method 2: Type the path manually
Open File Explorer (Windows), Finder (Mac), or your Linux file manager. Paste the path from the section above, replacing [SteamID] and [GameID] with your actual numbers.
On Windows, you can also press Windows + R, type the path, and press Enter.
#Method 3: Search for screenshots by file name
Steam names screenshots with a timestamp pattern like 20260514153022_1.jpg — that’s YYYYMMDDhhmmss followed by an index suffix. Search your entire drive for *_1.jpg files modified after the date you took the screenshot.
This is a last resort for when your Steam install path is non-standard. It still works.
#Why Can’t You Find Your Screenshot Folder?
If the folder isn’t where the docs say it should be, one of four things is usually going on.
You installed Steam to a non-default drive. Steam used to default to C:\Program Files (x86)\Steam, but if you picked a different drive during install, the userdata folder follows. Open Steam, go to Settings > Storage, and the listed Steam Library Folder reveals the install path.
The userdata folder is one level up from any library folder.
You have multiple Steam accounts on one PC. Each Steam account has its own numeric [SteamID] folder inside userdata. If you took the screenshot while logged into a different account, look inside the other folder, because Steam writes the file under whichever account was active when F12 was pressed.
The game hasn’t generated a [GameID] folder yet. Steam only creates the per-game screenshot folder after you take your first screenshot in that title.
Take one shot with F12, then check again.
You disabled local screenshot storage. Under Settings > In-Game, there’s an External Screenshot Folder field. If you or someone else changed this to a custom path, screenshots go there instead. Clear the field to restore the default location, and Steam will write to the userdata folder on the next capture.
#Find Your Steam User ID
Your Steam User ID is the numeric string Steam uses to identify your account in the file system. It’s different from your Steam username or profile name.
Inside the Steam client, click your profile name in the top-right corner and select Account details. Your Steam ID appears at the top of the page in 17-digit Steam64 format, for example 76561198012345678.
The folder name under userdata uses a shorter format called Steam32.
To convert Steam64 to Steam32, subtract the constant 76561197960265728 from your Steam64 ID. So 76561198012345678 becomes 52079950.
According to Steam Support’s account ID documentation, both formats refer to the same account, and Steam picks the format internally based on which API or file is asking. The 76561197960265728 offset is fixed across all Steam accounts ever created.
If math isn’t your thing, there’s an easier route.
Open File Explorer, go to your Steam folder, open userdata, and the only numeric subfolder is your Steam32 ID.
#How Do You Change the Steam Screenshot Save Location?
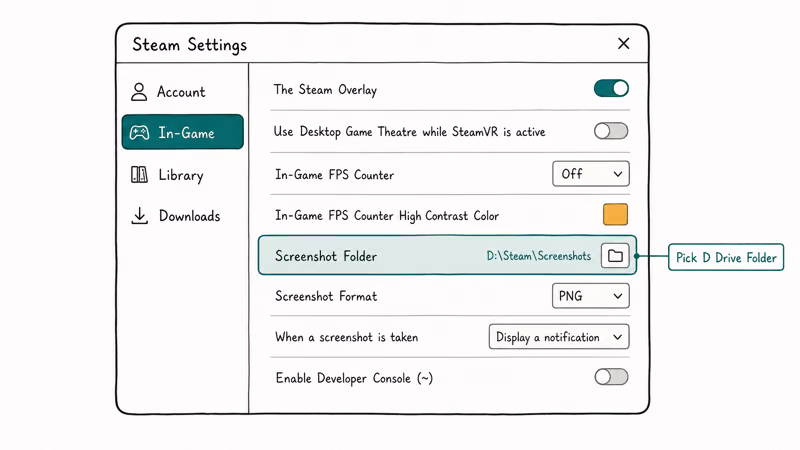
Steam’s settings panel doesn’t give you a dropdown to pick a new screenshot drive. The fastest official route is to set an External Screenshot Folder under Settings > In-Game, which makes Steam save a second copy of each screenshot to a path you choose. Your originals still sit inside the userdata folder.
To move the actual save location off your C drive, you need a Windows symbolic link. This redirects the original screenshots folder to a path you control, so Steam keeps writing to the same folder name while the data lives on a different drive.
Here’s the process on Windows.
- Quit Steam completely. Right-click the Steam tray icon and select Exit, then check Task Manager for any leftover Steam processes.
- Go to
C:\Program Files (x86)\Steam\userdata\[SteamID]\760\and copy theremotefolder to your new location (for example,D:\SteamScreenshots). - Delete the original
remotefolder under760\. - Open Command Prompt as administrator. Search for “cmd” in the Start menu, right-click, and select Run as administrator.
- Run this command, replacing
[SteamID]with your numeric ID and adjusting the destination path:
mklink /D "C:\Program Files (x86)\Steam\userdata\[SteamID]\760\remote" "D:\SteamScreenshots\remote"- Open Steam and take a test screenshot with F12. The file should appear in
D:\SteamScreenshots\remote\[GameID]\screenshots.
Microsoft’s mklink documentation states that /D creates a directory symbolic link and the redirect is transparent to any program that opens the original path. Steam treats the linked folder like the real folder because it keeps writing to the original path while Windows redirects that folder to the new location.
On Mac or Linux, the equivalent command is ln -s /new/path /old/path from Terminal.
Heads up: if a future Steam client update wipes the userdata folder during a reinstall, the symlink will go with it, and you’ll need to re-create it. If that happens alongside other Steam errors like the Steam content file locked message, fix the install integrity first, then redo the symlink.
#Steam Screenshot Format and Quality
By default, Steam saves screenshots as JPEG with quality optimized for Steam Community upload size, not archival fidelity. On a 1920x1080 game, expect JPEG files in the 200-500 KB range.
To get lossless copies, open Settings > In-Game and check Save an uncompressed copy.
Steam then saves a PNG of every screenshot to a separate folder under the screenshots parent path. The uncompressed copies are 5-10x larger than the JPEG versions, so they fill drive space faster, especially in 4K games where a single PNG can hit 12-15 MB.
For competitive capture, uncompressed copies preserve fine UI details better than JPEGs.
According to a Steam Community thread, Valve confirms the JPEG quality sits near 90 on the standard 0-100 scale and isn’t user-configurable.
That’s why most players who care about image fidelity enable the uncompressed setting. If you’re capturing screenshots for video thumbnails, marketing, or modding work, turning on uncompressed copies is the right default.
#Move Steam Screenshots Out of the Folder Maze
The userdata folder structure is convenient for Steam but painful for humans. If you take dozens of screenshots a week, manually copying files out of [SteamID]\760\remote\[GameID]\screenshots for every game is a chore.
Three workflows make this easier.
Use the External Screenshot Folder setting. Point it at a flat folder like D:\Screenshots.
Under Settings > In-Game, this option tells Steam to drop a duplicate copy in the path you choose.
Steam still keeps originals in userdata, but the duplicates live in your easy-access folder. Files there aren’t separated by game, so you’ll need to name games into the filename if you want to sort later, and the duplicate path won’t auto-clean when you delete the original.
Upload to Steam Cloud. Right-click any screenshot in the Manager, select Upload, then grab it from your Community profile.
Symlink the screenshots folder to a sync service. Drop a symbolic link from remote to a folder inside Dropbox, OneDrive, or Google Drive — every screenshot syncs automatically once it lands on disk. Microsoft’s mklink documentation confirms this is supported, but cloud-sync behavior still depends on the sync app and how it handles rapidly changing game files.
For most players, the External Screenshot Folder setting is the lowest-friction option. It takes ten seconds to configure and doesn’t need admin rights or command-line work. If you’re more interested in capturing screenshots outside Steam, our guide on how to screenshot on HP laptops covers the OS-level shortcuts that capture any window or game, including non-Steam titles.
#Bottom Line
If you just took a Steam screenshot and need to find it right now, open Steam, click View > Screenshots, pick the game, and click Show on Disk. That’s the entire workflow.
The deep path C:\Program Files (x86)\Steam\userdata\[SteamID]\760\remote\[GameID]\screenshots is what Steam uses under the hood, but you rarely need to type it.
Use External Screenshot Folder for a quick C drive fix.
If you run into other Steam issues along the way, these guides cover the most common follow-up problems:
- Steam disk write error: fix the write failures that block downloads and updates.
- Unable to initialize Steam API: resolve the API error that stops games from launching.
- Delete a Steam account: walk through the permanent account removal request.
#Frequently Asked Questions
Can I change where my Steam screenshots are saved?
Yes. Open Steam, go to Settings > In-Game, and set the External Screenshot Folder. To move the original folder, use the mklink command.
Are Steam screenshots automatically uploaded to the Steam Cloud?
No. After you capture a screenshot with F12, Steam saves it locally and shows the Screenshot Manager when you exit the game. From there, you choose which screenshots to upload. Nothing leaves your PC until you click Upload.
Do Steam screenshots use up my storage space?
Yes. A single 1080p screenshot is typically 200-500 KB.
Can I share my Steam screenshots with others?
You can upload screenshots to your Steam Community profile, where anyone can view them. You can also share files directly by sending the JPEG from the screenshots folder, or you can copy the Steam Community URL for any uploaded screenshot. Community-uploaded screenshots stay public until you delete them from your profile, so be mindful before uploading anything that contains personal information like in-game chat with real names or party invite codes.
Can I delete my Steam screenshots?
Yes, you can delete them from your local drive by removing the JPEG files, and from Steam Community by opening the Screenshot Manager, selecting the screenshot, and clicking Delete. Local deletion does not remove uploaded copies, and vice versa.
What format are Steam screenshots saved in?
JPEG by default. Enable Save an uncompressed copy under Settings > In-Game to keep PNG versions.
Why can’t I find my screenshots folder on my Mac?
The folder is hidden inside ~/Library/Application Support/Steam/userdata/[SteamID]/760/remote/[GameID]/screenshots. In Finder, the Library folder is hidden by default. Hold Option while clicking the Go menu, then choose Library, or use Cmd+Shift+G and paste the path.
Does the Steam screenshot key work on a Steam Deck?
Yes. The Steam Deck uses the Steam button + R1 shortcut instead of F12. The screenshots land in the same userdata folder structure on the Deck’s internal storage, and you can browse them through View > Screenshots in Desktop Mode.
Fortnite Stuck on the Loading Screen? Fix It in 2026
Fortnite stuck on the loading screen? Check server status, fix the Windows N Media Pack and DirectX 11 on PC, clear the console cache, and verify files.
Minecraft Keeps Crashing? Java and Bedrock Fixes (2026)
Minecraft keeps crashing on startup or mid-game? Update your GPU driver, remove mods on Java, and reinstall Gaming Services on Bedrock. Fixes for both.
Pokemon GO Not Loading? Fix the Loading Screen 2026
Pokemon GO not loading or stuck on the Pokeball? Check server status, fix automatic date and time, grant location permission, clear the cache, and update.
PS5 Controller Not Charging? 9 Fixes That Work (2026)
DualSense not charging? Swap the cable, use a rear port in Rest Mode, clean the USB-C port, and check power settings. 9 fixes for a dead PS5 controller.