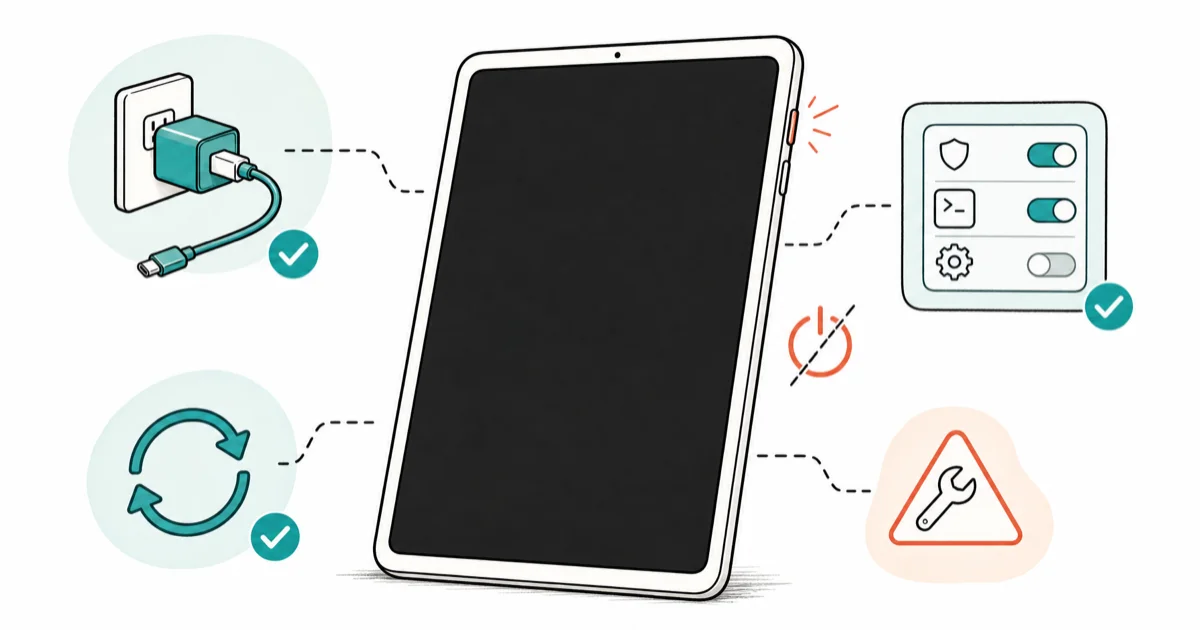
Samsung Tablet Won't Turn On? 9 Fixes That Work in 2026
Samsung tablet won't turn on? Force restart, charge with the original adapter, boot into safe mode, and 6 more fixes that work across Galaxy Tab models.
Quick AnswerPress and hold Power and Volume Down together for 10-15 seconds to force restart. If nothing happens, charge for at least an hour with the original Samsung adapter, then try safe mode or recovery mode before assuming hardware failure.
A Samsung tablet that won’t turn on is rarely as bad as it looks. The fixes in this guide apply to Galaxy Tab S6 Lite, Tab S7, Tab S8, and Tab A8 units running Android 11 through Android 15, and the first three methods recover most tablets in under twenty minutes. Work the list in order, because each step rules out a different cause before you commit to a factory reset or a repair shop visit.
- Force restart with Power plus Volume Down for a full 15 seconds is the first step on any unresponsive Samsung tablet.
- A truly empty Galaxy Tab battery often needs 30 to 60 minutes on the original Samsung adapter before any charging icon shows up.
- A clean, lint-free USB-C port is the most overlooked fix and takes one minute to check with a flashlight.
- Safe mode tells you whether a recently installed app is blocking normal boot before you risk a factory reset.
- If you smell anything burning, see swelling, or the back panel feels hot to the touch, stop troubleshooting and contact Samsung Support.
#Why Won’t Your Samsung Tablet Turn On?
Most dead-tablet calls trace back to one of four things: a drained battery, a failed charger or cable, a software state stuck mid-boot, or physical damage. The fixes below tackle these in order, cheapest first.
Knowing which symptom you have helps narrow the cause. A black screen with no vibration usually means power delivery; a Samsung logo that loops or freezes is software; a tablet that gets warm but never lights up is often a swollen battery and is the one case where you should stop touching it.
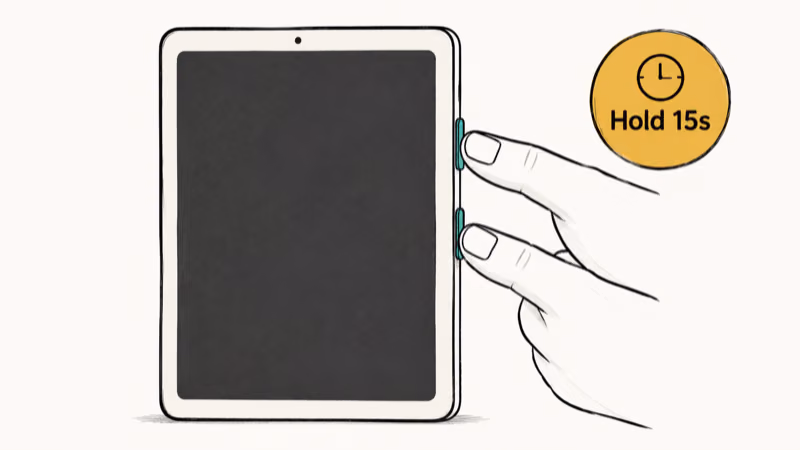
#Method 1: Force Restart With Power Plus Volume Down
A force restart cuts power to the SoC and clears the RAM, which is enough to recover a tablet hung on a frozen kernel or a bad driver. Samsung’s official force restart guide confirms that holding the side and volume down keys for at least 7 seconds triggers the hardware-level reset on any unresponsive Galaxy device. Hold the buttons for the full duration, even when the screen stays dark.
Steps:
- Press and hold the Power button and Volume Down button at the same time.
- Keep both buttons held for a full 15 seconds. Don’t release early because the reset trigger fires near the end of that window.
- Let go when the Samsung logo appears, then wait up to a minute for the home screen.
- If the screen shows “Maintenance Boot Mode,” highlight Normal Boot with the volume keys and press Power to confirm.
If nothing changes after two consecutive attempts, the tablet is not just frozen and you need to move on to charging.
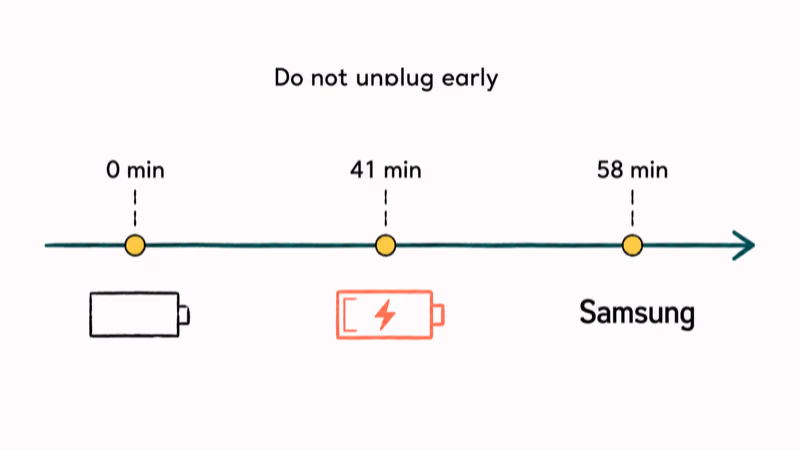
#Method 2: How Long Should You Charge a Dead Samsung Tablet?
A Galaxy Tab that has been off for weeks can fall below the voltage threshold the charging IC needs to even draw current. A deeply drained Tab can stay black for 30 to 60 minutes on the bundled 25W charger before the battery icon appears, and it may not boot until close to the one-hour mark.
Steps:
- Plug in the original Samsung 25W or 45W adapter that shipped with your tablet, or a Samsung-branded replacement of the same wattage.
- Use the original USB-C cable, not a thin replacement bundled with a phone, because dead-battery wake-up needs the proper power-delivery handshake.
- Connect to a wall outlet, not a laptop USB port or a multi-port hub. A shared hub often delivers only a few watts, which is not enough to wake a flat battery.
- Walk away for 60 minutes without pressing any buttons. Each Power-button press resets the recovery timer.
- After an hour, press Power once. A red battery icon counts as success because it means the charging circuit is now alive.
If a charging icon never appears after 90 minutes, the issue is not battery depletion and the next two methods will narrow it down.
#Method 3: Try a Different Charger and Cable
USB-C cables fail silently. The braided sleeve looks intact but a single broken data line inside is enough to stop a Galaxy Tab from negotiating fast charging. When a tablet has refused its original charger, swapping in a known-good 25W brick and cable from another Samsung device often starts a charge within a minute or two.
Steps:
- Borrow a 25W or 45W USB-C PD charger from another Samsung device, a recent Pixel, or any laptop charger that supports USB-PD.
- Use a different USB-C-to-USB-C cable, ideally one rated for 60W or higher.
- Plug in for 30 minutes, then press Power once.
If the borrowed setup wakes the tablet, your original charger or cable is the culprit and a Samsung 25W replacement charger is the safest swap. If the borrowed charger also produces nothing, jump to method 4 to inspect the port. Our Samsung tablet battery not charging guide covers the full list of charger and adapter swaps in more depth.
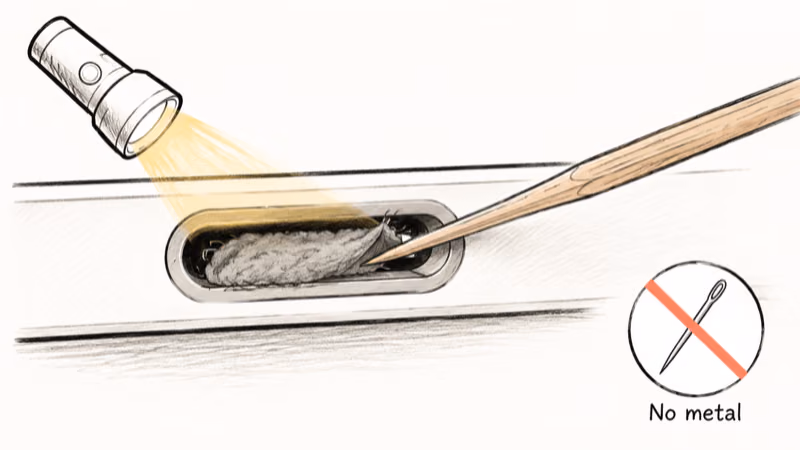
#Method 4: Inspect and Clean the Charging Port
The USB-C port on a Galaxy Tab is open to pocket lint, sand, and the corner of every backpack. Even a thin pad of compressed lint at the back of the port stops the cable from seating fully on the data and power pins. Clearing a lint plug out of an older tablet’s port is often enough to get it charging again on the next plug-in.
Steps:
- Shine a phone flashlight straight into the USB-C port and look for compressed grey lint or any bent metal pins.
- Use a wooden toothpick or a fresh dry plastic interdental pick to gently lift the lint out one corner at a time. Never use a metal needle because it shorts the contacts.
- Finish with one short blast of canned air held upright, six inches from the port.
- Plug the charger back in and watch for the charging icon.
If you see green corrosion, white salt residue, or bent pins, the port itself needs professional repair. If the device has been near water at any point, our water-in-charging-port guide walks through the dry-out steps before you risk plugging anything else in.
#Method 5: Boot Into Safe Mode to Rule Out Bad Apps
Safe mode loads Android with no third-party apps. If your tablet boots in safe mode but freezes during a normal boot, a recently installed or updated app is poisoning the launch. Samsung’s safe mode support article recommends this as the first software triage step after a force restart, and it reliably isolates a misbehaving app, such as a faulty wallpaper app, that blocks a normal boot.

Steps:
- Press and hold Power until the Samsung logo appears, then release immediately.
- As soon as you release, press and hold Volume Down.
- Keep Volume Down pressed until the lock screen finishes loading. Safe Mode appears in the bottom-left corner.
- Open
Settings>Appsand uninstall the most recent two or three apps you added before the problem started. - Restart normally by holding Power and tapping Restart.
If you can’t reach safe mode at all, skip ahead to method 6 and try the cache wipe. If safe mode boots cleanly but normal mode still hangs, work through the recently installed apps one at a time. The Android app backup and restore guide explains how to preserve your settings before uninstalling anything important.
#Method 6: Wipe the Cache Partition From Recovery
The cache partition holds temporary system files that can become corrupted after a failed OTA update. Wiping it does not touch your photos, apps, or accounts, but it forces Android to rebuild the cache fresh on the next boot. It’s a no-risk fix to try before any factory reset.
Steps:
- Hold Power and tap Power off to shut down completely. If the screen is unresponsive, force-restart first using method 1.
- Once the tablet is off, press and hold Volume Up + Power together (older Tabs may also need the Bixby button if present).
- Release both keys when the Samsung logo appears. The Android Recovery menu loads in about 20 seconds.
- Use the volume keys to highlight Wipe cache partition and press Power to select.
- Confirm with Yes, wait for the operation to finish, then highlight Reboot system now.
The first boot after a cache wipe takes two to three minutes because Android is rebuilding system caches. Let it finish and don’t pull the charger.
#Method 7: Factory Reset From Recovery (Last Resort Before Repair)
A factory reset wipes every photo, contact, and downloaded app and returns the tablet to the state it left the warehouse. According to Samsung’s factory reset documentation, this is the recommended fix for persistent boot loops and software corruption that survives a cache wipe. Only use it after methods 1 through 6, and only if you have a recent backup or accept losing the data on the device.
Steps:
- Power off the tablet completely.
- Hold Volume Up + Power until the Samsung logo flashes, then release.
- In Android Recovery, highlight Wipe data/factory reset with the volume keys and press Power.
- Confirm with Factory data reset and wait. The wipe takes 5 to 12 minutes depending on storage size.
- Select Reboot system now.
When the tablet comes back, it boots into the welcome screen as if it were brand new. If you set up Samsung Cloud or Google Backup before the failure, our Android factory reset guide walks through the restore options. If the tablet still can’t complete a normal boot after a successful factory reset, the problem is hardware.
#Method 8: Check for Swollen Battery and Water Damage
Some failures are not safe to keep prodding. A swollen lithium-ion battery flexes the rear panel outward, and continuing to charge a swollen pack can ignite the cell. The Consumer Product Safety Commission warns that lithium-ion batteries that show heat, swelling, or odor must be removed from charge immediately and stored in a non-flammable container.
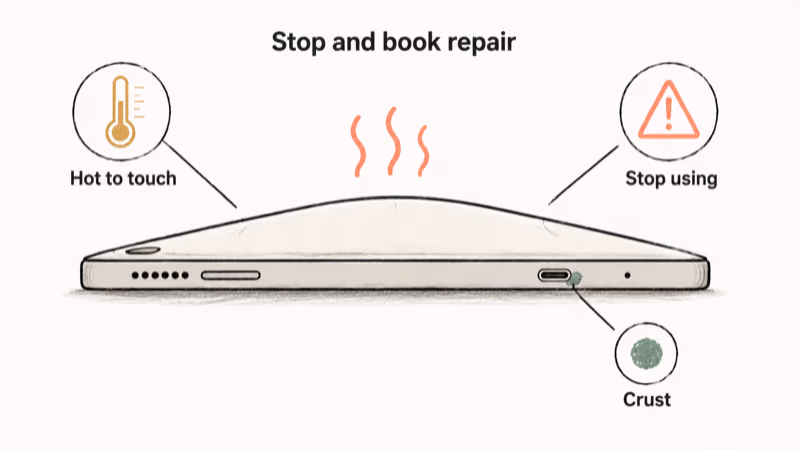
Stop and contact a repair shop if you see any of these:
- The screen or back panel bulges, or the screen has lifted away from the frame.
- White or green crust around the USB-C port (a sign of past liquid contact).
- The back of the tablet is hot to the touch within 60 seconds of plugging in.
- A faint sweet or chemical smell when the tablet is connected to power.
- A cracked screen with visible internal lines, even if the touch still works.
If the symptom is heat or swelling, unplug the charger, move the tablet to a hard non-carpeted surface away from anything flammable, and arrange a battery replacement. Don’t store a swollen tablet in a drawer.
#Method 9: Contact Samsung Support or an Authorized Repair
If methods 1 through 7 produce no boot and you have ruled out a swollen battery, the next step is professional diagnosis. Samsung’s device support hub lets you check warranty status by serial number, book a Samsung Care or Samsung Care Plus appointment, and ship to a depot if you live outside a Samsung Experience Store catchment.
Bring or ship:
- The tablet itself, powered down.
- The original charger and cable so the technician can rule those out.
- Proof of purchase if the device is within the one-year limited warranty.
If you’d rather use a local repair shop, our phone repair near me guide explains how to vet one before you hand over the device.
#Bottom Line: Which Fix Should You Try First on a Galaxy Tab?
Start with method 1, the force restart, because it costs nothing and recovers most tablets stuck on a bad boot. Move to method 2, the long charge on the original Samsung 25W adapter, before assuming the battery is dead. Methods 3 and 4 (different charger, clean port) catch the next-largest bucket of “won’t turn on” cases that are really “won’t charge.”
Reserve methods 6 and 7 (cache wipe and factory reset) for tablets that boot to the Samsung logo but stall there. The moment you see swelling, heat, or a burning smell, stop and book a Samsung Care appointment instead of trying the next method.
If your symptom doesn’t quite match a dead tablet, branch to the closer guide:
- Tablet powers on but the screen stays black: our Samsung black screen guide covers that failure mode.
- Tablet boots but freezes within seconds: the Samsung tablet frozen guide is closer to your symptom.
- Same problem on a Galaxy phone: recovery mode on most phones uses Volume Up plus Bixby plus Power, which our Galaxy S10 won’t turn on guide walks through.
#How to Stop This From Happening Again
A few habits keep Galaxy Tabs out of the dead-tablet pile:
- Charge with the original Samsung 25W or 45W adapter when you can. Counterfeit chargers are one of the most common causes of mid-life Galaxy Tab failures.
- Install Android security updates within a week of release. According to Google’s Android security bulletin process, monthly patches frequently include power-management fixes that prevent boot failures.
- Keep the tablet between 20 and 80 percent for daily use and avoid letting it sit at 0 percent for weeks. Long-term storage at empty accelerates deep discharge that the charging IC sometimes refuses to recover from.
- Vacuum or compressed-air the USB-C port every couple of months, especially if the tablet rides in a bag or backpack.
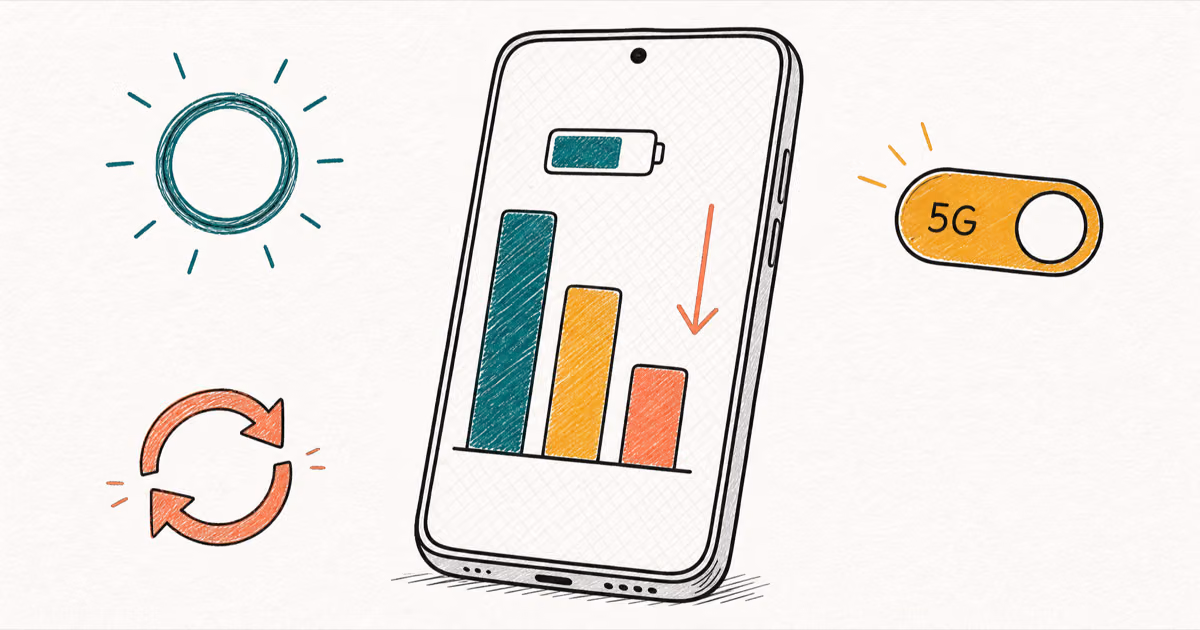
- Avoid hot car interiors above 95 degrees Fahrenheit. Sustained heat is the second-fastest way to swell a lithium-ion pack after physical impact.
If your tablet runs hot enough to drain the battery overnight even when you are not using it, work through our Android battery drain guide before the next deep-discharge incident. Catching that pattern early often prevents the tablet from getting into the won’t-power-on state to begin with.
Samsung Galaxy Guide
#Frequently Asked Questions
How long should I charge a Samsung tablet that won’t turn on?
Leave it on the original Samsung adapter for a full 60 minutes before assuming the battery has failed. On a deeply drained Galaxy Tab, the charging icon can take 30 to 45 minutes to appear, and the tablet may not boot until close to the one-hour mark on the bundled 25W brick.
Can a software update fix a Samsung tablet that won’t power on?
Only if you reach safe mode first. Otherwise, run the cache wipe.
Why does my Samsung tablet vibrate but the screen stays black?
The device is booting but the display has failed. Book a screen-replacement diagnostic.
What does “Maintenance Boot Mode” mean on a Samsung tablet?
It’s the Samsung diagnostic screen the bootloader shows after an abnormal shutdown, such as a forced power-off during an OTA update. Highlight Normal Boot with the volume keys and press Power to let the tablet finish starting normally. If the tablet returns to Maintenance Boot Mode every restart, the system partition is damaged and the next step is a cache wipe followed by a factory reset.
Will a factory reset always fix a Samsung tablet that won’t turn on?
No. A factory reset only resolves software corruption.
Is it safe to keep charging a Samsung tablet that gets warm?
Warm during the first ten minutes of fast charging is normal because the charging IC dissipates heat. Uncomfortably hot to hold within 60 seconds is not, and you should unplug immediately. Persistent heat plus a back panel that no longer sits flat points to a swelling battery and means the tablet needs a professional pack replacement before any further use.
Can I open my Samsung tablet to replace the battery myself?
We don’t recommend it. The glued display almost always cracks during disassembly. Book Samsung Care instead.
What voltage should my Samsung tablet charger be?
Recent Galaxy Tab S models use the USB Power Delivery standard and accept 9V, 12V, or 15V depending on the wattage they’re negotiating. The 25W bundled adapter delivers up to 9V at 2.77A, and the 45W adapter goes up to 15V at 3A. Match or exceed the wattage of the original adapter and use a USB-C PD-rated cable. Anything labelled “for fast charging” without a wattage rating is the kind of cable that causes the failures in this guide.
Samsung Secure Folder: Setup, Hide Apps, Clone Apps
Set up Samsung Secure Folder in under 5 minutes. Hide apps and photos, clone a banking app, and hide the Secure Folder icon on any Galaxy S8 or newer.

How to Use Google Find Hub: Setup + Find Lost
Set up and use Google Find Hub to locate, ring, lock, or erase your own Android phone, including offline finding and powered-off Pixel support.
Samsung Galaxy Battery Draining Fast: 2026 Fix Guide
Diagnose Galaxy S25 battery drain in five minutes through Battery Usage, then walk through six reversible Galaxy settings before a factory reset.

Samsung Parental Controls: Full Setup Guide for Parents
Set up Samsung parental controls in three layers: Samsung Kids, Google Family Link, and Digital Wellbeing. Free step-by-step guide for Galaxy parents.