How to Rotate a Table in Microsoft Word (3 Methods)
Learn how to rotate a table in Microsoft Word using the text box method, cell orientation, and page orientation. Clear steps for all Word versions.
Quick AnswerWord does not rotate tables like images. Paste your table inside a text box, then rotate the text box 90 degrees using the rotation handle or Format Shape panel. This works in all modern Word versions.
Rotating a table in Microsoft Word trips up plenty of users because the option isn’t where you’d expect it. Word treats tables as inline content anchored to the text flow, so the rotation handle you see on shapes and images never appears on a table. All three workarounds below apply to Word for Microsoft 365 and Word 2019 on both Windows and macOS.
- Word can’t rotate a table directly; you must embed it in a text box first
- Text box rotation handles spin the table 90, 180, 270, or any custom angle from 0 to 360
- Cell text direction changes text orientation without rotating the whole table
- Landscape page orientation gives wide tables more horizontal room without tilting them
- Ctrl+Z undoes any rotation instantly while the file is still open
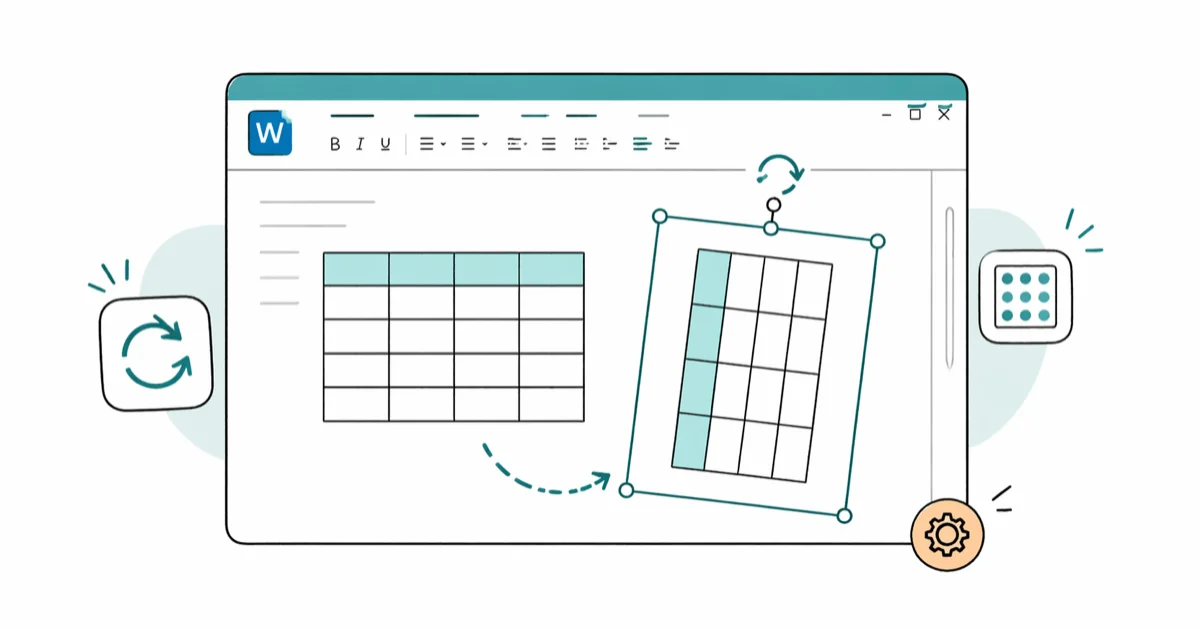
#How Do You Rotate a Full Table Using a Text Box?
According to Microsoft’s support documentation on tables, tables are anchored to the text flow, which is why you can’t rotate them directly the way you rotate shapes or images. The workaround is wrapping the table inside a floating text box, since text boxes carry their own rotation handle and a Format Shape rotation field that accepts any value from 0 to 360 degrees.
Microsoft’s Insert a Text Box article states that text boxes can hold any content you can paste from elsewhere in the document, including tables. That’s the whole trick.
Here’s the full sequence.
Step 1: Insert a text box. Go to Insert > Text Box > Draw Text Box and drag a rectangle anywhere on the page. Size doesn’t matter yet.
Step 2: Paste your table into the text box. Select the original table by clicking the small four-arrow handle that appears at its top-left corner. Press Ctrl+C, click once inside the text box, and press Ctrl+V. Word preserves cell borders, shading, fonts, and column widths during the paste, so the visual appearance survives the move.
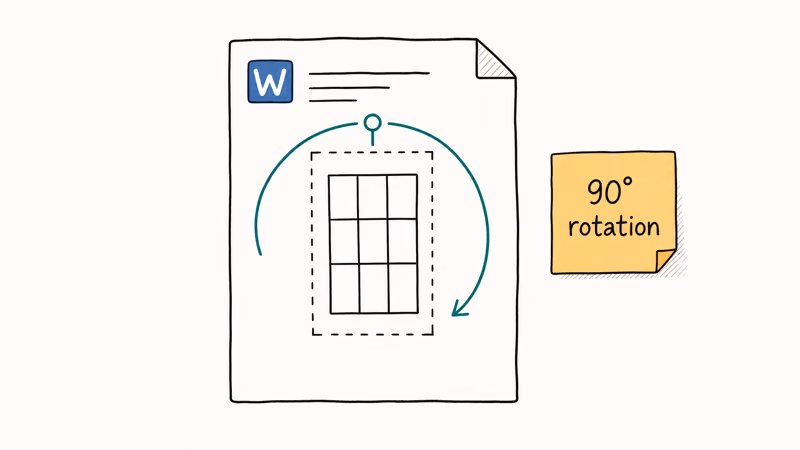
Step 3: Rotate the text box. Click the outer edge of the box (not the inside) so the box is selected as a whole shape. A round rotation handle appears at the top. Drag it freely, or hold Shift while dragging to snap to 15-degree increments.
Step 4: Set an exact angle. Right-click the text box edge and choose Format Shape > Size and Properties > Rotation, then type 90, 180, or 270 and press Enter.
Step 5: Resize and reposition. Drag the corner handles outward until the rotated table fits cleanly. Then drag the box itself to the spot on the page where it should live.
The 90-degree rotation finishes almost instantly. Cell borders, header shading, and font weight all survive the paste with no loss of data.
If your source table uses banded rows or conditional formatting, scroll the page after rotating and confirm the colors still alternate the way they should. A small subset of conditional rules tied to “above the table” cell positions can drift after the paste because their relative references no longer match the floating layout.
Optional: Hide the text box border. Right-click the box, choose Format Shape > Line > No Line, and the visible rectangle disappears.
#How Do You Rotate Only Text Inside Specific Cells?
If you want the table to stay where it sits on the page but tilt the text inside certain cells, use Text Direction. No text box. No floating shape. The table stays anchored to the paragraph it lives in, and only the writing tilts.
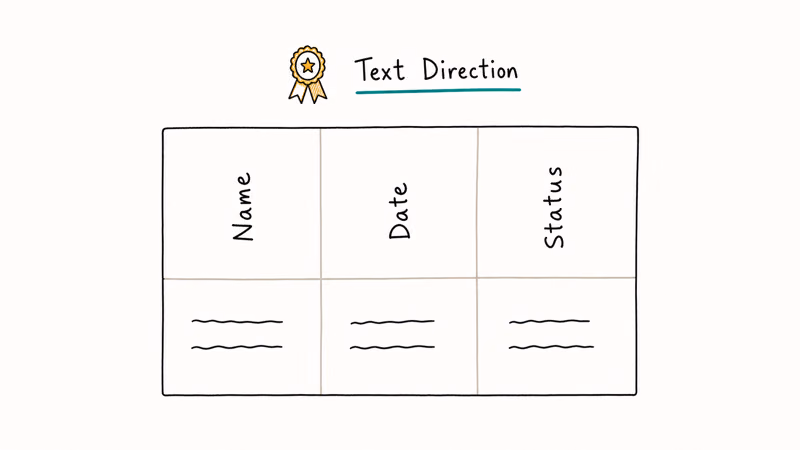
Highlight the cells. Open Table Layout in the ribbon. Click Text Direction repeatedly to cycle through horizontal, top-to-bottom, and bottom-to-top.
Microsoft’s Table Tools support article confirms that this option is the recommended path for header rows in Word 2010 and newer.
On a wide table with many narrow columns, vertical headers can shrink the table width enough to fit the whole thing on a single portrait page. Header cells are usually the only place rotated text earns its keep, since it lets you fit narrow columns under long labels without expanding every column to match the longest word in the heading.
One catch: Word doesn’t auto-reflow rows after you rotate cell text, so you may have to widen the row by hand. The Layout tab’s AutoFit > AutoFit to Contents option handles most cases, and it’s the fastest way to clean up a header row that suddenly looks cramped after the text flips vertical.
If you also work with documents that pull in scanned tables, see how to insert a PDF into Word for a cleaner alternative to retyping.
#Landscape Orientation for Wide Tables
Sometimes the real problem isn’t rotation at all. The table is just too wide for a portrait page, and tilting it 90 degrees to fit forces readers to turn their head or twist the screen. A landscape section is usually the cleaner answer because it keeps the columns straight while giving them more horizontal room.
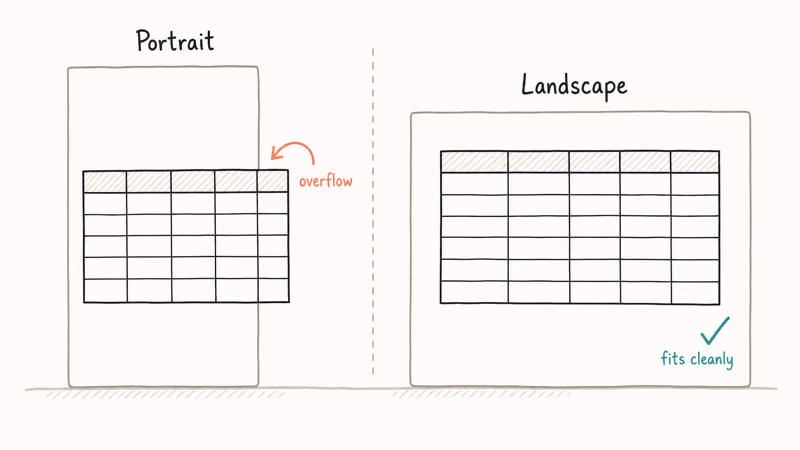
Click immediately before your table. Open Layout > Breaks > Next Page to insert a section break. Inside the new section, switch to Layout > Orientation > Landscape.
Move the table into the landscape section. After it, insert another Next Page break and flip orientation back to Portrait.
According to Microsoft’s page orientation guide, this section-break pattern keeps both orientations in a single file and prints them correctly when you export to PDF. On export, the landscape page renders in landscape orientation while the surrounding portrait pages stay portrait.
For document protection issues that come up while editing, see how to unprotect a Word document.
#Common Problems When Rotating Tables
Most rotation issues come from four predictable failure modes.
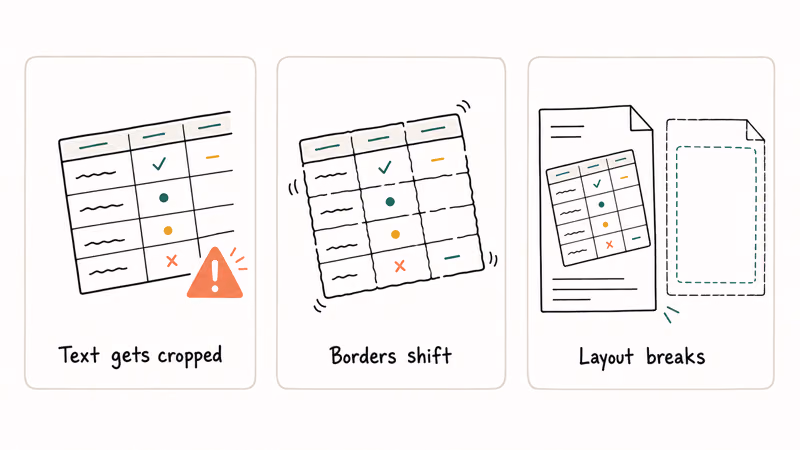
Table overflows the text box. Drag the corner handles outward. After rotation, Word treats the table’s bounding box as taller (or wider) than the original because the diagonal is longer than either side, so a box sized for the un-rotated table will clip the rotated version unless you grow it.
Text appears at the wrong angle. Right-click the text box edge, choose Format Shape, and type the exact rotation value (0, 90, 180, or 270) into the rotation field. Dragging the rotation handle is fine for rough work, but it rarely lands on a clean 90. Even a one or two degree drift looks visibly crooked once you print the page, so the typed value is worth the extra step every time.
Table borders disappear after pasting. This happens when the text box’s default formatting overrides the table’s border style. Click inside the table, open Table Design, and pick a border preset. The borders return without disturbing cell data.
Text box drifts when you edit nearby paragraphs. Right-click the box, choose More Layout Options, and clear the Move Object With Text checkbox. The box stays put while you type around it.
If problems pile up and the document is fighting you on multiple fronts, save a copy and start the rotation in a fresh blank file. Word sometimes keeps cached layout state from earlier edits that no UI control will clear, and a clean file resets that state without losing the underlying content.
#Comparing All Three Methods
Here’s when each option earns its keep.
Text box rotation is the only method that visually rotates the entire table, including borders, shading, and content. It works at any angle from 0 to 360 degrees and survives PDF export. Reach for it when you need sideways figures in reports, presentations, or documents where the table itself needs to be turned.
Cell Text Direction rotates only the writing inside cells. It’s faster, keeps the table anchored, and is almost always the right call for header rows.
Landscape sections rotate nothing. The page just becomes wider. Reach for this when your table is too wide for a portrait page and you’d rather keep the columns straight than tilt the whole layout.
For rotating media files instead of tables, see how to rotate a video in Windows Media Player.
#Before You Start: Back Up the File
Save a backup before rotating. Word’s undo history covers the current session only. Once you close the file, every undo step disappears with it, and a 10-second copy now spares you a 30-minute reconstruction later. This is doubly true for documents you’ve already spent hours laying out.
Use File > Save As and append -backup or today’s date to the filename. Keep the copy in the same folder so you can find it without hunting.
#Bottom Line
The text box method is the only complete option for visually rotating a table at any angle in Word. It takes about 60 seconds, preserves every formatting detail (borders, shading, fonts, alignment), and exports cleanly when you save the document as a PDF, which is what most readers and printers expect to receive.
Pick Text Direction when you only need rotated header text. Pick a landscape section when the table needs more width, not a tilt.
Start with the text box for true rotation, and drop down to the landscape section if the layout fights you on every page. For other Office recovery work, see how to recover unsaved Excel files.
#Frequently Asked Questions
Can I rotate a table to any angle in Word?
Yes, when you use the text box method. Right-click the text box edge, open Format Shape, and type any value from 0 to 360 in the rotation field. The Text Direction control inside cells is more limited and cycles only through horizontal, top-to-bottom, and bottom-to-top.
Does rotating a table affect cell content?
No. The text box method rotates the table visually, but the underlying cell values don’t change and Word doesn’t reformat the data. Double-click inside the rotated text box to edit any cell, and formulas continue to calculate as if the table were never tilted. The rotation lives on the text box container, not on the cells themselves.
If you accidentally lose your work, see how to recover unsaved Word documents.
Will a rotated table print or export to PDF correctly?
Yes. Word preserves the rotation when you export to PDF using File > Save As or File > Export, and the PDF shows the table at exactly the angle you set.
Can I undo a rotation?
Press Ctrl+Z immediately. If you’ve made other edits since, right-click the text box and use Format Shape to reset the rotation field to 0. Once you close and reopen the file, the undo history is gone, so a saved backup is the only reliable rollback path. The same logic applies to the AutoSave history in Microsoft 365: it captures changes within the active session but can’t recover layout decisions you made yesterday.
Why does my text box rotation handle not appear?
You are probably clicking inside the text box rather than on its edge. The handle only appears when the box itself is selected as an object, not when the cursor is editing content. Click the outer border so the dashed selection outline turns solid, and the green rotation handle should appear above the top edge.
Does this work in Word for Mac?
Yes. Both the text box rotation and the Text Direction option work the same way in Word for macOS. Insert > Text Box and Table Layout > Text Direction sit in the same places they do on Windows.
Can I rotate a table in Google Docs or LibreOffice?
Google Docs does not support table rotation at all. LibreOffice Writer supports it through a similar text frame approach, though the menu is named Frame instead of Text Box. If you import a rotated Word table into LibreOffice, you may need to reapply the rotation because LibreOffice interprets the original text box differently.

Apps Crashing After iOS 27 Update? Fix Order (2026)
Apps crashing after the iOS 27 update? Update the app in the App Store first, then offload and reinstall to clear stale cache, then restart. The fix order.

Do AI Translation Earbuds Work Offline? What to Know
Do AI translation earbuds work offline? A few do with downloaded language packs, but most need the cloud. Here's what works offline and what you give up.

How to Set Up Translation Earbuds (Pairing and Modes)
How to set up translation earbuds: charge, install the app, pair over Bluetooth, pick two languages, and choose a mode. A step-by-step first-use guide.

Translation Earbuds Not Translating? How to Fix Them
Translation earbuds not translating? Usually it's the app, the internet, or the language settings. Here's how to fix pairing, sound, and lag fast.